?发现宝藏
前些天发现了一个巨牛的人工智能学习网站,通俗易懂,风趣幽默,忍不住分享一下给大家。【点击进入巨牛的人工智能学习网站】。
Python中的设计模式与最佳实践
在软件开发中,设计模式是一种解决常见问题的经过验证的解决方案。Python作为一种流行的编程语言,具有丰富的库和灵活的语法,使其成为实现设计模式的理想选择。本文将介绍几种常见的设计模式,并提供相应的Python示例代码,以便读者了解如何在Python中应用这些设计模式。

1. 单例模式(Singleton Pattern)
单例模式确保一个类只有一个实例,并提供全局访问点。
class Singleton: _instance = None def __new__(cls): if cls._instance is None: cls._instance = super().__new__(cls) return cls._instance# 示例singleton1 = Singleton()singleton2 = Singleton()print(singleton1 is singleton2) # Output: True2. 工厂模式(Factory Pattern)
工厂模式用于创建对象的接口,但允许子类决定实例化哪个类。它将实例化逻辑委托给子类。
from abc import ABC, abstractmethodclass Animal(ABC): @abstractmethod def sound(self): passclass Dog(Animal): def sound(self): return "Woof!"class Cat(Animal): def sound(self): return "Meow!"class AnimalFactory: def get_animal(self, animal_type): if animal_type == "dog": return Dog() elif animal_type == "cat": return Cat() else: raise ValueError("Invalid animal type")# 示例factory = AnimalFactory()dog = factory.get_animal("dog")cat = factory.get_animal("cat")print(dog.sound()) # Output: Woof!print(cat.sound()) # Output: Meow!3. 观察者模式(Observer Pattern)
观察者模式定义了对象之间的一对多依赖关系,使得当一个对象的状态发生变化时,其所有依赖项都会收到通知并自动更新。
class Observer: def update(self, message): passclass Subject: def __init__(self): self._observers = [] def add_observer(self, observer): self._observers.append(observer) def remove_observer(self, observer): self._observers.remove(observer) def notify_observers(self, message): for observer in self._observers: observer.update(message)class MessagePublisher(Subject): def publish_message(self, message): self.notify_observers(message)class MessageSubscriber(Observer): def __init__(self, name): self.name = name def update(self, message): print(f"{self.name} received message: {message}")# 示例publisher = MessagePublisher()subscriber1 = MessageSubscriber("Subscriber 1")subscriber2 = MessageSubscriber("Subscriber 2")publisher.add_observer(subscriber1)publisher.add_observer(subscriber2)publisher.publish_message("Hello, observers!")# Output:# Subscriber 1 received message: Hello, observers!# Subscriber 2 received message: Hello, observers!4. 策略模式(Strategy Pattern)
策略模式定义了一系列算法,并将每个算法封装起来,使它们可以相互替换。该模式可以使算法的变化独立于使用它们的客户端。
from abc import ABC, abstractmethodclass Strategy(ABC): @abstractmethod def execute(self, a, b): passclass AddStrategy(Strategy): def execute(self, a, b): return a + bclass SubtractStrategy(Strategy): def execute(self, a, b): return a - bclass Context: def __init__(self, strategy): self._strategy = strategy def execute_strategy(self, a, b): return self._strategy.execute(a, b)# 示例add_strategy = AddStrategy()subtract_strategy = SubtractStrategy()context = Context(add_strategy)result1 = context.execute_strategy(5, 3) # Output: 8context = Context(subtract_strategy)result2 = context.execute_strategy(5, 3) # Output: 25. 装饰器模式(Decorator Pattern)
装饰器模式允许向一个对象动态地添加新功能,同时不改变其结构。它是一种以透明、动态方式扩展对象的功能。
def make_bread(func): def wrapper(): print("Mixing ingredients") func() print("Baking the bread") return wrapper@make_breaddef make_sandwich(): print("Making sandwich")make_sandwich()# Output:# Mixing ingredients# Making sandwich# Baking the bread6. 原型模式(Prototype Pattern)
原型模式用于创建对象的一种模式,通过复制现有对象来创建新对象,从而避免了使用复杂的构造函数。
import copyclass Prototype: def __init__(self): self._objects = {} def register_object(self, name, obj): self._objects[name] = obj def unregister_object(self, name): del self._objects[name] def clone(self, name, **attrs): obj = copy.deepcopy(self._objects.get(name)) obj.__dict__.update(attrs) return obj# 示例class Car: def __init__(self): self.make = "Toyota" self.model = "Corolla" self.year = "2022"car_prototype = Car()prototype = Prototype()prototype.register_object("car", car_prototype)car = prototype.clone("car", year="2023")这段代码展示了原型模式(Prototype Pattern)的实现。原型模式用于创建对象的一种模式,它允许通过复制现有对象来创建新对象,而不是通过实例化类来创建。让我们来解析一下:
Prototype类:
__init__ 方法初始化一个空字典 _objects,用于存储注册的对象。register_object 方法用于注册对象,将对象存储在 _objects 字典中,以便稍后克隆使用。unregister_object 方法用于注销对象,从 _objects 字典中删除特定名称的对象。clone 方法用于克隆对象。它接受一个名称参数,指定要克隆的对象的名称,并且可以接受额外的关键字参数来更新克隆对象的属性。它使用 copy.deepcopy 创建对象的深层副本,以避免对象间共享状态的问题。然后通过更新克隆对象的 __dict__ 属性来应用任何额外的属性更改,然后返回克隆后的对象。 示例类 Car:
定义了一个简单的 Car 类,具有 make、model 和 year 属性。这是我们要克隆的对象的示例。使用原型模式:
创建了一个 Car 类的实例car_prototype。创建了一个 Prototype 实例 prototype。使用 register_object 方法将 car_prototype 注册到原型中,名称为 “car”。使用 clone 方法从原型中克隆一个 Car 对象,名为 “car”,并且更新了 year 属性为 “2023”。 总之,这段代码演示了如何使用原型模式创建和管理对象的实例,以及如何在创建新对象时进行自定义属性更新。
7. 建造者模式(Builder Pattern)
建造者模式用于创建复杂对象,它将对象的构建过程与其表示分离,从而可以按照不同的方式构建对象。
class Computer: def __init__(self, cpu, memory, storage): self.cpu = cpu self.memory = memory self.storage = storageclass ComputerBuilder: def __init__(self): self._computer = Computer("", "", "") def set_cpu(self, cpu): self._computer.cpu = cpu return self def set_memory(self, memory): self._computer.memory = memory return self def set_storage(self, storage): self._computer.storage = storage return self def build(self): return self._computer# 示例builder = ComputerBuilder()computer = builder.set_cpu("Intel").set_memory("8GB").set_storage("256GB SSD").build()8. 命令模式(Command Pattern)
命令模式将请求封装为对象,以便可以参数化其他对象对请求的执行、将请求排队或记录请求日志,以及支持可撤销的操作。
from abc import ABC, abstractmethodclass Command(ABC): @abstractmethod def execute(self): passclass Light: def turn_on(self): print("Light is on") def turn_off(self): print("Light is off")class LightOnCommand(Command): def __init__(self, light): self._light = light def execute(self): self._light.turn_on()class LightOffCommand(Command): def __init__(self, light): self._light = light def execute(self): self._light.turn_off()class RemoteControl: def __init__(self): self._commands = {} def set_command(self, slot, command): self._commands[slot] = command def press_button(self, slot): if slot in self._commands: self._commands[slot].execute()# 示例light = Light()light_on = LightOnCommand(light)light_off = LightOffCommand(light)remote = RemoteControl()remote.set_command(1, light_on)remote.set_command(2, light_off)remote.press_button(1) # Output: Light is onremote.press_button(2) # Output: Light is off这段代码展示了命令模式(Command Pattern)的实现,用于将请求封装成对象,从而使你能够参数化客户端对象以在不同的请求之间进行参数化。现在让我们来解析它:
Command 类:
是一个抽象基类 (Abstract Base Class, ABC),其中定义了一个抽象方法execute(),它将在具体命令类中实现。所有具体命令类都必须实现这个方法。 Light 类:
定义了一种名为 Light 的简单设备,具有两种操作:turn_on() 和 turn_off()。 具体命令类 LightOnCommand 和 LightOffCommand:
这两个类实现了 Command 类。它们分别将 Light 对象作为参数,在execute() 方法中调用了 Light 对象的 turn_on() 和 turn_off() 方法,实现了对 Light 设备的控制。 RemoteControl 类:
这是一个遥控器类,其中包含一个字典_commands,用于存储命令对象。set_command() 方法用于将命令对象与特定的槽位关联起来。press_button() 方法用于按下特定槽位的按钮,如果有与该槽位关联的命令对象,则执行该命令。 示例:
创建了一个 Light 对象。创建了两个具体命令对象,分别用于打开和关闭 Light。创建了一个 RemoteControl 对象,并将这两个具体命令对象分别与槽位 1 和槽位 2 关联。通过按下不同槽位的按钮来测试遥控器。按下槽位 1 会打印 “Light is on”,按下槽位 2 会打印 “Light is off”。这段代码演示了如何使用命令模式来实现一个简单的遥控器系统,其中遥控器的按钮与具体的操作(命令)相关联,从而实现了解耦和可扩展性。
9. 状态模式(State Pattern)
状态模式允许对象在其内部状态改变时改变其行为,使对象看起来好像修改了其类。
from abc import ABC, abstractmethodclass State(ABC): @abstractmethod def handle(self): passclass StateContext: def __init__(self, state): self._state = state def set_state(self, state): self._state = state def request(self): self._state.handle()class ConcreteStateA(State): def handle(self): print("Handling request in State A") # State A transitions to State B context.set_state(ConcreteStateB())class ConcreteStateB(State): def handle(self): print("Handling request in State B") # State B transitions to State A context.set_state(ConcreteStateA())# 示例context = StateContext(ConcreteStateA())context.request() # Output: Handling request in State Acontext.request() # Output: Handling request in State B10. 中介者模式(Mediator Pattern)
中介者模式用于减少对象之间的直接依赖关系,通过引入中介者对象来集中控制对象之间的交互。
class Mediator: def __init__(self): self._colleagues = [] def add_colleague(self, colleague): self._colleagues.append(colleague) def send_message(self, message, colleague): for col in self._colleagues: if col != colleague: col.receive_message(message)class Colleague: def __init__(self, mediator): self._mediator = mediator def send_message(self, message): self._mediator.send_message(message, self) def receive_message(self, message): print(f"Received message: {message}")# 示例mediator = Mediator()colleague1 = Colleague(mediator)colleague2 = Colleague(mediator)mediator.add_colleague(colleague1)mediator.add_colleague(colleague2)colleague1.send_message("Hello from colleague 1")colleague2.send_message("Hi from colleague 2")# Output:# Received message: Hello from colleague 1# Received message: Hi from colleague 2这段代码展示了中介者模式(Mediator Pattern)的实现,该模式用于减少对象之间的直接通信,而是通过一个中介对象来协调对象之间的交互。现在让我们解析代码:
Mediator 类:
__init__ 方法初始化了一个空列表 _colleagues,用于存储参与通信的同事对象。add_colleague 方法用于向中介者中添加同事对象。send_message 方法用于发送消息给其他同事对象,它会遍历 _colleagues 列表,并调用每个同事对象的 receive_message 方法,除了消息的发送者自身。 Colleague 类:
__init__ 方法接受一个中介者对象作为参数,并将其保存在 _mediator 属性中。send_message 方法用于向中介者发送消息,它将消息和发送者自身作为参数传递给中介者的 send_message 方法。receive_message 方法用于接收来自中介者的消息,并打印消息内容。 示例:
创建了一个 Mediator 对象。创建了两个 Colleague 对象,并将它们注册到中介者中。同事对象通过调用自己的send_message 方法来发送消息给其他同事对象,实际上是通过中介者来进行通信。两个同事对象收到了对方发送的消息,并打印出来。 通过中介者模式,对象之间的通信被解耦,每个对象只需与中介者对象通信,而不需要直接与其他对象通信,从而降低了对象之间的耦合度,提高了系统的可维护性和扩展性。

适配器模式(Adapter Pattern)
适配器模式是一种结构型设计模式,用于将一个类的接口转换成客户端所期望的另一个接口。在软件开发中,经常会遇到需要使用已有的类,但是其接口与所需接口不匹配的情况。这时候就可以使用适配器模式来解决这一问题。
例如,假设有一个现有的类提供了特定功能,但是其方法命名或参数形式与新的需求不匹配。为了在不修改原有类的情况下与新的需求兼容,可以创建一个适配器类,该适配器类将新的需求接口转换为现有类的接口。
适配器模式通常包括三个角色:
目标接口(Target):客户端所期待的接口,适配器会实现这个接口。适配者类(Adaptee):已经存在的类,其中包含客户端希望使用的功能,但其接口与目标接口不匹配。适配器类(Adapter):通过实现目标接口并持有适配者对象,将客户端的请求转发给适配者对象。适配器模式的优点包括:
使得客户端能够使用已有的类,无需修改原有代码。提高代码的复用性和灵活性,适配器将现有类与新的需求解耦。然而,适配器模式也有一些缺点:
增加了系统的复杂性,引入了额外的类和对象。过多的适配器可能导致系统难以维护和理解。在设计和应用适配器模式时,需要根据具体情况权衡利弊,确保使用适配器的同时保持代码的清晰和简洁。
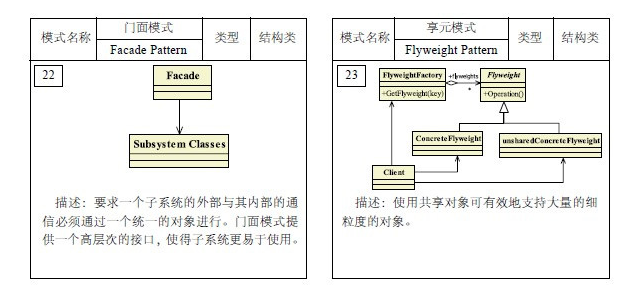
外观模式(Facade Pattern)
外观模式是一种结构型设计模式,旨在为复杂系统提供一个简化的接口,以便客户端更容易地使用系统。在软件开发中,经常会遇到需要访问多个子系统或复杂接口的情况,这时候可以使用外观模式来隐藏系统的复杂性,提供一个统一的接口供客户端使用。
外观模式通常包括以下角色:
外观类(Facade):为客户端提供简单的接口,隐藏了子系统的复杂性,负责处理客户端的请求并将其委派给子系统处理。子系统(Subsystem):包含多个相关的类或模块,负责实现系统的各种功能。外观模式的优点包括:
简化了客户端的调用过程,减少了客户端与子系统之间的耦合度。提高了代码的可维护性和可扩展性,客户端无需了解子系统的内部实现细节。然而,外观模式也有一些缺点:
过度使用外观模式可能导致系统的接口过于臃肿,难以维护。外观类成为了系统的唯一入口,一旦外观类出现问题,整个系统的功能都将受到影响。在设计和应用外观模式时,需要根据系统的复杂性和需求来决定是否使用,以及如何设计外观类的接口,以确保系统的易用性和可维护性。
总结
设计模式在软件开发中起着至关重要的作用,它们为开发人员提供了解决常见问题的有效工具和方法。本文介绍了两种常见的设计模式:适配器模式和外观模式。
适配器模式允许将一个类的接口转换成客户端所期望的另一个接口,从而使得原本不兼容的接口能够一起工作。通过适配器模式,我们可以在不修改原有类的情况下,使其与新的需求兼容,提高了代码的复用性和灵活性。
外观模式为复杂系统提供了一个简化的接口,隐藏了系统内部的复杂性,使客户端能够更轻松地使用系统。通过外观模式,我们可以将多个子系统或复杂接口封装起来,提供一个统一的接口给客户端,减少了客户端与子系统之间的耦合度,提高了代码的可维护性和可扩展性。
综上所述,设计模式是软件开发中不可或缺的一部分,它们为开发人员提供了解决问题的方法和思路,能够帮助我们编写更具有可读性、可维护性和可扩展性的代码。在实际项目中,根据具体需求和场景选择合适的设计模式,并结合最佳实践,将有助于开发出高质量的软件产品。