目录
1.引言
2.需要解决的几个关键问题
1.游戏区的方块我们怎么存储起来
2.每种类型方块集合的构建
3.如何将创建的方块集合和节点二维数组结合起来
4.方块集合的移动和旋转
5.边界和方块检测
6.方块的整行消除
3.写在最后
1.引言
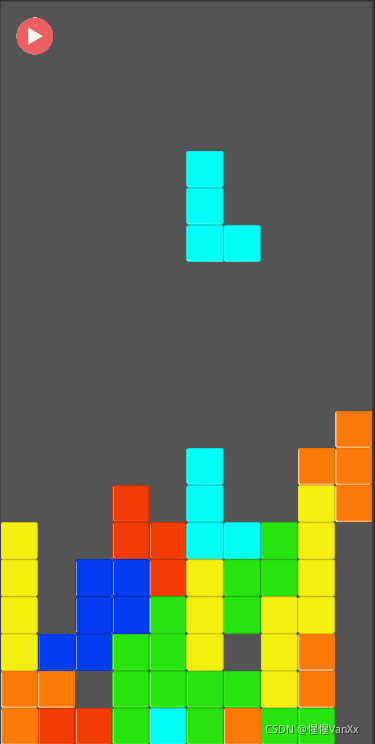
最近开始学cocos,学完Typescript语法之后,跑去看cocos的官方文档,捣鼓了几天,写了一个非常简单的贪吃蛇,甚至连像样的碰撞检测也没有,自觉无趣,就荒废了一段时间。这几个星期我又重拾了cocos,就有了实现俄罗斯方块的想法。一开始我想着上网找找资料,发现关于cocos开发俄罗斯方块的文章几乎寥寥无几(也有可能是我找的方法不对),更头痛的是,我找到的仅有几个分享文章的代码注释比较少,也可能是我的理解能力不行,后来花了几天也没能完全看懂。所以我打算自己尝试写写看,过了两个星期,总算是完成了。
在文章的后面,我会附上整个cocos的项目文件供大家参考,代码写得不好,请大家多多指教。

2.需要解决的几个关键问题
1.游戏区的方块我们怎么存储起来
因为俄罗斯方块是像素游戏,我们可以把每一个方块看成一个像素,那么整个游戏区就是一块像素集合,结合到cocos内,我们把每一个方块定义成cc.Node型,那么我们的游戏区就可以使用一个cc.Node型的二维数组将方块保存起来,方便进行旋转,位移,堆叠,删除等关键操作。在这里我使用的是一个20*10的二维数组。
//整个游戏区的格子用二维数组保存
    box: cc.Node[][] = [];
//初始化box二维数组,这个数组的[0][0]在游戏区的最左下角
InitBox() {
for (let i = 0; i < 20; i++) {
this.box[i] = [];
for (let j = 0; j < 10; j++) {
this.box[i][j] = null;
}
}
//生成不同的方块集合
this.buildBlock();
}2.每种类型方块集合的构建
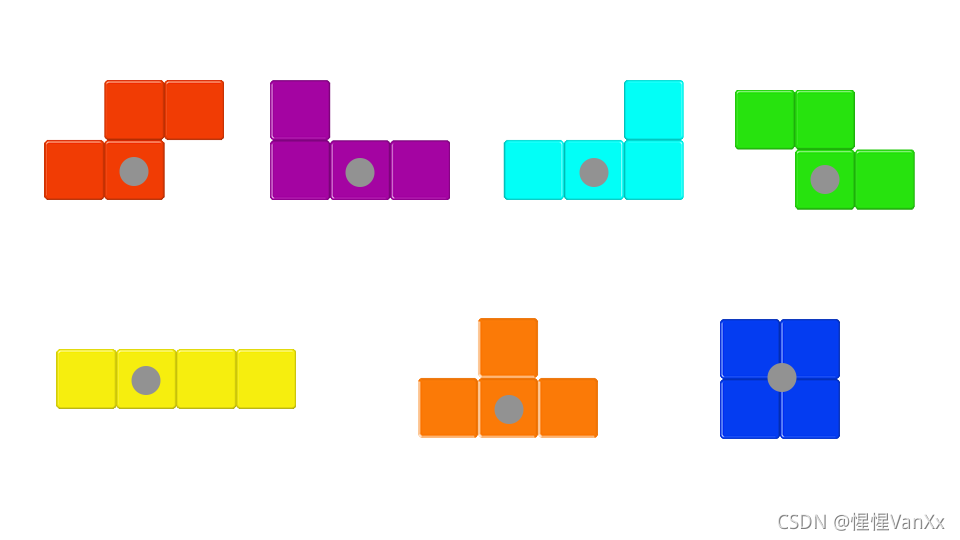
总所周知(),俄罗斯方块中的方块有七种,分别是:反Z型、L型、反L型、Z型、条型、T型、方形。

我们可以发现,每种方块集合都是由四个小方块组成的,我们可以利用这个特点构建统一的构建方法。
为了后续使用起来方便,我首先定义了每种小方块的预制体(Prefab)和一个空节点的预制体,这个预制体所生成的节点是用来装后续构建的方块节点的。所以结构上是父与子的关系。
    //正方形的子块
    @property(cc.Prefab)
    block_0: cc.Prefab = null;
    //Z字型的子块
    @property(cc.Prefab)
    block_1: cc.Prefab = null;
    //左L型的子块
    @property(cc.Prefab)
    block_2: cc.Prefab = null;
    //右L型的子块
    @property(cc.Prefab)
    block_3: cc.Prefab = null;
    //反Z型的子块
    @property(cc.Prefab)
    block_4: cc.Prefab = null;
    //长条型的子块
    @property(cc.Prefab)
    block_5: cc.Prefab = null;
    //T字型的子块
    @property(cc.Prefab)
    block_6: cc.Prefab = null;
    //方块集合的中心
    @property(cc.Prefab)
    currentBlockCentre = null;
    //当前的块
    currentBlock: cc.Node = null;        //currentBlockCentre的具体实现
    currentBlockPart01: cc.Node = null;  //四个子块的具体实现
    currentBlockPart02: cc.Node = null;
    currentBlockPart03: cc.Node = null;
    currentBlockPart04: cc.Node = null;
关于随机生成哪种颜色、哪种类型的方块,我只是简单的选择了自带的Math.random()。
    buildBlock() {
        this.rand = Math.floor(7 * Math.random());    //从七种中随机选择一种构建
        this.chooseColor(this.rand);
        this.chooseType(this.rand);
    }
后面就是根据输入的rand参数来选择构建方块集合的颜色、种类。关于如何构建,具体就是选择这个方块集合的中心点——最好选择在某个子块的中心,并将position设为(0, 0)。这样,在后续的旋转方面的实现会非常方便。然后选择好中心点之后,其他的子块就根据这个中心点来设置position,而cocos中子节点的position是相对于父节点的,子节点如果将position设置为(0, 0),那么子节点的位置就在父节点中心点上。
另外,每个子块的预制体尺寸都是60*60,也就是说游戏区每个格子之间的间隔是60。
这一段的代码比较长,我就不详细给出了。
    //选择方块集合的颜色
    chooseColor(rand) {
        ……
        //Z字形方块的颜色
        if (rand == 1) {
            this.currentBlockPart01 = cc.instantiate(this.block_1);
            this.currentBlockPart02 = cc.instantiate(this.block_1);
            this.currentBlockPart03 = cc.instantiate(this.block_1);
            this.currentBlockPart04 = cc.instantiate(this.block_1);
            this.currentBlock = cc.instantiate(this.currentBlockCentre);
            this.node.addChild(this.currentBlock);
            this.currentBlock.setPosition(30, 510);     //将当前生成的方块集合位置设定在游戏区的上面,准备后续的下落
        }
        //左L型方块的颜色
        if (rand == 2)
        ……
    }
    //选择形状
    chooseType(rand) {
        ……
        //创建Z字形
        if (rand == 1) {
            //Z字形左
            this.currentBlockPart01.setPosition(-60, 0);
            this.currentBlockPart01Pos = cc.v2(18, 4);  //初始化当前块的位置,相对于currentBlock
            //Z字形中
            this.currentBlockPart02.setPosition(0, 0);
            this.currentBlockPart02Pos = cc.v2(18, 5);
            //Z字形下
            this.currentBlockPart03.setPosition(0, -60);
            this.currentBlockPart03Pos = cc.v2(17, 5);
            //Z字形右
            this.currentBlockPart04.setPosition(60, -60);
            this.currentBlockPart04Pos = cc.v2(17, 6);
        }
        //创建左L型
        if (rand == 2)
        ……
    }
3.如何将创建的方块集合和节点二维数组结合起来
上面的代码里有这样的变量:currentBlockPart0XPos,定义了当前可操作方块集合currentBlock每个子块currentBlockPart0X在box节点二维数组中的具体位置。这四个变量非常有用,之后就可以实现当前可操作方块移动之后,将位置信息保存在box节点二维数组中。
//当前子块的位置
    currentBlockPart01Pos: cc.Vec2 = null;
    currentBlockPart02Pos: cc.Vec2 = null;
    currentBlockPart03Pos: cc.Vec2 = null;
    currentBlockPart04Pos: cc.Vec2 = null;
之后在每次可操作方块集合变化后,我们都可以调用下面这两个方法更新可操作方块集合在box数组中的位置。
    //读取当前操作方块集合的位置信息
    checkCurrentBlockPos() {
        this.box[this.currentBlockPart01Pos.x][this.currentBlockPart01Pos.y] = this.currentBlockPart01;
        this.box[this.currentBlockPart02Pos.x][this.currentBlockPart02Pos.y] = this.currentBlockPart02;
        this.box[this.currentBlockPart03Pos.x][this.currentBlockPart03Pos.y] = this.currentBlockPart03;
        this.box[this.currentBlockPart04Pos.x][this.currentBlockPart04Pos.y] = this.currentBlockPart04;
    }
    //清除上个位置的当前操作方块集合位置信息
    deleteCurrentBlockPos() {
        this.box[this.currentBlockPart01Pos.x][this.currentBlockPart01Pos.y] = null;
        this.box[this.currentBlockPart02Pos.x][this.currentBlockPart02Pos.y] = null;
        this.box[this.currentBlockPart03Pos.x][this.currentBlockPart03Pos.y] = null;
        this.box[this.currentBlockPart04Pos.x][this.currentBlockPart04Pos.y] = null;
    }
4.方块集合的移动和旋转
关于移动,遵循大部分俄罗斯方块游戏的操作方式,左键左移,右键右移,上键旋转,下键下移,还有自动下落。
    //自动下落
    autoDown() {
        this.schedule(() => {
            //一直下落直到碰到下边界
            if (this.isClashBottom()) {
                this.deleteRow();   //行消除检测
                this.buildBlock();  //创建新的方块集合
            } else if (this.isClashBlockDown()) {   //一直下落直到碰到其他方块
                this.isGameOver();  //判断游戏是否结束
                this.deleteRow();
                this.buildBlock();
            } else {
                //向下一格
                this.currentBlock.y -= 60;
                this.deleteCurrentBlockPos();
                this.currentBlockPart01Pos.x -= 1;
                this.currentBlockPart02Pos.x -= 1;
                this.currentBlockPart03Pos.x -= 1;
                this.currentBlockPart04Pos.x -= 1;
                this.checkCurrentBlockPos();
            }
        }, 1);
    }

    //键盘监听
    onKeyDown(e) {
        switch (e.keyCode) {
            case cc.macro.KEY.left:
                if (this.isClashLeft()) {    //判断是否撞到左边界
                    break;
                } else if (this.isClashBlockLeft()) {    //判断当前操作块是否左边撞到了其他子块
                    break;
                } else {
                    this.currentBlock.x -= 60;
                    this.deleteCurrentBlockPos();
                    this.currentBlockPart01Pos.y -= 1;
                    this.currentBlockPart02Pos.y -= 1;
                    this.currentBlockPart03Pos.y -= 1;
                    this.currentBlockPart04Pos.y -= 1;
                    this.checkCurrentBlockPos();
                    break;
                }
            case cc.macro.KEY.right:
                ……
            case cc.macro.KEY.up:
                //改变形态
                if (this.isClashLeft()) {    //判断是否撞到左边界
                    break;
                } else if (this.isClashRight()) {    //判断是否撞到右边界
                    break;
                } else if (this.isClashBottom()) {    //判断是否撞到下边界
                    break;
                } else if (this.isClashBlockLeft()) {    //判断当前操作块是否左边撞到了其他子块
                    break;
                } else if (this.isClashBlockRight()) {    //判断当前操作块是否右边边撞到了其他子块
                    break;
                } else if (this.isClashBlockDown()) {    //判断当前操作块是否下边撞到了其他子块
                    break;
                } else {
                    this.deleteCurrentBlockPos();
                    this.changeShape();    //旋转变形态
                    this.checkCurrentBlockPos();
                    break;
                }
            case cc.macro.KEY.down:
                ……
        }
    }
关于旋转这部分,我其实是取巧了,我特意设置了某些子块的位置为中心点,正好可以使我这种旋转操作成立。
图中灰色圆形指出的子块则是我设定的中心点。而如果将中心点作为二维坐标原点,可以划分为八个区域:y轴上半、y轴下半、x轴左半、x轴右半、第一象限、第二象限、第三象限、第四象限。
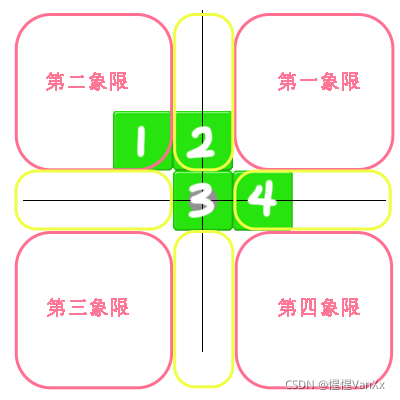
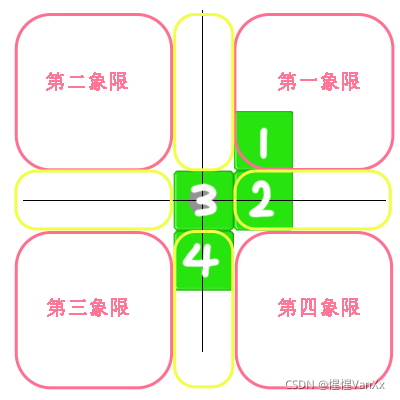
以Z型旋转为例,可以发现,在四个坐标轴上的子块x和y都改变了,而在象限上的子块只是改变了x和y的其中一个,而且是取原来值的相反数。我们这样实现旋转,实际上只是子块的位置改变了,子块所朝方向并没有改变。
//旋转变形态
    changeShape() {
        this.whichPartChange(this.currentBlockPart01, this.currentBlockPart01Pos);
        this.whichPartChange(this.currentBlockPart02, this.currentBlockPart02Pos);
        this.whichPartChange(this.currentBlockPart03, this.currentBlockPart03Pos);
        this.whichPartChange(this.currentBlockPart04, this.currentBlockPart04Pos);
    }

    //传入被判断的部分
    whichPartChange(currentBlockPart: cc.Node, currentBlockPartPos: cc.Vec2) {
        //修正参数,用于旋转currentBlockPartPos的位置,从左边到上边,上边到右边,右边到下边,下边到左边,在象限中的不需要用到
        let modParameterX = Math.abs(currentBlockPart.position.x / 60);
        let modParameterY = Math.abs(currentBlockPart.position.y / 60);
        let modParameterMax = Math.max(modParameterX, modParameterY);
        //y轴上半
        if (currentBlockPart.position.x == 0 && currentBlockPart.position.y > 0) {
            //行- 列+
            currentBlockPartPos.x -= modParameterMax;
            currentBlockPartPos.y += modParameterMax;
            //旋转当前块的位置
            currentBlockPart.setPosition(currentBlockPart.position.y, currentBlockPart.position.x);
        }
        //x轴左半
        else if (currentBlockPart.position.x < 0 && currentBlockPart.position.y == 0) {
            ……
        }
        //y轴下半
        else if (currentBlockPart.position.x == 0 && currentBlockPart.position.y < 0) {
            ……
        }
        //x轴右半
        else if (currentBlockPart.position.x > 0 && currentBlockPart.position.y == 0) {
            ……
        }
        //第一象限
        if (currentBlockPart.position.x > 0 && currentBlockPart.position.y > 0) {
            //行-
            if (currentBlockPart.position.x >= 60 && currentBlockPart.position.y >= 60) {
                currentBlockPartPos.x -= 2;
            } else {
                currentBlockPartPos.x -= 1;
            }
            //旋转当前块的位置
            currentBlockPart.setPosition(currentBlockPart.position.x, -currentBlockPart.position.y);
        }
        //第二象限
        else if (currentBlockPart.position.x < 0 && currentBlockPart.position.y > 0) {
            ……
        }
        //第三象限
        else if (currentBlockPart.position.x < 0 && currentBlockPart.position.y < 0) {
            ……
        }
        //第四象限
        else if (currentBlockPart.position.x > 0 && currentBlockPart.position.y < 0) {
            ……
        }
    }
5.边界和方块检测
边界检测有三种,分别是左边界检测、右边界检测和下边界检测。方块检测同样为三种,分别是当前可操作方块集合下方检测、左方检测和右方检测。
//判断是否即将碰撞到左边界
    isClashLeft(): boolean {
        if (this.currentBlockPart01Pos.y - 1 < 0 || this.currentBlockPart02Pos.y - 1 < 0 ||
            this.currentBlockPart03Pos.y - 1 < 0 || this.currentBlockPart04Pos.y - 1 < 0) {
            return true;
        }
        return false;
    }

    //判断是否即将碰撞到右边界
    isClashRight(): boolean {
        ……
    }

    //判断是否即将碰撞到下边界
    isClashBottom(): boolean {
        ……
    }
//判断是否即将碰撞到其他方块(下)
isClashBlockDown(): boolean {
//向下检测方块碰撞
if (this.box[this.currentBlockPart01Pos.x - 1][this.currentBlockPart01Pos.y] != null && !this.isCurrentBlockChild(this.box[this.currentBlockPart01Pos.x - 1][this.currentBlockPart01Pos.y]) ||
this.box[this.currentBlockPart02Pos.x - 1][this.currentBlockPart02Pos.y] != null && !this.isCurrentBlockChild(this.box[this.currentBlockPart02Pos.x - 1][this.currentBlockPart02Pos.y]) ||
this.box[this.currentBlockPart03Pos.x - 1][this.currentBlockPart03Pos.y] != null && !this.isCurrentBlockChild(this.box[this.currentBlockPart03Pos.x - 1][this.currentBlockPart03Pos.y]) ||
this.box[this.currentBlockPart04Pos.x - 1][this.currentBlockPart04Pos.y] != null && !this.isCurrentBlockChild(this.box[this.currentBlockPart04Pos.x - 1][this.currentBlockPart04Pos.y])) {
return true;
}
}
//判断是否即将碰撞到其他方块(左)
isClashBlockLeft() {
……
}
//判断是否即将碰撞到其他方块(右)
isClashBlockRight() {
……
}
//判断是否是当前操作方块集合的子块
isCurrentBlockChild(judgeObj: cc.Node): boolean {
for (let i = 0; i < 4; i++) {
if (judgeObj === this.currentBlock.children[i]) {
return true;
}
}
return false;
}因为每个子块在对方块检测时,都要向左、右或下一格判断是否存在其他方块,而有可能判断的方块是和自己同一个父类的,所以判断时还要判断是否为当前操作方块集合的子块。
6.方块的整行消除
需要注意的是,游戏内方块如果一列一列看的话,有时会存在镂空的情况,这时就要考虑镂空的时候要怎么向下移动一格。所以在rowDown()方法中,在整体下降的时候,如果判断到同一列上一格是空的,则赋为null,把刚移动到下一格的方块信息删除。
//行消除检测
    deleteRow() {
        for (let i = 0; i < 18; i++) {
            let count = 0;
            for (let j = 0; j < 10; j++) {
                if (this.box[i][j] != null) {
                    count++;
                }
            }
            //如果某一行内都存在方块
            if (count == 10) {
                for (let j = 0; j < 10; j++) {
                    //方块删除
                    this.box[i][j].removeFromParent();
                    this.box[i][j] = null;
                }
                this.rowDown(i);
                i--;    //因为rowDown(i)后,整体向下了一格,所以i--,否则无法实现多行消除,导致游戏无法正常运行
            }
        }
    }

    //全体方块向下移动一格
    rowDown(i: number) {
        //记录i值,即被当前被消除行
        let k = i;
        //列遍历
        for (let j = 0; j < 10; j++) {
            //temp:用于计算当前被消除行上面有多少行的方块元素(包括中间层存在镂空)
            let temp = -1;
            for (i = k; i < 18; i++) {
                temp++;
                if (this.box[i][j] != null) {
                    this.box[i - 1][j] = this.box[i][j];
                    this.box[i][j].y -= 60;
                    if (this.box[i + 1][j] == null) {
                        this.box[temp + k][j] = null;
                    }
                }
            }
        }
    }
3.写在最后
大体上最核心的问题我应该都好好说明了,如果有某些地方不清楚的话,欢迎下载原项目文件:
链接: 百度网盘 请输入提取码 提取码: c4ss
非常感谢以下两位大佬提供了部分思路和素材:
CocosCreater的俄罗斯方块游戏实现_zwww7766的博客-CSDN博客_cocos 俄罗斯方块
CocosCreator之KUOKUO分享-俄罗斯方块_kuokuo666的博客-CSDN博客