Android grade语法,多渠道打包
文章目录
- Android grade语法,多渠道打包
- 一、groovy语法
- 二、自动打包切换测试正式环境
- 三、gradle多渠道打包
- 总结
一、groovy语法
以下代码需要 在build.grade文件中操作,具体打印日志在build中查看
//字符串拼接
task StringText{
    def str1 = "woshishuangyinhao"
    def str2 = "woshidanyinhao"


    println str1+str2
}


//集合
task list{
    def list = [1,2,3,4,5]
    println list[0]
    list.each {
        println it
    }


    for (int i in 1..5){
        println list[i]
    }
}


task map{
    def map = ["name":"jeck","age":19]
    println(map["name"])
    map.each {
        println("key:${it.key},value:${it.value}")
    }
}


//定义一个方法  计算两数之和
task method{
    println(methodA(2,3))
    println(methodBean())
}


def methodA(int a,int b){
    a+b
}


def methodBean(){
    //groovy默认只返回最后一行的结果
    Student student = new Student()
    student.name = "hahahh"
    student.age = 1215415
}
//定义一个对象 ,在groovy没有私有一说,都能被调用
class Student{
    String name
    int age


    String getName() {
        return name
    }


    void setName(String name) {
        this.name = name
    }


    int getAge() {
        return age
    }


    void setAge(int age) {
        this.age = age
    }
}
//测试闭包
task closure{
    mEach{
        println(it)
    }
}
//闭包--》回调或者 钩子 在groovy只对{}里面的有效,Closure
def mEach(closure){
    for (int i in 1..5){
        closure(i)
    }
}
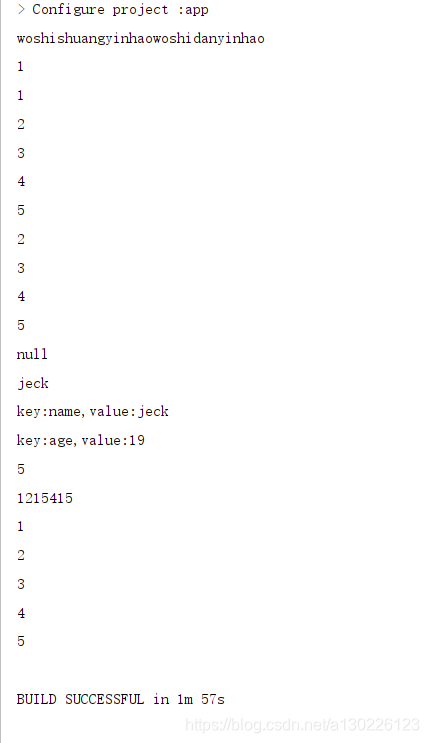
打印如下

二、自动打包切换测试正式环境
1.配置baseurl
在对应文件中分别配置url:
baseUrl = “https://www.debug.com”
baseUrl = “https://www.release.com”

2.在gradle中编写读取文件方法:
//用groovy读取配置文件
def getServerUrl(String str){
    def url;
    Properties properties = new Properties();
    def proFile =  file("src/main/filters/"+str+"/config.properties")
    if (proFile!= null && proFile.canRead()){
        properties.load(new FileInputStream(proFile))
        if (properties!= null){
            url = properties['baseUrl'];
        }
    }
    url
}
打印测试:
buildTypes {
        debug{
            println getServerUrl("debug")
        }
        release {
            println getServerUrl("release")
        }
    }

3.配置读取配置方法
buildTypes {
    debug {
        //三个参数 1 数据类型  2 变量名 3 变量值
        buildConfigField 'String','url',getServerUrl('debug')
    }
    release {
        buildConfigField 'String','url',getServerUrl('release')
    }
}
然后clean +rebuild project项目,然后会自动生成一个如下的类:
public final class BuildConfig {
  public static final boolean DEBUG = Boolean.parseBoolean("true");
  public static final String APPLICATION_ID = "com.rb.renbin.agradledemo";
  public static final String BUILD_TYPE = "debug";
  public static final String FLAVOR = "huawei";
  public static final int VERSION_CODE = 1;
  public static final String VERSION_NAME = "1.0";
  // Field from product flavor: huawei
  public static final String PLATE_FROM = "huawei";
  // Field from build type: debug
  public static final String url = "https://www.debug.com";
}
4.然后获取里面的url配置到请求base就行了,这样打包和编译运行就会自动切换正式环境和测试环境了
String baseurl = BuildConfig.url;
三、gradle多渠道打包
1.先创建自己的签名文件
2.配置签名
//签名配置
signingConfigs{
    release{
        keyAlias 'arouter'
        keyPassword '123456'
        storeFile file('app/arouter.jks')
        storePassword '123456'
    }
}


//自动打包切换域名 用groovy读取配置文件
buildTypes {
    debug {
        //三个参数 1 数据类型  2 变量名 3 变量值
        buildConfigField 'String','url',getServerUrl('debug')
    }
    release {
        buildConfigField 'String','url',getServerUrl('release')
        //混淆
        minifyEnabled true
        // 配置签名
        signingConfig signingConfigs.release
        //包的输出
    }
}
3.在defaultConfig配置渠道code
defaultConfig {
    applicationId "com.rb.renbin.agradledemo"
    minSdkVersion 23
    targetSdkVersion 30
    versionCode 1
    versionName "1.0"


    testInstrumentationRunner "androidx.test.runner.AndroidJUnitRunner"
    //多渠道包code
    flavorDimensions "versionCode"
}
4.配置渠道号
productFlavors{
    xiaomi{
        buildConfigField 'String','PLATE_FROM','xiaomi'
    }


    yingyongbao{
        buildConfigField 'String','PLATE_FROM','yingyongbao'
    }


    huawei{
        buildConfigField 'String','PLATE_FROM','huawei'
    }
}
或者
productFlavors{
    xiaomi{}
    yingyongbao{}
    huawei{}
}


productFlavors.all{
    flavor ->
        buildConfigField 'String','PLATE_FROM',"\"${name}\""
}
5.输出包,配置打包输出方法
release {
    buildConfigField 'String','url',getServerUrl('release')
    //混淆
    minifyEnabled true
    // 配置签名
    signingConfig signingConfigs.release
    //包的输出  渠道+时间+版本号
    android.applicationVariants.all { variant ->
        variant.outputs.all { output ->  // each 改为 all
            def fileName = "${getCurrentTime()}_V${defaultConfig.versionName}_release.apk"
            def outFile = output.outputFile
            if (outFile != null && outFile.name.endsWith('.apk')) {
                outputFileName = fileName  //  output.outputFile 改为 outputFileName
            }
        }
    }
}

def  getCurrentTime(){
    return new Date().format("yyyy-MM-dd",TimeZone.getTimeZone("UTC"))
}
6.gradle多渠道打包
在terminal下执行 gradlew assemble 打包指令

或者在这里选择自己需要的渠道打包也可以

打包如下:
