Nginx 是开源、高性能、高可靠的 Web 和反向代理服务器,而且支持热部署,几乎可以做到 7 * 24 小时不间断运行,即使运行几个月也不需要重新启动。在工作中,我们经常会用到需要搭建文件服务器的情况,这里就以在linux下搭建文件服务器为例,解释编译nginx和搭建服务器的过程。
一、nginx编译安装
1、下载nginx
nginx下载网站wget下载命令wget http://nginx.org/download/nginx-1.25.2.tar.gz2、解压压缩包
tar -zxvf nginx-1.25.2.tar.gz3、创建用户和用户组
useradd -M -s /sbin/nologin nginx4、编译安装nginx
# 依次执行下面命令cd nginx-1.25.2./configure \--prefix=/usr/local/nginx \--user=nginx \--group=nginx \--without-http_rewrite_module \--without-http_gzip_modulemake && make install#让系统识别nginx的操作命ln -s /usr/local/nginx/sbin/nginx /usr/local/sbin/如果在编译过程中报错需要依赖包,执行以下命令安装依赖
#nginx的配置及运行需要pcre、zlib、openssl等软件包的支持,因此需要安装这些软件的开发包,以便提供相应的库和头文件。yum -y install pcre-devel zlib-devel openssl-devel gcc gcc-c++ make依赖安装完成重新执行./configure命令
5、检查、启动、重启、停止 nginx服务的命令
nginx -t#检查配置文件是否配置正确#启动nginx#停止cat /usr/local/nginx/logs/nginx.pid#先查看nginx的PID号kill -3 <PID号>kill -s QUIT <PID号>killall -3 nginxkillall -s QUIT nginx#重载kill -1 <PID号>kill -s HUP <PID号>killall -1 nginxkillall -s HUP nginx#日志分割,重新打开日志文件kill -USR1 <PID号>#平滑升级kill -USR2 <PID号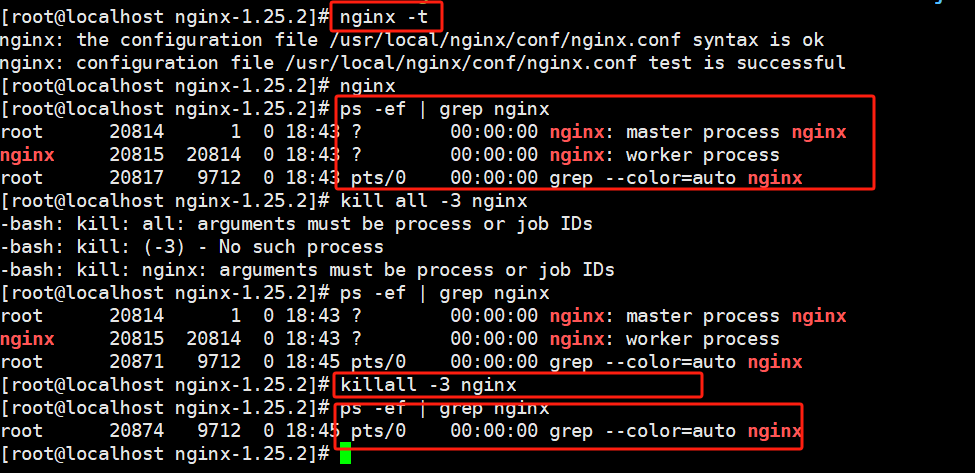
二、配置nginx文件下载服务器
1、配置nginx.conf文件
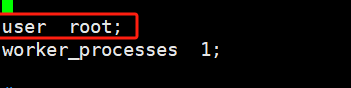
到nginx.conf文件目录cd /usr/local/nginx/conf/cp nginx.conf nginx.conf_bak将 user nobody 改成:user root并取消注释
配置以下部分
# 显示目录 autoindex on; # 显示文件大小 autoindex_exact_size on; # 显示文件时间 autoindex_localtime on; # 防止中文乱码 charset utf-8; server { listen 8888; #配置了监听端口此条不生效 server_name localhost; #文件服务器本地存储路径 root /root/nginx_storge; }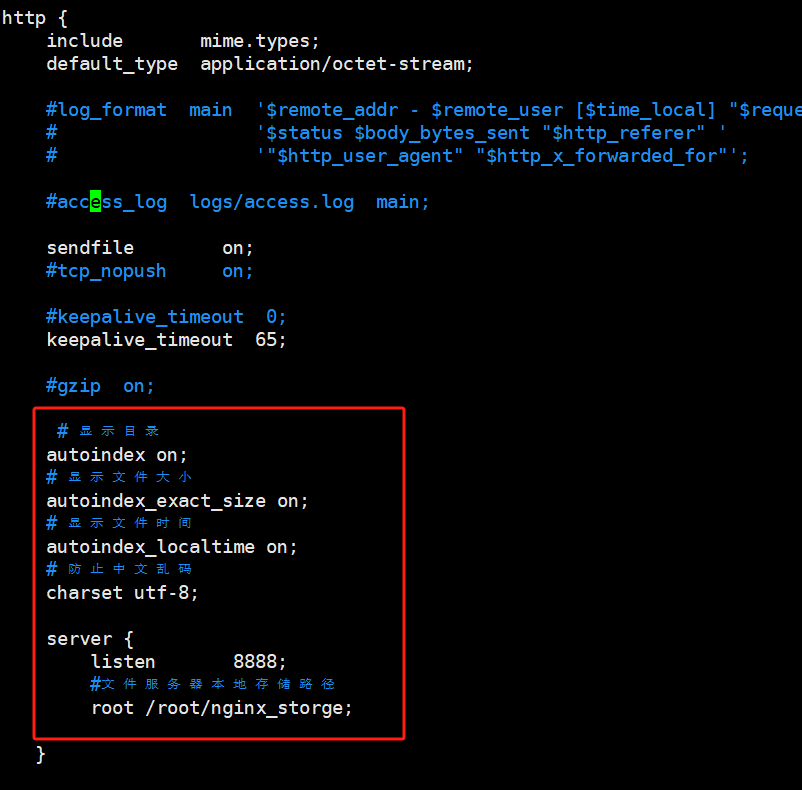
mkdir /root/nginx_storge2、检查并启动nginx
# 检查nginx配置nginx -t#启动nginxnginx -c /usr/local/nginx/conf/nginx.conf#重载nginxnginx -s reload
3、测试下载
在cd /root/nginx_storge/中新建几个文件和文件夹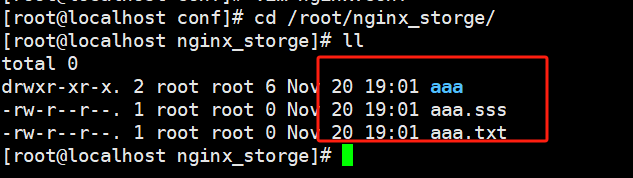
在浏览器中输入地址:http://192.168.86.129:8888/(根据自己的ip修改)可以看到文件信息,点击文件可以下载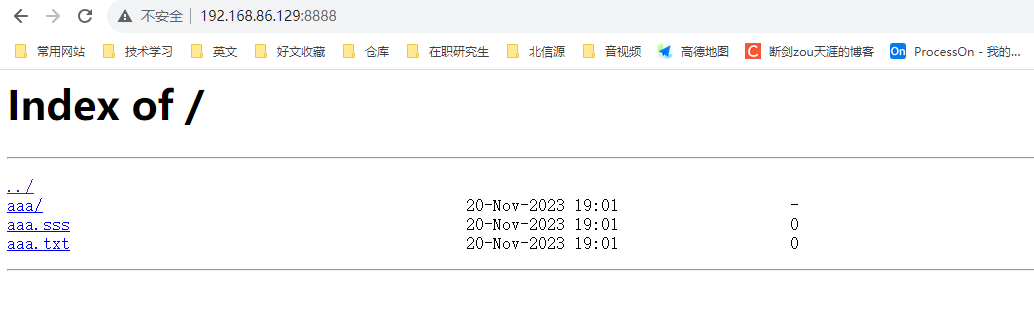
三、自动启动nginx的启动脚本
在实际的工作中,我们需要在不同的地方启动nginx,这种情况下,我们就可以通过自定义脚本的方式来实现该功能。下面我们就以一个视频下载为例来简单说明内容的写法。
1 目录接口
我们首先需要创建一个目录,目录的命名不重要,可以按照各自的业务来,因为脚本是按照相对路径来的,用的时候只需要将该文件夹直接拷贝过去,就可以直接执行,文件夹中的内容结构如下:
---- server.conf #下载路径相关的配置
---- start.sh #执行脚本
---- nginx #nginx相关的文件夹
-------- conf
------------ nginx.conf #nginx的配置文件
-------- logs
------------ access.log #访问日志文件 ,一开始只需要创建一个空文件即可
------------ error.log #错误日志文件 ,一开始只需要创建一个空文件即可
------------ nginx.pid #pid文件 ,一开始只需要创建一个空文件即可
2、server.conf内容
server.conf是配置文件,主要是下载的端口和服务器上面下载文件的绝对路径
recordVideoDownloadPord=8888recordVideoDownloadRootPath=/home/filePath3、nginx.conf内容
nginx.conf是nginx配置文件的模板,里面是主要的配置框架,实际内容会在执行start.sh时根据配置替换
user root;worker_processes 1;error_log /usr/local/nginx/logs/error.log info;pid /usr/local/nginx/logs/nginx.pid;events { worker_connections 1024;}http { default_type application/octet-stream; log_format main '$remote_addr - $remote_user [$time_local] "$request" ' '$status $body_bytes_sent "$http_referer" ' '"$http_user_agent" "$http_x_forwarded_for"'; access_log /usr/local/nginx/logs/access.log main; sendfile on; #tcp_nopush on; #keepalive_timeout 0; keepalive_timeout 65; #gzip on; # 显示目录 autoindex on; # 显示文件大小 autoindex_exact_size on; # 显示文件时间 autoindex_localtime on; # 防止中文乱码 charset utf-8; server { listen 8888; #配置了监听端口此条不生效 server_name localhost; #文件服务器本地存储路径 root /home/filePath; access_log /usr/local/nginx/logs/access.log main; # ssl_certificate cert.pem; # ssl_certificate_key cert.key; }}4、start.sh文件
#!/bin/bashlocal_path=$(pwd)echo "localPath: $local_path"nginx_error_log="$local_path/nginx/logs/error.log info"nginx_pid="$local_path/nginx/logs/nginx.pid"nginx_access_log="$local_path/nginx/logs/access.log main"nginx_config_file="$local_path/nginx/conf/nginx.conf"#get config port=`sed '/^recordVideoDownloadPord=/!d;s/.*=//' $local_path/server.conf`root_path=`sed '/^recordVideoDownloadRootPath=/!d;s/.*=//' $local_path/server.conf` echo "read config port : $port" echo "read config root : $root_path"#replace nginxConfigFilesed -i "s|error_log .*;$|error_log ${nginx_error_log};|g" $nginx_config_filesed -i "s|access_log .*;$|access_log ${nginx_access_log};|g" $nginx_config_filesed -i "s|pid .*;$|pid ${nginx_pid};|g" $nginx_config_filesed -i "s|listen .*;$|listen ${port};|g" $nginx_config_file sed -i "s|root .*;$|root ${root_path};|g" $nginx_config_file #stop already started nginxif [ -f "$nginx_pid" ]; then pid=$(cat $nginx_pid) if ps -p $pid > /dev/null then echo "nginx is running pid=$pid, begin stop nginx " kill -3 $pid fifiecho "begin start nginx"/usr/local/nginx/sbin/nginx -c $nginx_config_file5、启动项目
首先需要在nginx/logs下面新建nginx.pid文件,执行命令如下
touch nginx/logs/nginx.pid将server.conf配置好后,执行start.sh文件,就可以启动项目,每次重启也只需要执行start.sh文件即可。
./start.sh后记
个人总结,欢迎转载、评论、批评指正