在Vue3项目中使用VueCropper裁剪组件(裁剪及预览效果)
文章标签:
《随便一记》
文章目录
前言一、使用步骤1.安装库2.引入库3.在component文件夹中新建一个裁剪Vue文件4.在父组件中使用(HTML)5.定义props传参(TS)6.核心方法(TS) 总结
前言
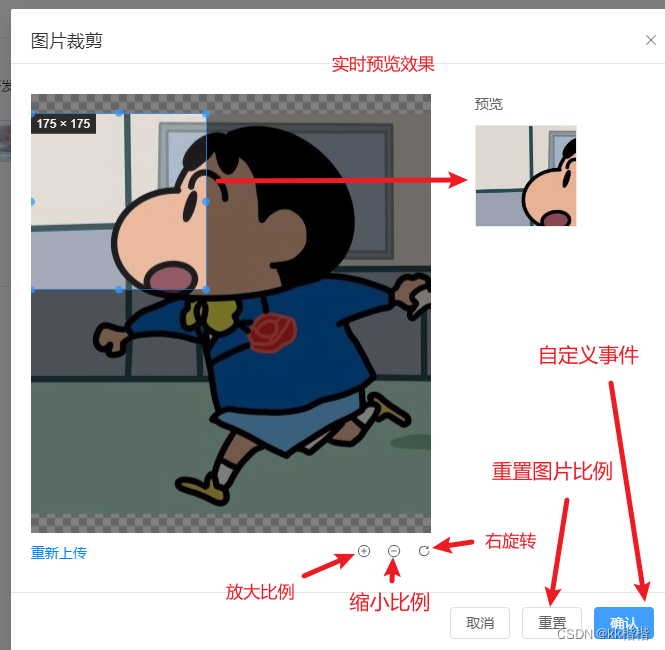
某次看到后台系统中使用到了裁剪组件,感觉挺好玩的并且最近也在学Vue3和Ts,所以就研究了VueCropper组件,封装了裁剪组件,效果如下图。 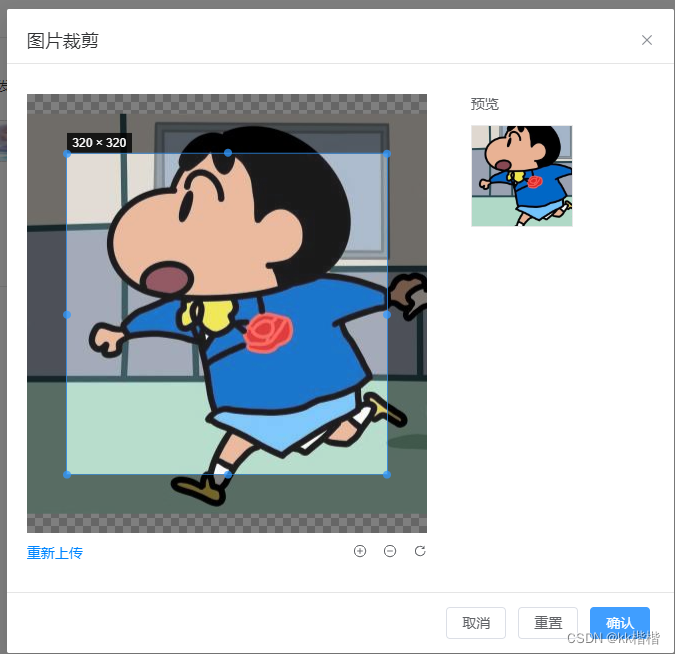
一、使用步骤
1.安装库
npm i vue-cropper --save
2.引入库
代码如下(示例):
import ‘vue-cropper/dist/index.css’
import { VueCropper } from ‘vue-cropper’
3.在component文件夹中新建一个裁剪Vue文件
TipsDialog是我自己封装的dialog组件,可以替换成el-dialog
<template> <div> <input ref="reuploadInput" type="file" accept="image/*" @change="onChange" id="fileBtn" style="display: none" > <TipsDialog :visible="dialogVisible" :title="'图片裁剪'" :width="'40%'" :custom-class="'upload_dialog'" @close="dialogVisible = false" > // 核心内容 <template #default> <div class="cropper"> // 裁剪左侧内容 <div class="cropper_left"> <vueCropper :tyle="{ width: '400px'}" ref="cropperRef" :img="options.img" :info="true" :info-true="options.infoTrue" :auto-crop="options.autoCrop" :fixed-box="options.fixedBox" :can-move="options.canMoveBox" :can-scale="options.canScale" :fixed-number="fixedNumber" :fixed="options.fixed" :full="options.full" :center-box="options.centerBox" @real-time="previewHandle" /> <div class="reupload_box"> <div class="reupload_text" @click="uploadFile('reload')" > 重新上传 </div> <div> <el-icon class="rotate_right" @click="changeScale(1)" > <CirclePlus /> </el-icon> <el-icon class="rotate_right" @click="changeScale(-1)" > <Remove /> </el-icon> <el-icon class="rotate_right" @click="rotateRight" > <RefreshRight /> </el-icon> </div> </div> </div> <div class="cropper_right"> <div class="preview_text"> 预览 </div> <div :style="getStyle" class="previewImg" > <div :style="previewFileStyle"> <img :style="previews.img" :src="previews.url" alt="" > </div> </div> </div> </div> </template> <template #footer> <span class="dialog-footer"> <el-button @click="dialogVisible = false">取消</el-button> <el-button type="" @click="refreshCrop" >重置</el-button> <el-button type="primary" @click="onConfirm" > 确认 </el-button> </span> </template> </TipsDialog> </div></template><script lang="ts" setup>// 需要引入的库import 'vue-cropper/dist/index.css'import { VueCropper } from 'vue-cropper'import { ref, watch, reactive } from 'vue'import TipsDialog from '~/components/TipsDialog/TipsDialog.vue' // 封装的dialog组件import { ElMessage } from 'element-plus'import { commonApi } from '../../api' // 封装的apiconst dialogVisible = ref<boolean>(false) // dialog的显示与隐藏const emits = defineEmits(['confirm']) // 自定义事件// 裁剪组件需要使用到的参数interface Options { img: string | ArrayBuffer | null // 裁剪图片的地址 info: true // 裁剪框的大小信息 outputSize: number // 裁剪生成图片的质量 [1至0.1] outputType: string // 裁剪生成图片的格式 canScale: boolean // 图片是否允许滚轮缩放 autoCrop: boolean // 是否默认生成截图框 autoCropWidth: number // 默认生成截图框宽度 autoCropHeight: number // 默认生成截图框高度 fixedBox: boolean // 固定截图框大小 不允许改变 fixed: boolean // 是否开启截图框宽高固定比例 fixedNumber: Array<number> // 截图框的宽高比例 需要配合centerBox一起使用才能生效 full: boolean // 是否输出原图比例的截图 canMoveBox: boolean // 截图框能否拖动 original: boolean // 上传图片按照原始比例渲染 centerBox: boolean // 截图框是否被限制在图片里面 infoTrue: boolean // true 为展示真实输出图片宽高 false 展示看到的截图框宽高 accept: string // 上传允许的格式}// 父组件传参propsinterface IProps { type: string // 上传类型, 企业logo / 浏览器logo allowTypeList: string[] // 接收允许上传的图片类型 limitSize: number // 限制大小 fixedNumber: number[] // 截图框的宽高比例 fixedNumberAider?: number[] // 侧边栏收起截图框的宽高比例 previewWidth: number // 预览宽度 title?: string // 裁剪标题}// 预览样式interface IStyle { width: number | string, height: number | string}/* 父组件传参 */const props = withDefaults(defineProps<IProps>(), { type: 'systemLogo', allowTypeList: () => ['jpg', 'png', 'jpeg'], limitSize: 1, fixedNumber: () => [1, 1], fixedNumberAider: () => [1, 1], previewWidth: 228, title: 'LOGO裁剪'})// 裁剪组件需要使用到的参数const options = reactive<Options>({ img: '', // 需要剪裁的图片 autoCrop: true, // 是否默认生成截图框 autoCropWidth: 150, // 默认生成截图框的宽度 autoCropHeight: 150, // 默认生成截图框的长度 fixedBox: false, // 是否固定截图框的大小 不允许改变 info: true, // 裁剪框的大小信息 outputSize: 1, // 裁剪生成图片的质量 [1至0.1] outputType: 'png', // 裁剪生成图片的格式 canScale: true, // 图片是否允许滚轮缩放 fixed: true, // 是否开启截图框宽高固定比例 fixedNumber: [1, 1], // 截图框的宽高比例 需要配合centerBox一起使用才能生效 1比1 full: true, // 是否输出原图比例的截图 canMoveBox: false, // 截图框能否拖动 original: false, // 上传图片按照原始比例渲染 centerBox: true, // 截图框是否被限制在图片里面 infoTrue: true, // true 为展示真实输出图片宽高 false 展示看到的截图框宽高 accept: 'image/jpeg,image/jpg,image/png,image/gif,image/x-icon'})const getStyle = ref<IStyle>({ width: '', height: ''})/* 允许上传的类型 */const acceptType = ref<string[]>([])// 裁剪后的预览样式信息const previews: any = ref({})const previewFileStyle = ref({})// 裁剪组件Refconst cropperRef: any = ref({})// input组件Refconst reuploadInput = ref<HTMLElement | null | undefined>()// 回显图片使用的方法const onChange = (e: any) => { const file = e.target.files[0] const URL = window.URL || window.webkitURL // 上传图片前置钩子,用于判断限制类型用 if (beforeUploadEvent(file)) { options.img = URL.createObjectURL(file) dialogVisible.value = true }}/* 上传图片前置拦截函数 */const beforeUploadEvent = (file: File) => { const type = file.name.substring(file.name.lastIndexOf('.') + 1) // 获得图片上传后缀 // 判断是否符合上传类型 const isAllowTye = props.allowTypeList.some(item => { return item === type }) if (!isAllowTye) { ElMessage.error(`仅支持${acceptType.value.join('、')}格式的图片`) return false } return true}/* 重置裁剪组件 */const refreshCrop = () => { // cropperRef裁剪组件自带很多方法,可以打印看看 cropperRef.value.refresh()}/* 右旋转图片 */const rotateRight = () => { cropperRef.value.rotateRight()}/* 放大缩小图片比例 */const changeScale = (num: number) => { const scale = num || 1 cropperRef.value.changeScale(scale)}// 缩放的格式const tempScale = ref<number>(0)// 点击上传const uploadFile = (type: string): void => { /* 打开新的上传文件无需生成新的input元素 */ if (type === 'reupload') { reuploadInput.value?.click() return } let input: HTMLInputElement | null = document.createElement('input') input.type = 'file' input.accept = options.accept input.onchange = onChange input.click() input = null}/* 上传成功方法 */const cropperSuccess = async (dataFile: File) => { const fileFormData = new FormData() fileFormData.append('file', dataFile) // 在接口请求中需要上传file文件格式, 并且该接口需要改header头部为form-data格式 const { code, data } = await commonApi.uploadFile(fileFormData) if (code.value === 200 && data.value) { return data.value } // 之前调用接口的方式 // axios('http://localhost:3001/adminSystem/common/api/upload', { // data: fileFormData, // method: 'POST', // headers: { // 'Content-Type': 'multipart/form-data' // } // }).then(async (result: any) => { // const res = await result // console.log(res, 'res') // }).catch((err: any) => { // console.log(err, 'err') // })} // base64转图片文件const dataURLtoFile = (dataUrl: string, filename: string) => { const arr = dataUrl.split(',') const mime = arr[0].match(/:(.*?);/)[1] const bstr = atob(arr[1]) let len = bstr.length const u8arr = new Uint8Array(len) while (len--) { u8arr[len] = bstr.charCodeAt(len) } return new File([u8arr], filename, { type: mime })}// 上传图片(点击保存按钮)const onConfirm = () => { cropperRef.value.getCropData(async (data: string) => { const dataFile: File = dataURLtoFile(data, 'images.png') const res = await cropperSuccess(dataFile) // 触发自定义事件 emits('confirm', res) return res }) dialogVisible.value = false}// 裁剪之后的数据const previewHandle = (data: any) => { previews.value = data // 预览img图片 tempScale.value = props.previewWidth / data.w previewFileStyle.value = { width: data.w + 'px', height: data.h + 'px', margin: 0, overflow: 'hidden', zoom: tempScale.value, position: 'relative', border: '1px solid #e8e8e8', 'border-radius': '2px' }}watch( () => props, () => { /* 预览样式 */ getStyle.value = { width: props.previewWidth + 'px', // 预览宽度 height: props.previewWidth / props.fixedNumber[0] + 'px' // 预览高度 } // 上传格式tips信息 acceptType.value = [] for (let i = 0; i < props.allowTypeList.length; i++) { acceptType.value.push(props.allowTypeList[i].toUpperCase()) } }, { deep: true })/* 向子组件抛出上传事件 */defineExpose({ uploadFile})</script><style lang="scss" scoped>.cropper { width: 100%; height: 50vh; display: flex; overflow: hidden; .cropper_left { display: flex; flex-direction: column; .reupload_box { display: flex; align-items: center; justify-content: space-between; margin-top: 10px; .reupload_text { color: var(--primary-color); cursor: pointer; } .rotate_right { margin-left: 16px; cursor: pointer; } } } .cropper_right { flex: 1; margin-left: 44px; .preview_text { margin-bottom: 12px; } }}</style>4.在父组件中使用(HTML)
// 引入裁剪组件import clipperDialog from '~/components/clipperDialog/clipperDialog.vue'HTML<clipperDialog ref="clipperRef" :type="clipperData.type" :allow-type-list="clipperData.allowTypeList" :limit-size="clipperData.limitSize" :fixed-number="clipperData.fixedNumber" :fixed-number-aider="clipperData.fixedNumberAider" :preview-width="clipperData.previewWidth" @confirm="onConfirm"/>5.定义props传参(TS)
JS// 定义interface类型interface IClipper { type: string // 上传类型 allowTypeList: string[] // 接收允许上传的图片类型 limitSize: number // 限制大小 fixedNumber: number[] // 截图框的宽高比例 fixedNumberAider?: number[] // 侧边栏收起截图框的宽高比例 previewWidth: number // 预览宽度 previewWidthAider?: number // 侧边栏收起预览宽度}const clipperData = ref<IClipper>({ type: '', allowTypeList: [], limitSize: 1, fixedNumber: [], previewWidth: 0})6.核心方法(TS)
/* 浏览器logo上传 */const browserUpload = (): void => { clipperData.value = { type: 'browserLogo', // 该参数可根据实际要求修改类型 allowTypeList: ['png', 'jpg', 'jpeg', 'peeee'], // 允许上传的图片格式 limitSize: 1, // 限制的大小 fixedNumber: [1, 1], // 截图比例,可根据实际情况进行修改 previewWidth: 100 // 预览宽度 } // 打开裁剪组件 clipperRef.value.uploadFile()}/* 保存logo自定义事件, 实际业务在此编写 */const onConfirm = (val: any): void => { console.log(val, '点击保存按钮后的图片信息')}总结
以上就是我封装的裁剪组件,或许存在一些不足之处,还请大佬们多多指教!
灵感来源:vue项目添加图片裁剪组件
登录后可发表评论
点击登录