最新2023 win11+wsl2 自己编译自己的JDK
参考文章,深入理解JAVA虚拟机 周志明的,结合网上多个实践文章终于完成。
1、安装ubuntu系统
参考我的上一篇文
win11安装wsl2的ubuntu
很简单的配置,系统是默认的ubuntu22.04
记得换个源,会很快,不过那个下文的gcc版本降级,需要稍微等一下。
2、下载jdk12源码并放到Linux系统
打包下载源码。
https://hg.openjdk.java.net/jdk/jdk12下载zip
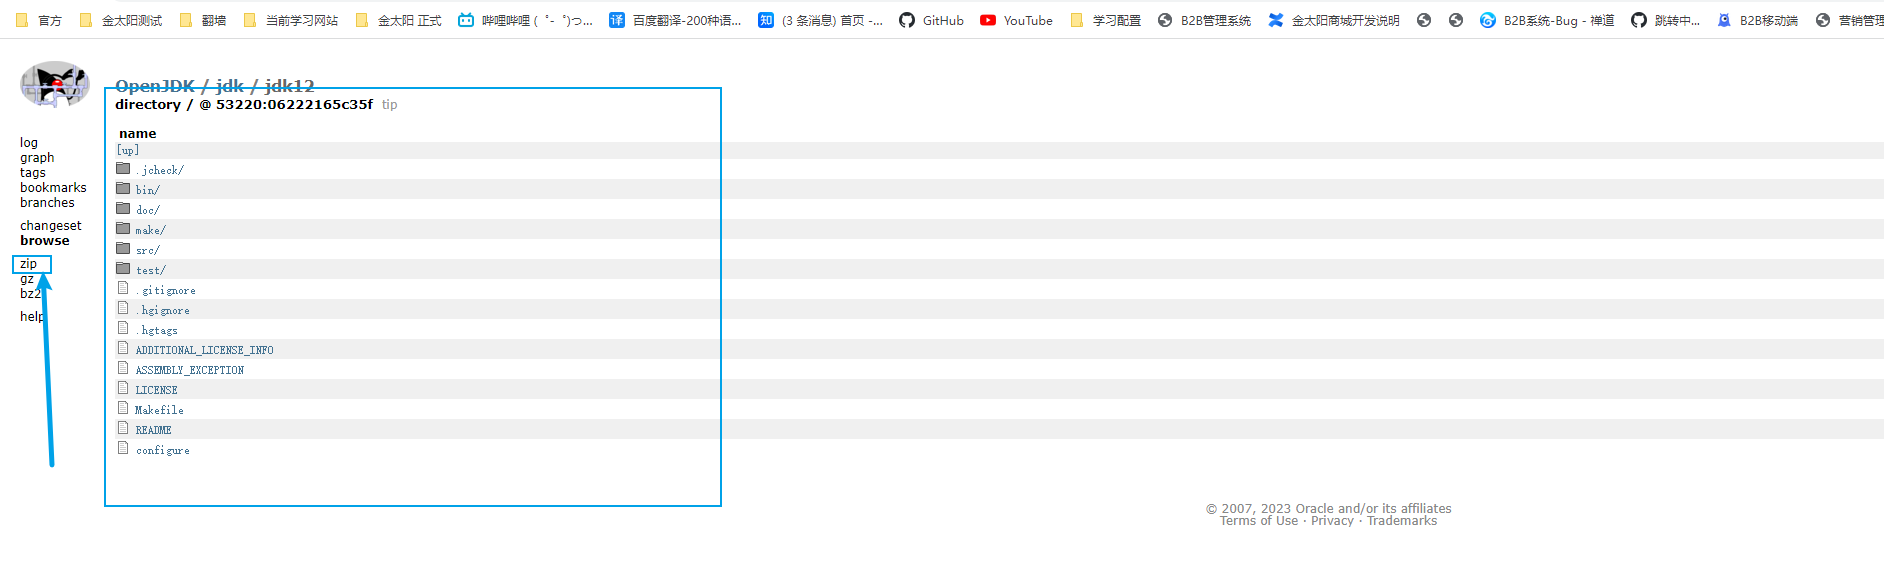
下载完文件
有两个方案。
第一个直接解压到当前的下载目录中,然后使用cp命令,就是等很久没有进度条,很烦。不推荐这是我当时的情景。 OTZ!!! cp或者mv 命令,卡住了
cp -r /mnt/e/download/googleDownload/jdk12-06222165c35f /home/jdk12//mnt/e 这个对于linux来讲的。/mnt 就能找到原来的真实windwos盘.e是 e盘,意思是windows下载解压放到了e盘的/download/googleDownload/
将jdk12-06222165c35f 这个解压的包,cp到 /home/jdk12/。
第二个就是,直接使用压缩工具,选择好文件夹,直接解压到,linux系统里面关于如何找到linux的文件系统。 \wsl ,可以直接找到linux的存储地方。
直接用7zip 解压路径
\\wsl$\Ubuntu\home\shine\Project\jdk12\\wsl$\ 找到系统按照路径Ubuntu 是安装的系统名称路径home 是系统里面,大家应该都知道,后面就是自定义了有一说一,还是很慢!!!!!!!!!但是起码有进度条,让我知道有用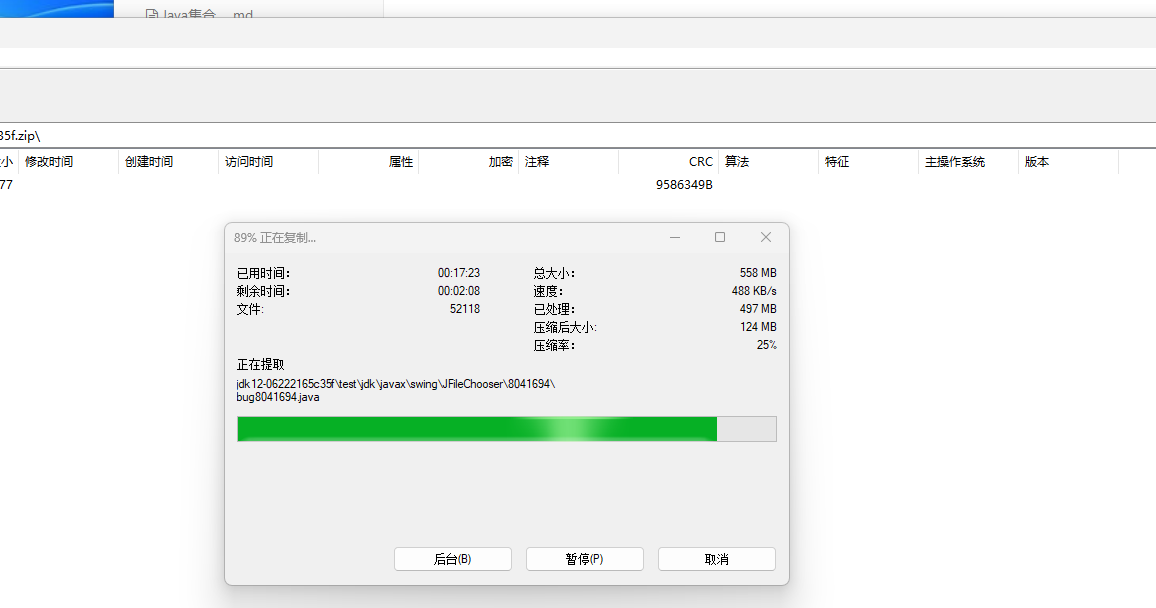
3、下载openOracleJdk 11
然后要想编译jdk12,你需要搞一个编译jdk12的环境。
使用bash 命令
bootstrap jdk,引导环境。因为jdk12很多是java代码写的。
意思是,你需要下一个jdk11。
据原文说,大版本号为N,需要编译好的jdk必须是N-1的。
sudo apt-get install openjdk-11-jdk4、配置好linux的编译环境
4.1、关键点,gcc的版本需要降低
ubuntu22.04的gcc是11太高了,后期生成源码配置会报错。需要使用gcc7
gedit 这个直接跳出文本编辑,比vim好用
\# ubuntu软件源配置文件gedit /etc/apt/sources.list# 向文件中添加如下代码,追加一个软件源deb [arch=amd64] http://archive.ubuntu.com/ubuntu focal main universe# 更新源文件apt-get update# 安装 gcc-7 g++-7apt-get -y install gcc-7 g++-7# 多版本管理 最后的数字越大,优先级越高 这里维护了7 9 11三个版本 默认是版本7update-alternatives --install /usr/bin/gcc gcc /usr/bin/gcc-7 50update-alternatives --install /usr/bin/g++ g++ /usr/bin/g++-7 50update-alternatives --install /usr/bin/gcc gcc /usr/bin/gcc-9 10update-alternatives --install /usr/bin/g++ g++ /usr/bin/g++-9 10update-alternatives --install /usr/bin/gcc gcc /usr/bin/gcc-11 30update-alternatives --install /usr/bin/g++ g++ /usr/bin/g++-11 304.2、安装其他编译需要的配置
等的时候安装以下,第三方库,比如freetype,cups
sudo apt-get install build-essentialsudo apt-get install libfreetype6-devsudo apt-get install libcups2-devsudo apt-get install libx11-dev libxext-dev libxrender-dev libxrandr-dev libxtst-dev libxt-devsudo apt-get install libasound2-devsudo apt-get install libffi-devsudo apt-get install autoconfsudo apt-get install libfontconfig1-dev应该没啥问题了,那么开始真正的编译了。
5、进行编译
准备好环境,和依赖项目后,使用默认配置就可以开始编译了。
输出命令
bash configure --enable-debug --with-jvm-variants=server 编译,fastDebug版本,仅含Server模式的HotSpot虚拟机默认是 release版本 相关命令查询可以用 bash configure --help最后成功了 如下所示
====================================================A new configuration has been successfully created in/home/shine/project/jdk12/jdk12-06222165c35f/build/linux-x86_64-server-fastdebugusing configure arguments '--enable-debug --with-jvm-variants=server --disable-warnings-as-errors'.Configuration summary:* Debug level: fastdebug* HS debug level: fastdebug* JVM variants: server* JVM features: server: 'aot cds cmsgc compiler1 compiler2 epsilongc g1gc graal jfr jni-check jvmci jvmti management nmt parallelgc serialgc services shenandoahgc vm-structs zgc'* OpenJDK target: OS: linux, CPU architecture: x86, address length: 64* Version string: 12-internal+0-adhoc.root.jdk12-06222165c35f (12-internal)Tools summary:* Boot JDK: openjdk version "11.0.18" 2023-01-17 OpenJDK Runtime Environment (build 11.0.18+10-post-Ubuntu-0ubuntu122.04) OpenJDK 64-Bit Server VM (build 11.0.18+10-post-Ubuntu-0ubuntu122.04, mixed mode, sharing) (at /usr/lib/jvm/java-11-openjdk-amd64)* Toolchain: gcc (GNU Compiler Collection)* C Compiler: Version 7.5.0 (at /usr/bin/gcc)* C++ Compiler: Version 7.5.0 (at /usr/bin/g++)Build performance summary:* Cores to use: 15* Memory limit: 15900 MB6、生成镜像
然后呢,生成镜像命令就是最后一步了。
make imagesmake 也会报错,会报错,参考8.2!!!因为源码问题
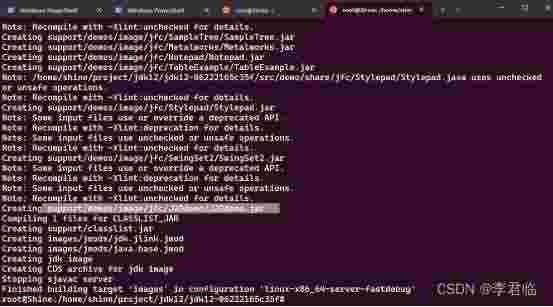
不知道有没有成功?太难了
7、验证编译结果
7.1、通过查看编译后JDK的版本,来验证编译是否成功
./build/linux-x86_64-server-fastdebug/jdk/bin/java --version如果输出以下内容,则代表编译成功!
openjdk 12-internal 2019-03-19OpenJDK Runtime Environment (fastdebug build 12-internal+0-adhoc.gx.jdk)OpenJDK 64-Bit Server VM (fastdebug build 12-internal+0-adhoc.gx.jdk, mixed mode)这是本人的 不要直接输入java --version
#不要直接输入 java --version,这是个安装的jdk版本,不是编译的#root@Shine:/home/shine/project/jdk12/jdk12-06222165c35f/build/linux-x86_64-server-fastdebug/jdk/bin# java --versionopenjdk 11.0.18 2023-01-17OpenJDK Runtime Environment (build 11.0.18+10-post-Ubuntu-0ubuntu122.04)OpenJDK 64-Bit Server VM (build 11.0.18+10-post-Ubuntu-0ubuntu122.04, mixed mode, sharing) root@Shine:/home/shine/project/jdk12/jdk12-06222165c35f/build/linux-x86_64-server-fastdebug/jdk/bin# ./java--versionopenjdk 12-internal 2019-03-19OpenJDK Runtime Environment (fastdebug build 12-internal+0-adhoc.root.jdk12-06222165c35f)OpenJDK 64-Bit Server VM (fastdebug build 12-internal+0-adhoc.root.jdk12-06222165c35f, mixed mode)8、问题总结
8.1、默认版本过高,make报错**
使用默认的gcc版本,然后bash configure,再make,导致以下问题,反正搞不定。
bash configure
WARNING: C and C++ compiler have different version numbers, gcc (Ubuntu 11.3.0-1ubuntu1~22.04) 11.3.0 Copyright (C) 2021 Free Software Foundation, Inc. This is free software; see the source for copying conditions. There is NO warranty; not even for MERCHANTABILITY or FITNESS FOR A PARTICULAR PURPOSE. vs g++ (Ubuntu 11.3.0-1ubuntu1~22.04) 11.3.0 Copyright (C) 2021 Free Software Foundation, Inc. This is free software; see the source for copying conditions. There is NO warranty; not even for MERCHANTABILITY or FITNESS FOR A PARTICULAR PURPOSE..**解决方法,如上问4.1,降低版本
如果因为之前没弄,可以直接删除
rm -r -f 那个build的文件
8.2、jdk12源码问题
然后 make images 又报错
gedit make/common/MakeBase.gmk替换
# Does the actual work with parameters stripped.# If the file exists AND the contents is the same as the variable, do nothing# else print a new file.# Always returns the name of the file where the value was printed.# Param 1 - Name of variable# Param 2 - (optional) name of file to store value inDependOnVariableHelper = \ $(strip \ $(eval -include $(call DependOnVariableFileName, $1, $2)) \ $(if $(call equals, $(strip $($1)), $(strip $($1_old))),,\ $(call MakeDir, $(dir $(call DependOnVariableFileName, $1, $2))) \ $(if $(findstring $(LOG_LEVEL), trace), \ $(info NewVariable $1: >$(strip $($1))<) \ $(info OldVariable $1: >$(strip $($1_old))<)) \ $(call WriteFile, $1_old:=$(call DoubleDollar,$(call EscapeHash,$($1))), \ $(call DependOnVariableFileName, $1, $2))) \ $(call DependOnVariableFileName, $1, $2) \ ) 替换成下面的
# Does the actual work with parameters stripped.# If the file exists AND the contents is the same as the variable, do nothing# else print a new file.# Always returns the name of the file where the value was printed.# Param 1 - Name of variable# Param 2 - (optional) name of file to store value inDependOnVariableHelper = \ $(strip \ $(eval $1_filename := $(call DependOnVariableFileName, $1, $2)) \ $(if $(wildcard $($1_filename)), $(eval include $($1_filename))) \ $(if $(call equals, $(strip $($1)), $(strip $($1_old))),,\ $(call MakeDir, $(dir $($1_filename))) \ $(if $(findstring $(LOG_LEVEL), trace), \ $(info NewVariable $1: >$(strip $($1))<) \ $(info OldVariable $1: >$(strip $($1_old))<)) \ $(call WriteFile, $1_old:=$(call DoubleDollar,$(call EscapeHash,$($1))), \ $($1_filename))) \ $($1_filename) \ )然后可以正常make images
参考博客
https://blog.csdn.net/qq_25825005/article/details/127162939