目录
1、总体流程
2、代码实现
下载数据集
确定激活函数、损失函数、计算梯度函数等
神经网络的搭建
模型的训练与验证
测试模型的泛化能力
1、总体流程

step1:下载数据集、读取数据
step2:搭建神经网络(确定输出层、隐藏层(层数)、输出层的结构)
step3:初始化偏置和权重
step4:设置损失函数、激活函数
step5:设置超参数
step6:神经网络训练数据(通过误差反向传播求导、学习)
step7:测试验证数据集(确定Loss、精确度)
step8:测试模型的泛化能力(输入自己手写的数字进行判断)
2、代码实现
下载数据集
# coding: utf-8try: import urllib.requestexcept ImportError: raise ImportError('You should use Python 3.x')import os.pathimport gzipimport pickleimport osimport numpy as npurl_base = 'http://yann.lecun.com/exdb/mnist/'key_file = { 'train_img':'train-images-idx3-ubyte.gz', 'train_label':'train-labels-idx1-ubyte.gz', 'test_img':'t10k-images-idx3-ubyte.gz', 'test_label':'t10k-labels-idx1-ubyte.gz'}dataset_dir = os.path.abspath('.')save_file = dataset_dir + "/mnist.pkl"train_num = 60000test_num = 10000img_dim = (1, 28, 28)img_size = 784def _download(file_name): file_path = dataset_dir + "/" + file_name if os.path.exists(file_path): return print("Downloading " + file_name + " ... ") urllib.request.urlretrieve(url_base + file_name, file_path) print("Done") def download_mnist(): for v in key_file.values(): _download(v) def _load_label(file_name): file_path = dataset_dir + "/" + file_name print("Converting " + file_name + " to NumPy Array ...") with gzip.open(file_path, 'rb') as f: labels = np.frombuffer(f.read(), np.uint8, offset=8) print("Done") return labelsdef _load_img(file_name): file_path = dataset_dir + "/" + file_name print("Converting " + file_name + " to NumPy Array ...") with gzip.open(file_path, 'rb') as f: data = np.frombuffer(f.read(), np.uint8, offset=16) data = data.reshape(-1, img_size) print("Done") return data def _convert_numpy(): dataset = {} dataset['train_img'] = _load_img(key_file['train_img']) dataset['train_label'] = _load_label(key_file['train_label']) dataset['test_img'] = _load_img(key_file['test_img']) dataset['test_label'] = _load_label(key_file['test_label']) return datasetdef init_mnist(): download_mnist() dataset = _convert_numpy() print("Creating pickle file ...") with open(save_file, 'wb') as f: pickle.dump(dataset, f, -1) print("Done!")def _change_one_hot_label(X): T = np.zeros((X.size, 10)) for idx, row in enumerate(T): row[X[idx]] = 1 return T def load_mnist(normalize=False, flatten=True, one_hot_label=False): """读入MNIST数据集 Parameters ---------- normalize : 将图像的像素值正规化为0.0~1.0 one_hot_label : one_hot_label为True的情况下,标签作为one-hot数组返回 one-hot数组是指[0,0,1,0,0,0,0,0,0,0]这样的数组 flatten : 是否将图像展开为一维数组 Returns ------- (训练图像, 训练标签), (测试图像, 测试标签) """ if not os.path.exists(save_file): init_mnist() with open(save_file, 'rb') as f: dataset = pickle.load(f) if normalize: for key in ('train_img', 'test_img'): dataset[key] = dataset[key].astype(np.float32) dataset[key] /= 255.0 if one_hot_label: dataset['train_label'] = _change_one_hot_label(dataset['train_label']) dataset['test_label'] = _change_one_hot_label(dataset['test_label']) if not flatten: for key in ('train_img', 'test_img'): dataset[key] = dataset[key].reshape(-1, 1, 28, 28) return (dataset['train_img'], dataset['train_label']), (dataset['test_img'], dataset['test_label']) if __name__ == '__main__': init_mnist()确定激活函数、损失函数、计算梯度函数等
##激活函数def sigmoid(x): return 1/(1+np.exp(-x))def softmax(x): if x.ndim == 2: x = x.T x = x - np.max(x, axis=0) y = np.exp(x) / np.sum(np.exp(x), axis=0) return y.T x = x - np.max(x) # 溢出对策 return np.exp(x) / np.sum(np.exp(x))def cross_entropy_error(y, t): if y.ndim == 1: t = t.reshape(1, t.size) y = y.reshape(1, y.size) # 监督数据是one-hot-vector的情况下,转换为正确解标签的索引 if t.size == y.size: t = t.argmax(axis=1) batch_size = y.shape[0] return -np.sum(np.log(y[np.arange(batch_size), t] + 1e-7)) / batch_size# 计算梯度def numerical_gradient(f, x): h = 1e-4 # 0.0001 grad = np.zeros_like(x) it = np.nditer(x, flags=['multi_index'], op_flags=['readwrite']) while not it.finished: idx = it.multi_index tmp_val = x[idx] x[idx] = float(tmp_val) + h fxh1 = f(x) # f(x+h) x[idx] = tmp_val - h fxh2 = f(x) # f(x-h) grad[idx] = (fxh1 - fxh2) / (2*h) x[idx] = tmp_val # 还原值 it.iternext() return graddef sigmoid_grad(x): return (1.0 - sigmoid(x)) * sigmoid(x)神经网络的搭建
class TwoLayerNet: def __init__(self, input_size, hidden_size, output_size, weight_init_std=0.01): # 初始化权重 self.params = {} self.params['W1'] = weight_init_std * np.random.randn(input_size, hidden_size) self.params['b1'] = np.zeros(hidden_size) self.params['W2'] = weight_init_std * np.random.randn(hidden_size, output_size) self.params['b2'] = np.zeros(output_size) def predict(self, x): W1, W2 = self.params['W1'], self.params['W2'] b1, b2 = self.params['b1'], self.params['b2'] a1 = np.dot(x, W1) + b1 z1 = sigmoid(a1) a2 = np.dot(z1, W2) + b2 y = softmax(a2) return y # x:输入数据, t:监督数据 def loss(self, x, t): y = self.predict(x) return cross_entropy_error(y, t) def accuracy(self, x, t): y = self.predict(x) y = np.argmax(y, axis=1) t = np.argmax(t, axis=1) accuracy = np.sum(y == t) / float(x.shape[0]) return accuracy # x:输入数据, t:监督数据 def numerical_gradient(self, x, t): loss_W = lambda W: self.loss(x, t) grads = {} grads['W1'] = numerical_gradient(loss_W, self.params['W1']) grads['b1'] = numerical_gradient(loss_W, self.params['b1']) grads['W2'] = numerical_gradient(loss_W, self.params['W2']) grads['b2'] = numerical_gradient(loss_W, self.params['b2']) return grads def gradient(self, x, t): W1, W2 = self.params['W1'], self.params['W2'] b1, b2 = self.params['b1'], self.params['b2'] grads = {} batch_num = x.shape[0] # forward a1 = np.dot(x, W1) + b1 z1 = sigmoid(a1) a2 = np.dot(z1, W2) + b2 y = softmax(a2) # backward dy = (y - t) / batch_num grads['W2'] = np.dot(z1.T, dy) grads['b2'] = np.sum(dy, axis=0) da1 = np.dot(dy, W2.T) dz1 = sigmoid_grad(a1) * da1 grads['W1'] = np.dot(x.T, dz1) grads['b1'] = np.sum(dz1, axis=0) return grads模型的训练与验证
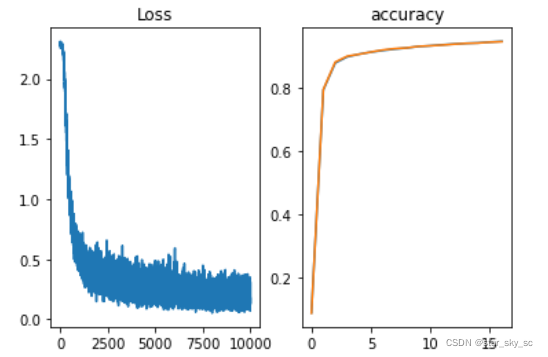
# 读入数据(x_train, t_train), (x_test, t_test) = load_mnist(flatten=True,normalize=True, one_hot_label=True)network = TwoLayerNet(input_size=784, hidden_size=50, output_size=10)iters_num = 10000train_size = x_train.shape[0]batch_size = 100learning_rate = 0.1train_loss_list = []train_acc_list = []test_acc_list = []iter_per_epoch = max(train_size / batch_size, 1)for i in range(iters_num): batch_mask = np.random.choice(train_size, batch_size) x_batch = x_train[batch_mask] t_batch = t_train[batch_mask] # 梯度 #grad = network.numerical_gradient(x_batch, t_batch) grad = network.gradient(x_batch, t_batch) # 更新 for key in ('W1', 'b1', 'W2', 'b2'): network.params[key] -= learning_rate * grad[key] loss = network.loss(x_batch, t_batch) train_loss_list.append(loss) if i % iter_per_epoch == 0: train_acc = network.accuracy(x_train, t_train) test_acc = network.accuracy(x_test, t_test) train_acc_list.append(train_acc) test_acc_list.append(test_acc) print(train_acc, test_acc)## 验证import matplotlib.pyplot as pltplt.subplot(1,2,1)plt.plot(np.arange(0,10000),train_loss_list)plt.title('Loss')plt.subplot(1,2,2)plt.plot(np.arange(0,np.size(train_acc_list)),train_acc_list,np.arange(0,np.size(test_acc_list)),test_acc_list)plt.title('accuracy')plt.show() 训练过程中的误差和精确度变化:

测试模型的泛化能力
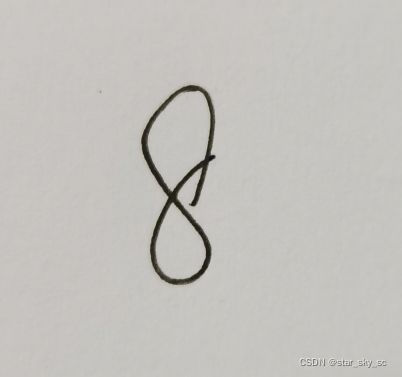
import cv2def img_show(name,img): cv2.imshow(name,img) cv2.waitKey(0) cv2.destroyAllWindows() def predict_img_num(filename, img_width, img_height, threshold, kernel_size): img_original = cv2.imread(filename) img = cv2.resize(img_original,(img_width,img_width),fx=1,fy=1) img_gray = cv2.cvtColor(img, cv2.COLOR_BGR2GRAY) ret, thresh2 = cv2.threshold(img_gray, threshold, 255, cv2.THRESH_BINARY) kernel = np.ones(kernel_size,np.uint8) thresh2 = cv2.erode(thresh2,kernel,iterations = 1) ret, thresh2 = cv2.threshold(thresh2, threshold, 255, cv2.THRESH_BINARY_INV) print(thresh2.shape) img_show('test',thresh2) thresh2 = thresh2.reshape(1,img_width*img_width) a = network.predict(thresh2) label = np.argmax(np.array(a)) return labelpredict_img_num('8.jpg',28,28,127,(3,3))输入手写图片8:

输出结果:
同样你也可以输入一些你自己手写的数字,来测试模型的泛化能力