为什么不使用shape标签
我想大家平常都用过shape标签来定义一个Drawable,来实现一些例如圆角、设置描边等一些需求。但是,最近发现项目中res/drawable/下的shape标签文件越来越多,每当我们实现一些稍微不同的小需求时(例如圆角半径不同)就要新建一个shape标签的文件,这不仅很繁琐,还增加了内存、增加了apk的大小。
GradientDrawable:shape的动态实现
在我们使用shape标签定义的xml时,其实最终转化为了GradientDrawable。所以,我们可以通过动态设置GradientDrawable来实现圆角、设置描边等功能需求。
动态实现圆角、修改背景色、设置描边Button
1、自定义GradientDrawable
有关GradientDrawable设置圆角、描边等API如下:
void | setColor(ColorStateList colorStateList)将此drawable更改为使用单个颜色状态列表而不是渐变。 |
|---|---|
void | setColor(int argb)将此可绘制更改为使用单一颜色而不是渐变。 |
void | setColorFilter(ColorFilter colorFilter)为绘图指定一个可选的颜色过滤器。 |
void | setColors(int[] colors)设置用于绘制渐变的颜色。 |
void | setCornerRadii(float[] radii)指定四个角的每一个的半径。 |
void | setCornerRadius(float radius)指定渐变角的半径。 |
void | setDither(boolean dither)此方法已弃用。该属性被忽略。 |
void | setGradientCenter(float x, float y)设置渐变的像素中心位置。 |
void | setGradientRadius(float gradientRadius)设置渐变的半径。 |
void | setGradientType(int gradient)设置此drawable使用的渐变类型。 |
void | setOrientation(GradientDrawable.Orientation orientation)设置此drawable中定义的渐变的方向。 |
void | setShape(int shape)设置用于绘制渐变的形状的类型。 |
void | setSize(int width, int height)设置由该drawable绘制的形状的大小。 |
void | setStroke(int width, ColorStateList colorStateList)设置绘图的笔触宽度和颜色状态列表。 |
void | setStroke(int width, ColorStateList colorStateList, float dashWidth, float dashGap)设置绘图的笔触宽度和颜色状态列表。 |
void | setStroke(int width, int color, float dashWidth, float dashGap)设置绘图的笔触宽度和颜色。 |
void | setStroke(int width, int color)设置绘图的笔触宽度和颜色。 |
void | setTintList(ColorStateList tint)指定该drawable的色彩颜色作为颜色状态列表。 |
void | setTintMode(PorterDuff.Mode tintMode)指定该drawable的色调混合模式。 |
void | setUseLevel(boolean useLevel)设置这个drawable是否会遵守它的 level属性。 |
更多用法请查看官方API:www.apiref.com/android-zh/…\
如果我们想更加方便的自定义配置圆角值等功能,需要继承GradientDrawable,关于自定义view的流程想必大家都熟悉这里不再详细说明,代码如下:
/**
 * @author xiaoman
 * res/drawable 中的shape文件动态设置
 */
public class RoundButtonDrawable extends GradientDrawable {

    private int mStrokeWidth = 0;

    /**
     * 设置描边宽度和颜色
     */
    void setStrokeData(int width, int color) {
        mStrokeWidth = width;
        setStroke(width, color);
    }

    void setStrokeColor(int color){
        setStrokeData(mStrokeWidth, color);
    }

    static RoundButtonDrawable fromAttrSet(Context context, AttributeSet attrs, int defStyleAttr) {
        TypedArray typedArray = context.obtainStyledAttributes(attrs, R.styleable.RoundButton, defStyleAttr, 0);
        int bgColor = typedArray.getColor(R.styleable.RoundButton_bgColor, ContextCompat.getColor(context,R.color.white));
        int mRadius = typedArray.getDimensionPixelSize(R.styleable.RoundButton_radius, 0);
        int mTopLeftRadius = typedArray.getDimensionPixelSize(R.styleable.RoundButton_topLeftRadius, 0);
        int mTopRightRadius = typedArray.getDimensionPixelSize(R.styleable.RoundButton_topRightRadius, 0);
        int mBottomLeftRadius = typedArray.getDimensionPixelSize(R.styleable.RoundButton_bottomLeftRadius, 0);
        int mBottomRightRadius = typedArray.getDimensionPixelSize(R.styleable.RoundButton_bottomRightRadius, 0);
        int strokeColor = typedArray.getColor(R.styleable.RoundButton_strokeColor,ContextCompat.getColor(context,R.color.white));
        int strokeWidth = typedArray.getDimensionPixelSize(R.styleable.RoundButton_strokeWidth, 0);
        typedArray.recycle();

        RoundButtonDrawable roundButtonDrawable = new RoundButtonDrawable();
        //设置背景颜色
        roundButtonDrawable.setColor(bgColor);
        //优先设置指定的圆角
        if (mTopLeftRadius > 0 || mTopRightRadius > 0 || mBottomLeftRadius > 0 || mBottomRightRadius > 0) {
            float[] radii = new float[]{
                    mTopLeftRadius, mTopLeftRadius,
                    mTopRightRadius, mTopRightRadius,
                    mBottomRightRadius, mBottomRightRadius,
                    mBottomLeftRadius, mBottomLeftRadius
            };
            roundButtonDrawable.setCornerRadii(radii);
        } else {
            roundButtonDrawable.setCornerRadius(mRadius);
        }
        //设置描边的宽度和颜色
        roundButtonDrawable.setStrokeData(strokeWidth, strokeColor);

        return roundButtonDrawable;
    }

}
attr代码如下:
<?xml version="1.0" encoding="utf-8"?>
<resources>

    <declare-styleable name="RoundButton">
       <attr name="bgColor" format="color"/>
       <attr name="radius" format="dimension"/>
       <attr name="topLeftRadius" format="dimension"/>
       <attr name="topRightRadius" format="dimension"/>
       <attr name="bottomLeftRadius" format="dimension"/>
       <attr name="bottomRightRadius" format="dimension"/>
       <attr name="strokeColor" format="color"/>
       <attr name="strokeWidth" format="dimension"/>
    </declare-styleable>

    <attr name="RoundButtonStyle" format="reference" />

</resources>
2、自定义Button,设置GradientDrawable为背景
因为GradientDrawable是shape标签的具体代码实现,所以,如果我们想通过GradientDrawable来实现圆角等功能需求的话,需要把上一步骤中我们自定义的GradientDrawable来作为button的background,具体代码如下:
/**
 * @author xiaoman
 *  可以设置背景色、指定圆角、描边的宽度和颜色
 */
public class RoundButton extends AppCompatTextView {

    private RoundButtonDrawable roundButtonDrawable;

    public RoundButton(Context context) {
        super(context);
        init(context, null, 0);
    }

    public RoundButton(Context context, AttributeSet attrs) {
        super(context, attrs, R.attr.RoundButtonStyle);
        init(context, attrs, R.attr.RoundButtonStyle);
    }

    public RoundButton(Context context, AttributeSet attrs, int defStyleAttr) {
        super(context, attrs, defStyleAttr);
        init(context, attrs, defStyleAttr);
    }

    private void init(Context context, AttributeSet attrs, int defStyleAttr) {
        roundButtonDrawable = RoundButtonDrawable.fromAttrSet(context, attrs, defStyleAttr);
        ViewHelperUtils.setBackgroundKeepingPadding(this, roundButtonDrawable);

    }

    /**
     * 设置背景颜色
     * @param color
     */
    @Override
    public void setBackgroundColor(int color) {
        roundButtonDrawable. setColor(color);
    }

    /**
     * 设置描边的宽度和颜色
     * @param width
     * @param color
     */
    public void setStrokeData(int width, int color) {

        roundButtonDrawable.setStrokeData(width, color);
    }

    /**
     * 设置描边颜色
     * @param color
     */
    public void setStrokeColors(int color) {
        roundButtonDrawable.setStrokeColor(color);
    }

    /**
     * 设置四个角的半径
     * @param radius
     */
    public void setRadius(int radius){
        roundButtonDrawable.setCornerRadius(radius);
    }

    /**
     * 设置 每一个角的半径
     * @param topLeftRadius     左上角半径
     * @param topRightRadius    右上角半径
     * @param bottomLeftRadius  右下角半径
     * @param bottomRightRadius 左下角半径
     */
    public void setEachCornerRadius(int topLeftRadius,int topRightRadius,int bottomLeftRadius,int bottomRightRadius){
        float[] radius = new float[]{
                topLeftRadius, topLeftRadius,
                topRightRadius, topRightRadius,
                bottomRightRadius, bottomRightRadius,
                bottomLeftRadius, bottomLeftRadius
        };

        roundButtonDrawable. setCornerRadii(radius);
    }

    /**
     * 设置渐变
     * @param gradientType 渐变类型
     * @param orientation  渐变方向
     * @param colors       渐变颜色
     */
    public void setGradient(int gradientType, GradientDrawable.Orientation orientation, int[] colors){
        roundButtonDrawable.setGradientType(gradientType);
        roundButtonDrawable.setOrientation(orientation);
        roundButtonDrawable.setColors(colors);
    }
    public static void setBackgroundKeepingPadding(View view, Drawable drawable) {
        int[] padding = new int[]{view.getPaddingLeft(), view.getPaddingTop(), view.getPaddingRight(), view.getPaddingBottom()};
        view.setBackground(drawable);
        view.setPadding(padding[0], padding[1], padding[2], padding[3]);
    }
}
3、在xml布局文件中直接引用自定义的button
<?xml version="1.0" encoding="utf-8"?>
<androidx.constraintlayout.widget.ConstraintLayout xmlns:android="http://schemas.android.com/apk/res/android"
    xmlns:app="http://schemas.android.com/apk/res-auto"
    xmlns:tools="http://schemas.android.com/tools"
    android:layout_width="match_parent"
    android:layout_height="match_parent"
    tools:context=".MainActivity">

    <com.ztk.demo.uitool.widget.RoundButton
        android:id="@+id/bt"
        android:layout_width="300dp"
        android:layout_height="wrap_content"
        android:text="Hello World!"
        android:padding="10dp"
        app:radius="30dp"
        app:bgColor="@color/colorAccent"
        android:textColor="#ffffff"
        android:gravity="center_horizontal"
        android:layout_marginTop="60dp"
        app:layout_constraintLeft_toLeftOf="parent"
        app:layout_constraintRight_toRightOf="parent"
        app:layout_constraintTop_toTopOf="parent" />
    <com.ztk.demo.uitool.widget.RoundButton
        android:id="@+id/bt2"
        android:layout_width="300dp"
        android:layout_height="wrap_content"
        android:text=""
        android:padding="10dp"
        app:topLeftRadius="10dp"
        app:bgColor="@color/colorPrimary"
        android:textColor="#ffffff"
        android:gravity="center_horizontal"
        android:layout_marginTop="30dp"
        app:layout_constraintTop_toBottomOf="@+id/bt"
        app:layout_constraintLeft_toLeftOf="parent"
        app:layout_constraintRight_toRightOf="parent" />

    <com.ztk.demo.uitool.widget.RoundButton
        android:id="@+id/bt3"
        android:layout_width="300dp"
        android:layout_height="wrap_content"
        android:text=""
        android:padding="10dp"
        app:radius="30dp"
        app:strokeColor="@color/colorAccent"
        app:strokeWidth="2dp"
        app:bgColor="@color/colorPrimary"
        android:textColor="#ffffff"
        android:gravity="center_horizontal"
        android:layout_marginTop="30dp"
        app:layout_constraintTop_toBottomOf="@+id/bt2"
        app:layout_constraintLeft_toLeftOf="parent"
        app:layout_constraintRight_toRightOf="parent" />

</androidx.constraintlayout.widget.ConstraintLayout>
也可以通过代码动态设置:
public class MainActivity extends AppCompatActivity {

    @Override
    protected void onCreate(Bundle savedInstanceState) {
        super.onCreate(savedInstanceState);
        setContentView(R.layout.activity_main);

        RoundButton bt = findViewById(R.id.bt);
        bt.setRadius(50);
//        bt.setStrokeColors(ContextCompat.getColor(this,R.color.colorPrimary));
        bt.setBackgroundColor(ContextCompat.getColor(this,R.color.colorPrimary));
//        bt.setEachCornerRadius(50,0,0,0);
//        bt.setStrokeData(6,ContextCompat.getColor(this,R.color.colorPrimary));
//        int[] colors ={ContextCompat.getColor(this,R.color.colorPrimary) , ContextCompat.getColor(this,R.color.colorAccent), ContextCompat.getColor(this,R.color.white)};
//        bt.setGradient(GradientDrawable.RECTANGLE,GradientDrawable.Orientation.LEFT_RIGHT,colors);
    }
}
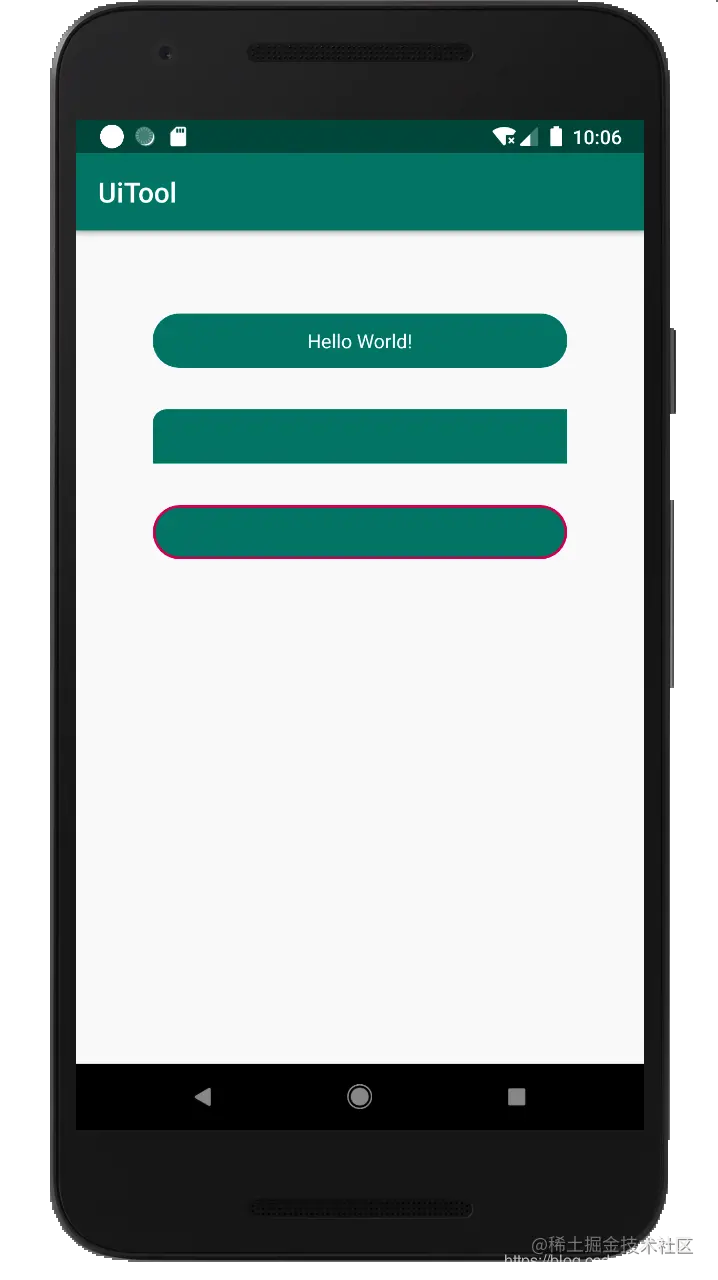
最后让我们看一下效果图:

这里需要注意的是:因为我们通过把自定义的GradientDrawable来作为button的background来实现,所以,这时再设置button的background会无效。