【源码那些事】超详细的ArrayList底层源码+经典面试题_wenwenaier的博客
🙏相见即是有缘,如果对你有帮助,给博主一个免费的点赞以示鼓励把QAQ☺
这里是温文艾尔の源码学习之路- 🙏作者水平欠佳,如果发现任何错误,欢迎批评指正
- 👋博客主页 温文艾尔の学习小屋
- 👋更多文章请关注温文艾尔主页
- 👋超详细ArrayList解析!
- 👋更多文章:
- 👋HashMap底层源码解析上(超详细图解+面试题)
- 👋HashMap底层源码解析下(超详细图解)
- 👋HashMap底层红黑树原理(超详细图解)+手写红黑树代码

文章目录
- 👋ArrayList底层源码
- 👋1 ArrayList继承关系
- 👋1.1 Cloneable的底层实现
- 👋1.2 RandomAccess标记接口
- 👋2 ArrayList构造方法源码解析
- 👋2.1 ArrayList()构造方法
- 👋2.2 ArrayList(int initialCapacity)构造方法
- 👋2.3 ArrayList(Collection<? extends E> c)构造方法
- 👋3 ArrayList基础方法
- 👋3.05 ArrayList中的各个变量
- 👋3.1添加方法
- 👋3.1.1 add(E e)
- 👋3.1.2 add(int index, E element)
- 👋3.1.3 addAll(Collection<? extends E> c)
- 👋3.1.4 addAll(int index, Collection<? extends E> c)
- 👋3.1.5 set(int index, E element)
- 👋3.1.6 get(int index)
- 👋3.1.7 remove(Object o)
- 👋3.1.8 clear()
- 👋4 扩展
- 👋4.1 转换方法toString()
- 👋4.2 迭代器Iterator iterator()
- 👋5 ArrayList相关面试题
- 👋5.1 ArrayList是如何扩容的
- 👋5.2 ArrayList频繁扩容导致添加性能急剧下降,如何处理?
- 👋5.3 ArrayList插入或删除元素一定比LinkedList慢吗
- 👋5.4 ArrayList是线程安全的吗
- 👋5.5 如何复制某个ArrayList到另一个ArrayList中去
- 👋5.6 已知成员变量集合存储N多用户名称,在多线程的环境下,使用迭代器在读取集合数据的同时如何保证还可以正常写入数据到集合中
- 👋5.7 ArrayList和LinkedList区别
👋ArrayList底层源码
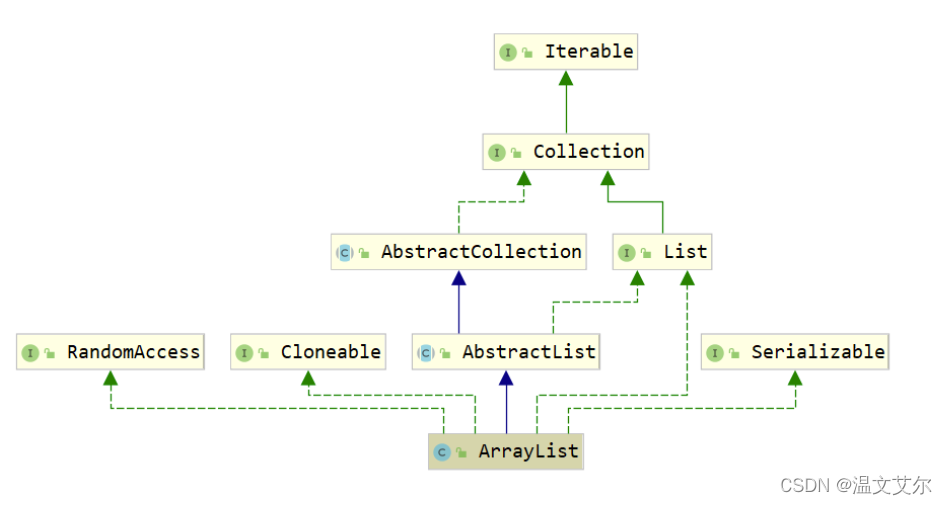
ArrayList的类图示:
- ArrayList集合介绍
- List底层基于
动态数组实现
- List底层基于
- 数组结构介绍
增删慢:每次删除元素都需要更改数组长度,拷贝以及移动元素位置查询快:由于数组在内存中是一块连续空间,因此可以根据地址+索引的方式快速获取对应位置上的元素
👋1 ArrayList继承关系
Serializable标记性接口
介绍 类的序列化由实现java.io.Serializable接口的类启用。不实现此接口的类将不会使任何状态序列化或反序列化。可序列化类的所有子类型都是可序列化的,序列化接口没有方法或字段,仅用于标识可串行化的语义
- 序列化:将对象的数据写入到文件(写对象)
- 反序列化:将文件中对象的数据读取出来(读对象)
Cloneable标记性接口
- 介绍 一个类实现Cloneable接口来指示
Object.clone()方法,该方法对于该类的实例进行字段的复制是合法的。在不实现Cloneable接口的实例上调用对象的克隆方法会导致异常CloneNotSupportedException被抛出。简言之:克隆就是依据已有的数据,创造一份新的完全一样的数据拷贝 - 克隆的前提条件
- 被克隆对象所在的类必须
实现Cloneable接口 - 必须重写
clone()方法
- 被克隆对象所在的类必须
Serializable接口
- 由List实现使用,以表明它们支持
快速(通常为恒定时间)随机访问 - 此接口的主要目的是允许算法更改其行为,以便在应用于随机访问列表或顺序访问列表时提供良好的性能

👋1.1 Cloneable的底层实现
    /**
     * Returns a shallow copy of this <tt>ArrayList</tt> instance.  (The
     * elements themselves are not copied.)
     *
     * @return a clone of this <tt>ArrayList</tt> instance
     */
    public Object clone() {
        try {
            ArrayList<?> v = (ArrayList<?>) super.clone();
            v.elementData = Arrays.copyOf(elementData, size);
            v.modCount = 0;
            return v;
        } catch (CloneNotSupportedException e) {
            // this shouldn't happen, since we are Cloneable
            throw new InternalError(e);
        }
    }
可以看到通过调用clone()方法,返回了一个ArrayList对象
v.elementData = Arrays.copyOf(elementData, size);
是我们能完成复制的关键,点进去
    public static <T,U> T[] copyOf(U[] original, int newLength, Class<? extends T[]> newType)
    {
        @SuppressWarnings("unchecked")
        T[] copy = ((Object)newType == (Object)Object[].class)
            ? (T[]) new Object[newLength]
            : (T[]) Array.newInstance(newType.getComponentType(), newLength);
        System.arraycopy(original, 0, copy, 0,
                         Math.min(original.length, newLength));
        return copy;
    }
我们原来数组中的数据通过System.arraycopy方法被拷贝到copy数组中,并将这个数组返回
克隆牵扯到浅拷贝和深拷贝,这里简述一下浅拷贝和深拷贝的区别
首先创建一个Student类
public class Student implements Cloneable {
    private String name;
    private Integer age;
    public Student() {
    }
    public Student(String name, Integer age) {
        this.name = name;
        this.age = age;
    }
    public String getName() {
        return name;
    }
    public void setName(String name) {
        this.name = name;
    }
    public Integer getAge() {
        return age;
    }
    public void setAge(Integer age) {
        this.age = age;
    }
    @Override
    public Object clone() throws CloneNotSupportedException {
        return super.clone();
    }
    @Override
    public String toString() {
        return "Student{" +
                "name='" + name + '\'' +
                ", age=" + age +
                '}';
    }
}
浅拷贝实例
package ArrayListProject.CloneTest;

import java.util.ArrayList;
import java.util.List;

/**
 * Description
 * User:
 * Date:
 * Time:
 */
public class Test {
    public static void main(String[] args) {
        ArrayList list = new ArrayList();
        Student stu = new Student("zs",18);
        list.add("123");
        list.add(stu);
        System.out.println("未拷贝之前的数组:"+list);
        ArrayList clone = (ArrayList)list.clone();
        System.out.println("拷贝之后的数组:"+clone);
        System.out.println("两个数组地址是否相等:"+(list==clone));
        System.out.println("两个数组中的stu对象是否相等:");
        System.out.println("list中的stu对象:"+list.get(1));
        System.out.println("修改stu对象之前,clone中的stu对象:"+clone.get(1));
        Student stu1 = (Student)list.get(1);
        stu1.setName("ls");
        System.out.println("修改stu对象之后,clone中的stu对象:"+clone.get(1));
        System.out.println("两者stu对象的地址是否相同"+(list.get(1)==clone.get(1)));
    }
}
未拷贝之前的数组:[123, Student{name='zs', age=18}]
拷贝之后的数组:[123, Student{name='zs', age=18}]
两个数组地址是否相等:false
两个数组中的stu对象是否相等:
list中的stu对象:Student{name='zs', age=18}
修改stu对象之前,clone中的stu对象:Student{name='zs', age=18}
修改stu对象之后,clone中的stu对象:Student{name='ls', age=18}
两者stu对象的地址是否相同true
由此我们得出
- 克隆之后的对象是一个新对象,
list==clone为false可知二者地址不相同 - 由list.get(1)==clone.get(1)为true可知,两者中的
stu对象为同一对象 - 修改list中的stu对象,clone中的stu对象也会随之改变可知,克隆的是stu
对象的地址,并没有创建新的对象,它仅仅是拷贝了一份引用地址 - 基本数据类型可以达到
完全复制,而引用数据类型则不可以
深拷贝和浅拷贝不同,深拷贝中拷贝的对象是一个完全新的对象,他拷贝的并不是引用地址,而是实实在在的创建了一个对象

👋1.2 RandomAccess标记接口
- 由List实现使用,以表明它们支持快速(通常为恒定时间)随机访问
- 此接口的主要目的是允许算法更改其行为,以便在应用于随机访问列表或顺序访问列表时提供良好的性能
因此List实现RandomAccess在执行随机访问时,性能会比顺序访问更快
public interface RandomAccess {
}
我们通过一个案例来证明
我们以1000000个数据作为测试
package ArrayListProject.CloneTest;

import java.util.ArrayList;
import java.util.Iterator;
import java.util.List;

public class Test02 {
    public static void main(String[] args) {
        //创建ArrayList集合
        List<String> list = new ArrayList<>();
        //添加100W条数据
        for (int i = 0; i < 1000000; i++) {
            list.add(i+"a");
        }

        //测试随机访问时间
        long startTime = System.currentTimeMillis();
        for (int i = 0; i < list.size(); i++) {
            //取出集合的每一个元素
            list.get(i);
        }
        long endTime = System.currentTimeMillis();
        System.out.println("随机访问耗时:"+(endTime-startTime));
        //测试顺序访问时间
        long startTime2 = System.currentTimeMillis();
        Iterator<String> it = list.iterator();
        while (it.hasNext()){
            it.next();
        }
        long endTime2 = System.currentTimeMillis();
        System.out.println("顺序访问耗时:"+(endTime2-startTime2));
    }
}
随机访问耗时:3
顺序访问耗时:4
由此可见,在数据量极大的情况下,ArrayList随机访问的效率远高于顺序访问

而LinkedList的数据结构是链表,且未实现RandomAccess接口,他的效率和ArrayList相比如何呢,我们来做一个
测试
package ArrayListProject.CloneTest;

import java.util.Iterator;
import java.util.LinkedList;
import java.util.List;

public class Test03 {
    public static void main(String[] args) {
        List<String> list1 = new LinkedList<>();
        for (int i = 0; i < 100000; i++) {
            list1.add(i+"a");
        }

        //测试随机访问时间
        long startTime = System.currentTimeMillis();
        for (int i = 0; i < list1.size(); i++) {
            //取出集合的每一个元素
            list1.get(i);
        }
        long endTime = System.currentTimeMillis();
        System.out.println("随机访问耗时:"+(endTime-startTime));
        //测试顺序访问时间
        long startTime2 = System.currentTimeMillis();
        Iterator<String> it = list1.iterator();
        while (it.hasNext()){
            it.next();
        }
        long endTime2 = System.currentTimeMillis();
        System.out.println("顺序访问耗时:"+(endTime2-startTime2));
    }
}
随机访问耗时:11676
顺序访问耗时:4
由此可见,没有实现RandomAccess接口的LinkedList集合的随机访问速度远远小于顺序访问

👋2 ArrayList构造方法源码解析
| Constructor | Constructor描述 |
|---|---|
| ArrayList() | 构造一个初始容量为10的空列表 |
| ArrayList(int initialCapacity) | 构造具有指定初始容量的空列表 |
| ArrayList(Collection<? extends E> c) | 构造一个包含指定集合的元素的列表,按照它们由集合的迭代器返回的顺序 |
👋2.1 ArrayList()构造方法
    /**
     * Constructs an empty list with an initial capacity of ten.
     */
    //构造一个初始容量为10的数组
    //DEFAULTCAPACITY_EMPTY_ELEMENTDATA:默认的空容量的数组
    //elementData:集合真正存储数据的容器
    public ArrayList() {
        this.elementData = DEFAULTCAPACITY_EMPTY_ELEMENTDATA;
    }
👋2.2 ArrayList(int initialCapacity)构造方法
    /**
     * Constructs an empty list with the specified initial capacity.
     *
     * @param  initialCapacity  the initial capacity of the list
     * @throws IllegalArgumentException if the specified initial capacity
     *         is negative
     */
    public ArrayList(int initialCapacity) {
        if (initialCapacity > 0) {
            //如果传进来的变量大于0,则初始化一个指定容量的空数组
            this.elementData = new Object[initialCapacity];
        } else if (initialCapacity == 0) {
            //传进来的变量=0,则不去创建新的数组,直接将已创建的EMPTY_ELEMENTDATA空数组传给
            //ArrayList
            this.elementData = EMPTY_ELEMENTDATA;
        } else {
            //传进来的指定数组容量不能<0
            throw new IllegalArgumentException("Illegal Capacity: "+
                                               initialCapacity);
        }
    }
👋2.3 ArrayList(Collection<? extends E> c)构造方法
    /**
     * Constructs a list containing the elements of the specified
     * collection, in the order they are returned by the collection's
     * iterator.
     *
     * @param c the collection whose elements are to be placed into this list
     * @throws NullPointerException if the specified collection is null
     */
    public ArrayList(Collection<? extends E> c) {
        //将构造方法中的参数转换成数组形式,其底层是调用了System.arraycopy()
        elementData = c.toArray();
        //将数组的长度赋值给size
        if ((size = elementData.length) != 0) {
            //检查elementData是不是Object[]类型,不是的话将其转换成Object[].class类型
            if (elementData.getClass() != Object[].class)
                //数组的创建与拷贝
                elementData = Arrays.copyOf(elementData, size, Object[].class);
        } else {
            //size为0,则把已创建好的空数组直接给它
            this.elementData = EMPTY_ELEMENTDATA;
        }
    }

👋3 ArrayList基础方法
👋3.05 ArrayList中的各个变量
//长度为0的空数组
private static final Object[] EMPTY_ELEMENTDATA = {};

//默认容量为0的空数组
private static final Object[] DEFAULTCAPACITY_EMPTY_ELEMENTDATA = {};

//集合存元素的数组
transient Object[] elementData;

//集合的长度
private int size;

//集合默认容量
private static final int DEFAULT_CAPACITY = 10;
👋3.1添加方法
| 方法名 | 描述 |
|---|---|
| add(E e) | 将指定的元素追加到此列表的末尾 |
| add(int index, E element) | 在此列表中的指定位置插入指定的元素 |
| addAll(Collection<? extends E> c) | 按指定集合的Iterator返回的顺序将指定集合中的所有元素追加到此列表的末尾 |
| addAll(int index, Collection<? extends E> c) | 将指定集合中的所有元素插入到此列表中,从指定的位置开始 |
👋3.1.1 add(E e)
    /**
     * Appends the specified element to the end of this list.
     *
     * @param e element to be appended to this list
     * @return <tt>true</tt> (as specified by {@link Collection#add})
     */
    //将指定的元素追加到此列表的末尾
    public boolean add(E e) {
        //每增加1个元素,数组所需容量+1,并检查增加数组容量后是否要扩容
        ensureCapacityInternal(size + 1);  // Increments modCount!!
        //添加元素
        elementData[size++] = e;
        return true;
    }


    private void ensureCapacityInternal(int minCapacity) {
        //如果是默认的DEFAULTCAPACITY_EMPTY_ELEMENTDATA数组
        if (elementData == DEFAULTCAPACITY_EMPTY_ELEMENTDATA) {
            //将两者之中的最大值最为新的容量
            minCapacity = Math.max(DEFAULT_CAPACITY, minCapacity);
        }
		//检查是否需要扩容
        ensureExplicitCapacity(minCapacity);
    }


    private void ensureExplicitCapacity(int minCapacity) {
        //记录操作次数
        modCount++;

        /*
        elementData.length:原集合中实际的元素数量
        minCapacity:集合的最小容量
        */
        if (minCapacity - elementData.length > 0)
            //扩容的核心方法
            grow(minCapacity);
    }

    private void grow(int minCapacity) {
		//获取为添加元素之前的集合元素数量,设置为oldCapacity
        int oldCapacity = elementData.length;
        //右移位运算符:oldCapacity>>1=oldCapacity/2
        //新容量为原有容量的1.5倍
        //扩容的核心代码
        int newCapacity = oldCapacity + (oldCapacity >> 1);
        //第一次add时newCapacity为0,故newCapacity - minCapacity会小于0
        //如果新容量比所需要的容量还小
        if (newCapacity - minCapacity < 0)
            //新容量就等于所需要的容量
            newCapacity = minCapacity;
        //如果新容量比规定的最大容量还大,最新容量等于最大容量
        if (newCapacity - MAX_ARRAY_SIZE > 0)
            newCapacity = hugeCapacity(minCapacity);
        //将原数组拷贝到一个更大容量的数组中
        elementData = Arrays.copyOf(elementData, newCapacity);
    }

    private static int hugeCapacity(int minCapacity) {
        if (minCapacity < 0) // overflow
            throw new OutOfMemoryError();
        return (minCapacity > MAX_ARRAY_SIZE) ?
            Integer.MAX_VALUE :
            MAX_ARRAY_SIZE;
    }
我们总结一下流程:
- 每增加一个元素,都要判断增加后容量是否达到了规定的
最大容量值,如果达到就触发扩容操作grow - 在扩容操作中,设置
新容量为老容量的1.5倍(int newCapacity = oldCapacity + (oldCapacity >> 1)),如果新容量小于所需容量,则新容量等于所需容量(newCapacity = minCapacity),如果新容量比规定的最大值还要大,则新容量等于最大容量newCapacity = hugeCapacity(minCapacity); - 将原数组拷贝进长度为新容量的新数组中
👋3.1.2 add(int index, E element)
在指定索引处添加元素
    public void add(int index, E element) {
        //判断所传入的索引是否符合规则(既不能<0,也不能大于原数组容量)
        rangeCheckForAdd(index);
		//数组所需容量+1,并判断增加元素之后是否需要扩容
        ensureCapacityInternal(size + 1);
        //数组元素拷贝,index之后的元素向后移一位,把index的位置空了出来
        System.arraycopy(elementData, index, elementData, index + 1,
                         size - index);
        //在index位置上填充要插入的元素
        elementData[index] = element;
        //元素个数+1
        size++;
    }
	//判断index是否符合规则
    private void rangeCheckForAdd(int index) {
        if (index > size || index < 0)
            throw new IndexOutOfBoundsException(outOfBoundsMsg(index));
    }
我们总结一下流程:
- 检查传入index是否符合规则
- 判断数组是否需要进行扩容
- 创建新数组,并将原数组元素进行拷贝,拷贝原理是使index之后的元素向后移动一位,将index位置空出,再在该位置填充元素
- 元素个数+1
👋3.1.3 addAll(Collection<? extends E> c)
按指定集合的Iterator返回的顺序将指定集合中的所有元素追加到此列表的末尾
    public boolean addAll(Collection<? extends E> c) {
        //将有数据的集合c转换成数组形式
        Object[] a = c.toArray();
        //将数据集合长度赋值给numNew
        int numNew = a.length;
        //判断增加元素后是否需要扩容
        ensureCapacityInternal(size + numNew);
        //将a拷贝进elementData最后
        System.arraycopy(a, 0, elementData, size, numNew);
        //数组中元素个数=原数组中元素个数+新数组中元素个数
        size += numNew;
        //c容量为0则返回false,容量不为0则返回true
        return numNew != 0;
    }
我们总结一下流程:
- 将原集合转换为数组形式
- 判断数组是否需要扩容
- 将传进来的集合元素拷贝到原集合的末尾
- 元素个数变化
👋3.1.4 addAll(int index, Collection<? extends E> c)
将指定集合中的所有元素插入到此列表中,从指定的位置开始
    public boolean addAll(int index, Collection<? extends E> c) {
        //判断index是否符合规则
        rangeCheckForAdd(index);

        //将要添加的集合转为数组形式
        Object[] a = c.toArray();
        //将数组长度赋给numNew
        int numNew = a.length;
        //判断增加元素之后是否需要扩容
        ensureCapacityInternal(size + numNew);  \
		//记录有多少位元素需要向后移动
        int numMoved = size - index;
        //如果有元素需要移动
        if (numMoved > 0)
            //进行数组拷贝,这一步只是进行移动操作,并没有添加数据,将数组中index之后的所有元素向后移动numNew位
            System.arraycopy(elementData, index, elementData, index + numNew,
                             numMoved);
		//进行数组填充,将集合c中的元素从数组index处开始填充
        System.arraycopy(a, 0, elementData, index, numNew);
        //数组中元素个数=原数组中元素个数+新数组中元素个数
        size += numNew;
        //返回c集合是否为空的布尔值
        return numNew != 0;
    }
我们总结一下流程:
- 将原集合转换为数组形式
- 判断数组是否需要扩容
- 记录下需要有多少元素进行移动
- 如果有元素需要移动,新数组中index之后的所有元素向后移动numNew位
- 对数组进行填充
- 数组元素个数变化
👋3.1.5 set(int index, E element)
根据索引修改集合元素
    public E set(int index, E element) {
        //判断索引是否符合规则,索引不能超过数组长度
        rangeCheck(index);
		//获得下标处的元素
        E oldValue = elementData(index);
        //修改索引处的元素值
        elementData[index] = element;
        //将旧的元素值返回
        return oldValue;
    }

	//校验索引
    private void rangeCheck(int index) {
        if (index >= size)
            throw new IndexOutOfBoundsException(outOfBoundsMsg(index));
    }
//获得下标处的元素
    E elementData(int index) {
        return (E) elementData[index];
    }
👋3.1.6 get(int index)
获得索引处的元素值
    /**
     * Returns the element at the specified position in this list.
     *
     * @param  index index of the element to return
     * @return the element at the specified position in this list
     * @throws IndexOutOfBoundsException {@inheritDoc}
     */
    public E get(int index) {
        rangeCheck(index);

        return elementData(index);
    }
//校验索引范围
    private void rangeCheck(int index) {
        if (index >= size)
            throw new IndexOutOfBoundsException(outOfBoundsMsg(index));
    }
//返回索引处元素
    E elementData(int index) {
        return (E) elementData[index];
    }
👋3.1.7 remove(Object o)
移除指定元素值的元素
    public boolean remove(Object o) {
        //如果要删除的元素是否为空
        if (o == null) {
            for (int index = 0; index < size; index++)
                if (elementData[index] == null) {
                    fastRemove(index);
                    return true;
                }
        } else {
            //遍历集合
            for (int index = 0; index < size; index++)
                //将集合中的每一个元素进行比对,比对成功则删除
                if (o.equals(elementData[index])) {
                    fastRemove(index);
                    return true;
                }
        }
        return false;
    }


    /*集合真正删除元素的方法
     * Private remove method that skips bounds checking and does not
     * return the value removed.
     */
    private void fastRemove(int index) {
        //对集合的实际修改次数+1
        modCount++;
        //计算要移动的元素的个数
        int numMoved = size - index - 1;
        //如果移动的元素的个数>0
        if (numMoved > 0)
            //移动元素
            System.arraycopy(elementData, index+1, elementData, index,
                             numMoved);
        //将要删除的元素置为null,就是为了尽快被垃圾回收机制回收
        elementData[--size] = null;
    }
ArrayList中使用迭代器遍历时删除元素会爆ConcurrentModificationException()并发修改异常的原因:这种情况只出现在要删除的元素位于集合尾部的时候
迭代器在遍历时会调用next()方法,next方法会在checkForComodification()方法中对expectedModCount

(期待修改次数)和modCount(实际修改次数)进行比对
        final void checkForComodification() {
            if (modCount != expectedModCount)
                throw new ConcurrentModificationException();
        }
expectedModCount值的变化只与第一次创建迭代器时的modCount有关,而modCount值的变化与增加和删除

(不考虑其他情况)都有关,如果在迭代器遍历时删除元素,会导致modCount与expectedModCount不一致,故

抛出ConcurrentModificationException异常
结论
-
当要删除的元素在集合的倒数第二个位置的时候,不会产生并发修改异常,因为在调用
hashNext方法的时候,光标的值和集合的长度一样,那么就会返回false,因此就不会再去调用next方法获取集合的元素,既然不会调用next方法,那么底层就不会产生并发修改异常 -
集合每次调用add方法的时候,实际修改次数变量的值都会
自增一次 -
在获取迭代器的时候,集合只会执行一次将时机修改集合的次数赋值给预期修改集合的次数
-
集合在删除元素的时候也会针对实际修改次数进行自增的操作
👋3.1.8 clear()
清空集合
    public void clear() {
        //修改次数
        modCount++;

        //将数组中的每个元素都设为null
        for (int i = 0; i < size; i++)
            elementData[i] = null;
		//数组元素个数清空
        size = 0;
    }

👋4 扩展
👋4.1 转换方法toString()
public String toString()把集合中所有元素转换成字符串
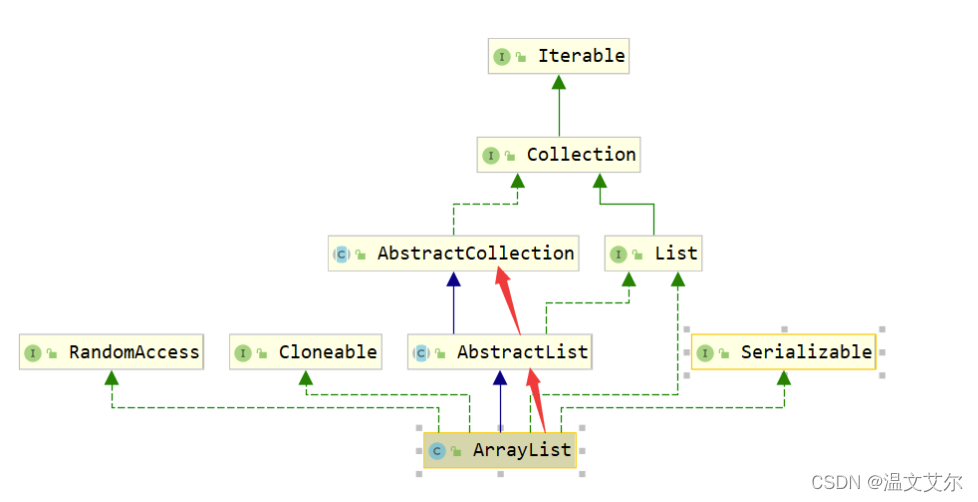
ArrayList集合本身并没有toString,我们需要到它的父类AbstractList的父类AbstractCollection中去寻找

    /**
     * Returns a string representation of this collection.  The string
     * representation consists of a list of the collection's elements in the
     * order they are returned by its iterator, enclosed in square brackets
     * (<tt>"[]"</tt>).  Adjacent elements are separated by the characters
     * <tt>", "</tt> (comma and space).  Elements are converted to strings as
     * by {@link String#valueOf(Object)}.
     *
     * @return a string representation of this collection
     */
    public String toString() {
        //获取集合元素的迭代器
        Iterator<E> it = iterator();
        //判断迭代器是否为空
        if (! it.hasNext())
            return "[]";//为空直接返回空
		//创建StringBuilder对象便于拼接字符串,StringBuilder线程安全
        StringBuilder sb = new StringBuilder();
        sb.append('[');
        for (;;) {
            E e = it.next();//迭代器向后移动
            sb.append(e == this ? "(this Collection)" : e);
            if (! it.hasNext())//迭代器执行完毕,将整个缓冲区对象转换为String对象
                return sb.append(']').toString();
            sb.append(',').append(' ');//否则拼接','' '
        }
    }
👋4.2 迭代器Iterator iterator()
ArrayList对迭代器方法进行了重写
//获取迭代器对象
public Iterator<E> iterator() {
    return new Itr();
}
//迭代器源码,不同集合实现的迭代器底层源码都是不一样的
private class Itr implements Iterator<E> {
        int cursor; //光标,默认值就是0
        int lastRet = -1; //记录-1这个位置
    	//将集合实际修改次数赋值给预期修改次数
        int expectedModCount = modCount;

    	//集合是否还有元素
     public boolean hasNext() {
            //判断光标是否不等于集合元素总量
            return cursor != size;
     }

     public E next() {
        checkForComodification();
        //将光标赋值给i  第一次i=0
        int i = cursor;
        //如果光标大于等于集合size就说明集合中已经没有元素
        if (i >= size)
            throw new NoSuchElementException();
         	//将集合存储数据的地址赋值给该方法的局部变量
        	Object[] elementData = ArrayList.this.elementData;
        //针对多线程环境,如果成立,触发并发修改异常
        if (i >= elementData.length)
            throw new ConcurrentModificationException();
         //光标向前移动1位
         cursor = i + 1;
         //将光标位的元素返回
         return (E) elementData[lastRet = i];
     }
    //校验预期修改次数是否和实际修改次数一样
     final void checkForComodification() {
         if (modCount != expectedModCount)
            throw new ConcurrentModificationException();
     }
}
if (i >= elementData.length)
throw new ConcurrentModificationException();的作用:
防止多并发修改异常,如果多个线程同时调用next(),i的值会增加,如果在容量之内会返回0,但如果增加的i的值大于容量,证明并发数量过多,对i的准确性造成破坏性影响,抛出ConcurrentModificationException()异常

👋5 ArrayList相关面试题
👋5.1 ArrayList是如何扩容的
第一次扩容10 以后每次都是原容量的1.5倍
👋5.2 ArrayList频繁扩容导致添加性能急剧下降,如何处理?
我们通过一个案例解答
public class Test04 {
    public static void main(String[] args) {
        //未指定容量的list
        ArrayList<String> list = new ArrayList<>();

        long startTime = System.currentTimeMillis();
        for (int i = 0; i < 1000000; i++) {
            list.add(i+"");
        }
        long endTime = System.currentTimeMillis();
        System.out.println("未指定容量时添加100W条数据用时:"+(endTime-startTime));

        //指定容量的list1
        ArrayList<String> list1 = new ArrayList<>(1000000);

        long startTime1 = System.currentTimeMillis();
        for (int i = 0; i < 1000000; i++) {
            list.add(i+"");
        }
        long endTime1 = System.currentTimeMillis();
        System.out.println("指定容量时添加100W条数据用时:"+(endTime1-startTime1));
    }
}
未指定容量时添加100W条数据用时:95
指定容量时添加100W条数据用时:69
由此我们可得,在数据量较大时,为了避免扩容,我们最好创建ArrayList时便指定容量
👋5.3 ArrayList插入或删除元素一定比LinkedList慢吗
首先我们要确定ArrayList和LinkedList的底层数据结构
- ArrayList数据结构是·动态数组·
- LinkedList数据结构是·链表·
我们从源码层面去分析
观察LinkedList的remove源码
    public E remove(int index) {
        //对索引的校验,我们这里不做讨论
        checkElementIndex(index);
        //主要看node(int index)方法
        return unlink(node(index));
    }

	//根据索引虽然可以直接去除一半的元素参与判断,但是效率依然很低,需要不断遍历
    Node<E> node(int index) {

		//这里是判断index在链表的前半部分还是后半部分,因为是双向的
        //判断index是否小于集合长度的一半
        if (index < (size >> 1)) {
            //在前半部分的话,第一个节点就为x,从前往后找
            Node<E> x = first;
            for (int i = 0; i < index; i++)
                x = x.next;
            return x;
        } else {
            //在后半部分的话,最后一个节点为x,从后往前找
            Node<E> x = last;
            for (int i = size - 1; i > index; i--)
                x = x.prev;
            return x;
        }
    }

	//通过node(int index)方法找到了index所在节点的位置
    E unlink(Node<E> x) {
        // assert x != null;
        final E element = x.item;
        //获取下一个节点
        final Node<E> next = x.next;
		//获取上一个节点
        final Node<E> prev = x.prev;

        //如果x在链表的开头
        if (prev == null) {
            first = next;
        } else {
            prev.next = next;
            x.prev = null;
        }

        //如果x在链表的末尾
        if (next == null) {
            last = prev;
        } else {
            next.prev = prev;
            x.next = null;
        }

        x.item = null;
        size--;
        modCount++;
        return element;
    }
由此我们可以得出结论:
- 要删除的节点位于集合中间位置,则LinkedList的速度慢
- 要删除的节点位于集合的头部和尾部,则LinkedList的速度快(如果不从添加元素时就开始计算时间的话是这样,但是如果要把添加元素的时间计算在内那么ArrayList快,因为LinkedList中的last节点每次在add元素时都会向后移动一位,也是需要花费时间的)
    void linkLast(E e) {
        final Node<E> l = last;
        final Node<E> newNode = new Node<>(l, e, null);
        last = newNode;
        if (l == null)
            first = newNode;
        else
            l.next = newNode;
        size++;
        modCount++;
    }
👋5.4 ArrayList是线程安全的吗
先回答问题:ArrayList不是线程安全的,我们使用一个案例来演示
package ArrayListProject.CloneTest;

import java.util.ArrayList;
import java.util.List;


public class CollectionTask implements Runnable {

    private List<String> list;

    public CollectionTask(List<String> list) {
        this.list = list;
    }

    @Override
    public void run() {
        try {
            Thread.sleep(50);
        }catch (Exception e){
            e.printStackTrace();
        }

        list.add(Thread.currentThread().getName());
    }
}

class MyTest{
    public static void main(String[] args) throws Exception {
        List<String> list = new ArrayList<>();
        CollectionTask ct = new CollectionTask(list);
        //开启50条线程
        for (int i = 0; i < 50; i++) {
            new Thread(ct).start();
        }

        //确保子线程执行完毕

        Thread.sleep(3000);

        for (int i = 0; i < list.size(); i++) {
            System.out.println(list.get(i));
        }

        System.out.println("集合长度:"+list.size());
    }
}
Thread-47
Thread-45
Thread-44
Thread-41
Thread-34
Thread-35
Thread-39
Thread-33
Thread-27
Thread-26
Thread-40
Thread-32
Thread-20
Thread-21
Thread-15
Thread-29
Thread-14
Thread-9
Thread-8
Thread-28
Thread-23
Thread-3
null
null
null
null
null
null
null
Thread-22
Thread-38
Thread-49
Thread-48
null
null
null
null
null
null
null
null
null
null
null
null
null
null
null
Thread-43
集合长度:49
由输出结果可知:ArrayList是线程不安全的
那么如何避免线程安全问题呢?
方案一:加同步代码块,保证代码在执行时不被其他线程干扰
    @Override
    public void run() {
        synchronized (this){
            try {
                Thread.sleep(50);
            }catch (Exception e){
                e.printStackTrace();
            }
            list.add(Thread.currentThread().getName());
        }
    }
方案二:使用Vector集合代替ArrayList
- Vector类实现了可扩展的对象数组,并且其add方法上有synchronized关键字,但是其效率相比ArrayList较低,如果不需要线程安全的实现,建议使用ArrayList代替Vector
    public synchronized void addElement(E obj) {
        modCount++;
        ensureCapacityHelper(elementCount + 1);
        elementData[elementCount++] = obj;
    }
方案三:利用Collections.synchronizedList(List list)方法
        List<String> list = new ArrayList<>();
        List<String> list1 = Collections.synchronizedList(list);
ArrayList什么情况下需要加同步锁?
ArrayList作为局部变量时不需要加锁,因为它是专属以某一线程的,而成员变量被所有线程共享,ArrayList作为成员变量时需要加同步锁
👋5.5 如何复制某个ArrayList到另一个ArrayList中去
- 使用clone()方法
- 使用ArrayList构造方法
- 使用addAll方法
👋5.6 已知成员变量集合存储N多用户名称,在多线程的环境下,使用迭代器在读取集合数据的同时如何保证还可以正常写入数据到集合中
package ArrayListProject.CloneTest;

import java.util.ArrayList;

public class CollectionThread implements Runnable {
    private static ArrayList<String> list = new ArrayList<>();

    static {
        list.add("Jack");
        list.add("Lucy");
        list.add("Jimmy");
    }

    @Override
    public void run() {
        //迭代器
        for (String s : list) {
            System.out.println(s);
            list.add("coco");
        }
    }
}

class MyTest01{
    public static void main(String[] args) {
        CollectionThread ct = new CollectionThread();

        for (int i = 0; i < 10; i++) {
            new Thread(ct).start();
        }
    }
}
报错信息:
Jack
Jack
Jack
Jack
Jack
Jack
Exception in thread "Thread-1" Exception in thread "Thread-2" Exception in thread "Thread-5" Exception in thread "Thread-6" Exception in thread "Thread-4" Exception in thread "Thread-0" Jack
Exception in thread "Thread-7" Jack
Exception in thread "Thread-3" Jack
Exception in thread "Thread-8" Jack
Exception in thread "Thread-9" java.util.ConcurrentModificationException
	at java.util.ArrayList$Itr.checkForComodification(ArrayList.java:901)
	at java.util.ArrayList$Itr.next(ArrayList.java:851)
	at ArrayListProject.CloneTest.CollectionThread.run(CollectionThread.java:23)
	at java.lang.Thread.run(Thread.java:748)
java.util.ConcurrentModificationException
我们可以看到ConcurrentModificationException并发修改异常出现,为了解决这个问题,我们可以利用下面集合来完成读写
CopyOnWriteArrayList
但是代价是昂贵的,除非我们的程序里有很多读写操作,否则还是用ArrayList
private static CopyOnWriteArrayList<String> list = new CopyOnWriteArrayList<>();
Jack
Jack
Jack
Jack
Jack
Jack
Jack
Jack
Jack
Jack
Lucy
Lucy
Lucy
Lucy
Lucy
Lucy
Lucy
Lucy
Lucy
Jimmy
Jimmy
Jimmy
Jimmy
Jimmy
Jimmy
Jimmy
Jimmy
Lucy
Jimmy
Jimmy
👋5.7 ArrayList和LinkedList区别
- ArrayList
- 基于
动态数组的数据结构 - 对于随机访问的get和set,ArrayList要优于LInkedList
- 对于随机操作的add和remove,ArrayList不一定比LInkedList慢(ArrayList底层由于是动态数组,因此并不是每次add和remove都需要创建新数组)
- 基于
- LinkedList
- 基于
链表的数据结构 - 对于顺序操作,LinkedList不一定比ArrayList慢
- 对于随机操作,LinkedList效率明显较低
- 基于
🙏相见即是有缘,如果对你有帮助,给博主一个免费的点赞以示鼓励把QAQ☺
这里是温文艾尔の源码学习之路- 🙏作者水平欠佳,如果发现任何错误,欢迎批评指正
- 👋博客主页 温文艾尔の学习小屋
- 👋更多文章请关注温文艾尔主页
- 👋超详细ArrayList解析!
- 👋更多文章:
- 👋HashMap底层源码解析上(超详细图解+面试题)
- 👋HashMap底层源码解析下(超详细图解)
- 👋HashMap底层红黑树原理(超详细图解)+手写红黑树代码

登录后可发表评论
点击登录