我是抄的,但也没完全抄,我来记录下
下面从后端开始

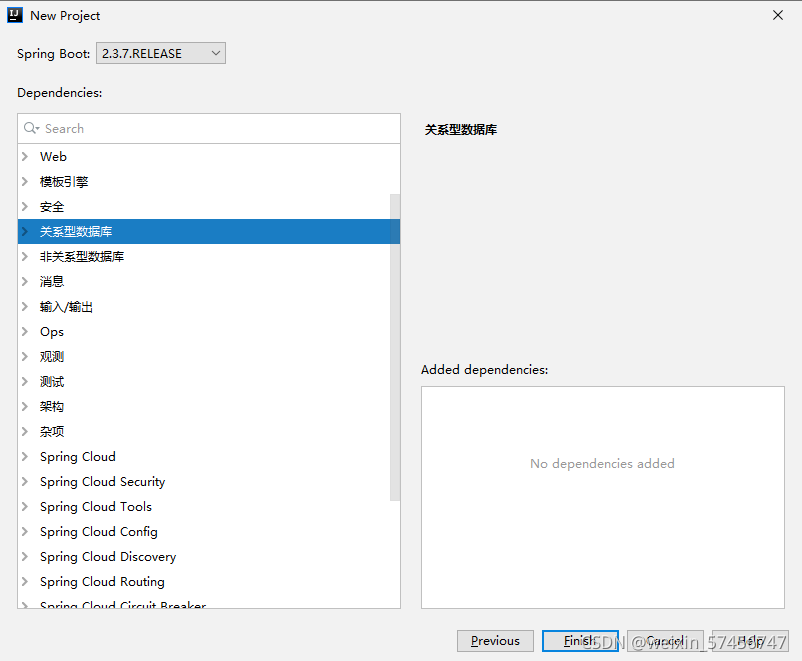
下边的我啥都没选,到后面直接添加依赖就行
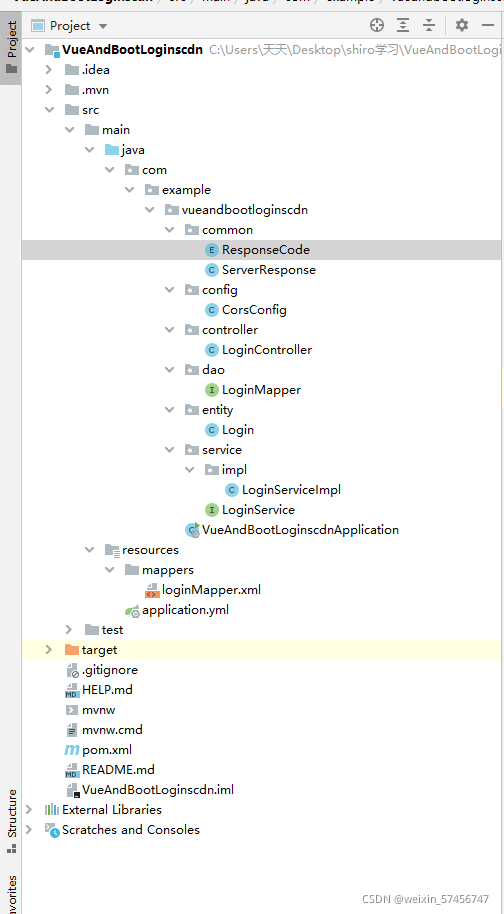
下面是项目文件目录
进入 pom.xml添加依赖
<dependencies>
        <dependency>
            <groupId>org.springframework.boot</groupId>
            <artifactId>spring-boot-starter-data-jdbc</artifactId>
        </dependency>
        <dependency>
            <groupId>org.springframework.boot</groupId>
            <artifactId>spring-boot-starter-jdbc</artifactId>
        </dependency>
        <dependency>
            <groupId>org.springframework.boot</groupId>
            <artifactId>spring-boot-starter-web</artifactId>
        </dependency>
        <dependency>
            <groupId>org.mybatis.spring.boot</groupId>
            <artifactId>mybatis-spring-boot-starter</artifactId>
            <version>2.2.0</version>
        </dependency>
        <dependency>
            <groupId>org.apache.commons</groupId>
            <artifactId>commons-lang3</artifactId>
            <version>3.1</version>
        </dependency>
        <dependency>
            <groupId>org.codehaus.jackson</groupId>
            <artifactId>jackson-core-asl</artifactId>
            <version>1.9.13</version>
        </dependency>
        <dependency>
            <groupId>net.sf.ezmorph</groupId>
            <artifactId>ezmorph</artifactId>
            <version>1.0.6</version>
        </dependency>
        <dependency>
            <groupId>mysql</groupId>
            <artifactId>mysql-connector-java</artifactId>
            <scope>runtime</scope>
        </dependency>
        <dependency>
            <groupId>org.projectlombok</groupId>
            <artifactId>lombok</artifactId>
            <optional>true</optional>
        </dependency>
        <dependency>
            <groupId>org.springframework.boot</groupId>
            <artifactId>spring-boot-starter-test</artifactId>
            <scope>test</scope>
        </dependency>
    </dependencies>
common里的状态码
ResponseCode
/**
 * 响应状态码
 *
 * @author 27498
 */
public enum ResponseCode {
    //成功
    SUCCESS(0, "true"),

    //失败
    ERROR(1, "false"),

    //参数错误
    ILLEGAL_ARGUMENT(2, "ILLEGAL_ARGUMENT"),

    ADMIN_NAME_ERROR(12 ,"管理员用户名不存在"),

    ADMIN_PASSWORD_ERROR(13,"管理员密码错误"),
    ;


    /**
     * 状态码
     */
    private final int code;

    /**
     * 与状态码相对应的描述
     */
    private final String desc;

    ResponseCode(int code, String desc) {
        this.code = code;
        this.desc = desc;
    }

    public int getCode() {
        return code;
    }

    public String getDesc() {
        return desc;
    }
}
ServerResponse
import org.codehaus.jackson.annotate.JsonIgnore;

import java.io.Serializable;

/**
 * 通用对象返回器
 *
 * @author 27498
 * <p>
 * JsonSerialize 保证序列化json的时候,如果是null的对象key会消失
 */
/*@JsonSerialize(include = JsonSerialize.Inclusion.NON_NULL)*/
public class ServerResponse<T> implements Serializable {

    /**
     * 状态码
     */
    private String success;

    /**
     * 状态码对应的数据
     */
    private String msg;

    /**
     * 泛型类型的数据
     */
    private T data;

    private ServerResponse(String success) {
        this.success = success;
    }

    private ServerResponse(String success, T data) {
        this.success = success;
        this.data = data;
    }

    private ServerResponse(String success, T data, String msg) {
        this.success = success;
        this.data = data;
        this.msg = msg;
    }

    private ServerResponse(String status, String msg) {
        this.success = status;
        this.msg = msg;
    }

    /**
     * 我们不希望 isSuccess 出现在返回的数据中, 通过@JsonIgnore 来实现这一目标
     *
     * @return
     */
    @JsonIgnore
    public boolean isSuccess() {
        return this.success.equals(ResponseCode.SUCCESS.getDesc());
    }

    public String getSuccess() {
        return success;
    }

    public T getData() {
        return data;
    }

    public String getMsg() {
        return msg;
    }

    /**
     * 作为统一返回的数据需要 各种类型的方法 以下方法主要处理成功时的场景
     *
     * @param <T>
     * @return
     */
    public static <T> ServerResponse<T> createBySuccess() {
        return new ServerResponse<T>(ResponseCode.SUCCESS.getDesc());
    }

    public static <T> ServerResponse<T> createBySuccessMessage(String msg) {
        return new ServerResponse<T>(ResponseCode.SUCCESS.getDesc(), msg);
    }

    public static <T> ServerResponse<T> createBySuccess(T data) {
        return new ServerResponse<T>(ResponseCode.SUCCESS.getDesc(), data);
    }

    public static <T> ServerResponse<T> createBySuccess(String msg, T data) {
        return new ServerResponse<T>(ResponseCode.SUCCESS.getDesc(), data, msg);
    }

    /**
     * 以下方法主要处理返回错误时的场景
     *
     * @param <T>
     * @return
     */
    public static <T> ServerResponse<T> createByError() {
        return new ServerResponse<T>(ResponseCode.ERROR.getDesc(), ResponseCode.ERROR.getDesc());
    }

    public static <T> ServerResponse<T> createByErrorMessage(String errorMessage) {
        return new ServerResponse<T>(ResponseCode.ERROR.getDesc(), errorMessage);
    }

    public static <T> ServerResponse<T> createByErrorCodeMessage(String errorCode, String errorMessage) {
        return new ServerResponse<T>(errorCode, errorMessage);
    }


}
config里的CorsConfig
import org.springframework.context.annotation.Bean;
import org.springframework.context.annotation.Configuration;
import org.springframework.web.cors.CorsConfiguration;
import org.springframework.web.cors.UrlBasedCorsConfigurationSource;
import org.springframework.web.filter.CorsFilter;

@Configuration
public class CorsConfig {
    private CorsConfiguration buildConfig() {
        CorsConfiguration corsConfiguration = new CorsConfiguration();
        corsConfiguration.addAllowedOrigin("*"); // 1
        corsConfiguration.addAllowedHeader("*"); // 2
        corsConfiguration.addAllowedMethod("*"); // 3
        return corsConfiguration;
    }

    @Bean
    public CorsFilter corsFilter() {
        UrlBasedCorsConfigurationSource source = new UrlBasedCorsConfigurationSource();
        source.registerCorsConfiguration("/**", buildConfig()); // 4
        return new CorsFilter(source);
    }
}
controller层
@RestController
@RequestMapping("/user")
public class LoginController {
    @Resource
    private LoginService loginService;

    @RequestMapping("/login")
    public ServerResponse queryALl(@RequestBody Login login) {
        return loginService.queryAll(login.getUsername(), login.getPassword());
    }
}
dao层
@Mapper
public interface LoginMapper {
    Login queryUserByName(String username);
}
实体类,我用了lombok
import lombok.Data;

@Data
public class Login {
    private int id;
    private String username;
    private String password;
}
loginserviceimpl
@Service("loginService")
@Slf4j
public class LoginServiceImpl implements LoginService {
    @Resource
    private LoginMapper loginMapper;
    @Override
    public ServerResponse queryAll(String username, String password) {
        if (StringUtils.isBlank(username) || StringUtils.isBlank(password)) {
            log.error("参数丢失啦");
            return ServerResponse.createByErrorMessage(ResponseCode.ILLEGAL_ARGUMENT.getDesc());
        }
        Login login = loginMapper.queryUserByName(username);
        if (login == null) {
            log.info("用户在登陆时输入错误的账户名");
            return ServerResponse.createByErrorMessage(ResponseCode.ADMIN_NAME_ERROR.getDesc());
        }
        if (!login.getPassword().equals(password)) {
            log.info(login.getUsername() + "在登录时候输出了错误的密码");
            return ServerResponse.createByErrorMessage(ResponseCode.ADMIN_PASSWORD_ERROR.getDesc());
        }
        return ServerResponse.createBySuccess(login);
    }

}
LoginService
public interface LoginService {

    public ServerResponse queryAll(String username, String password);
}
下面是resources里的xml文件与sql语句,先搞个mappers,在mappers下边弄个xml文件
<?xml version="1.0" encoding="UTF-8" ?>
<!DOCTYPE mapper PUBLIC "-//mybatis.org//DTD Mapper 3.0//EN" "http://mybatis.org/dtd/mybatis-3-mapper.dtd" >
<mapper namespace="com.example.vueandbootloginscdn.dao.LoginMapper">

    <select id="queryUserByName" resultType="com.example.vueandbootloginscdn.entity.Login">
        select id,username, password
        from sys.vueandbootlogin
        where username = #{username}
    </select>
</mapper>
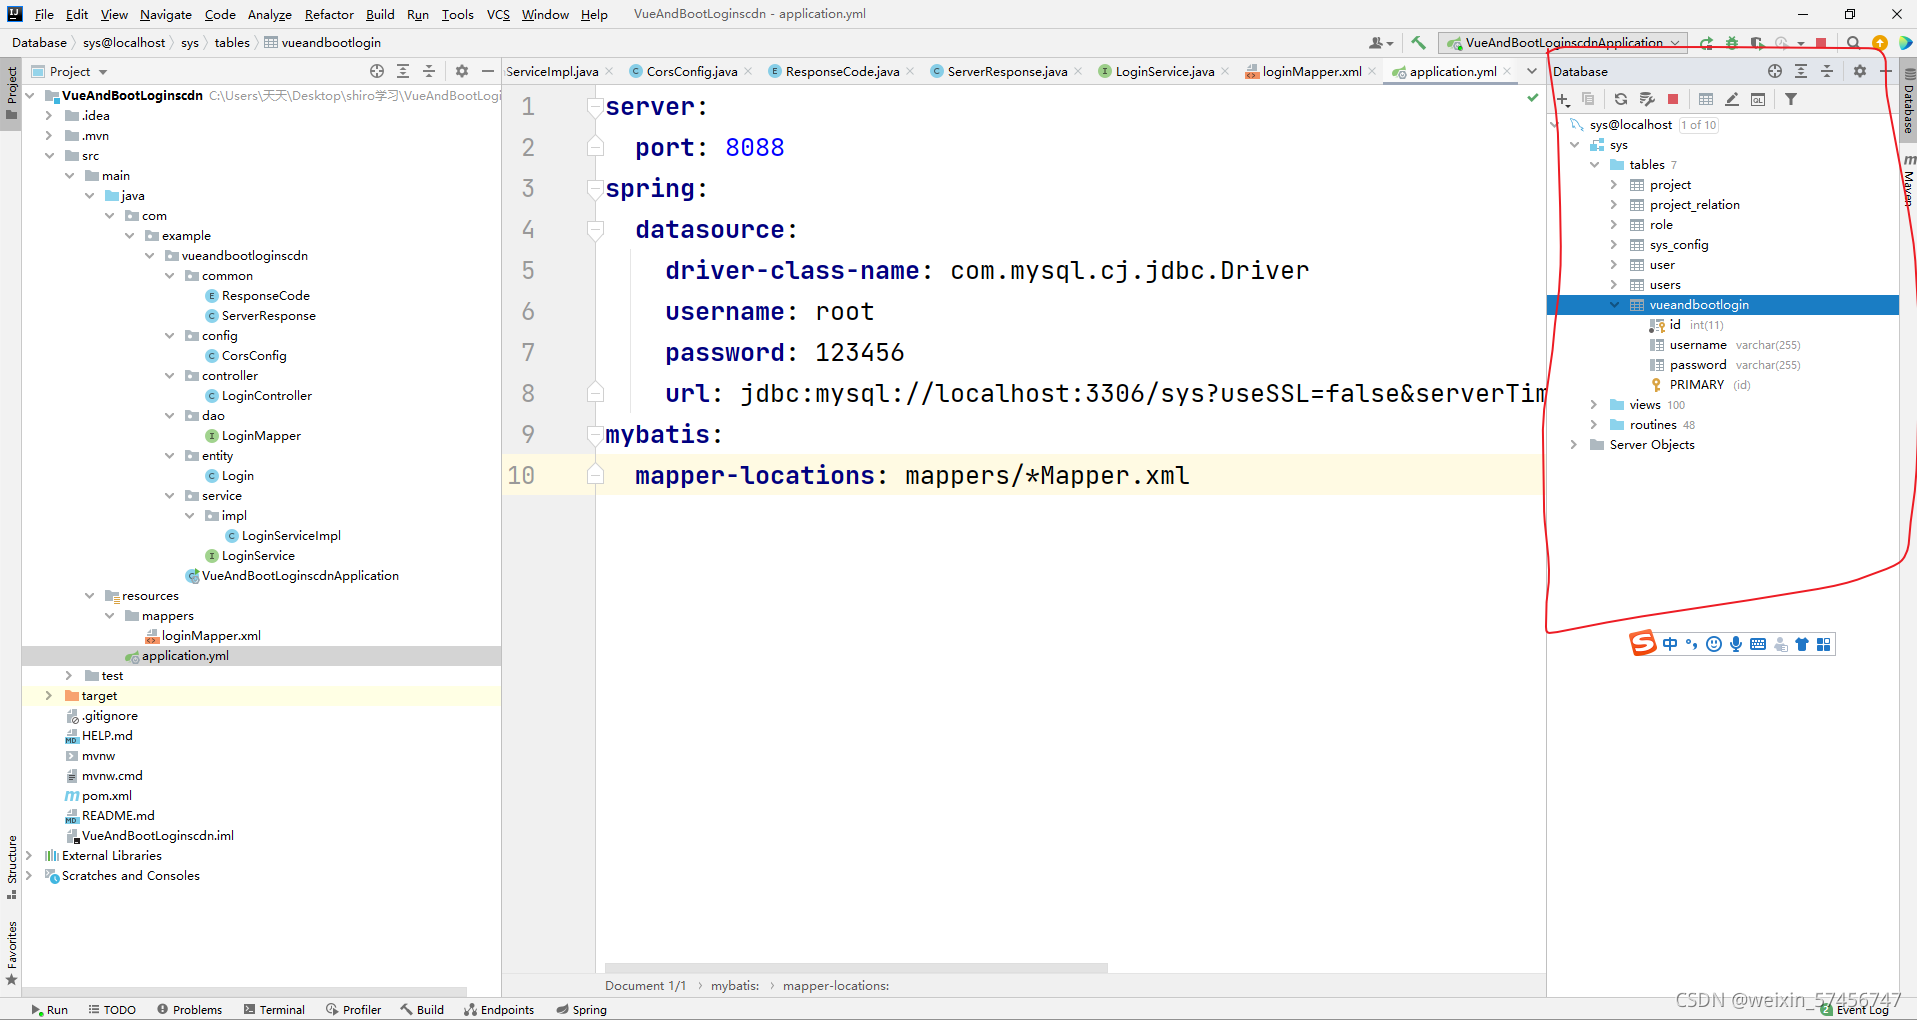
接下来弄application.properties 给这小子的后缀名 改成 yml,里边是我连接数据库的信息,改成你自己的 8088 是端口号
server:
  port: 8088
spring:
  datasource:
    driver-class-name: com.mysql.cj.jdbc.Driver
    username: root
    password: 123456
    url: jdbc:mysql://localhost:3306/sys?useSSL=false&serverTimezone=UTC&useUnicode=true&characterEncoding=UTF8
mybatis:
  mapper-locations: mappers/*Mapper.xml
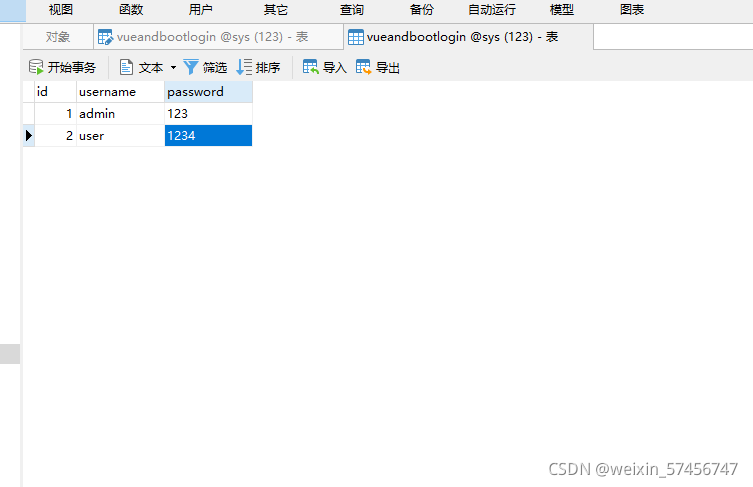
然后是数据库部分,建个表,三个字段,两条数据,搞定
在idea里把你数据库连接上,后端就ojbk了
搞完后端搞前端
随便找个地方建个文件夹,随便起个名字,然后找到命令提示符 右击用管理员权限打开cmd
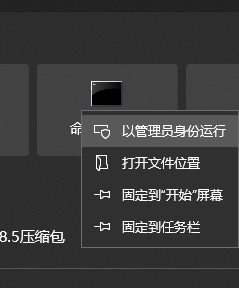
在cmd里进入刚创建的文件夹下

使用 vue init webpack vuecsdn 创建一个vue项目 这里用了vue-cli 没有的csdn去搞一个,让你选择东西的时候按照我这个来就行


cd vuecsdn进入你创建的项目然后依次输入如下命令
vue install vue-router
vue install axios
npm install element-ui -S
npm install
下载完之后 输入 npm run dev进入网页能不能出来👇

出来之后把这个文件夹导入到HBuilder里,下边是我的项目目录,没有的创建一个多的删了,比如helloworld.vue

咱们从router里的index.js开始
import Vue from 'vue'
import Router from 'vue-router'
import Login from '../views/login'
import Success from '../views/Success'
Vue.use(Router)

export default new Router({
  routes: [
    {
		// 登录页面
      path: '/login',
      name: 'Login',
      component: Login
    },
	{
		// 首页
	  path: '/success',
	  name: 'Success',
	  component: Success
	}
  ]
})
然后是login.vue
<template>
	<div>
		<el-form ref="form" :model="form" :rules="rules" class="loginform">
			<h3 class="logintitle">欢迎登录</h3>
			<el-form-item label="账号" prop="username">
				<el-input type="text" placeholder="请输入用户名" v-model="form.username"></el-input>
			</el-form-item>
			<el-form-item label="密码" prop="password">
				<el-input type="password" placeholder="请输入密码" v-model="form.password"></el-input>
			</el-form-item>
			<el-form-item>
				<el-button type="primary" @click="submitForm('form')" >登录</el-button>
			</el-form-item>

		</el-form>
	</div>
</template>

<script>
	export default {
		name: 'Login',
		data() {
			return {
				form: {
					username: '',
					password: ''
				},
				rules: {
					username: [{
						required: true,
						message: '请输入用户名',
						trigger: 'blur'
					}],
					password: [{
						required: true,
						message: '请输入密码',
						trigger: 'blur'
					}]
				}
			}
		},
		methods: {
			submitForm(formName) {
				console.log(this.$data.form.usernamename);
				console.log(this.$data.form.password);
				let _this = this;
				this.$axios({
					method: 'post',
					url: "http://localhost:8088/user/login",
					data: _this.$data.form
				}).then(res => {
					console.log(res)
					console.log(res.data.success)
					console.log(res.data.data.user_id)
					if (res.data.success == "true") {
						_this.$router.push("/success")
					}
				}).catch(error => {
					this.$message({
						message: '你有点问题',
						type: 'warning'
					});
				})
			},
		}
	}
</script>

<style scoped>
	.loginform {
		width: 21.875rem;
		margin: 9.375rem auto;
		border: 1px solid #DCDFE6;
		padding: 20px;
		border-radius: 15px;
		box-shadow: 0 0 30px #DCDFE6;
	}

	.logintitle {
		text-align: center;
	}
</style>
再然后就是Success.vue
<template>
	<div>
		你是个成熟的大人了,但是代码该c v还是要c v
	</div>
</template>

<script>
	export default{
		name: 'Success'
	}
</script>

<style>
</style>
App.vue里
<template>
  <div id="app">
    <router-view></router-view>

  </div>
</template>

<script>
export default {
  name: 'App'
}
</script>

<style>

</style>
main.js里边
import Vue from 'vue'
import App from './App'
import VueRouter from 'vue-router'
import router from './router'
import ElementUI from 'element-ui';
import 'element-ui/lib/theme-chalk/index.css'
import axios from "axios";
Vue.prototype.$axios = axios
Vue.use(VueRouter)
Vue.use(ElementUI)
Vue.config.productionTip = false


new Vue({
  el: '#app',
  router,
  render: h => h(App)
})
搞定了,虽然我也是c v 的但是没办法,写的不好啊,各位轻点喷,谢谢
下边是成功页面

下边是密码输入错误的
