文章目录
- 一、Zabbix
- 二、zabbix功能
- 三、部署zabbix
- 1、安装
- 2、部署mariadb
- 3、部署php
- 4、测试连接数据库
- 5、部署 zabbix server
- 6、配置代理端zabbix
- 7、配置告警自动发布邮件
- 8、web页面配置监控机制
一、Zabbix
- zabbix 是一个企业级分布式开源监控解决方案
- zabbix 软件能够监控众多网络参数和服务器的健康度、完整性。zabbix使用灵活的告警机制,允许用户为几乎任何时间配置基于邮件的告警,这样用户可以快速响应服务器问题。zabbix基于存储的数据提供出色的报表和数据可视化功能,这些功能使得zabbix称为容量规划的理想选择
二、zabbix功能
①数据采集
②灵活的阈值定义
③高度可配置话的告警
④实时图形
⑤web监控功能
⑥可视化选项繁多
⑦配置简单
三、部署zabbix
1、安装
[root@localhost ~]#systemctl  stop firewalld  #关防火墙
[root@localhost ~]#setenforce 0
[root@localhost ~]#vim /etc/yum.repos.d/nginx.repo  #配置nginx源,用于下载nginx
[nginx]
name=nginx repo
baseurl=http://nginx.org/packages/centos/7/$basearch/
gpgcheck=0
enabled=1
[root@localhost ~]#yum clean all #清楚元数据
[root@localhost ~]#yum list  #加载元数据列表
[root@localhost ~]# yum -y install nginx  # yum安装nginx服务
已加载插件:fastestmirror, langpacks
Loading mirror speeds from cached hostfile
 * base: mirrors.cn99.com
 * extras: mirrors.ustc.edu.cn
 * updates: mirrors.ustc.edu.cn
软件包 1:nginx-1.20.1-1.el7.ngx.x86_64 已安装并且是最新版本
无须任何处理
[root@localhost ~]# systemctl start nginx #开启服务
[root@localhost ~]# systemctl enable nginx #开启nginx服务开机自启
Created symlink from /etc/systemd/system/multi-user.target.wants/nginx.service to /usr/lib/systemd/system/nginx.service.
[root@localhost ~]# netstat -anpt | grep nginx #查看端口是否开启
tcp        0      0 0.0.0.0:80              0.0.0.0:*               LISTEN      22332/nginx: master
2、部署mariadb
[root@localhost ~]# yum  -y install mariadb*  #安装mariadb,该服务为mysql的分支,端口3306
已加载插件:fastestmirror, langpacks
Loading mirror speeds from cached hostfile
 * base: mirrors.cn99.com
 * extras: mirrors.ustc.edu.cn
 * updates: mirrors.ustc.edu.cn
软件包 1:mariadb-embedded-5.5.68-1.el7.x86_64 已安装并且是最新版本
软件包 1:mariadb-server-5.5.68-1.el7.x86_64 已安装并且是最新版本
软件包 1:mariadb-test-5.5.68-1.el7.x86_64 已安装并且是最新版本
软件包 1:mariadb-devel-5.5.68-1.el7.x86_64 已安装并且是最新版本
软件包 1:mariadb-bench-5.5.68-1.el7.x86_64 已安装并且是最新版本
软件包 1:mariadb-embedded-devel-5.5.68-1.el7.x86_64 已安装并且是最新版本
软件包 1:mariadb-5.5.68-1.el7.x86_64 已安装并且是最新版本
软件包 1:mariadb-libs-5.5.68-1.el7.x86_64 已安装并且是最新版本
无须任何处理
[root@localhost ~]# systemctl  start mariadb.service #开启服务
[root@localhost ~]# systemctl  enable mariadb.service #开启服务开机自启
Created symlink from /etc/systemd/system/multi-user.target.wants/mariadb.service to /usr/lib/systemd/system/mariadb.service.
[root@localhost ~]# netstat -anpt | grep 3306 #查看端口
tcp        0      0 0.0.0.0:3306            0.0.0.0:*               LISTEN      31153/mysqld
 [root@localhost ~]# mysql_secure_installation  #mysql安全配置向导

NOTE: RUNNING ALL PARTS OF THIS SCRIPT IS RECOMMENDED FOR ALL MariaDB
      SERVERS IN PRODUCTION USE!  PLEASE READ EACH STEP CAREFULLY!

In order to log into MariaDB to secure it, we'll need the current
password for the root user.  If you've just installed MariaDB, and
you haven't set the root password yet, the password will be blank,
so you should just press enter here.

Enter current password for root (enter for none):   #回车
OK, successfully used password, moving on...

Setting the root password ensures that nobody can log into the MariaDB
root user without the proper authorisation.

Set root password? [Y/n] y  #是否为root用户设置密码
New password:  #设置的新的密码
Re-enter new password:  #再次确认密码
Password updated successfully!
Reloading privilege tables..
 ... Success!


By default, a MariaDB installation has an anonymous user, allowing anyone
to log into MariaDB without having to have a user account created for
them.  This is intended only for testing, and to make the installation
go a bit smoother.  You should remove them before moving into a
production environment.

Remove anonymous users? [Y/n] n #是否删除匿名用户
 ... skipping.

Normally, root should only be allowed to connect from 'localhost'.  This
ensures that someone cannot guess at the root password from the network.

Disallow root login remotely? [Y/n] n #是否禁止root用户远程登录
 ... skipping.

By default, MariaDB comes with a database named 'test' that anyone can
access.  This is also intended only for testing, and should be removed
before moving into a production environment.

Remove test database and access to it? [Y/n] n #是否删除test库和访问权限
 ... skipping.

Reloading the privilege tables will ensure that all changes made so far
will take effect immediately.

Reload privilege tables now? [Y/n] y #是否刷新授权表
 ... Success!

Cleaning up...

All done!  If you've completed all of the above steps, your MariaDB
installation should now be secure.

Thanks for using MariaDB!
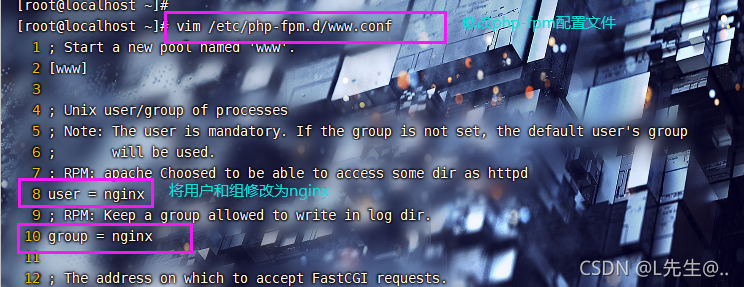
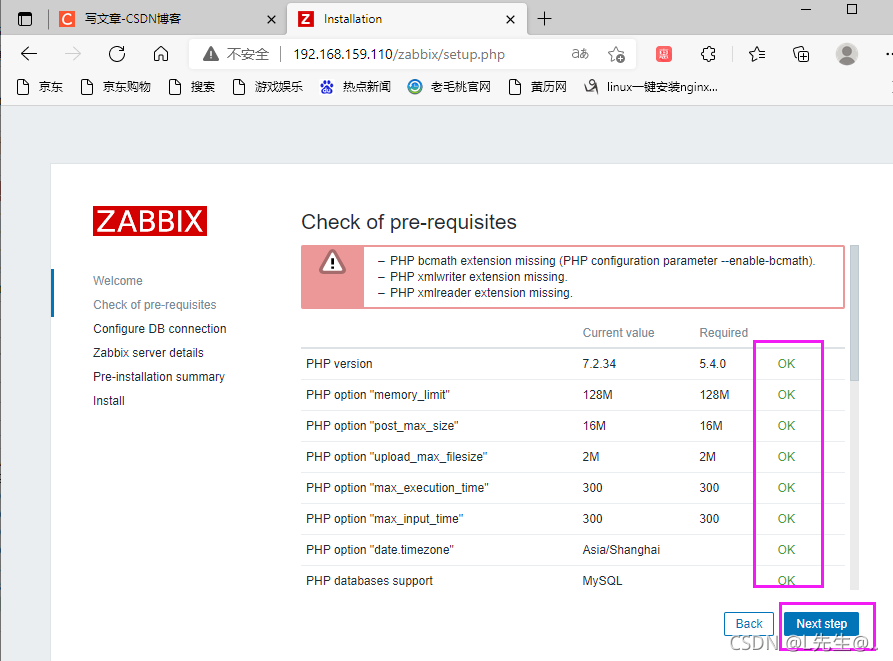
3、部署php
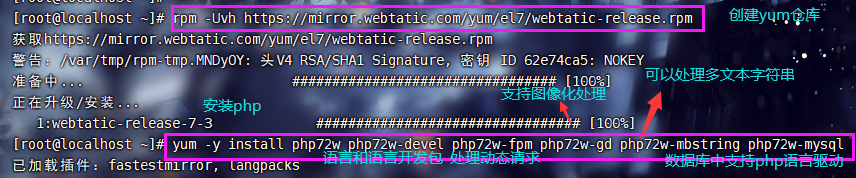
[root@localhost ~]# yum  -y install epel-release.noarch
[root@localhost ~]# rpm -Uvh https://mirror.webtatic.com/yum/el7/webtatic-release.rpm
[root@localhost ~]# yum -y install php72w php72w-devel php72w-fpm php72w-gd php72w-mbstring php72w-mysql


[root@localhost ~]# vim /etc/php.ini
202 short_open_tag = On #支持php短标签
359 expose_php = Off #隐藏php版本
368 max_execution_time = 300 #修改执行时间为300s
378 max_input_time = 300 #修改接收数据等待时间
656 post_max_size = 16M #post数据大小
799 upload_max_filesize = 2M #上传文件大小为2M
800 always_populate_raw_post_data = -1 #使原始数据可以直接被处理
878 date.timezone = Asia/Shanghai #修改时区
[root@localhost ~]# systemctl start php-fpm #开启php服务
[root@localhost ~]# systemctl enable php-fpm #开启服务开机自启
Created symlink from /etc/systemd/system/multi-user.target.wants/php-fpm.service to /usr/lib/systemd/system/php-fpm.service.
[root@localhost ~]# netstat -anpt | grep 9000 #查看端口
tcp        0      0 127.0.0.1:9000          0.0.0.0:*               LISTEN      87450/php-fpm: mast
4、测试连接数据库
[root@localhost ~]# vim /usr/share/nginx/html/info.php #在首页根目录下写一个首页文件

<?php
phpinfo();
?>
[root@localhost ~]# systemctl restart php-fpm.service
[root@localhost ~]# systemctl restart nginx
宿主机访问
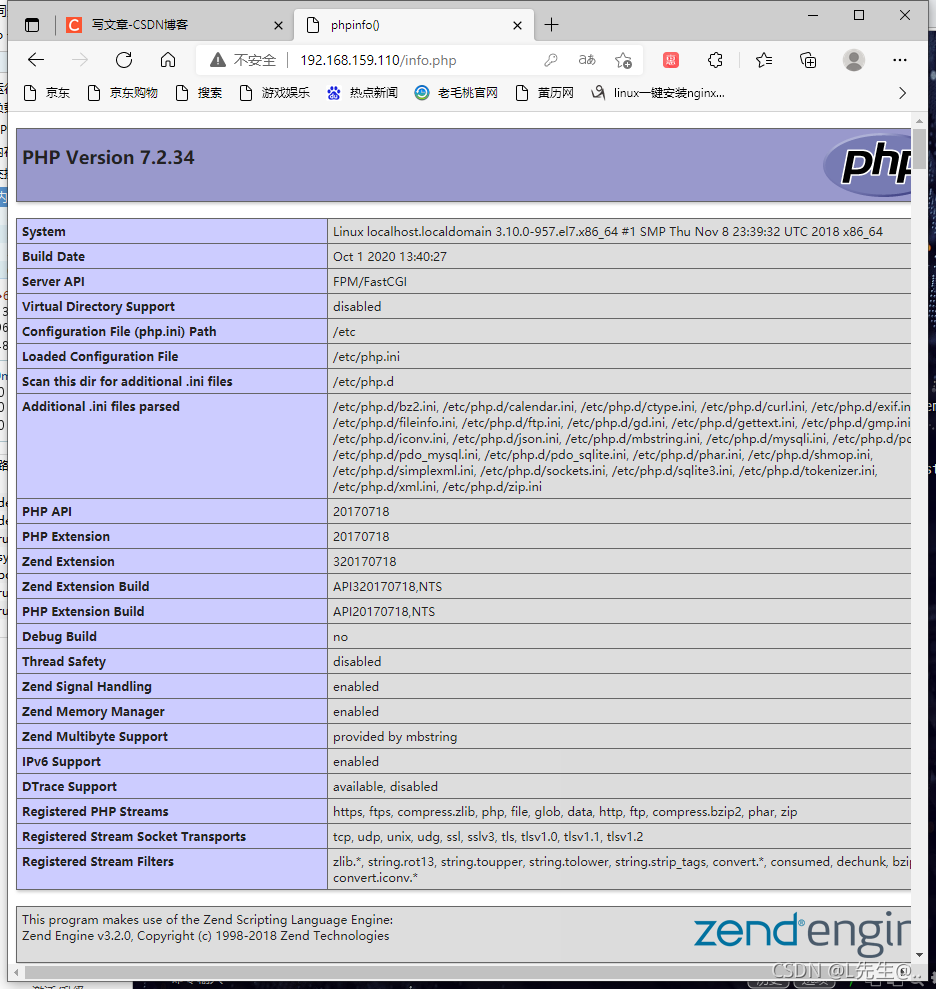
[root@localhost ~]# vim /usr/share/nginx/html/info.php
<?php
$link=mysqli_connect('127.0.0.1','root','lwj2828427125'); #测试连接数据库 (是之前设置的mysql安全配置向导)
if ($link) echo '连接成功';
else echo '连接失败';
?>


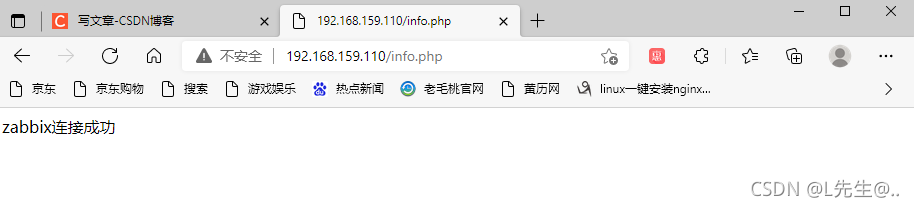
[root@localhost ~]# vim /usr/share/nginx/html/info.php

<?php
$link=mysqli_connect('127.0.0.1','zabbix','admin123');
if ($link) echo 'zabbix连接成功';
else echo 'zabbix连接失败';
?>

解决方法:
出现这样的问题一般是用户冲突,

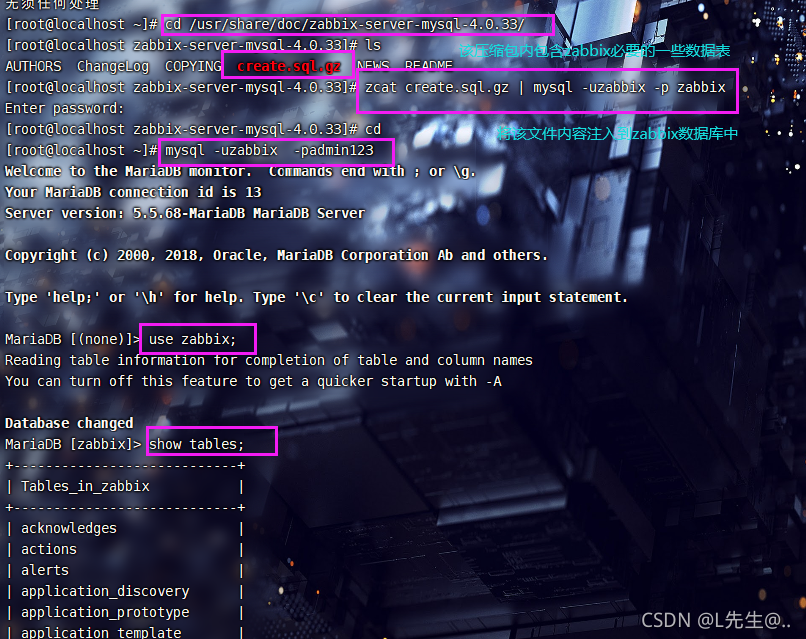
5、部署 zabbix server
[root@localhost ~]# rpm -i https://repo.zabbix.com/zabbix/4.0/rhel/7/x86_64/zabbix-release-4.0-1.el7.noarch.rpm
[root@localhost ~]# yum -y install zabbix-server-mysql zabbix-web-mysql zabbix-agent

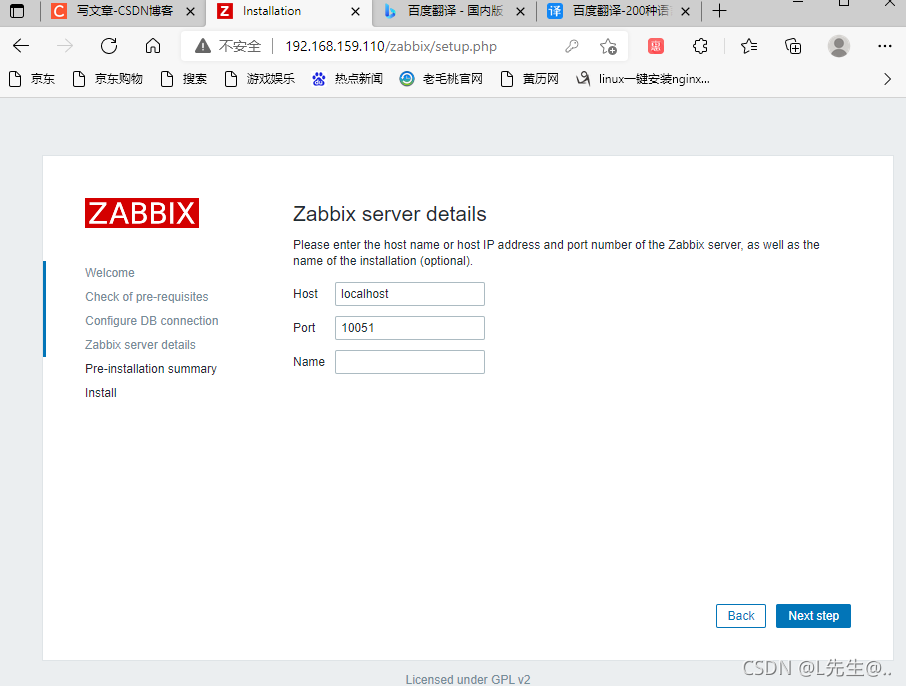
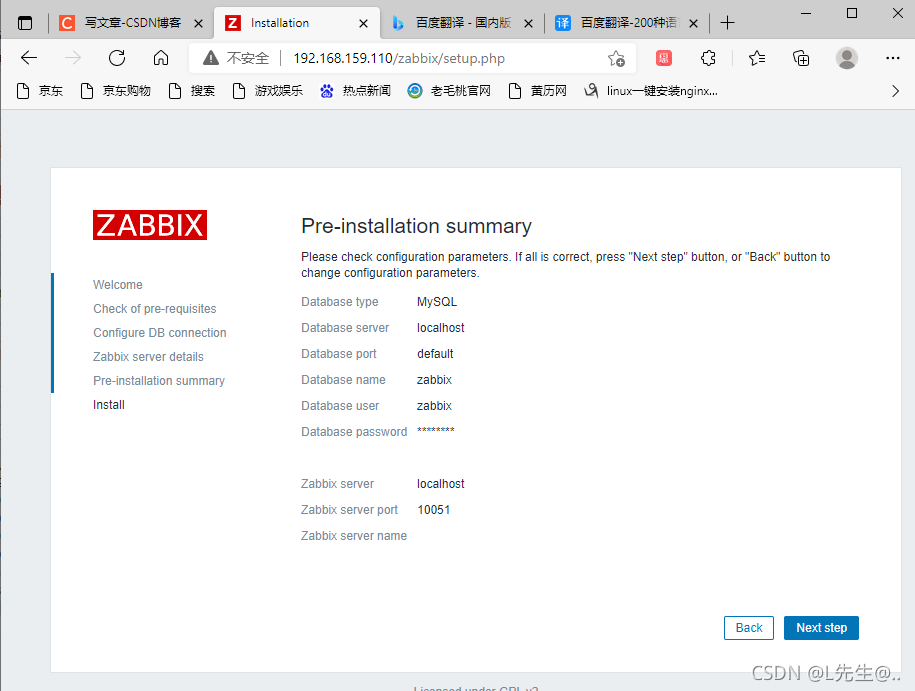
[root@localhost ~]# vim /etc/zabbix/zabbix_server.conf #编辑zabbix服务端配置文件
38 LogFile=/var/log/zabbix/zabbix_server.log #定义日志文件位置和名称
49 LogFileSize=0  #定义日志文件大小,0表示不限制大小
72 PidFile=/var/run/zabbix/zabbix_server.pid  #进程文件位置
82 SocketDir=/var/run/zabbix  #通信文件位置
91  DBHost=localhost #数据库所在服务器,本地
100 DBName=zabbix  #数据库名称
116 DBUser=zabbix #数据库用户
124 DBPassword=admin123 #数据库密码
356 SNMPTrapperFile=/var/log/snmptrap/snmptrap.log  #snmp协议日志位置
471 Timeout=4 #定义超时时间
514 AlertScriptsPath=/usr/lib/zabbix/alertscripts #告警的脚本存放位置
525 ExternalScripts=/usr/lib/zabbix/externalscripts #扩展性脚本存放位置
561 LogSlowQueries=3000 #定义慢查询时间
[root@localhost ~]# cp -r /usr/share/zabbix/ /usr/share/nginx/html #将zabbix的所有必要内容复制
[root@localhost ~]# chown -R zabbix.zabbix /etc/zabbix #到nginx默认首页目录下
[root@localhost ~]# chown -R zabbix.zabbix /usr/share/nginx #将zabbix相关的目录用户和组进行修改
[root@localhost ~]# chown -R zabbix.zabbix /usr/lib/zabbix
[root@localhost ~]# chmod -R 777 /etc/zabbix/web  #为zabbix web页面目录和php动态会话目录赋予权限
[root@localhost ~]# chmod -R 777 /var/lib/php/session
[root@localhost ~]#
[root@localhost ~]#
[root@localhost ~]# systemctl  start zabbix-server.service #开启服务
[root@localhost ~]# systemctl enable zabbix-server.service
Created symlink from /etc/systemd/system/multi-user.target.wants/zabbix-server.service to /usr/lib/systemd/system/zabbix-server.service.
[root@localhost ~]# netstat -anpt | grep 10051 #10051是zabbix服务端端口号
tcp        0      0 0.0.0.0:10051           0.0.0.0:*               LISTEN      36435/zabbix_server
tcp6       0      0 :::10051                :::*                    LISTEN      36435/zabbix_server
[root@localhost ~]#
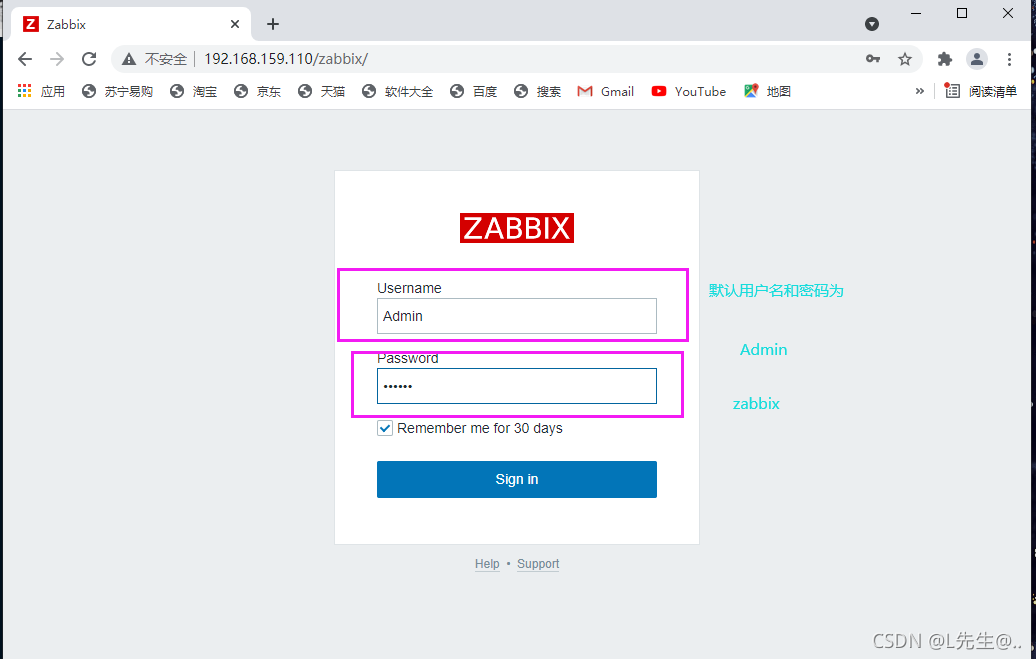
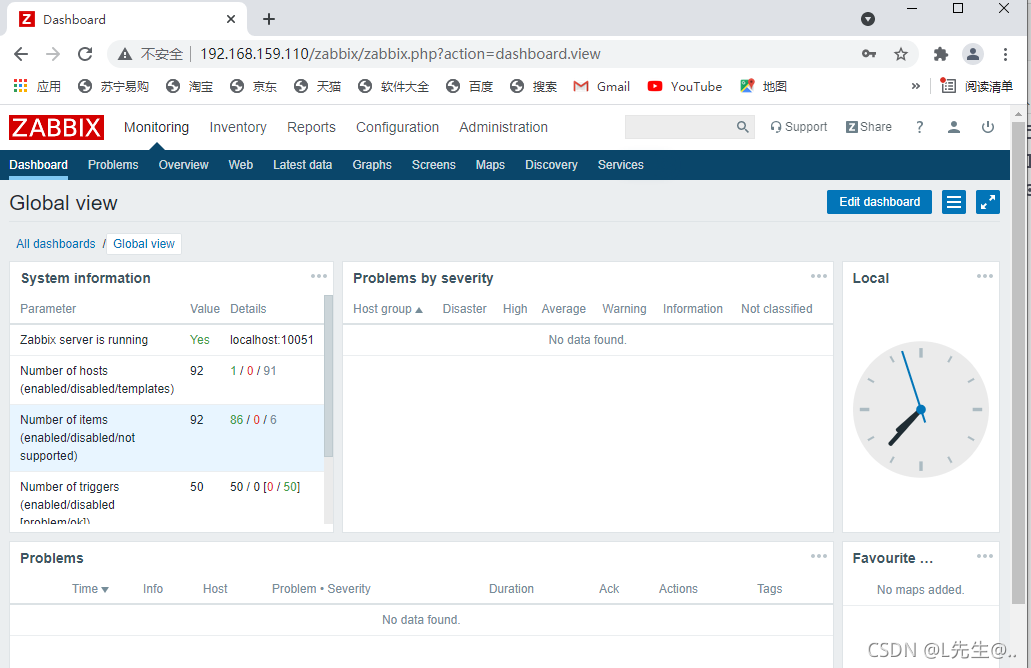
访问宿主机


6、配置代理端zabbix
重新开一台虚拟机
[root@localhost ~]# systemctl stop firewalld
[root@localhost ~]# setenforce 0
[root@localhost ~]# rpm -i https://repo.zabbix.com/zabbix/4.0/rhel/7/x86_64/zabbix-release-4.0-1.el7.noarch.rpm  #安装zabbix源
警告:/var/tmp/rpm-tmp.yhXjIo: 头V4 RSA/SHA512 Signature, 密钥 ID a14fe591: NOKEY
[root@localhost ~]# yum -y install zabbix-agent #安装zabbix代理服务
已加载插件:fastestmirror, langpacks
Loading mirror speeds from cached hostfile
 * base: mirrors.huaweicloud.com
 * extras: mirrors.ustc.edu.cn
 * updates: ftp.sjtu.edu.cn
软件包 zabbix-agent-4.0.33-1.el7.x86_64 已安装并且是最新版本
无须任何处理
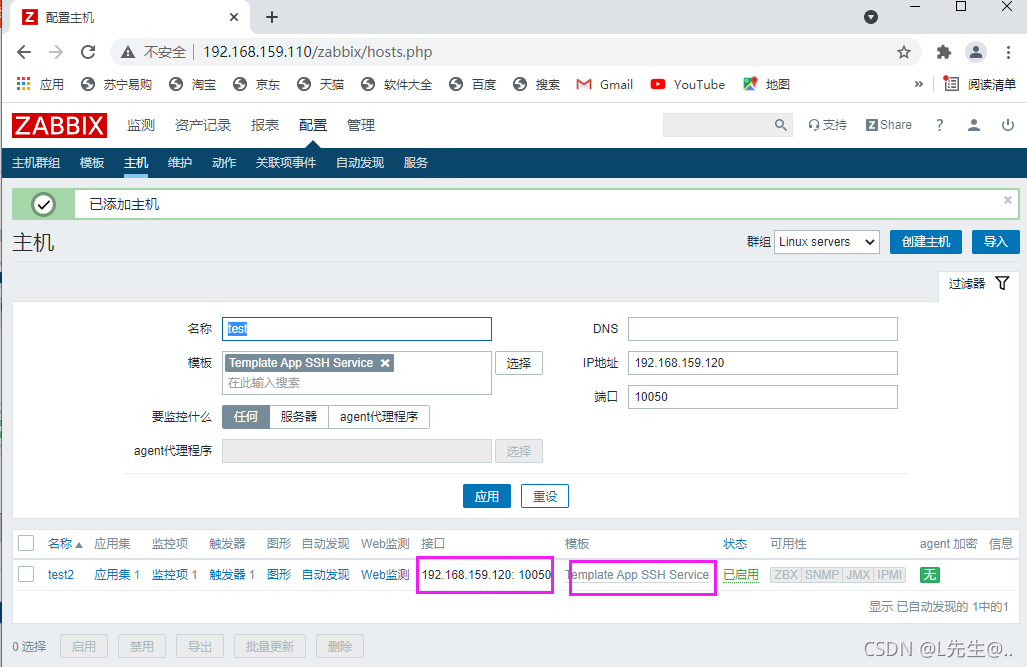
[root@localhost ~]# vim /etc/zabbix/zabbix_agentd.conf #编辑zabbix代理服务配置文件
98 Server=192.168.159.110 #指向监控端地址
139 ServerActive=192.168.159.110 #指向监控服务器
150 Hostname=test #修改名称


7、配置告警自动发布邮件
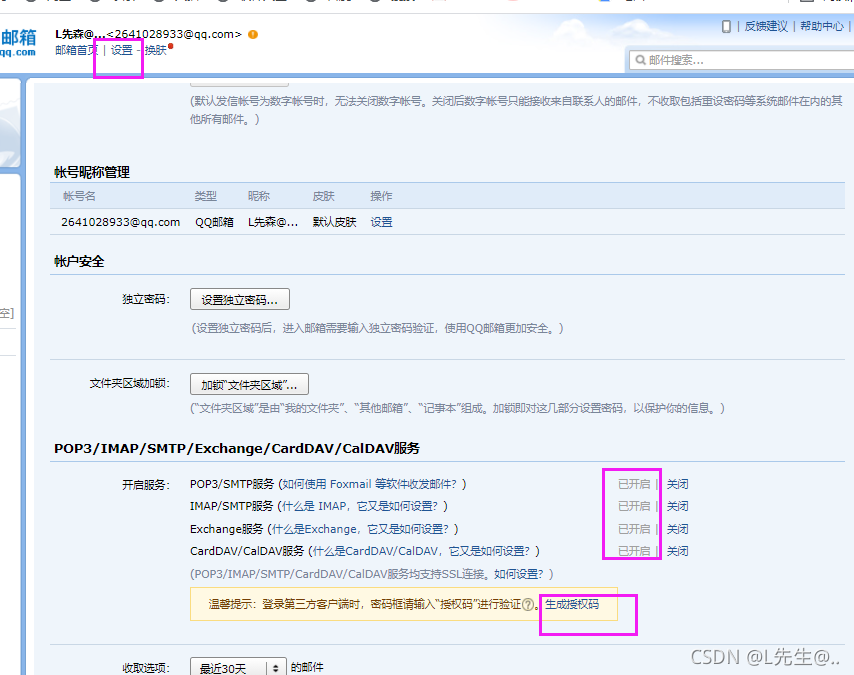
QQ邮箱的开启方式
在服务器上配置
[root@localhost ~]# yum -y install mailx #安装收发邮件工具mailx
已加载插件:fastestmirror, langpacks
Loading mirror speeds from cached hostfile
 * base: mirrors.cn99.com
 * epel: ftp.iij.ad.jp
 * extras: mirrors.ustc.edu.cn
 * updates: mirrors.ustc.edu.cn
 * webtatic: us-east.repo.webtatic.com
软件包 mailx-12.5-19.el7.x86_64 已安装并且是最新版本
无须任何处理
[root@localhost ~]# vim /etc/mail.rc  #编辑配置文件
set from=2641028933@qq.com
set smtp=smtp.qq.com
set smtp-auth-user=2641028933@qq.com
set smtp-auth-password=ytwkwsbgovsoecgc
set smtp-auth=login
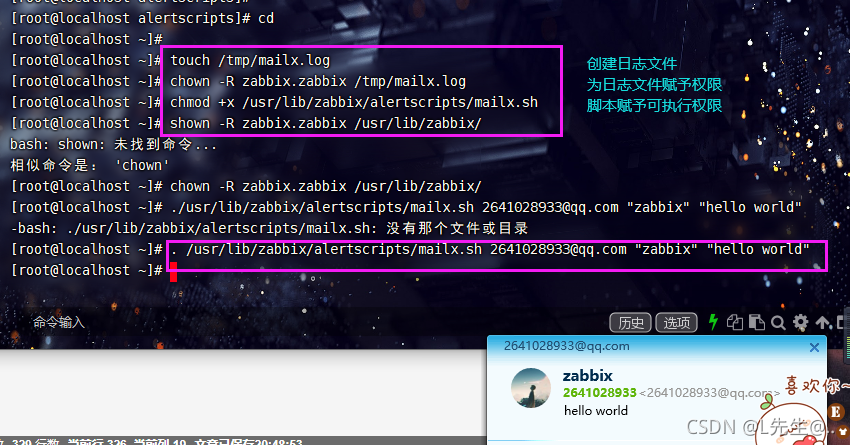
测试能否正常发送

[root@localhost ~]# cd /usr/lib/zabbix/alertscripts/
[root@localhost alertscripts]# vim mailx.sh
#!/bin/bash
#send mail

messages=`echo $3 | tr '\r\n' '\n'`
subject=`echo $2 | tr '\r\n' '\n'`
echo "${messages}" | mail -s "${subject}" $1 >> /tmp/mailx.log 2>&1

#$3是信息  $2是标题 $1是邮箱
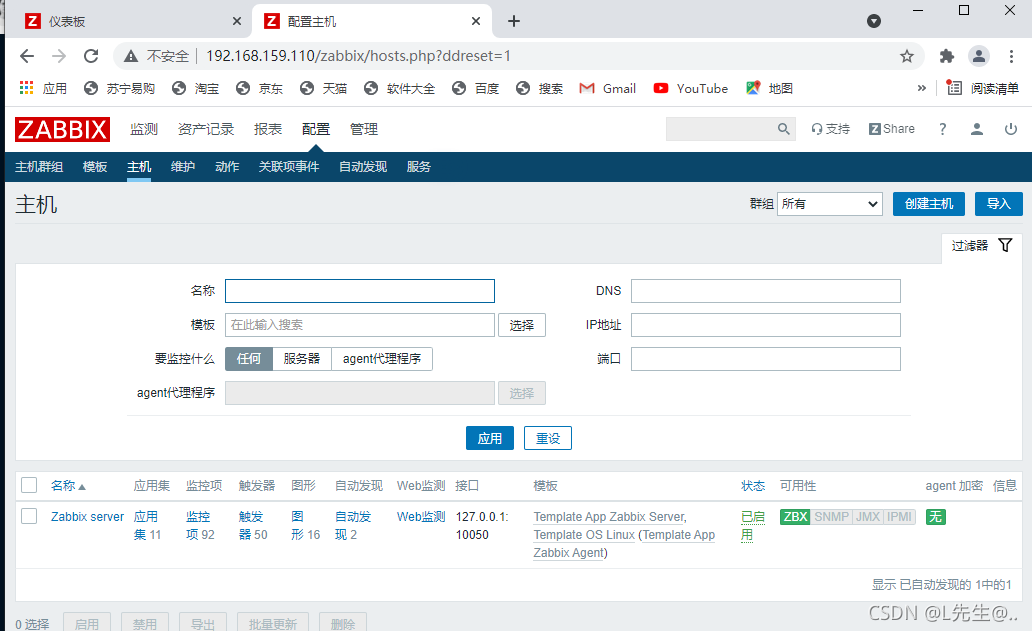
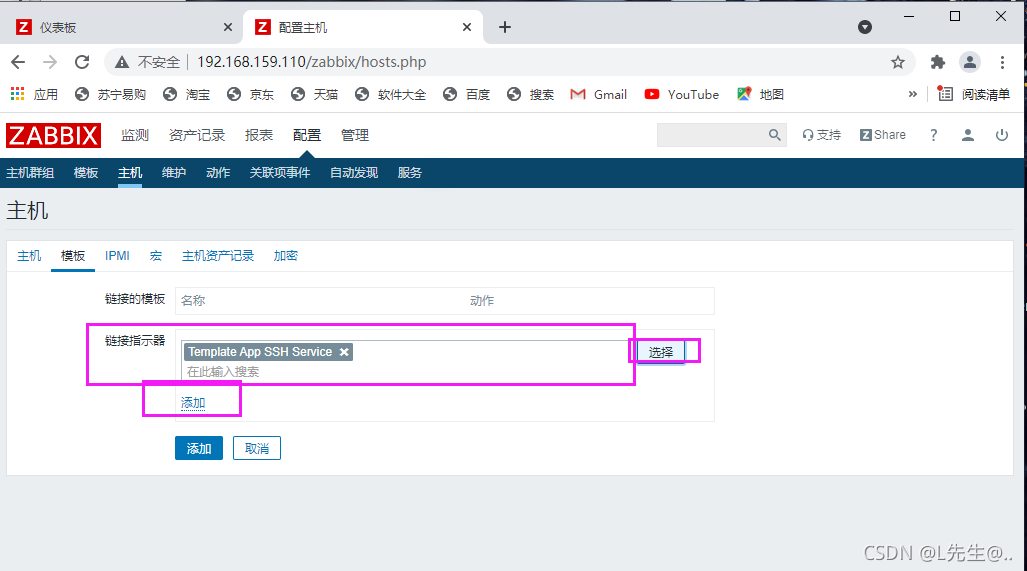
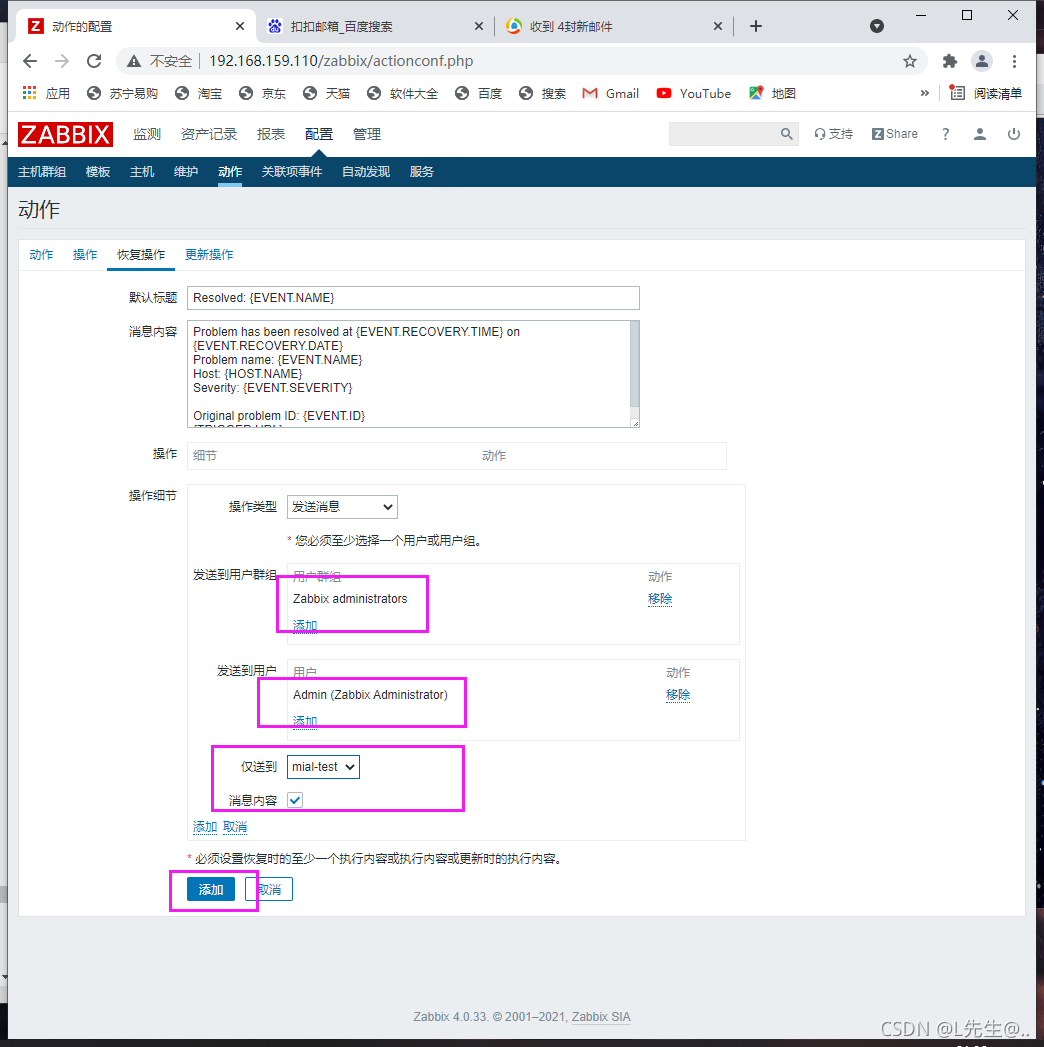
8、web页面配置监控机制


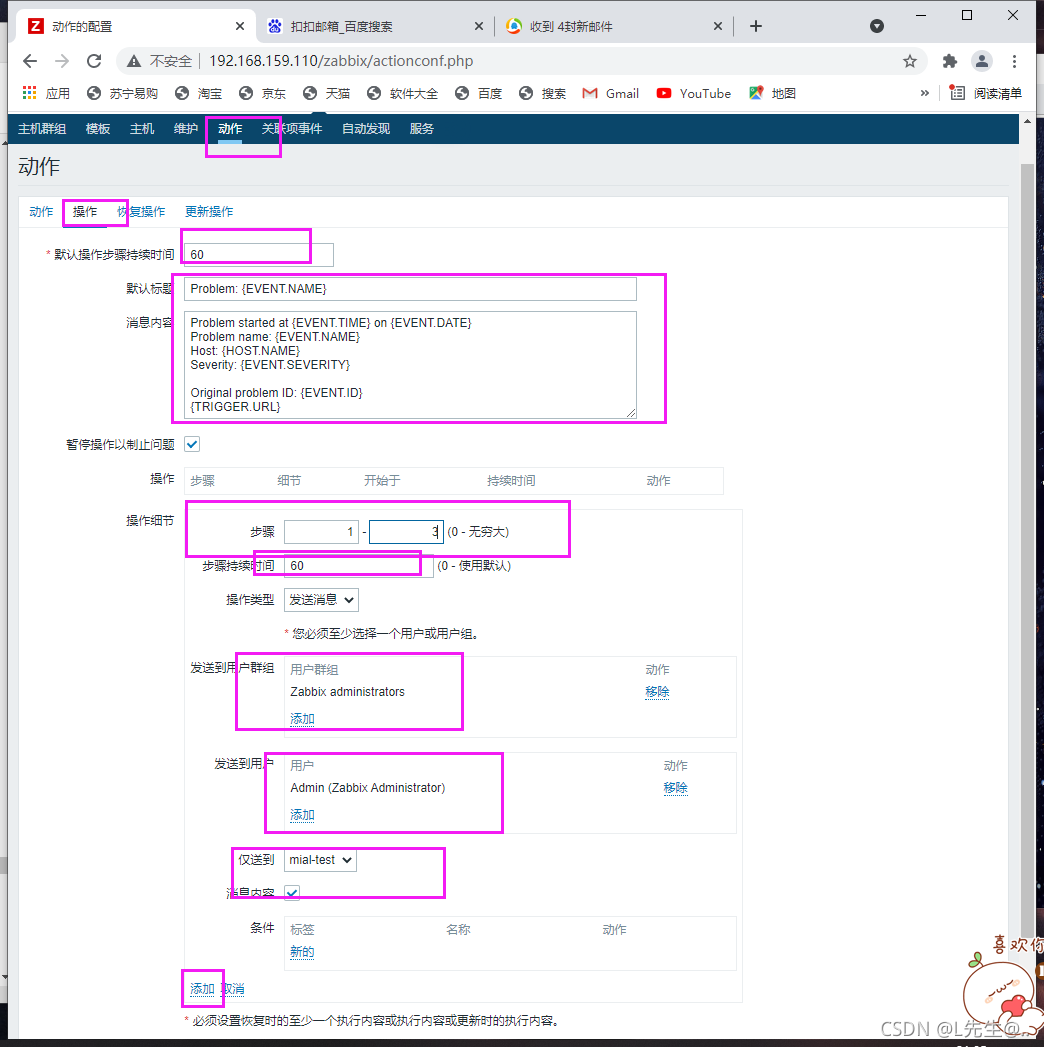
服务器重启zabbix服务
192.168.159.110

代理服务器重启ssh服务,
