1.创建springboot项目:
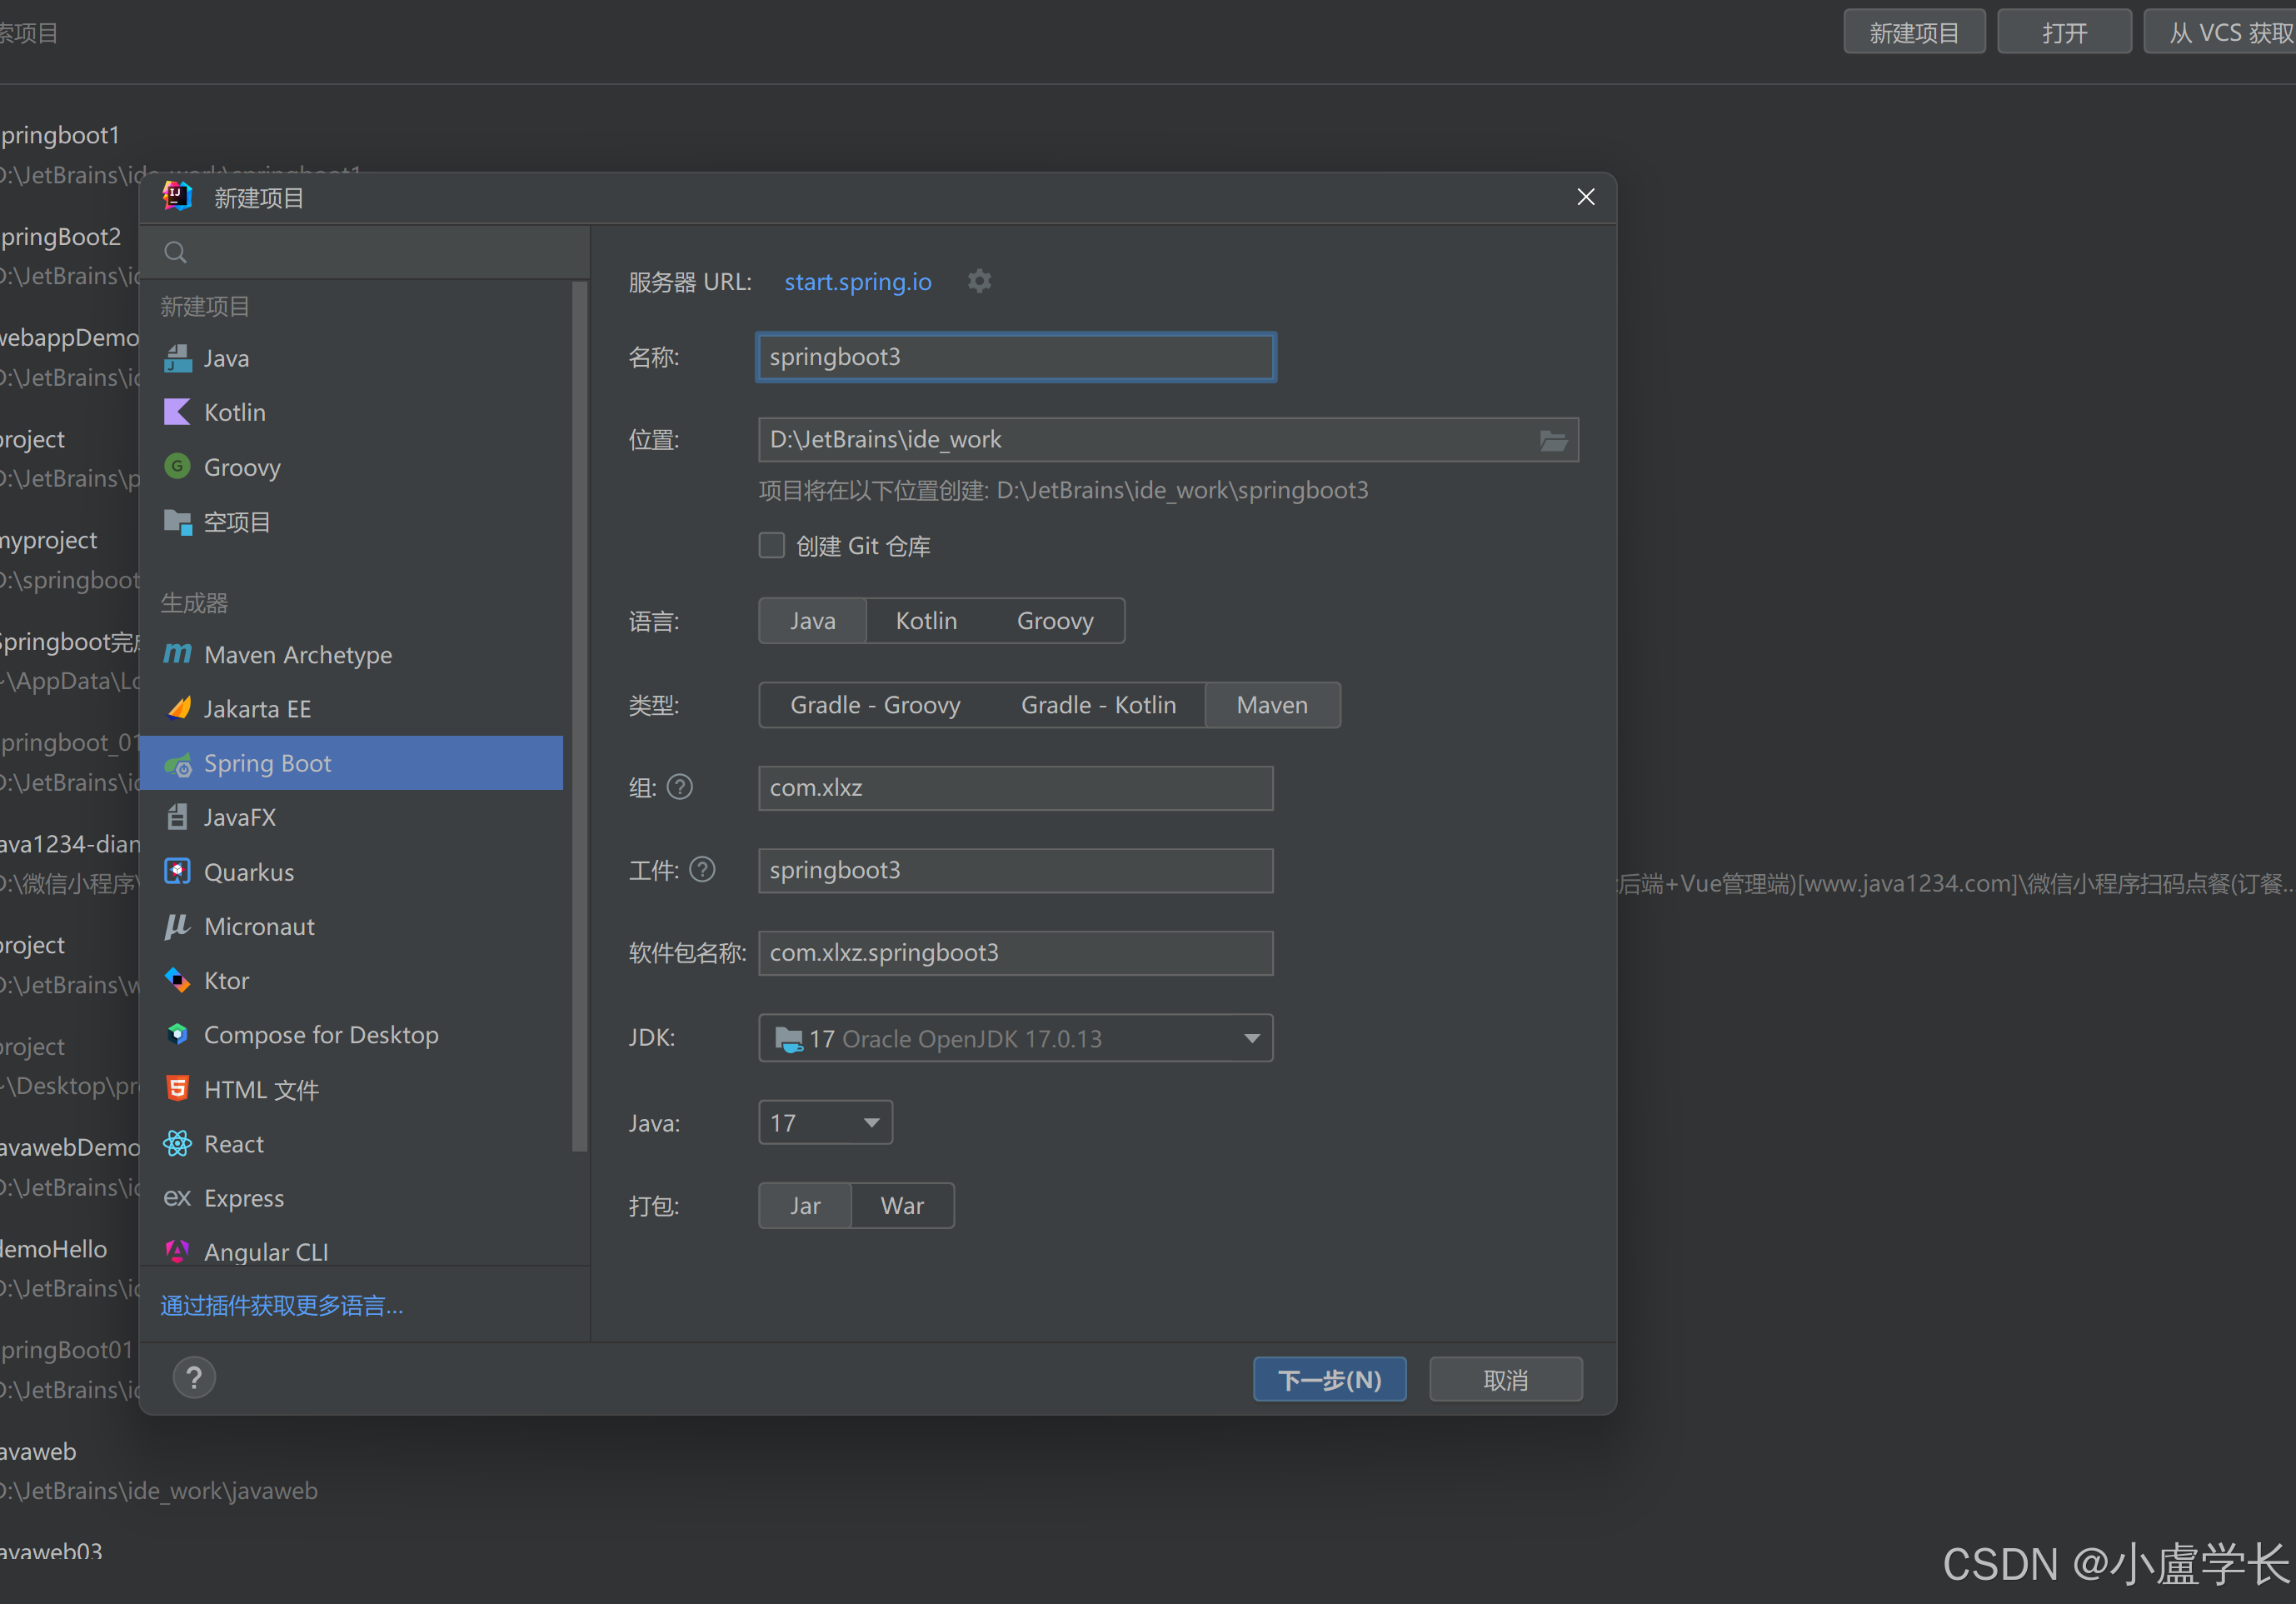
新建项目 -> Spring Boot ->自定义写你的项目名称、项目位置等、语言java、类型选择maven,最后选择JDK版本,这里推荐17以上,对应Java也一样,最后选jar包 -> next
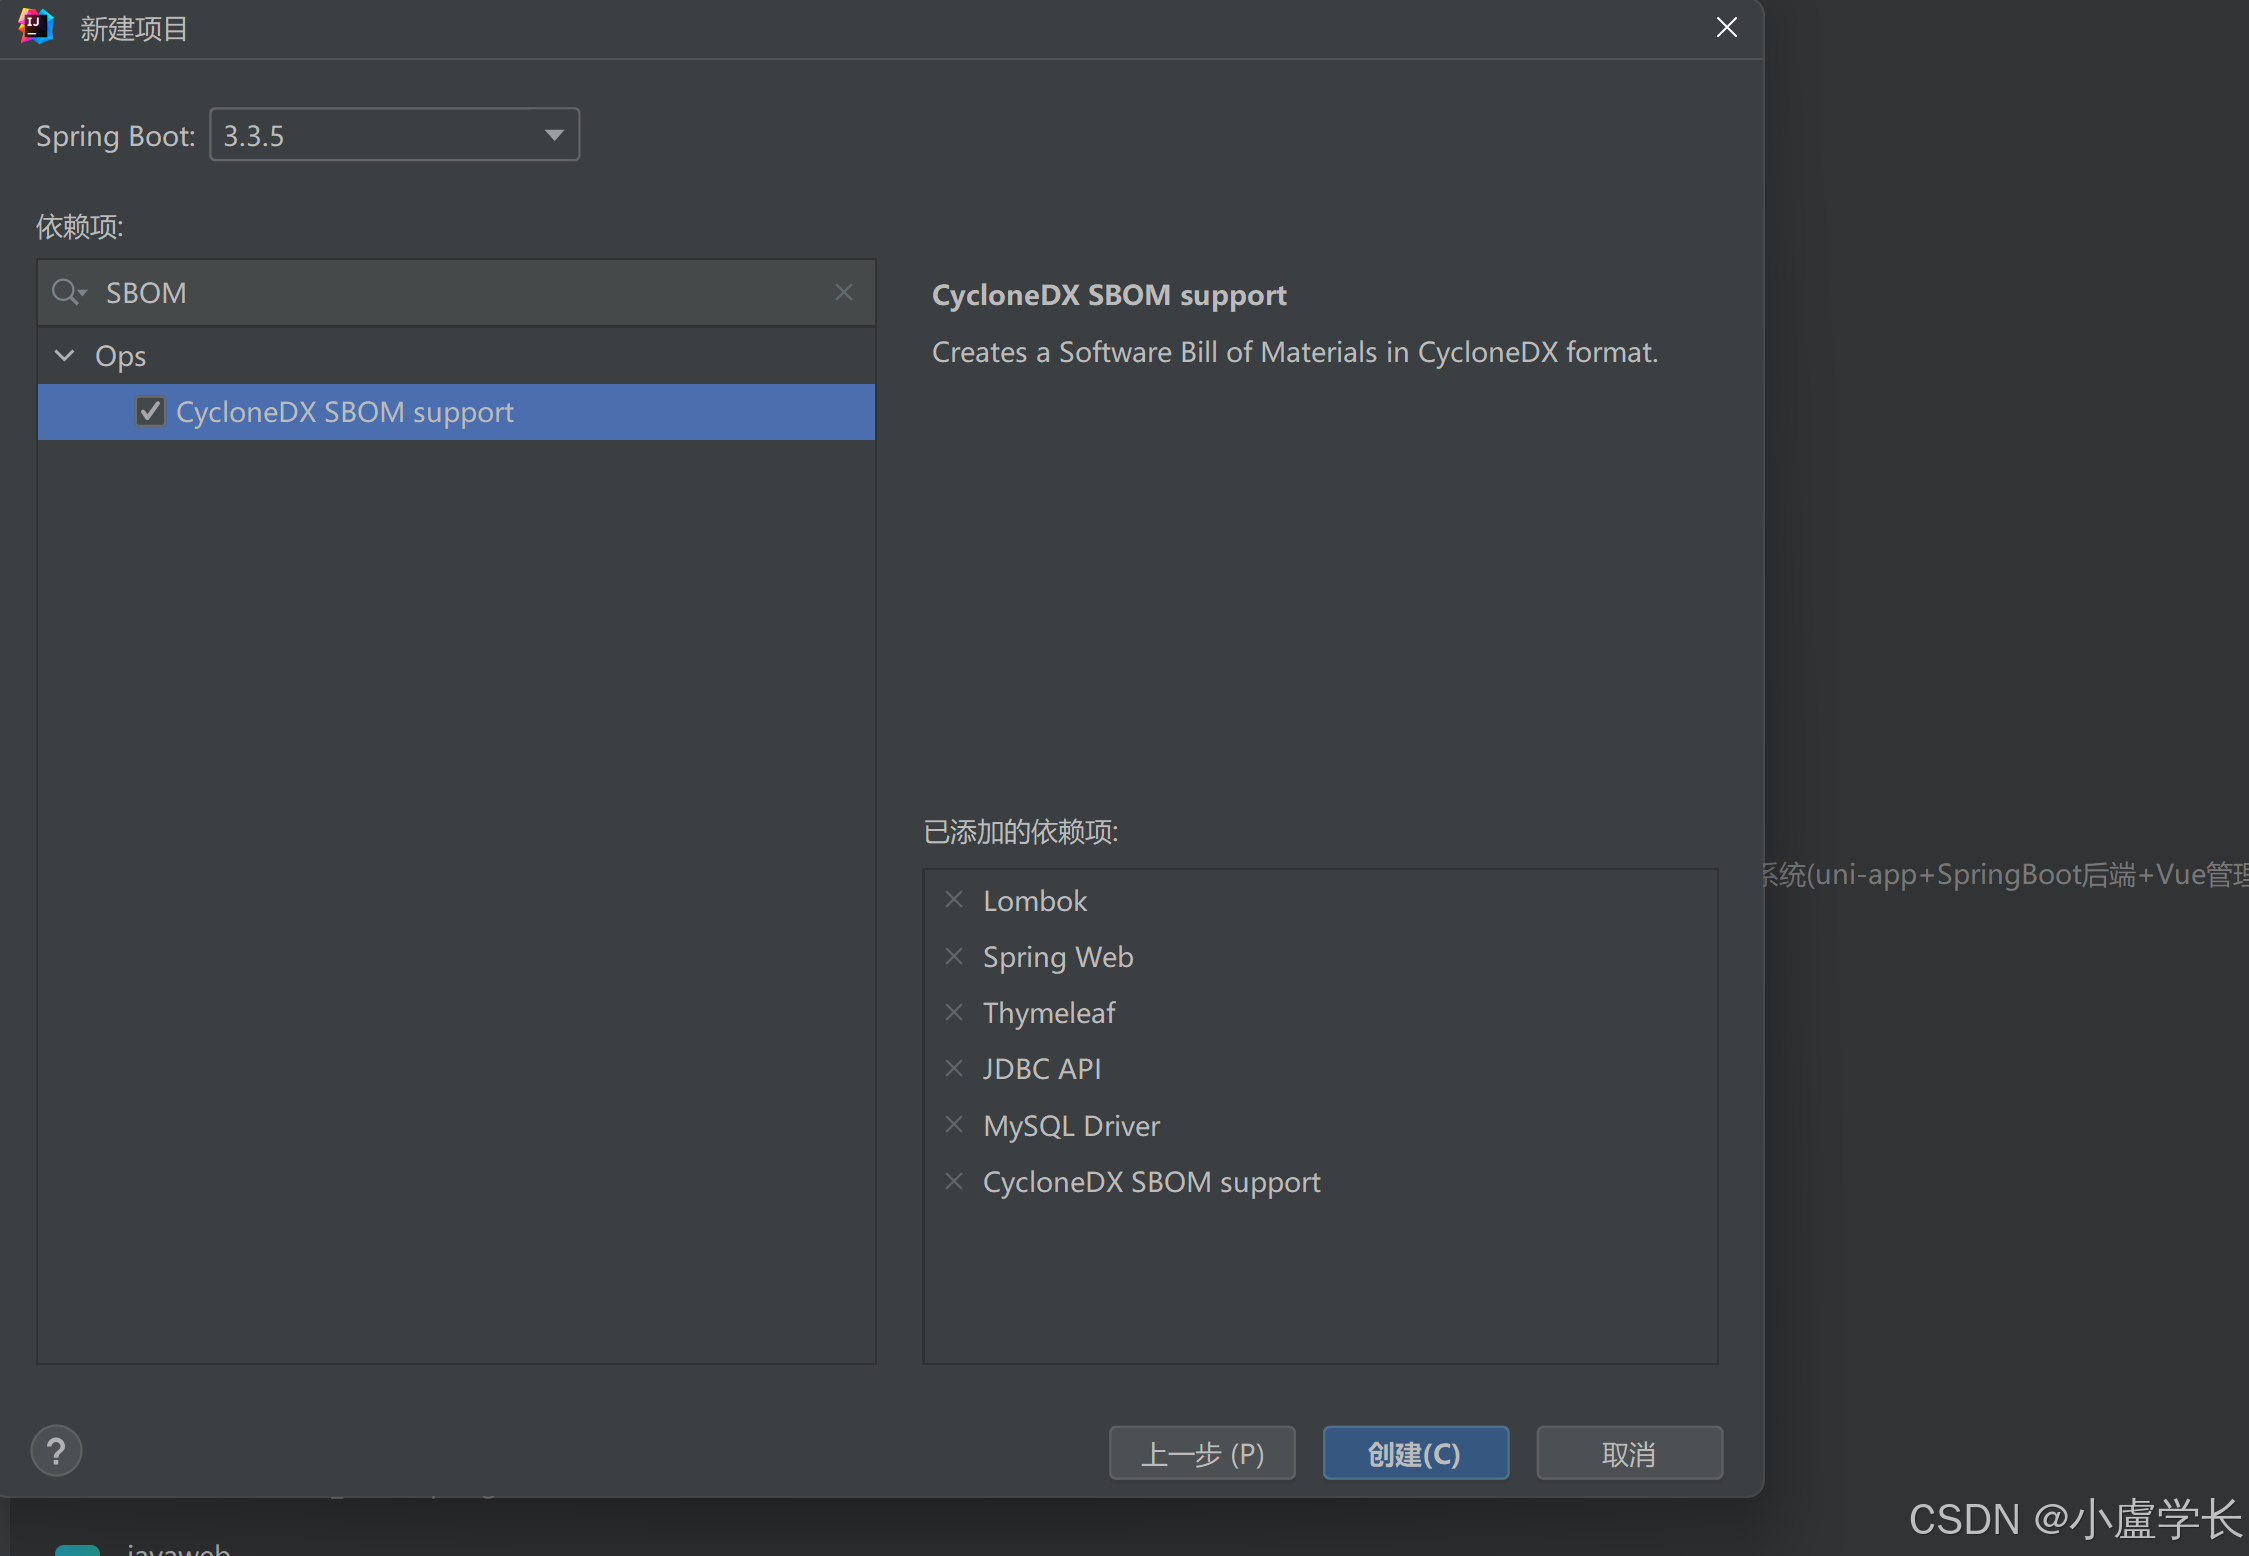
首先选择springboot版本,我这里为3.3.5,接下来导入依赖,springboot功能强大, 能直接导入而不需要手敲,按图先导入这几种(可以直接搜索),下面为对这几种依赖的个人解释:
Lombok:日志文件,springboot开发必不可少
Spring Web:添加web依赖,web开发必须
Thymeleaf:处理web环境
JDBC API:数据库驱动
MySQL Driver:用于与MySQL数据库交互
CycloneDX SBOM support:用于跟踪,管理依赖项
接下来点击创建,等待idea构建完毕

2.配置application.yml文件
开始时你只能看到applicaiton.propitious,右键 -> 重构 -> 改为 application.yml
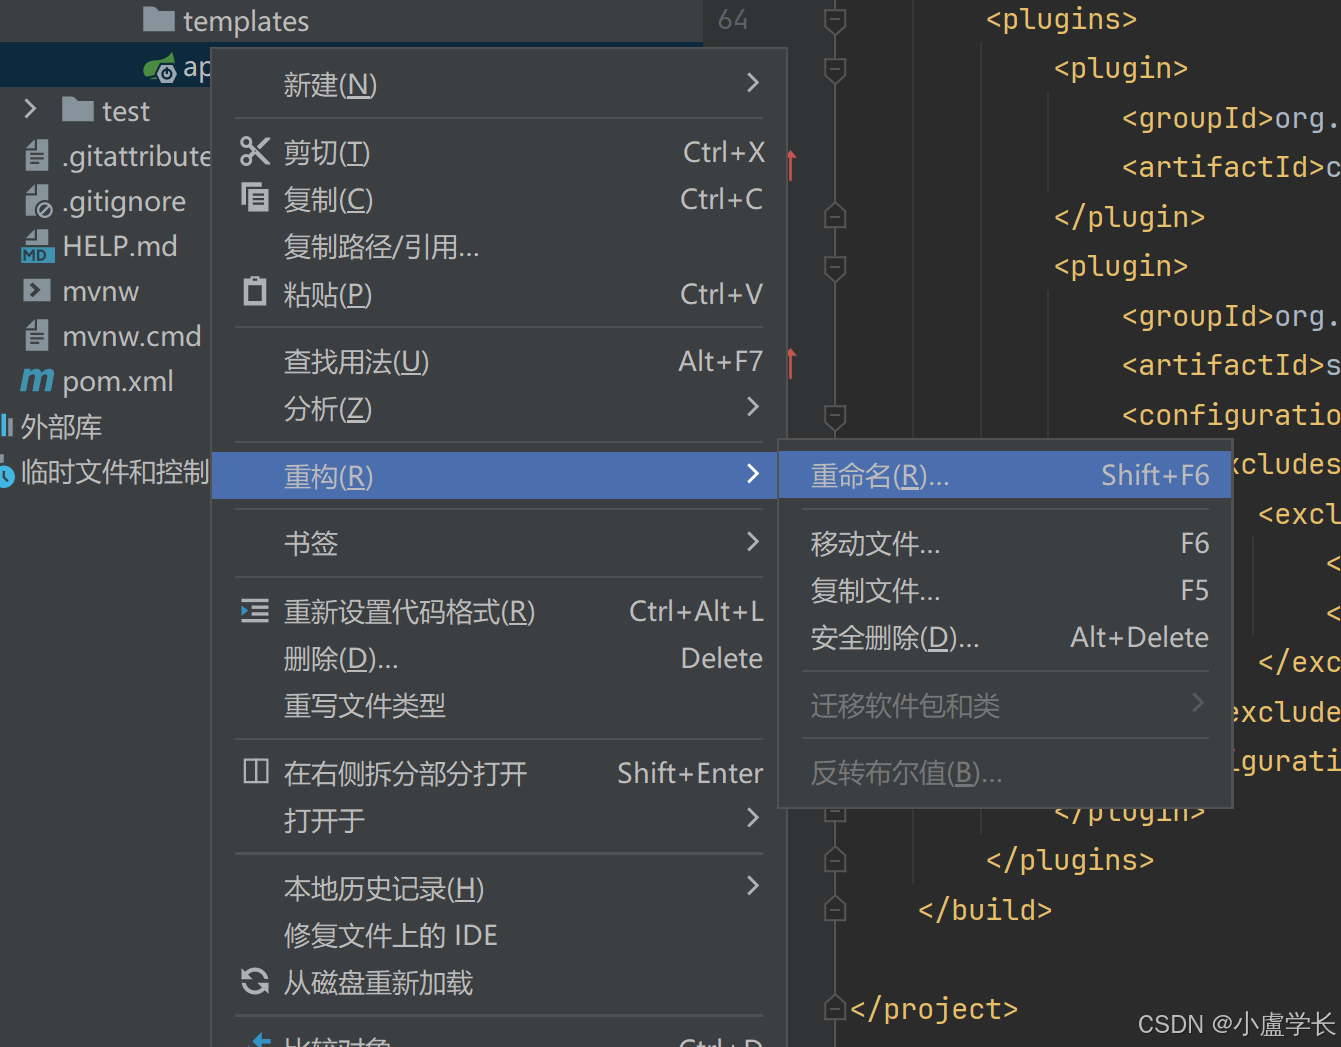
删除里面代码,复制为如下代码:
spring:
application:
name: xlxz
datasource:
url: jdbc:mysql://localhost:3306/【这里替换你建的数据库名】?useUnicode=true&characterEncoding=utf-8&useSSL=false&serverTimezone=Asia/Shanghai
username: root #这里替换你的数据库用户名
password: 123456 #这里替换你的数据库密码
driver-class-name: com.mysql.cj.jdbc.Driver
mybatis-plus:
mapper-locations: classpath:mapper/*.xml
3.接下来你就可以自己测试了!(可以自己写,也可以用文末我的简单示例)
4.如果测试不成功,如注解大量报错这些,则可能是最新的springboot版本太超前了,与mybatis-plus-boot-starter 不兼容,则需要自己手动导入一下依赖:
在pom.xml中,
<dependencies>里面导入以下依赖:
<dependency> <groupId>com.baomidou</groupId> <artifactId>mybatis-plus-boot-starter</artifactId> <version>3.5.7</version> <exclusions> <exclusion> <groupId>org.mybatis</groupId> <artifactId>mybatis-spring</artifactId> </exclusion> </exclusions></dependency><dependency> <groupId>org.mybatis</groupId> <artifactId>mybatis-spring</artifactId> <version>3.0.3</version></dependency><dependency> <groupId>mysql</groupId> <artifactId>mysql-connector-java</artifactId> <version>8.0.33</version></dependency>
这三个依赖大致作用就是解析和sql驱动。
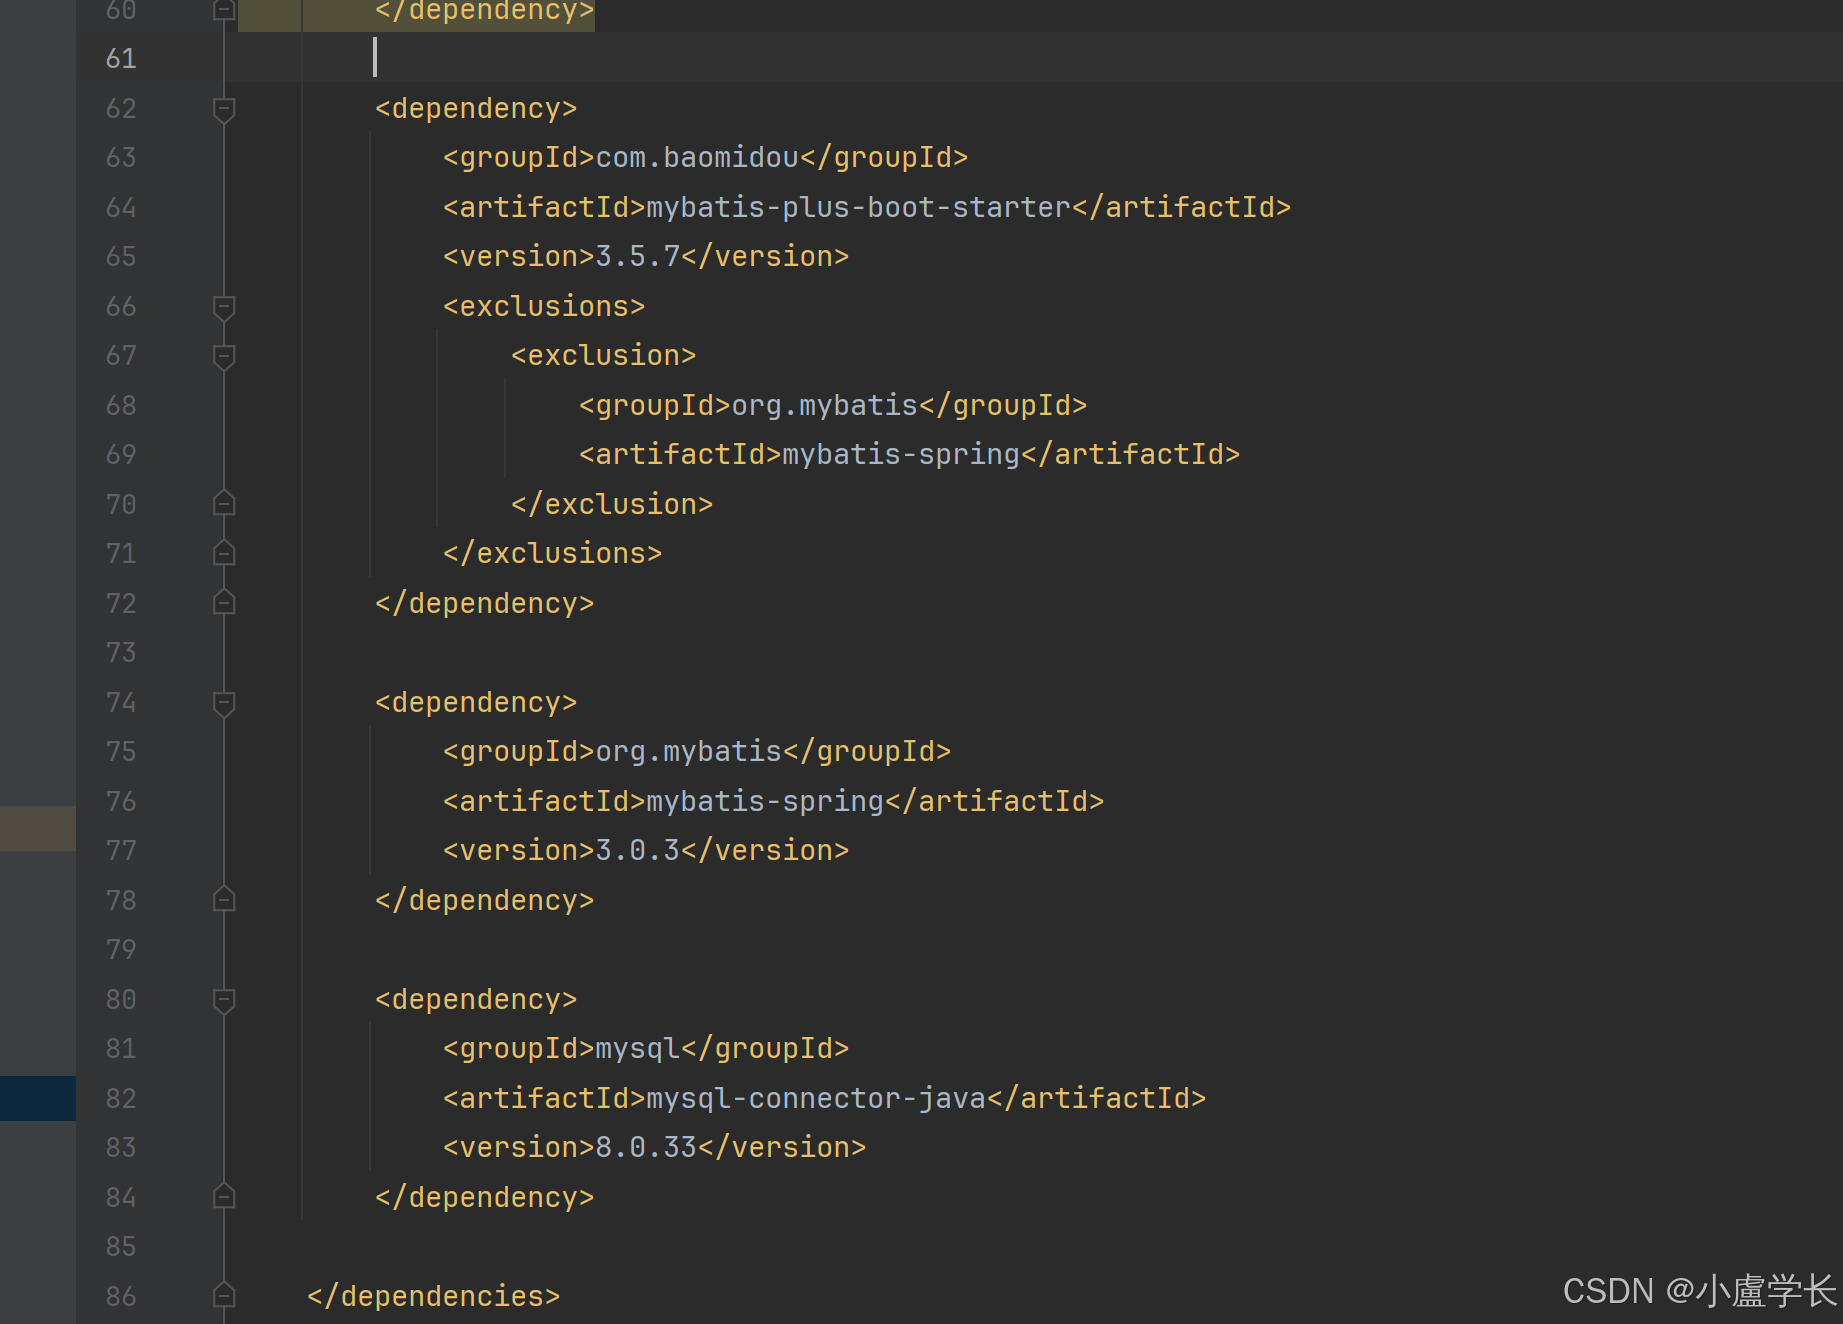
然后右键 -> 点击maven ->重新加载项目
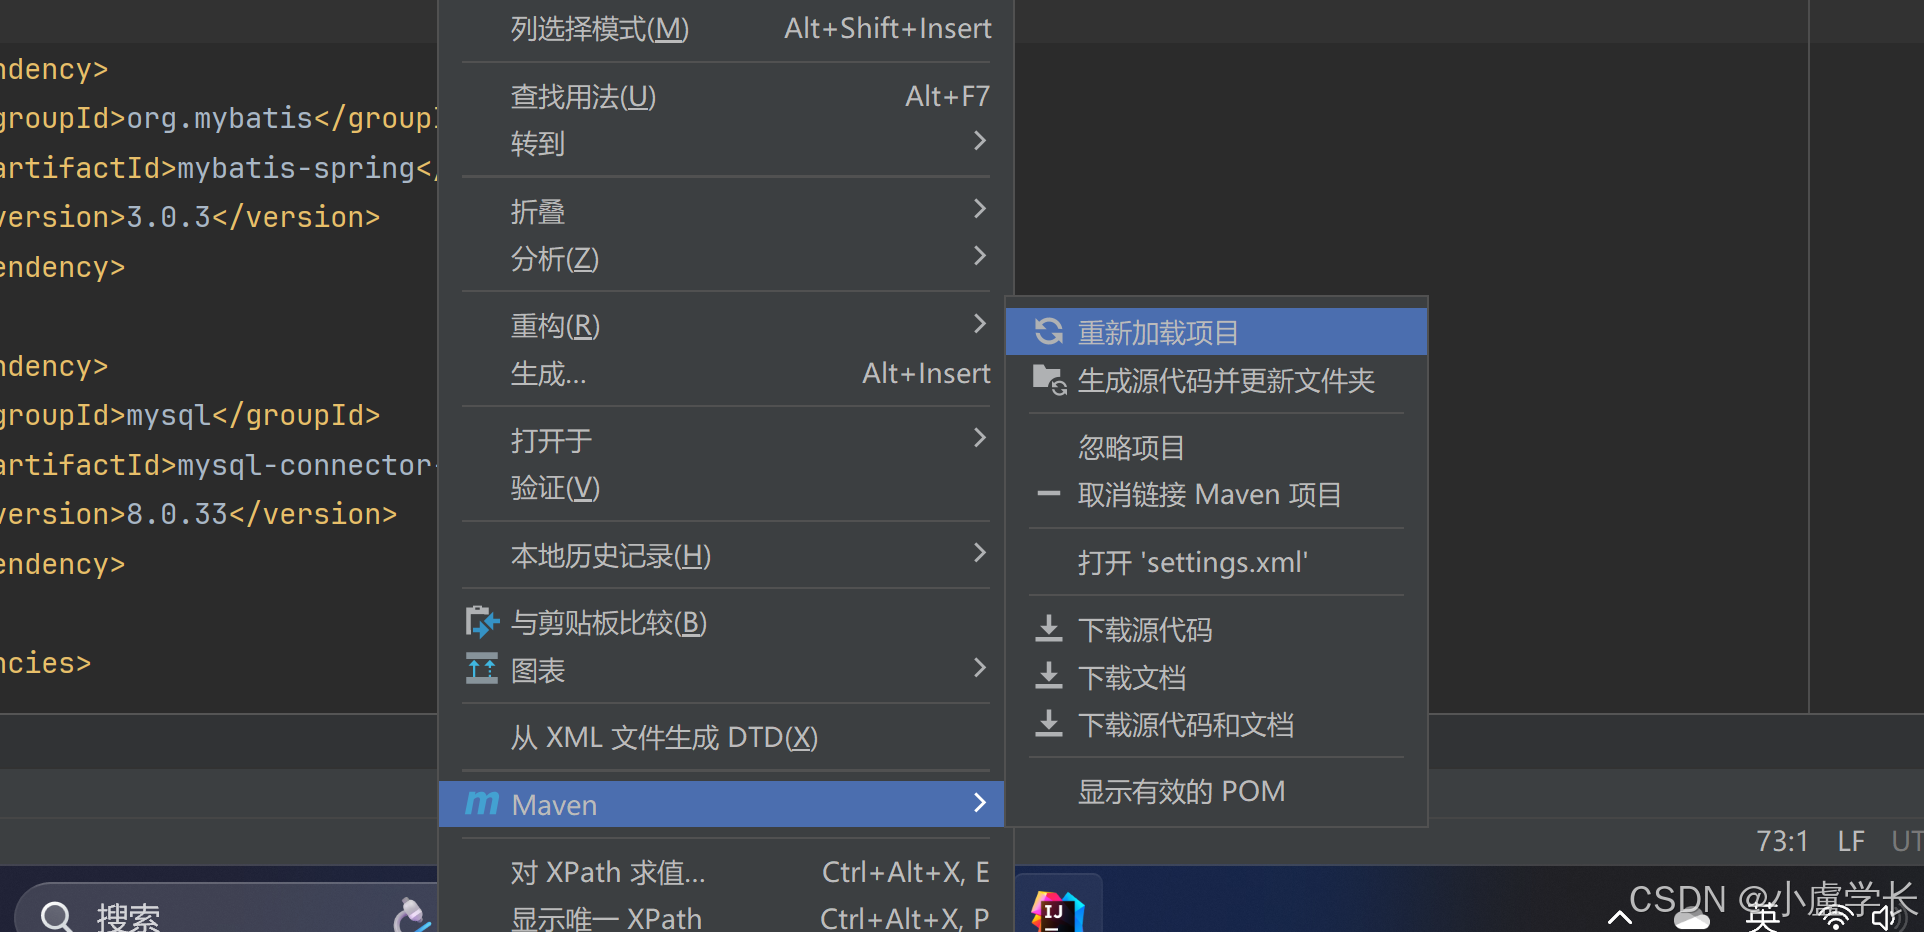
就可以解决报错问题(当然这是基础的构建问题)
5.简单测试:
首先建一个简单的数据库:
create database users1;
use users1;
CREATE TABLE `user` (
`userid` int NOT NULL AUTO_INCREMENT COMMENT '用户id',
`username` varchar(255) DEFAULT NULL COMMENT '用户名字',
`userPassword` varchar(255) DEFAULT NULL COMMENT '用户密码',
PRIMARY KEY (`userid`)
) ENGINE=InnoDB AUTO_INCREMENT=6 DEFAULT CHARSET=utf8mb4 COLLATE=utf8mb4_0900_ai_ci;
然后插入一个简单数据:例如下:

然后按下面这个格式建包建类:
各类的代码如下:(记得代码中自己替换成自己项目的路径,否则会报红)
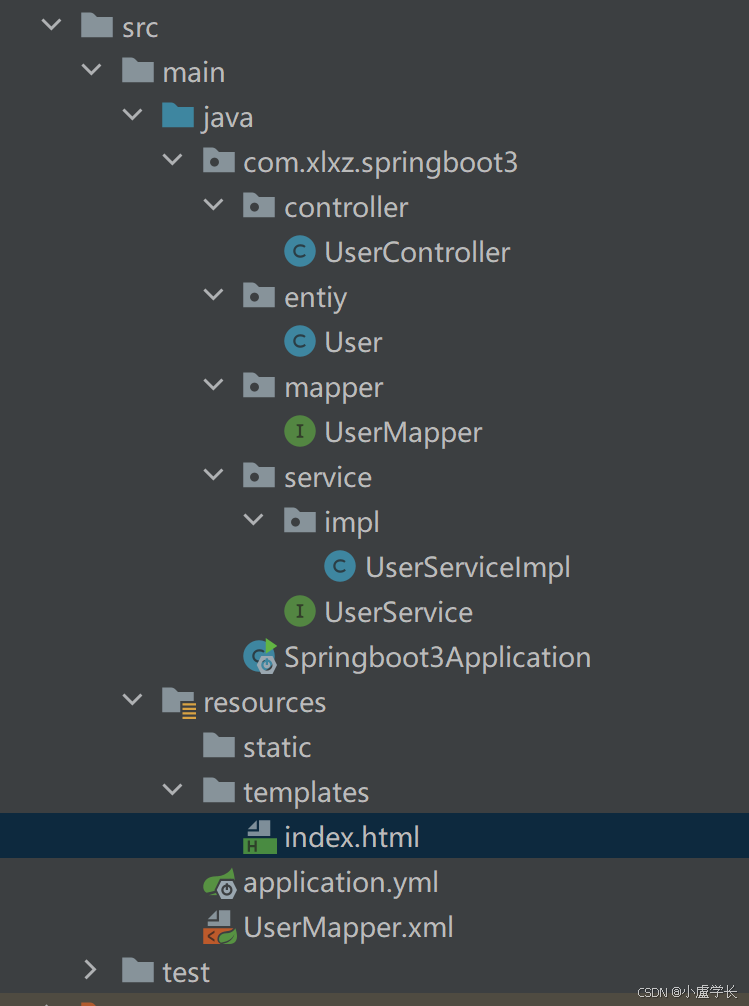
UserController:
package com.xlxz.springboot3.controller;import com.xlxz.springboot3.entiy.User;import com.xlxz.springboot3.service.UserService;import jakarta.annotation.Resource;import org.springframework.stereotype.Controller;import org.springframework.ui.Model;import org.springframework.web.bind.annotation.GetMapping;import java.util.List;@Controllerpublic class UserController { @Resource UserService userService; @GetMapping("/index") public String list(Model model){ List<User> list = userService.list(); model.addAttribute("list", list); return "index"; }} User:
package com.xlxz.springboot3.entiy;import com.baomidou.mybatisplus.annotation.TableField;import com.baomidou.mybatisplus.annotation.TableName;import lombok.AllArgsConstructor;import lombok.Data;import lombok.NoArgsConstructor;@Data@NoArgsConstructor@AllArgsConstructor@TableName("user")public class User { @TableField("userid") private int userid; @TableField("username") private String username; @TableField("userPassword") private String userPassword;} UserMapper:
package com.xlxz.springboot3.mapper;import com.baomidou.mybatisplus.core.mapper.BaseMapper;import com.xlxz.springboot3.entiy.User;import org.apache.ibatis.annotations.Mapper;@Mapperpublic interface UserMapper extends BaseMapper<User> {} UserServiceImpl:
package com.xlxz.springboot3.service.impl;import com.baomidou.mybatisplus.extension.service.impl.ServiceImpl;import com.xlxz.springboot3.entiy.User;import com.xlxz.springboot3.mapper.UserMapper;import com.xlxz.springboot3.service.UserService;import org.springframework.stereotype.Service;@Servicepublic class UserServiceImpl extends ServiceImpl<UserMapper, User> implements UserService {} UserServiceI:
package com.xlxz.springboot3.service;import com.baomidou.mybatisplus.extension.service.IService;import com.xlxz.springboot3.entiy.User;public interface UserService extends IService<User> {} index.html:
<!DOCTYPE html><html><head> <meta charset="UTF-8"> <meta name="viewport" content="width=device-width, initial-scale=1.0, maximum-scale=1.0, minimum-scale=1.0"> <meta http-equiv="X-UA-Compatible" content="ie=edge"> <title>用户列表</title> <style> body { font-family: Arial, sans-serif; background-color: #f4CAF50; color: #333; padding: 20px; } table { width: 100%; border-collapse: collapse; margin-top: 20px; } th, td { border: 1px solid #ddd; padding: 8px; text-align: left; } th { background-color: #00796B; color: white; } tr:nth-child(even) { background-color: #f9f9f9; } tr:hover { background-color: #f5f5f5; } </style></head><body><div> <h1 >这是用户列表页面</h1> <table> <thead> <tr> <th>ID</th> <th>用户名</th> <th>密码</th> <tbody> <tr th:each="user : ${list}"> <td th:text="${user.userid}">1td> <td th:text="${user.username}">用户名td> <td th:text="${user.userPassword}">密码td> </tr> </tbody> </table></div></body></html> application.yml:这个已经有了,主要替换数据库信息
spring: application: name: xlxz datasource: url: jdbc:mysql://localhost:3306/users1?useUnicode=true&characterEncoding=utf-8&useSSL=false&serverTimezone=Asia/Shanghai username: root password: 123456 driver-class-name: com.mysql.cj.jdbc.Drivermybatis-plus: mapper-locations: classpath:mapper/*.xml
UserMapper.xml一般建好就有代码了,没有就复制如下:
<?xml version="1.0" encoding="UTF-8"?><beans xmlns="http://www.springframework.org/schema/beans" xmlns:xsi="http://www.w3.org/2001/XMLSchema-instance" xsi:schemaLocation="http://www.springframework.org/schema/beans http://www.springframework.org/schema/beans/spring-beans.xsd"></beans>
启动:

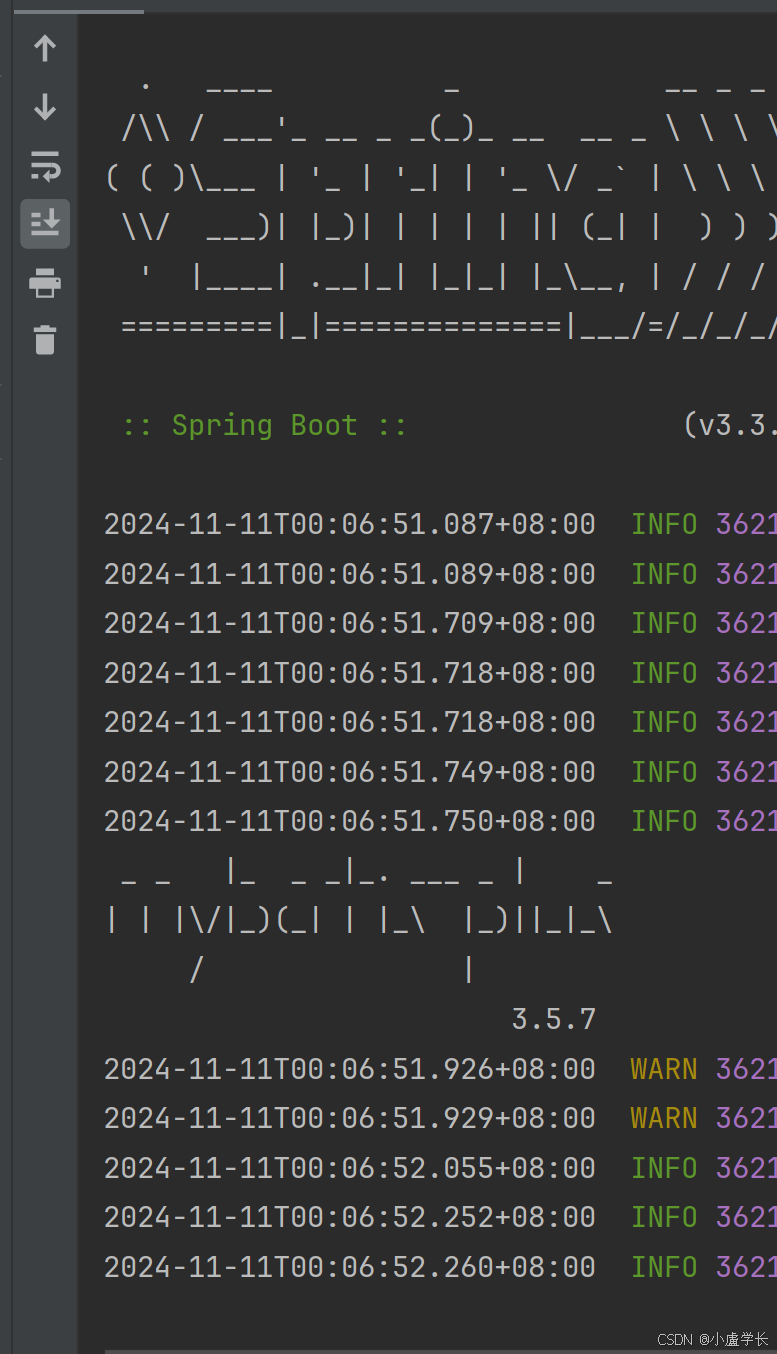
没有爆红就OK,打开浏览器,输入:http://localhost:8080/index 运行:

测试完成,实现了一个简单的前后端数据库交互