当前位置:首页 » 《关注互联网》 » 正文

后端返回前端时间格式化

5 人参与  2024年09月13日 16:41  分类 : 《关注互联网》  评论

点击全文阅读


时间格式化的方法总共包含以下 5 种。

1.前端时间格式化

JS 版时间格式化

1

2

3

4

5

6

7

8

9

10

11

12

13

14

15

16

17

18

19

function dateFormat(fmt, date) {

    let ret;

    const opt = {

        "Y+": date.getFullYear().toString(),        // 年

        "m+": (date.getMonth() + 1).toString(),     // 月

        "d+": date.getDate().toString(),            // 日

        "H+": date.getHours().toString(),           // 时

        "M+": date.getMinutes().toString(),         // 分

        "S+": date.getSeconds().toString()          // 秒

        // 有其他格式化字符需求可以继续添加,必须转化成字符串

    };

    for (let k in opt) {

        ret = newRegExp("(" + k + ")").exec(fmt);

        if (ret) {

            fmt = fmt.replace(ret[1], (ret[1].length == 1) ? (opt[k]) : (opt[k].padStart(ret[1].length, "0")))

        };

    };

    return fmt;

}

方法调用:

1

2

3

4

let date = newDate();

dateFormat("YYYY-mm-dd HH:MM:SS", date);

>>> 2021-07-2521:45:12

2.SimpleDateFormat格式化

使用 SimpleDateFormat 来进行时间格式化,它也是 JDK 8 之前重要的时间格式化方法,它的核心实现代码如下:

1

2

3

4

// 定义时间格式化对象和定义格式化样式

SimpleDateFormat dateFormat = new SimpleDateFormat("yyyy-MM-dd HH:mm:ss");

// 格式化时间对象

String date = dateFormat.format(new Date())

接下来我们使用 SimpleDateFormat 来实现一下本项目中的时间格式化,它的实现代码如下:

1

2

3

4

5

6

7

8

9

10

11

12

13

@RequestMapping("/list")

public List<UserInfo> getList() {

    // 定义时间格式化对象

    SimpleDateFormat dateFormat = new SimpleDateFormat("yyyy-MM-dd HH:mm:ss");

    List<UserInfo> list = userMapper.getList();

    // 循环执行时间格式化

    list.forEach(item -> {

        // 使用预留字段 ctime 接收 createtime 格式化的时间(Date->String)

        item.setCtime(dateFormat.format(item.getCreatetime()));

        item.setUtime(dateFormat.format(item.getUpdatetime()));

    });

    return list;

}

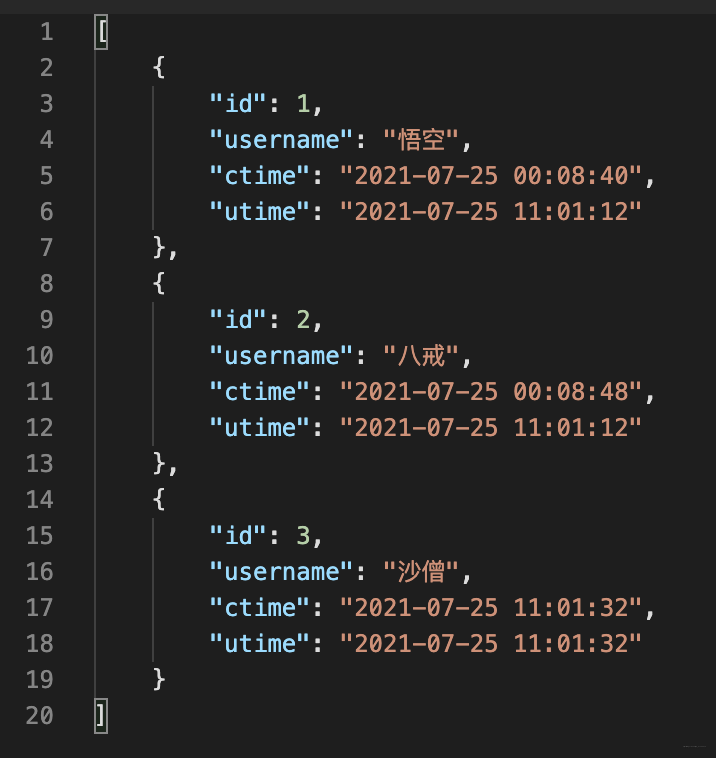
程序执行结果如下:

从上述结果可以看出,时间格式化没有任何问题,以及到底我们预想的目的了。但细心的读者会发现,为什么接口的返回字段咋变了呢?(之前的字段是 createtime 现在却是 ctime…)

这是因为使用 #SimpleDateFormat.format 方法之后,它返回的是一个 String 类型的结果,而我们之前的 createtime 和 updatetime 字段都是 Date 类型的,因此它们是不能接收时间格式化得结果的。

所以此时我们就需要在实体类 UserInfo 新增两个字符串类型的“时间”字段,再将之前 Data 类型的时间字段进行隐藏,最终实体类 UserInfo 的实现代码如下:

1

2

3

4

5

6

7

8

9

10

11

12

13

14

15

16

17

18

import com.fasterxml.jackson.annotation.JsonIgnore;

import lombok.Data;

import java.util.Date;

@Data

publicclass UserInfo {

    privateint id;

    private String username;

    @JsonIgnore// 输出结果时隐藏此字段

    private Date createtime;

    // 时间格式化后的字段

    private String ctime;

    @JsonIgnore// 输出结果时隐藏此字段

    private Date updatetime;

    // 时间格式化后的字段

    private String utime;

}

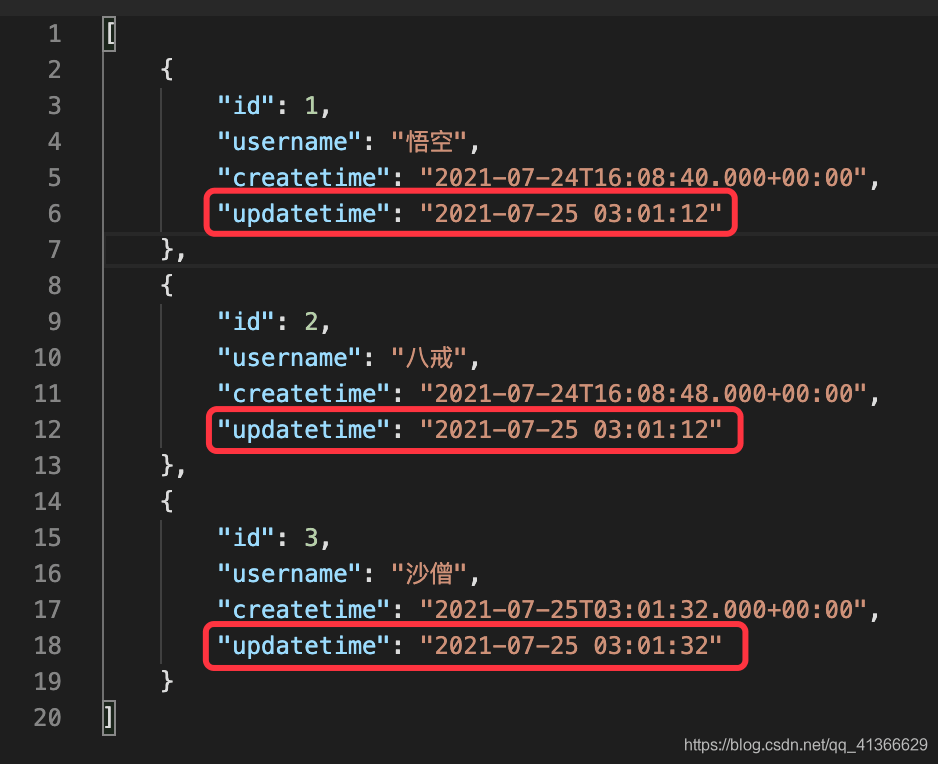
我们可以使用 @JsonIgnore 注解将字段进行隐藏,隐藏之后的执行结果如下:
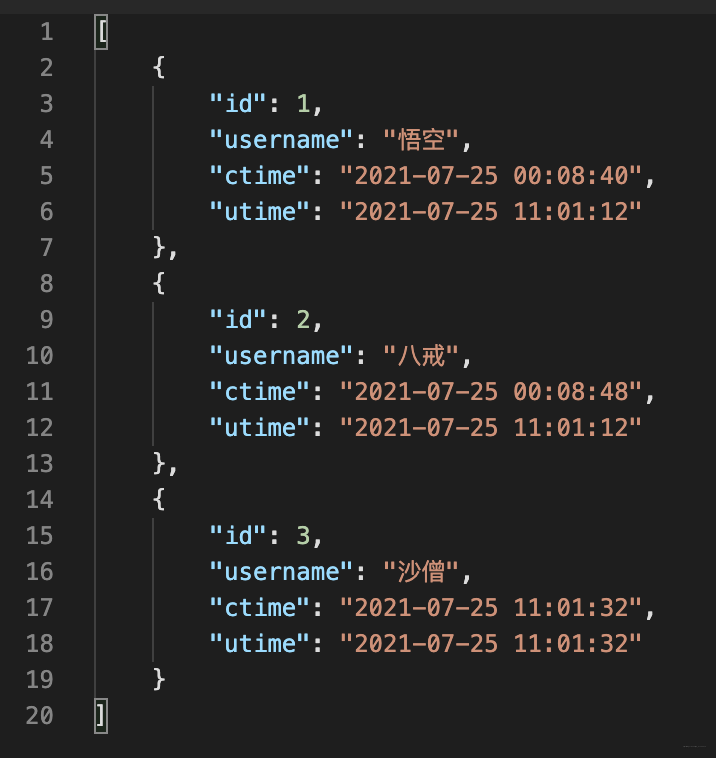
3.DateTimeFormatter格式化

JDK 8 之后,我们可以使用 DateTimeFormatter 来替代 SimpleDateFormat,因为 SimpleDateFormat 是非线程安全的,而 DateTimeFormatter 是线程安全的,所以如果是 JDK 8 以上的项目,尽量使用 DateTimeFormatter 来进行时间格式化。

DateTimeFormatter 格式化的代码和 SimpleDateFormat 类似,具体实现如下:

1

2

3

4

5

6

7

8

9

10

11

12

13

@RequestMapping("/list")

public List<UserInfo> getList() {

    // 定义时间格式化对象

    DateTimeFormatter dateFormat = DateTimeFormatter.ofPattern("yyyy-MM-dd HH:mm:ss");

    List<UserInfo> list = userMapper.getList();

    // 循环执行时间格式化

    list.forEach(item -> {

        // 使用预留字段 ctime 接收 createtime 格式化的时间(Date->String)

        item.setCtime(dateFormat.format(item.getCreatetime()));

        item.setUtime(dateFormat.format(item.getUpdatetime()));

    });

    return list;

}

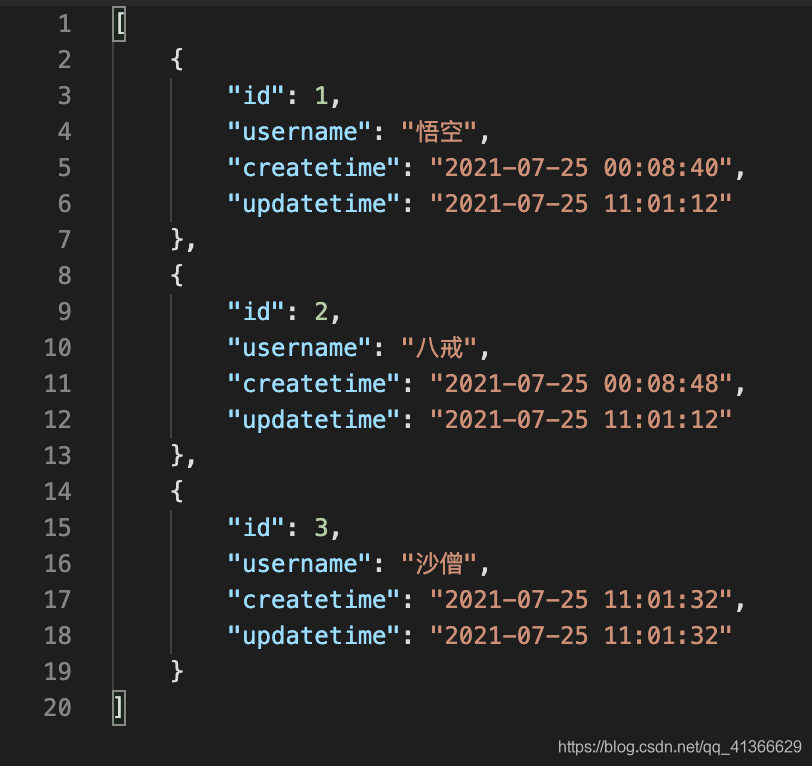
执行结果如下所示:

DateTimeFormatter 和 SimpleDateFormat 在使用上的区别是 DateTimeFormatter 是用来格式化 JDK 8 提供的时间类型的,如 LocalDateTime,而 SimpleDateFormat 是用来格式化 Date 类型的,所以我们需要对 UserInfoer 实体类做如下的修改:

1

2

3

4

5

6

7

8

9

10

11

12

13

14

15

import com.fasterxml.jackson.annotation.JsonIgnore;

import lombok.Data;

import java.time.LocalDateTime;

@Data

publicclass UserInfo {

    privateint id;

    private String username;

    @JsonIgnore

    private LocalDateTime createtime;

    private String ctime;

    @JsonIgnore

    private LocalDateTime updatetime;

    private String utime;

}

我们可以使用 LocalDateTime 来接收 MySQL 中的 datetime 类型。

4.全局时间格式化

以上两种后端格式化的实现都有一个致命的缺点,它们在进行时间格式化的时候,都需要对核心业务类做一定的修改,这就相当为了解决一个问题,又引入了一个新的问题,那有没有简单一点、优雅一点的解决方案呢?

答案是:有的。我们可以不改任何代码,只需要在配置文件中设置一下就可以实现时间格式化的功能了。

首先,我们找到 Spring Boot 的配置文件 application.properties(或 application.yml),只需要在 application.properties 配置文件中添加以下两行配置:

1

2

3

4

# 格式化全局时间字段

spring.jackson.date-format=yyyy-MM-dd HH:mm:ss

# 指定时间区域类型

spring.jackson.time-zone=GMT+8

这样设置之后,我们将原始的 UserInfo 和 UserController 进行还原。

UserInfo 实现代码如下:

1

2

3

4

5

6

7

8

9

10

import lombok.Data;

import java.util.Date;

@Data

publicclass UserInfo {

    privateint id;

    private String username;

    private Date createtime;

    private Date updatetime;

}

UserController 实现代码:

1

2

3

4

@RequestMapping("/list")

public List<UserInfo> getList() {

    return userMapper.getList();

}

然后我们运行程序,看到的执行结果如下:

从以上结果和代码可以看出,我们只需要在程序中简单配置一下,就可以实现所有时间字段的格式化了。

实现原理分析为什么在配置文件中设置一下,就可以实现所有时间字段的格式化了呢?

1

2

3

4

# 格式化全局时间字段

spring.jackson.date-format=yyyy-MM-dd HH:mm:ss

# 指定时间区域类型

spring.jackson.time-zone=GMT+8

这是因为 Controller 在返回数据时,会自动调用 Spring Boot 框架中内置的 JSON 框架 Jackson,对返回的数据进行统一的 JSON 格式化处理,在处理的过程中它会判断配置文件中是否设置了“spring.jackson.date-format=yyyy-MM-dd HH:mm:ss”,如果设置了,那么 Jackson 框架在对时间类型的字段输出时就会执行时间格式化的处理,这样我们就通过配置来实现全局时间字段的格式化功能了。

为什么要指定时间区域类型“spring.jackson.time-zone=GMT+8”呢?

最现实的原因是,如果我们不指定时间区域类型,那么查询出来的时间就会比预期的时间少 8 个小时,这因为我们(中国)所处的时间区域比世界时间少 8 个小时导致的,而当我们设置了时区之后,我们的时间查询才会和预期时间保持一致。

GMT 是什么?时间区域设置中的“GMT” 是什么意思?

Greenwich Mean Time (GMT) 格林尼治时间,也叫做世界时间。

格林尼治时间格林尼治是英国伦敦南郊原皇家格林尼治天文台所在地,地球本初子午线的标界处,世界计算时间和经度的起点。以其海事历史、作为本初子午线的标准点、以及格林尼治时间以其命名而闻名于世。这里地势险要,风景秀丽,兼具历史和地方风情,也是伦敦在泰晤士河的东方门户。

不光是天文学家使用格林尼治时间,就是在新闻报刊上也经常出现这个名词。我们知道各地都有各地的地方时间。如果对国际上某一重大事情,用地方时间来记录,就会感到复杂不便.而且将来日子一长容易搞错。因此,天文学家就提出一个大家都能接受且又方便的记录方法,那就是以格林尼治的地方时间为标准。

以本初子午线的平子夜起算的平太阳时。又称格林尼治平时或格林尼治时间。各地的地方平时与世界时之差等于该地的地理经度。1960年以前曾作为基本时间计量系统被广泛应用。由于地球自转速率曾被认为是均匀的,因此在1960年以前,世界时被认为是一种均匀时。由于地球自转速度变化的影响,它不是一种均匀的时间系统,它与原子时或力学时都没有任何理论上的关系,只有通过观测才能对它们进行比较。后来世界时先后被历书时和原子时所取代,但在日常生活、天文导航、大地测量和宇宙飞行等方面仍属必需;同时,世界时反映地球自转速率的变化,是地球自转参数之一,仍为天文学和地球物理学的基本资料。

5.部分时间格式化

某些场景下,我们不需要对全局的时间都进行统一的处理,这种情况我们可以使用注解的方式来实现部分时间字段的格式化。

我们需要在实体类 UserInfo 中添加 @JsonFormat 注解,这样就可以实现时间的格式化功能了,实现代码如下:

1

2

3

4

5

6

7

8

9

10

11

12

13

import com.fasterxml.jackson.annotation.JsonFormat;

import lombok.Data;

import java.util.Date;

@Data

publicclass UserInfo {

    privateint id;

    private String username;

    // 对 createtime 字段进行格式化处理

    @JsonFormat(pattern = "yyyy-MM-dd hh:mm:ss", timezone = "GMT+8")

    private Date createtime;

    private Date updatetime;

}

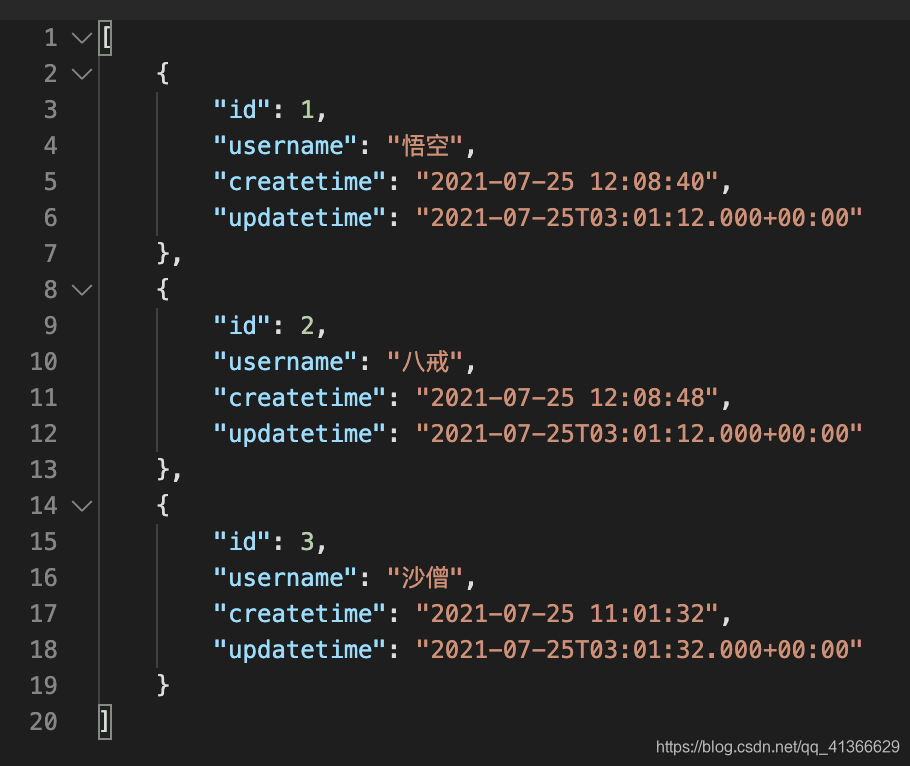
修改完代码之后,我们运行项目执行结果如下:

从上述结果可以看出,使用注解的方式也可以实现时间的格式化。它的实现原理和第 4 种时间格式化的实现原理类似,都是在返回数据之前,对相应的字段进行时间格式化的处理。

总结

本文我们介绍了 5 种时间格式化的实现方法,其中第 1 种为前端时间格式化的方法,后 4 种为后端格式化的方法,SimpleDateFormat 和 DateTimeFormatter 格式化的方法更适用普通的 Java 项目,其中 SimpleDateFormat 是非线程安全的,而 DateTimeFormatter 是线程安全的,但它们都不是 Spring Boot 项目中最优的时间格式化方案。

如果是 Spring Boot 的项目,推荐使用第 4 种全局时间格式化或第 5 种局部时间格式化的方式,这两种实现方式都无需修改核心业务代码,只需要简单的配置一下,就可以完成时间的格式化功能了。

参考:springboot时间格式化的五种方法总结(解决后端传给前端的时间显示不一致)_java_脚本之家


点击全文阅读


本文链接:http://zhangshiyu.com/post/159431.html

<< 上一篇 下一篇 >>

  • 评论(0)
  • 赞助本站

◎欢迎参与讨论,请在这里发表您的看法、交流您的观点。

关于我们 | 我要投稿 | 免责申明

Copyright © 2020-2022 ZhangShiYu.com Rights Reserved.豫ICP备2022013469号-1