CLIP概述
CLIP(Contrastive Language-Image Pretraining)是由OpenAI开发的一种深度学习模型,用于将图像和自然语言文本进行联合编码。它采用了多模态学习的方法,使得模型能够理解图像和文本之间的语义关系。
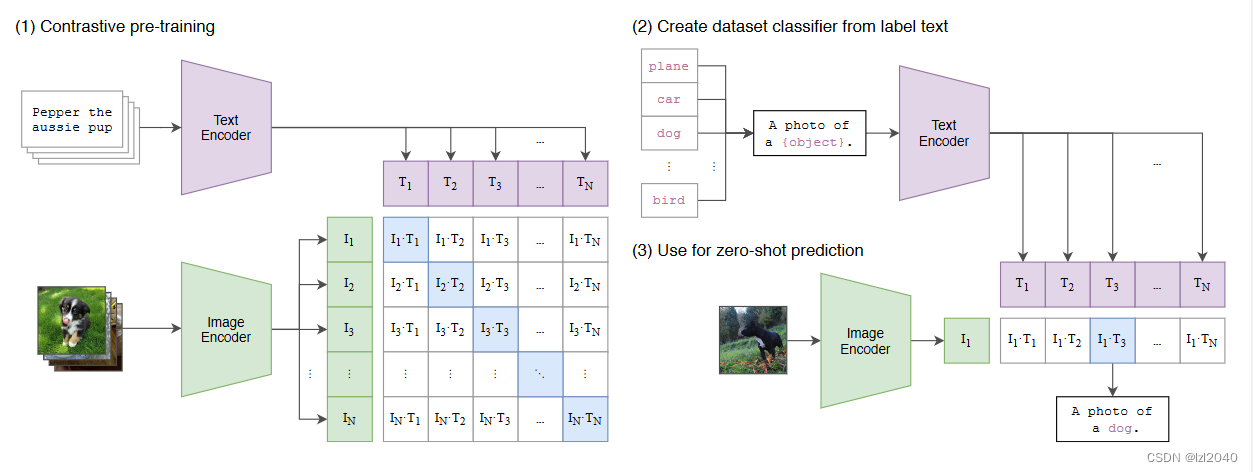
它的核心思想是将图像和文本视为同等重要的输入,并通过联合训练来学习它们之间的联系。CLIP模型使用了一个共享的编码器,它将图像和文本分别映射到一个共享的特征空间中。通过将图像和文本的编码向量进行比较,模型能够判断它们之间的相似性和相关性。
它在训练过程中使用了对比损失函数,以鼓励模型将相关的图像和文本对编码得更接近,而将不相关的图像和文本对编码得更远。这使得CLIP模型能够具有良好的泛化能力,能够在训练过程中学习到通用的图像和文本理解能力。
它的整体流程如下:
它展现了强大的zero-shot能力,在许多视觉与语言任务中表现出色,如图像分类、图像生成描述、图像问答等。它的多模态能力使得CLIP模型能够在图像和文本之间建立强大的语义联系,为各种应用场景提供了更全面的理解和分析能力。
正是因为它出色的zero-shot能力,因此训练的模型本身就含有很多可以利用的知识,因此在一些任务上,如分类任务,caption任务,可以尝试在自己的数据集上微调CLIP,或许通过这种操作就能获得不错的性能。但是目前如何微调CLIP网上并没有看到很详细的介绍,因此我整理了相关的知识并在此记录。
参考链接
微调代码
第三方库
clip-by-openaitorch下面以我做的图像分类任务为例,介绍相关的步骤。
步骤介绍
1.构建数据集
构建自己的数据集,每次迭代返回的数据包括:RGB图像和图像的标签(a photo of {label})
代码示例如下:
import osfrom PIL import Imageimport numpy as npimport clipclass YourDataset(Dataset): def __init__(self,img_root,meta_root,is_train,preprocess): # 1.根目录(根据自己的情况更改) self.img_root = img_root self.meta_root = meta_root # 2.训练图片和测试图片地址(根据自己的情况更改) self.train_set_file = os.path.join(meta_root,'train.txt') self.test_set_file = os.path.join(meta_root,'test.txt') # 3.训练 or 测试(根据自己的情况更改) self.is_train = is_train # 4.处理图像 self.img_process = preprocess # 5.获得数据(根据自己的情况更改) self.samples = [] self.sam_labels = [] # 5.1 训练还是测试数据集 self.read_file = "" if is_train: self.read_file = self.train_set_file else: self.read_file = self.test_set_file# 5.2 获得所有的样本(根据自己的情况更改) with open(self.read_file,'r') as f: for line in f: img_path = os.path.join(self.img_root,line.strip() + '.jpg') label = line.strip().split('/')[0] label = label.replace("_"," ") label = "a photo of " + label self.samples.append(img_path) self.sam_labels.append(label) # 转换为token self.tokens = clip.tokenize(self.sam_labels) def __len__(self): return len(self.samples) def __getitem__(self, idx): img_path = self.samples[idx] token = self.tokens[idx] # 加载图像 image = Image.open(img_path).convert('RGB') # 对图像进行转换 image = self.img_process(image) return image,token2.加载预训练CLIP模型和相关配置
首先使用第三方库加载预训练的CLIP模型,会返回一个CLIP模型和一个图像预处理函数preprocess,这将用于之后的数据加载过程。
device = torch.device("cuda:0" if torch.cuda.is_available() else "cpu")net, preprocess = clip.load("RN50",device=device,jit=False)然后初始化优化器,损失函数,需要注意的是,如果刚开始你的损失很大或者出现异常,可以调整优化器的学习率和其他参数来进行调整,通常是调整的更小会有效果。
optimizer = optim.Adam(net.parameters(), lr=1e-6,betas=(0.9,0.98),eps=1e-6,weight_decay=0.001)scheduler = lr_scheduler.StepLR( optimizer, step_size=10, gamma=0.1)# 创建损失函数loss_img = nn.CrossEntropyLoss()loss_txt = nn.CrossEntropyLoss()3.加载数据
该步骤主要是调用第一步中创建的类,然后使用DataLoader函数加载自己的数据集。
代码如下:
your_dataset = YourDataset(img_root= '/images', meta_root= '/meta', is_train=True,preprocess=preprocess)dataset_size_your = len(your_dataset)your_dataloader = DataLoader(your_dataset,batch_size=4,shuffle=True,num_workers=4,pin_memory=False)4.开始训练
训练代码按照模板来写即可,总共要训练epoches次,每次要将一个数据集里面的所有数据都训练一次,然后在每次训练完成的时候保存模型,这里分为两种:
保存模型的参数保存模型的参数、优化器、迭代次数该部分的代码如下:
phase = "train"model_name = "your model name"ckt_gap = 4epoches = 30for epoch in range(epoches): scheduler.step() total_loss = 0 batch_num = 0 # 使用混合精度,占用显存更小 with torch.cuda.amp.autocast(enabled=True): for images,label_tokens in your_dataloader: # 将图片和标签token转移到device设备 images = images.to(device) label_tokens = label_tokens.to(device) batch_num += 1 # 优化器梯度清零 optimizer.zero_grad() with torch.set_grad_enabled(phase == "train"): logits_per_image, logits_per_text = net(images, label_tokens) ground_truth = torch.arange(len(images),dtype=torch.long,device=device) cur_loss = (loss_img(logits_per_image,ground_truth) + loss_txt(logits_per_text,ground_truth))/2 total_loss += cur_loss if phase == "train": cur_loss.backward() if device == "cpu": optimizer.step() else: optimizer.step() clip.model.convert_weights(net) if batch_num % 4 == 0: logger.info('{} epoch:{} loss:{}'.format(phase,epoch,cur_loss)) epoch_loss = total_loss / dataset_size_your torch.save(net.state_dict(),f"{model_name}_epoch_{epoch}.pth") logger.info(f"weights_{epoch} saved") if epoch % ckt_gap == 0: checkpoint_path = f"{model_name}_ckt.pth" checkpoint = { 'it': epoch, 'network': net.state_dict(), 'optimizer': optimizer.state_dict(), 'scheduler': scheduler.state_dict()} torch.save(checkpoint, checkpoint_path) logger.info(f"checkpoint_{epoch} saved") logger.info('{} Loss: {:.4f}'.format( phase, epoch_loss))全部代码
import osfrom PIL import Imageimport numpy as npimport clipfrom loguru import loggerfrom torch.utils.data import Dataset, DataLoader, ConcatDatasetimport torch.optim as optimfrom torch.optim import lr_schedulerimport torch.nn as nnclass YourDataset(Dataset): def __init__(self,img_root,meta_root,is_train,preprocess): # 1.根目录(根据自己的情况更改) self.img_root = img_root self.meta_root = meta_root # 2.训练图片和测试图片地址(根据自己的情况更改) self.train_set_file = os.path.join(meta_root,'train.txt') self.test_set_file = os.path.join(meta_root,'test.txt') # 3.训练 or 测试(根据自己的情况更改) self.is_train = is_train # 4.处理图像 self.img_process = preprocess # 5.获得数据(根据自己的情况更改) self.samples = [] self.sam_labels = [] # 5.1 训练还是测试数据集 self.read_file = "" if is_train: self.read_file = self.train_set_file else: self.read_file = self.test_set_file# 5.2 获得所有的样本(根据自己的情况更改) with open(self.read_file,'r') as f: for line in f: img_path = os.path.join(self.img_root,line.strip() + '.jpg') label = line.strip().split('/')[0] label = label.replace("_"," ") label = "photo if " + label self.samples.append(img_path) self.sam_labels.append(label) # 转换为token self.tokens = clip.tokenize(self.sam_labels) def __len__(self): return len(self.samples) def __getitem__(self, idx): img_path = self.samples[idx] token = self.tokens[idx] # 加载图像 image = Image.open(img_path).convert('RGB') # 对图像进行转换 image = self.img_process(image) return image,token# 创建模型device = torch.device("cuda:0" if torch.cuda.is_available() else "cpu")net, preprocess = clip.load("RN50",device=device,jit=False)optimizer = optim.Adam(net.parameters(), lr=1e-6,betas=(0.9,0.98),eps=1e-6,weight_decay=0.001)scheduler = lr_scheduler.StepLR( optimizer, step_size=10, gamma=0.1)# 创建损失函数loss_img = nn.CrossEntropyLoss()loss_txt = nn.CrossEntropyLoss()# 加载数据集your_dataset = YourDataset(img_root= '/images', meta_root= '/meta', is_train=True,preprocess=preprocess)dataset_size_your = len(your_dataset)your_dataloader = DataLoader(your_dataset,batch_size=4,shuffle=True,num_workers=4,pin_memory=False)phase = "train"model_name = "your model name"ckt_gap = 4for epoch in range(st,args.epoches): scheduler.step() total_loss = 0 batch_num = 0 # 使用混合精度,占用显存更小 with torch.cuda.amp.autocast(enabled=True): for images,label_tokens in your_dataloader: # 将图片和标签token转移到device设备 images = images.to(device) label_tokens = label_tokens.to(device) batch_num += 1 # 优化器梯度清零 optimizer.zero_grad() with torch.set_grad_enabled(phase == "train"): logits_per_image, logits_per_text = net(images, label_tokens) ground_truth = torch.arange(len(images),dtype=torch.long,device=device) cur_loss = (loss_img(logits_per_image,ground_truth) + loss_txt(logits_per_text,ground_truth))/2 total_loss += cur_loss if phase == "train": cur_loss.backward() if device == "cpu": optimizer.step() else: optimizer.step() clip.model.convert_weights(net) if batch_num % 4 == 0: logger.info('{} epoch:{} loss:{}'.format(phase,epoch,cur_loss)) epoch_loss = total_loss / dataset_size_food101 torch.save(net.state_dict(),f"{model_name}_epoch_{epoch}.pth") logger.info(f"weights_{epoch} saved") if epoch % ckt_gap == 0: checkpoint_path = f"{model_name}_ckt.pth" checkpoint = { 'it': epoch, 'network': net.state_dict(), 'optimizer': optimizer.state_dict(), 'scheduler': scheduler.state_dict()} torch.save(checkpoint, checkpoint_path) logger.info(f"checkpoint_{epoch} saved") logger.info('{} Loss: {:.4f}'.format( phase, epoch_loss))