文章目录
为何选Nuxt.js?理解Nuxt3工作模式的关键: 渲染机制Nuxt3支持的渲染机制Nuxt的渲染流程 重要概念:模块、中间件和插件路由中间件 Nuxt3工程结构package.json参考目录结构自动导入 页面之间的关系页面跳转与参数传递页面跳转动态路由传参 状态共享和持久化采用useState()在页面之间共享状态用Pinia共享状态和持久化 几个主要命令动态组件后台交互:$fetch()和useFetch()useFetch和useAsyncData的区别useAsyncData与useLazyAsyncData的区别useFetch在onMounted()中的使用使用axios 服务端引擎NitroServer端的写法上下文对象nuxtApp几个注意点记得clientOnly 调试Nuxt3SSR部署实例理解SSR 部署UI框架和tailwindcss集成UI组件使用Elment PlusNaive UI 参考文档相关工具链
为何选Nuxt.js?
在前后端分离出现之前,传统的web页面都是服务端渲染的,如JSP、PHP、Python Django,还有各种模板技术Freemarker, velocity,thymeleaf、mustache等等。其实这套技术都挺成熟的,也用了很多年。
但前后端分离出现后,带来两个好处:
工程上的分工,让前端专门盯前端技术,开发效率上得到提升通过各种CDN, nodejs技术,前端的性能能持续优化,部署方式更为灵活多变,带来更多的想象空间vue系的Nuxt.js 和 React系的Next.js谁更胜一筹?目前我还没有答案,貌似后者更成熟一些,但Nuxt也发展迅速。
此外,阿里的UmiJs也在冉冉升起…
理解Nuxt3工作模式的关键: 渲染机制
写Nuxt3代码时一个最大的困惑就是:你写的这段代码是运行在客户端还是服务端的?是运行在哪个阶段的?。因为Nuxt3的渲染机制模糊了客户端和服务端的边界。而且,有些页面是在构建阶段生成的。
注意:Nuxt3默认是开启ssr的(在nuxt.config.js里可以关闭它),默认它采用一致性渲染(Universal rendering)。
开启ssr后,即使你/pages目录下的代码,如axios请求或$fetch请求,Nuxt3也会在服务端执行,在服务端取回数据。如果你在请求中调用了客户端的API如sessionStorage,则会报错。这点要非常小心。
Nuxt3支持的渲染机制
Nuxt3提供了几种不同的按需渲染机制:
CSR:Client Side Rendering:仅客户端渲染(CSR):页面由JS在浏览器里动态生成:js通过ajax从后台取数据,动态生成DOM
SSR: server-side rendering通用渲染(SSR): 页面由服务端nodejs生成: nodejs将vue代码解析,一次性生成html返回给浏览器。带来的好处是搜索引擎优化(SEO)。
SSG: static site generation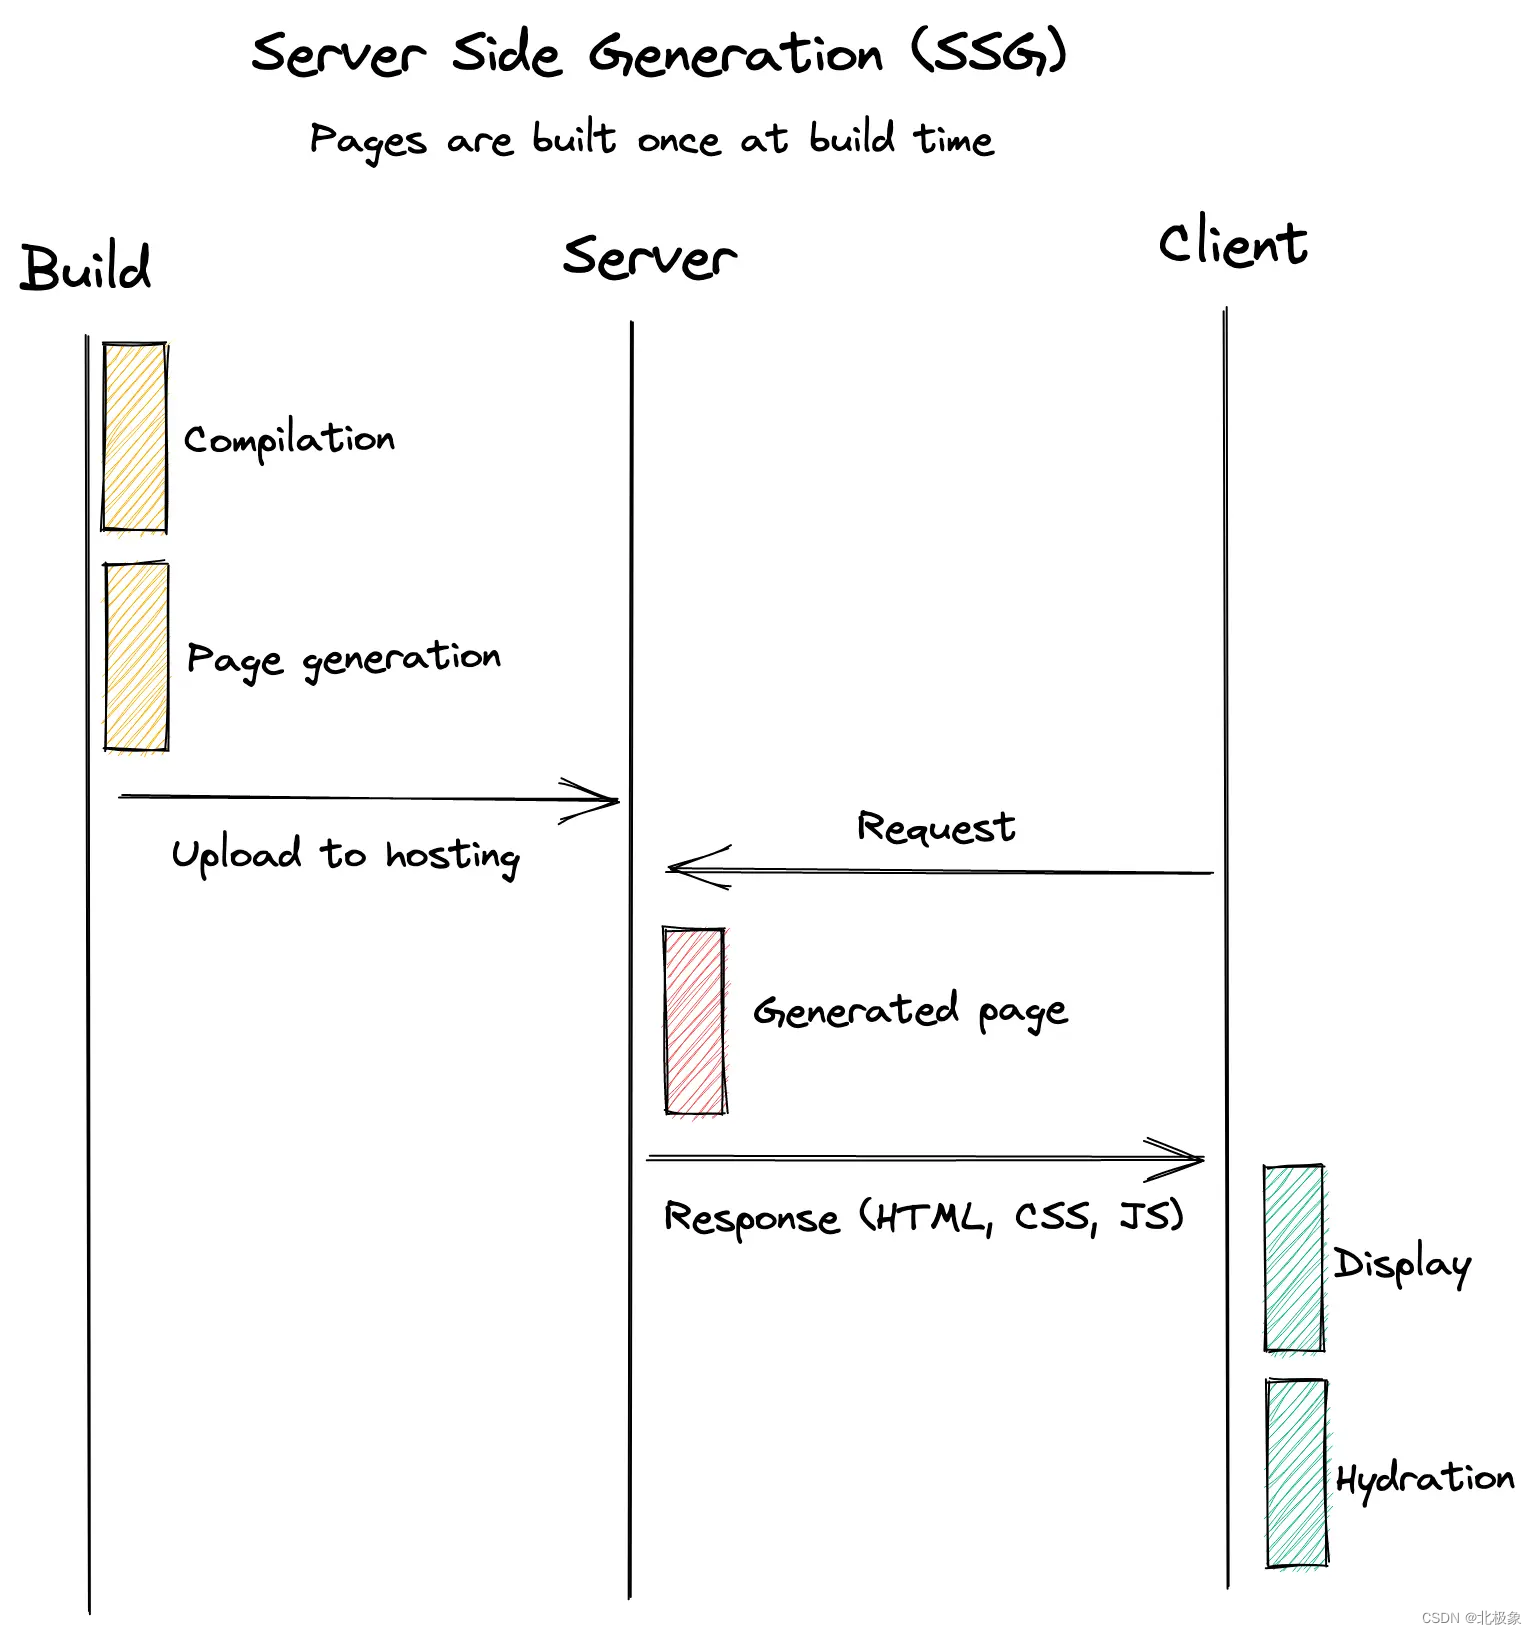
ISR:Incremental Static Regeneration,vue不支持,但nuxt3支持,需要node提供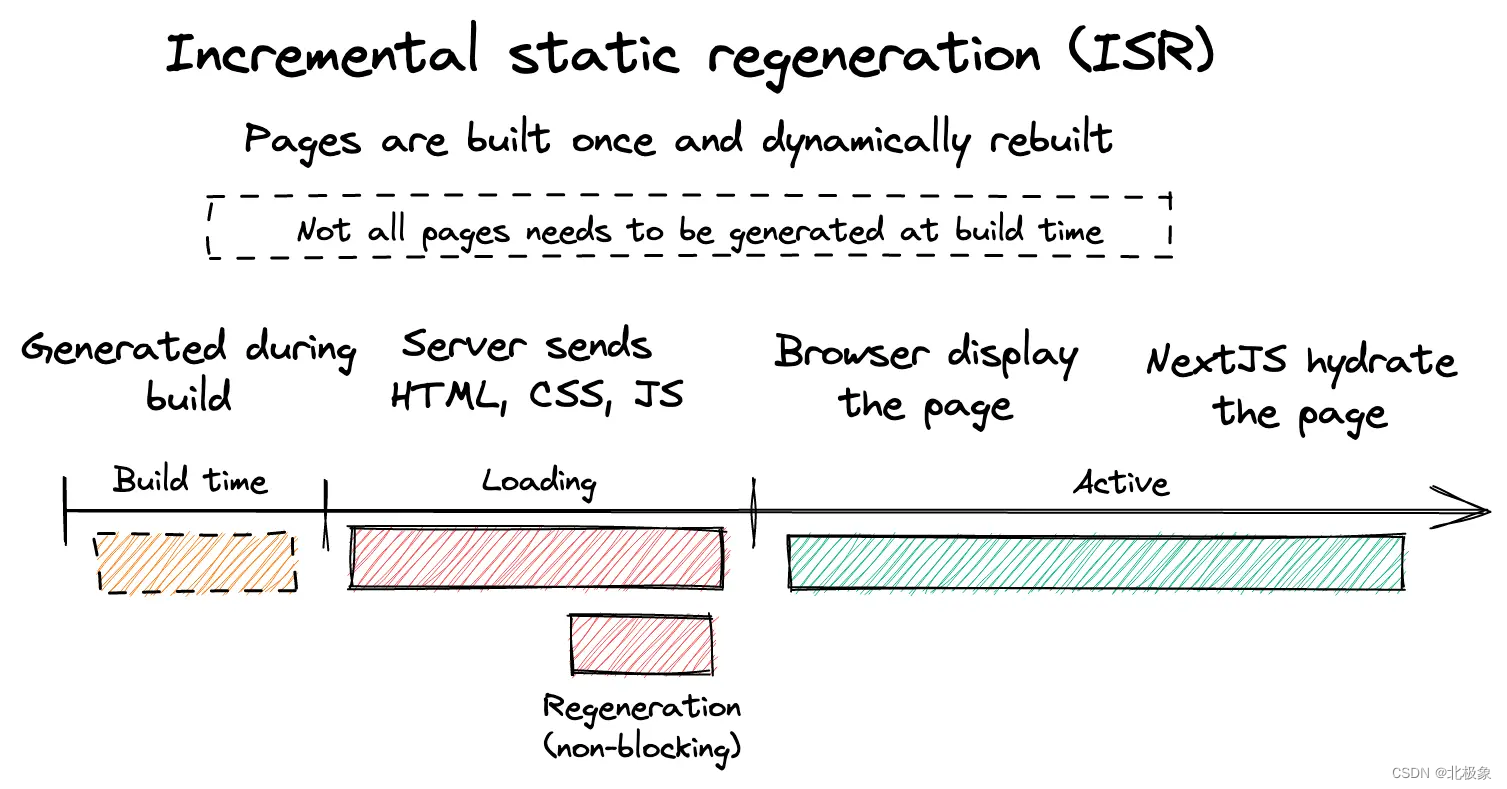
ESR: Edge Side Rendering,核心思想是,借助边缘计算的能力,将静态内容与动态内容以流式的方式,先后返回给用户。cdn 节点相比于 server,距离用户更近,有着更短的网络延时。在 cdn 节点上,将可缓存的页面静态部分,先快速返回给用户,同时在 cdn 节点上发起动态部分内容请求,并将生成的静态部分的缓存后,继续返回给用户。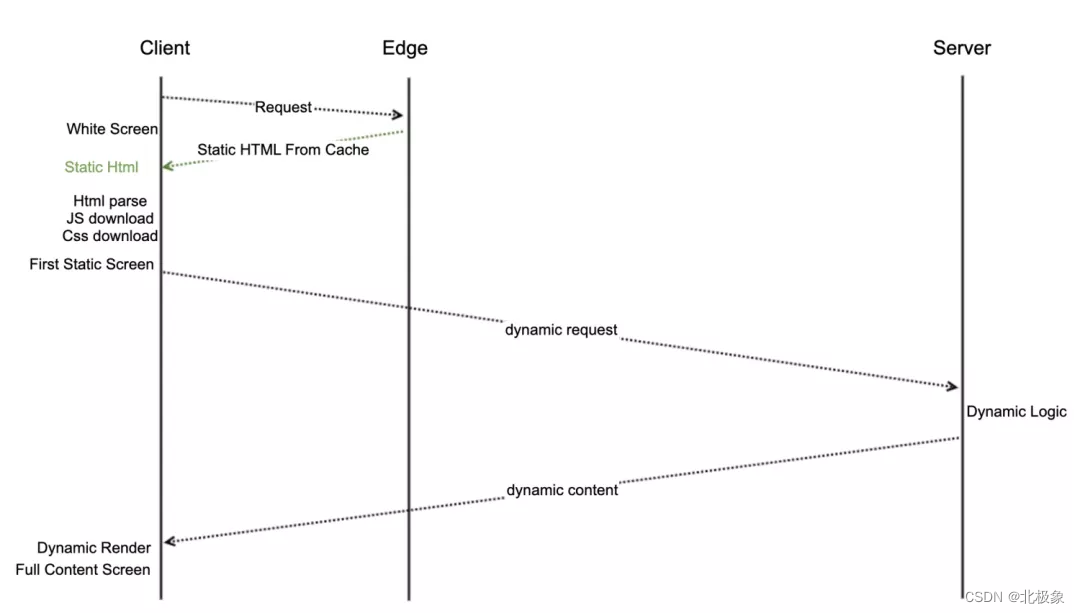
SWR:stale-while-revalidate,一种由 HTTP RFC 5861(opens in a new tab) 推广的 HTTP 缓存失效策略。这种策略首先从缓存中返回数据(过期的),同时发送 fetch 请求(重新验证),最后得到最新数据。使用 SWR,组件将会不断地、自动获得最新数据流。UI 也会一直保持快速响应。参见:https://swr.vercel.app/zh-CN
混合渲染:不同的路由,不同的页面,采用不同的渲染机制。Hybrid Rendering 机制:
Hybrid rendering allows different caching rules per route using Route Rules and decides how the server should respond to a new request on a given URL.
所以,我们可以在nuxt config里为不同的route配置不同的渲染策略,分别有:redirect、ssr、cors、headers和static and swr 几种选项。
Nuxt3提供了HMR(Hot Module Replacement)热更新机制。
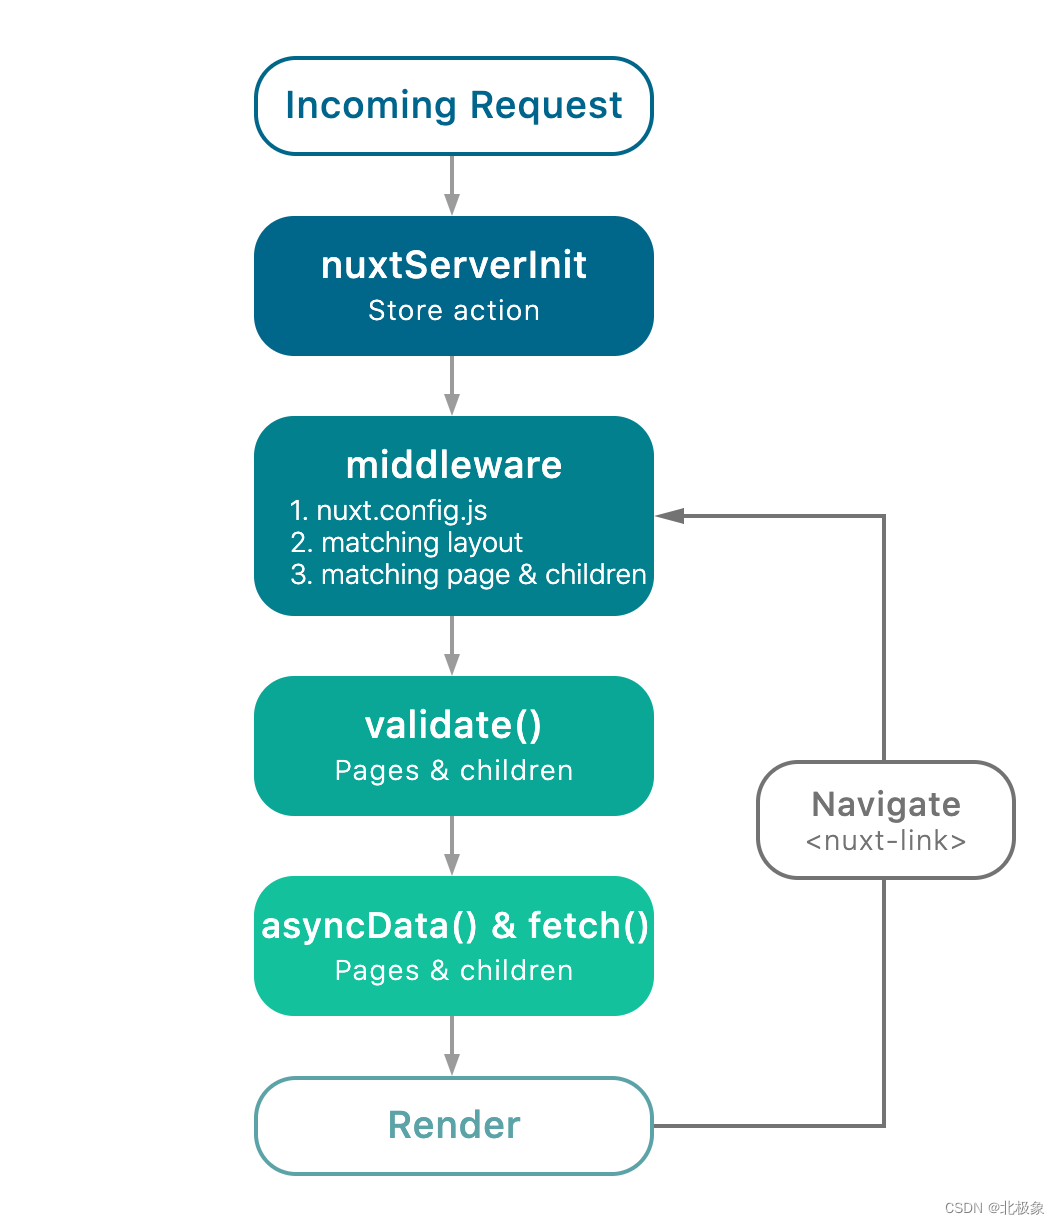
Nuxt的渲染流程
此外,别的渲染机制还有NSR(Native Side Rendering),它首先在列表页中加载离线页面模板,通过 Ajax 预加载页面数据,通过 Native 渲染生成 Html 数据并且缓存在客户端。
重要概念:模块、中间件和插件
module:模块提供了一种比较好的扩展和复用机制。模块能对外提供vue组件,组合API,插件。模块通过defineNuxtModule()定义。layer:具有nuxt.config 和 app.config配置和标准nuxt目录结构的软件包,方便被其它项目复用:在nuxt.config.ts中可以通过extend一个layer来引用layermiddleware:拦截路由切换,每次切换都会调用中间件的逻辑plugin: 插件能方便地引入第三方的功能部件,然后挂到nuxtApp,作为全局对象使用所以: 公共的、独立的功能可以封装成Composable,也可以封装成Plugin。
export default defineNuxtPlugin((nuxtApp) => { const instance = ofetch.create({ baseURL: '/api', headers: { Accept: 'application/json' } }) // You can also just do this instead of returning // nuxtApp.provide('ofetch', instance) return { provide: { ofetch: instance } }})然后,可以这么用:
const { $ofetch } = useNuxtApp()路由中间件
路由中间件能在前端路由切换时做一些事情。分为页面级和全局两种。全局中间件文件以.global.ts结尾。
中间件可以定义在插件或页面中,也可以作为一个单独的文件放在middleware目录下。
在插件中定义一个中间件:
export default defineNuxtPlugin(() => { addRouteMiddleware('global-test', () => { console.log('this global middleware was added in a plugin') }, { global: true }) addRouteMiddleware('named-test', () => { console.log('this named middleware was added in a plugin') })})在页面中定义中间件(inline middleware):
<template> <div> Forbidden </div></template><script setup>definePageMeta({ // This is an example of inline middleware middleware: () => { console.log('Strictly forbidden.') return false }})</script>在页面中使用中间件:
<script setup>definePageMeta({ middleware: 'redirect-me'})</script>当从其它页面路由到该页面时,redirect-me中间件会被调用。
在路由中间件中可以返回一个页面,例如:
export default defineNuxtRouteMiddleware((to, from) => { return 'test/main' })则应用该中间件的页面会直接跳转到pages/test/main.vue页面。如果不写return语句,则进入该页面。
Nuxt3工程结构
package.json参考
{ "name": "mall", "version": "1.0.0", "private": true, "scripts": { "dev": "nuxt", "build": "nuxt build", "serve": "nuxt dev", "preview": "nuxt preview", "start": "nuxt start", "generate": "nuxt generate" }, "dependencies": { "@nuxt/content": "^1.0.0", "@nuxtjs/pwa": "^3.3.5", "core-js": "^3.25.3", "element-plus": "^2.2.27", "@element-plus/icons-vue": "^2.0.10", "vue": "3.2.45", "pinia": "^2.0.14", "@pinia/nuxt": "^0.4.5" }, "devDependencies": { "nuxt": "^3.0.0", "nuxt-windicss": "^2.5.5", "vite": "^3.2.4", "@nuxt/types": "^2.15.8", "@nuxt/typescript-build": "^2.1.0", "@iconify/vue": "^3.2.1", "@vueuse/nuxt": "^8.4.2", "@windicss/plugin-animations": "^1.0.9", "sass": "^1.51.0" }}目录结构
首要的一点:要分清哪些是客户端代码,哪些是服务端代码。
我们在server下面的代码可以理解为运行在服务端,这些API充当代理转发的作用,以解决我们前端跨域问题,就和nginx里的proxypass转发给后端一样的作用。Nuxt 3 内部采用Nitro server作为服务器,Nitro 用unjs/h3 这个框架内部处理请求和路由。
约定成俗的目录结构: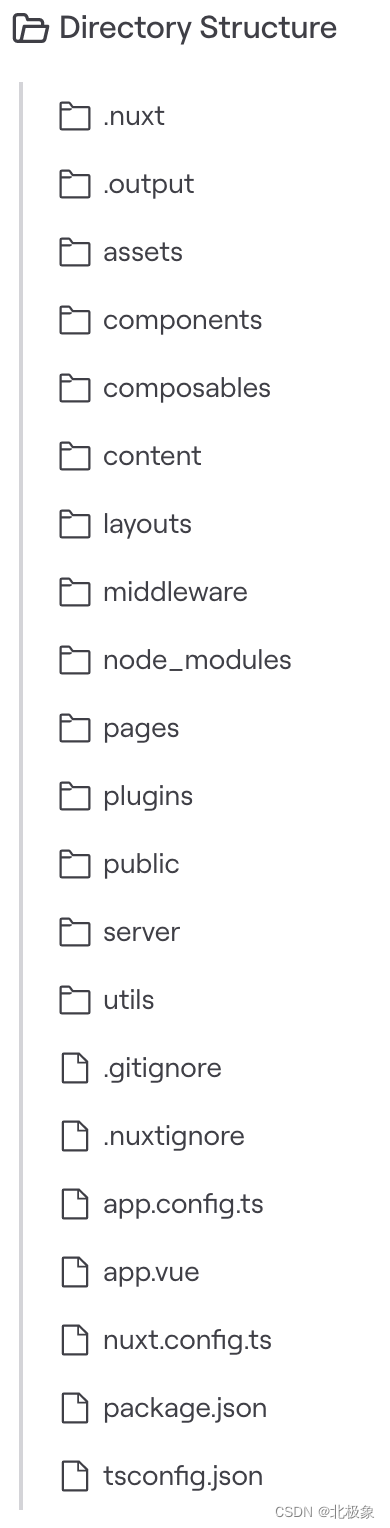
├── app.vue # Nuxt 3 应用程序中的主组件 入口组件
├── components # 组件目录,支持自动导入
├── layouts # 布局目录
├── composables # 公共函数,支持自动导入
├── assets # 静态资源目录 与vue项目的assets相同
├── middleware # 路由中间件
├── nuxt.config.ts # Nuxt 配置文件,可以理解成vue.config.js 文件名必须是nuxt.config 后缀名可以是.js,.ts或.mjs
├── package.json
├── pages # 基于文件的路由
├── plugins #插件
├── public # 不会参与打包,与vue项目的public类似直接挂在服务器的根目录
├── README.md
├── server
├── tsconfig.json
└── yarn.lock
注意:
composables下如果有嵌套目录,则需要在嵌套目录下放置index.ts,再在里面export相应对象。components组件嵌套在目录内,可以用驼峰式引入,如引入components/user/avatar.vue,可以用<UserAvatar>server目录,下面可以有api,middleware, plugin等子目录,api下面每个文件对应一个restful API,好像没法一个文件定义多个API。自动导入
Nuxt3支持自动导入(auto-import),也就是说在composables、components等目录下的对象,可以直接在vue组件里使用。
在server端,~server/utils目录下的对象也是能被server端代码自动导入的。
页面之间的关系
入口点在app.vue中:
<script setup>import { ID_INJECTION_KEY } from "element-plus";provide(ID_INJECTION_KEY, { prefix: 100, current: 0,});</script><template> <div> <NuxtLayout> <NuxtLoadingIndicator :height="5" :duration="3000" :throttle="400" /> <NuxtPage /> </NuxtLayout> </div></template>通过<NuxtPage>找到layout下某个layout,可以通过名称指定layout,缺省是layouts/default.vue:
<!--default.vue文件--><template> <main class="py-2 px-10 text-center"> <slot /> <Footer /> <div class="mt-5 mx-auto text-center opacity-25 text-sm"> </div> </main></template>也可以在page中通过definePageMeta()宏指定layout。
然后,default.vue中的slot会被route里指定的某个page替换,默认的page是pages/index.vue。
在page里就可以调用我们在components目录下存放的各个组件了。
<template> <div> <Header /> <PageWrapper> hello world </PageWrapper> </div></template><script lang="ts" setup>import { ref } from "vue";const activeIndex = ref('1')const activeIndex2 = ref('1')const handleSelect = (key: string, keyPath: string[]) => { console.log(key, keyPath)}const value1 = ref();</script><style></style>上面这个page用到了两个组件:Header和PageWrapper,分别对应components下的Header/index.vue和page/Wrapper.vue文件。
这就是从app.vue->layout->page->component的调用关系。
页面跳转与参数传递
页面跳转
可以采用<NuxtLink>调用navigateTo()函数<script setup>const router = useRouter();const name = ref('');const type = ref(1);function navigate(){ return navigateTo({ path: '/search', query: { name: name.value, type: type.value } })}</script><script setup>import { useRouter } from "vue-router";const router = useRouter();function test() {router.back();router.forward();router.go();router.push({ path: "/home" });router.replace({ hash: "#bio" });}</script>注意:const router = useRouter() 需要放在setup()函数里。不能直接放到方法里,否则router为空。
动态路由传参
通过动态路由/user/[id]/info请求页面,在该页面中通过route.params.id可以获取参数id。通过navigateTo()或router.push()路由,则在页面中通过route.query.name和route.query.type能获得相应参数。状态共享和持久化
采用useState()在页面之间共享状态
Nuxt3提供useState组合式函数,使用此函数可以创建一个可在整个组件中共享的状态,此状态还是响应式的并且对于SSR非常友好。
之所以是SSR友好的,是因为如果在服务端使用useState保存状态的话,此状态会在服务端渲染后序列化并发送到客户端,这样共享状态可以在客户端的所有组件中使用。
注意,useState只能在setup和lifecycle Hooks中使用。
page1.vue:
<template> {{ counter }} <el-button @click="counter++">加1</el-button> <el-button @click="counter--">减1</el-button></template><script setup lang="ts">const counter = useState("counter", () => Math.round(Math.random() * 1000)) // 定义并初始化</script>page2.vue:
<template> {{ counter }}</template><script setup lang="ts">const counter = useState("counter") // 引用已存在的对象</script>例如,我们可以在多个页面之间共享当前登录用户信息。
用Pinia共享状态和持久化
yarn add -D @pinia-plugin-persistedstate/nuxt
然后,配置nuxt.config.ts:
export default defineNuxtConfig({ modules: [ '@pinia/nuxt', '@pinia-plugin-persistedstate/nuxt', ],})再然后:
import { defineStore } from 'pinia'export const useStore = defineStore('main', { state: () => { return { someState: 'hello pinia', } }, persist: true,})持久化可以选择
persist: { storage: persistedState.localStorage, },或者
persist: { storage: persistedState.sessionStorage, },几个主要命令
nuxt 启动一个热加载的 Web 服务器(开发模式) localhost:3000。nuxt build 利用 webpack 编译应用,压缩 JS 和 CSS 资源(发布用)。nuxt start 以生产模式启动一个 Web 服务器 (需要先执行nuxt build)。nuxt generate 编译应用,并依据路由配置生成对应的 HTML 文件 (用于静态站点的部署)。主要参数:
–config-file 或 -c: 指定 nuxt.config.js 的文件路径。
–spa 或 -s: 禁用服务器端渲染,使用 SPA 模式
–unix-socket 或 -n: 指定 UNIX Socket 的路径。
动态组件
使用vue中动态组件的写法要使用resolveComponent语法:
<template> <div> <component :is="isHeader ? TheHeader : 'div'" /> </div></template><script setup>const isHeader = ref(1)// 组件const TheHeader = resolveComponent('TheHeader')</script>后台交互:$fetch()和useFetch()
Nuxt3 不再需要axios这个模块了,直接采用内置的useFetch, useLazyFetch, useAsyncData and useLazyAsyncData几个方法。我们通常在server/api下的模块中使用这些API。
$fetch是Nuxt3对ofetch的封装. 在服务器端渲染期间,调用$fetch获取内部API 路由将直接调用相关函数(模拟请求),节省额外的 API 调用。请注意,$fetch是Nuxt 3中进行 HTTP请求的首选方式,而不是为 Nuxt 2 进行的@nuxt/http和@nuxtjs/axios。
useFetch()封装了useAsyncData和$fetch, 它会根据URL和fetch选项自动生成key,并推断API响应类型。默认情况下,useFetch 会阻止导航,直到它的异步处理程序被解析。
const { users } = await $fetch('/api/users', { method: 'POST', body: { some: 'json' } })// Adding baseURLawait $fetch('/config', { baseURL })// Adding paramsawait $fetch('/movie?lang=en', { params: { id: 123 } })await useFetch(() => "/my/post/url", { method: 'POST', mode: 'cors', // 允许跨域 body: { some: true }, initialCache: false, onResponse({ request, response, options }) { // Process the response data }, });也可以这么写: (这种写法不推荐,不要在vue component中直接向后端发送请求,要通过API中转)
onMounted(async () => { const{ data, pending, error, refresh } = await useFetch(() => 'http://localhost:8888/cms/api/ebook/listall', {mode: 'cors'}, { immediate: true }) const bookList = JSON.parse(data.value) // 注意data是一个vue的ref对象,需要.value获得其值 bookList.forEach(book => { console.log(book.bookName) });})在server/api程序defineEventHandler()中,可以直接返回JSON 数据,一个 Promise 或者使用 event.res.end() 来发送响应。
$fetch()的第二个参数options的类型为FetchOptions
interface FetchOptions<R extends ResponseType = ResponseType> extends Omit<RequestInit, "body"> { baseURL?: string; body?: RequestInit["body"] | Record<string, any>; params?: SearchParameters; query?: SearchParameters; parseResponse?: (responseText: string) => any; responseType?: R; response?: boolean; retry?: number | false; onRequest?(context: FetchContext): Promise<void> | void; onRequestError?(context: FetchContext & { error: Error; }): Promise<void> | void; onResponse?(context: FetchContext & { response: FetchResponse<R>; }): Promise<void> | void; onResponseError?(context: FetchContext & { response: FetchResponse<R>; }): Promise<void> | void;}传递的参数通过body, 或params或query来设置。
useFetch和useAsyncData的区别
useFetch接收一个 URL并获取该数据,而useAsyncData可能有更复杂的逻辑。useFetch(url)几乎等同于useAsyncData(url, () => $fetch(url))。 useFetch是useAsyncData的封装useAsyncData是最常见用例的开发人员体验糖。useAsyncData,做一些简单的get数据请求,useFetch可以做更复杂的post、put、delete等请求<script>await useAsyncData(() => $fetch(`/api/hello/${ctr.value}`), { watch: [ctr] })</script>最关键的一点是:useAsyncData()里的操作是在服务端执行的,如果要SSR,请把axios或fetch请求数据的操作放在useAsyncData()里。
useAsyncData与useLazyAsyncData的区别
useLazyAsyncData是useAsyncData的lazy:true的封装。useLazyAsyncData是异步函数,不会阻塞导航, 但是pending时它的初始值为null, 开始的时候不能立马访问,可以通过watch监听拿到数据useFetch在onMounted()中的使用
UseFetch()在onMounted中使用,需要进行延迟调用才可以使用,否则获取不到数据。解决方式是使用nextTick()方法。
直接调用获取不了数据:
onMounted(() => { const { data } = await useFetch('/api/ebook/getall') bookList.value = data.value})需要:
onMounted(() => { nextTick(async () => { const { data } = await useFetch('/api/ebook/getall') bookList.value = data.value })})mounted钩子函数执行时所有的DOM挂载和渲染都已完成,如果数据变化后要执行某个操作,而这个操作需要改变DOM结构的时候,这个操作都应该放进Vue.nextTick()的回调函数中。
使用axios
Nuxt3下也可以继续使用axios库,集成方式比较简单,写一个插件,expose出axios实例:
import axios from "axios";export default defineNuxtPlugin((nuxtApp) => { const defaultUrl = "<https://localhost:5001>"; let api = axios.create({ baseUrl: defaultUrl, headers: { common: {}, }, });return { provide: { api: api, }, };});然后就可以调用this$.api的方法了。
服务端引擎Nitro
Nitro 的基础是 rollup 和 h3:一个为高性能和可移植性而生的最小 http 框架。
在nuxt3中的新服务端引擎 Nitro Engine, nuxt2中服务端核心使用的是connect.js,而nuxt3使用的是nuxt团队自研的h3框架,特点就是具有很强的可移植性,而且非常轻量级,并且还支持connect编写的中间件。也就是说nuxt3基于h3编写的server端,可以无缝地移植到支持js运行环境的地方。
Nuxt3开发团队在 Nuxt 的新服务端引擎 Nitro 上工作了整整 9 个月。它解锁了 Nuxt 服务端等方面新的全栈能力 。
在开发中,它使用 rollup 和 Node.js workers 来为服务端代码和上下文隔离服务。并且通过读取 server/api/ 目录下的文件和 server/functions 目录下的服务端函数来生成你的服务端 API。
在生产中,它将您的 app 和服务端代码构建到独立的 .output 目录中。这份输出是很轻量的:代码是压缩的,并且移除了所有 Node.js 模块。你可以在任何支持 JavaScript 的系统下部署这份产物,Node.js、Severless、Workers、边缘渲染(Edge Side Rendering)或纯静态部署。
这份产物包含了运行时代码,来支持在任意环境下运行 Nuxt 服务端(包括实验性的浏览器 Service Workers!)的,并且启动静态文件服务,这使得它成为了一个符合 JAMStack 架构的真正的 hybrid 框架。另外还实现了一个原生存储层,支持多个源、驱动和本地资源。
Server端的写法
如果你的页面要SEO,那取数据就得经过server层。不能直接在page里ajax找后台要数据。而是需要server层的转发。
Nuxt自动扫描~/server/api, ~/server/routes, 和 ~/server/middleware目录中的文件,以注册具有HMR支持的API和服务器处理程序。
每个文件都应该导出一个用defineEventHandler()定义的默认函数。处理程序可以直接返回JSON数据,一个Promise或使用event.node.res.end()发送响应。
上下文对象nuxtApp
useNuxtApp()返回一个nuxtApp实例主要是提供了一个可以访问nuxt的共享运行时的上下文,此上下文在服务端和客户端都存在。上下文(context)里包括: vue app的实例,运行时的钩子(hooks), 运行时的配置变量和内部状态,例如:ssrContext和payload。
const nuxtApp = useNuxtApp()
nuxtApp是一个运行时的上下文, 你可以通过插件来扩展它。使用provide方法就可以创建nuxt 插件,指定name,就可以在所有的组合式API和组件中通过name来调用value指定对象。
const nuxtApp = useNuxtApp()nuxtApp.provide('hello', (name) => `Hello ${name}!`)// Prints "Hello name!"console.log(nuxtApp.$hello('name'))例如,我们在插件中这么定义:
export default defineNuxtPlugin(async (nuxtApp) => {return { provide: { auth: { loggedIn, session, redirectTo, updateSession, }, }, };})则在客户端代码里,可以这么使用:
export const useAuth = () => useNuxtApp().$authuserAuth().loggedIn()这是扩展Nuxt应用的常用技法。
几个注意点
记得clientOnly
使用client-only标签告诉nuxt这里不需要服务端渲染。
<template> <client-only> <vue-pdf-app style="height: 100vh;" :pdf="pdfUrl"></vue-pdf-app> </client-only> </template>调试Nuxt3
vscode中launch.json设置:
{ "name": "serve", "type": "node", "request": "launch", "cwd": "${workspaceFolder}", "runtimeExecutable": "yarn", "runtimeArgs": ["serve"]}
SSR部署
部署 Nuxt.js 服务端渲染的应用不能直接使用 nuxt 命令,而应该先进行编译构建,然后再启动 Nuxt 服务,可通过以下两个命令来完成:
nuxt buildnuxt start通常脚本中会包装成: yarn build or pnpm build 命令
构建完后生成.output文件夹。该文件夹即是部署文件。.output文件夹下包含public和server两个目录。重命名为release后,再创建一个ecosystem.config.js文件。
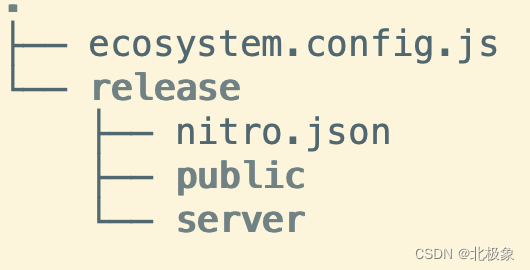
ecosystem.config.js文件内容:
module.exports = { apps: [ { name: 'CMSFront', exec_mode: 'cluster', instances: 'max', script: './release/server/index.mjs', env: { NITRO_PORT: '9999', } } ]}然后再用pm2启动node进程:
pm2 start ecosystem.config.js
当然要先安装一下pm2:
npm install pm2 -g
实例理解SSR
vue component定义如下:
<template> <el-row :gutter="12" align="middle"> <el-col :span="4" v-for="book in bookList" style="margin-top:12px"> <el-card class="box-card" style="height:380px;background-color: antiquewhite;" shadow="hover"> <img :src="getCoverSrc(book.bookId)" class="image" /> <span style="padding-bottom: 20px;"> {{ book.bookName }} </span> <div class="card_footer"> 价格:9.9元 </div> </el-card> </el-col> </el-row> </template><script lang="ts" setup>import { ref } from 'vue';const bookList:[] = ref()const currentDate = ref(new Date())function getCoverSrc(bookId) { return `http://localhost:8888/cms/api/ebook/cover/${bookId}`}onMounted(async () => { const { data } = await useFetch('/api/ebook/getall') bookList.value = data.value})</script>该组件显示书籍列表。调用的server/api如下:
import { $fetch } from 'ofetch'export default defineEventHandler(async (event) => { const books = await $fetch('http://localhost:8888/cms/api/ebook/listall') return books})该API从后端获取数据。
如果不用SSR渲染,则返回给前端的页面不包含书籍列表数据,前端js会通过ajax请求去获得书籍列表。采用SSR后,获得书籍列表就在服务端完成了,返回给前端的就是渲染后的书籍列表html片段了。
通过curl命令请求一下page(每个page有自己的URL),就能验证。
部署
三种部署形式:
SSR渲染部署。先nuxi build,会为我们生成 .nuxt文件和.output目录。再node .output/server/index.mjs
或者用pm2运行。如果用pm2运行,先创建一个ecosystem.config.js文件:
module.exports = { apps: [ { name: 'CMSFront', exec_mode: 'cluster', instances: 'max', script: './output/server/index.mjs', env: { NITRO_PORT: '9999', } } ]}再用pm2运行:
pm2 start ecosystem.config.js
静态部署。先nuxi generate编译成静态文件,会生成dist 文件夹,所有静态化后的资源文件均在其中。然后扔到nginx上SPA部署。nuxi build --spa, 自动生成dist/文件夹,然后扔到nginx上UI框架
UI框架通常分为CSS框架和UI组件框架两大类,前者有tailwindcss、windicss、unocss,后者有niave UI, element plus等。CSS框架比原生的css标准更高阶,更容易记忆和书写。
和tailwindcss集成
tailwindcss目前成了很多前端框架的标配,无论vue或React。tailwindcss采用约定成俗的样式,能简化、语义化我们class的写法。它和bootstrap有点类似,和element-plus, antd是互补,也有些重叠。
安装:
yarn add -D @nuxtjs/tailwindcss
然后,nuxt.config.ts里:
export default defineNuxtConfig({ modules: ['@nuxtjs/tailwindcss']})再准备一个~/assets/css/tailwind.css文件:
@tailwind base;@tailwind components;@tailwind utilities;就可以开箱即用了。
还有一个CSS框架unocss,大家也可以参考一下。
UI组件
使用Elment Plus
安装:
yarn add element-plusyarn add @element-plus/nuxt -D配置:
export default defineNuxtConfig({ modules: [ '@element-plus/nuxt' ], elementPlus: { /** Options */ }})则所有Element Plus 组件也都可以直接自动导入,但图标例外,还需要手动引入:
<script lang="ts" setup>import { Document } from '@element-plus/icons-vue'</script>Naive UI
https://www.naiveui.com/zh-CN/os-theme
老外的推荐:
tailwindElement Plus: I was really hoping I would like this but I didn’t really enjoy it. Very stable, large community. 8/10NaiveUI: I really like this one, smaller community than some of the others. I am leaning toward using it though. 7/10Ant Design: Seems quite stable, not my style so I didn’t explore too far. 7/10Vuestic: Smaller than some of the others and missing some key components. Looks promising but I am not comfortable using it for a new production project today. 6/10Equal: Small and lightweight. organized well. 6/10Headless UI. Super small but it makes using tailwind a more viable option. 6/10PrimeVue: I have spent the most time with this one. It seems pretty good and is somewhat like Vuetify. There are several paid upgrades, which is fine with me, but something to note for others. 7/10daisyui, https://daisyui.comheadlessui,https://headlessui.comVuetify