前端代码审查(Code Review)
针对目录结构、SCSS规范、JS规范、Vue规范
可参照官方给出的风格指南(Code Review)
具体实践规范
1、POST/PUT/DELETE 请求按钮需要添加 loading 状态,防止重复提交。
建议使用 Element UI 提供的button 组件的loading属性,或者自己封装一个 loading 状态的按钮组件。
<el-button type="primary" :loading="loading" @click="handleSubmit"> 提交 </el-button>2、模板上超过两个的判断条件,写成方法或者computed
<!--bad--><template> <t-table v-if="satus==1&&orderStatus==2&&isShowTable"/></template><!--good--><template> <t-table v-if="isChangeAvailiable"/></template><script> computed: { isChangeAvailiable() { return ( this.satus==1&&this.orderStatus==2&&this.isShowTable ); }, },</script>3、可选链访问数组/对象元素
//badcosnt obj = {}cosnt b = obj.a && obj.a.bconsole.log(b)// undefined//goodcosnt obj = {}cosnt b = obj?.a?.bconsole.log(b)// undefined4、定时器及时清理
mounted () { this.timer = setInterval(() => { ... }, 1000)}destroyed () { if (this.timer) { clearInterval(this.timer) }}5、window/body上的监听事件–需要解绑
mounted() { window.addEventListener('resize', this.fun)}beforeDestroy () { window.removeEventListener('resize', this.fun);}6、async await 结合使用(调用接口)
export default { created() { this.getOrderNo() }, methods:{ async getOrderNo() { const res = await this.$api.getOrderNo() if(res.success){ // 成功处理 } } }}7、使用try…catch…时–错误代码需要提示
try { // 成功处理} catch (error) { // 处理异常的代码 this.$message.error(error.message)}8、函数有很多参数,需要封装成一个对象
// bad--->这个方式参数就必须按顺序传递const getUserInfo =(name,age,sex,mobile,hobby)=> { // 函数逻辑}// goodconst getUserInfo =(userInfo)=> { // 函数逻辑 const {name,age,sex,mobile,hobby} = userInfo}9、简化switch case判断
// badconst counter =(state=0,action)=>{ switch (action.type) { case 'ADD': return state + 1 case 'MINUS': return state - 1 default: return state }}// goodconst counter =(state=0,action)=>{ const step={ 'ADD':1, 'MINUS':-1 } return state + (step[action.type] ?? 0)}10、判断条件过多需要提取出来
// badconst checkGameStatus =()=>{ if(status===0||(satuas===1&&isEnd===1)||(isEnd===2)){ // 调用 }}// goodconst isGaneOver =()=>{ return (status===0||(satuas===1&&isEnd===1)||(isEnd===2))}const checkGameStatus =()=>{ if(isGameOver()){ // 调用 }}11、if 判断嵌套—>错误前置
// badconst publishPost =(post)=>{ if(isLoggenIn){ if(post){ if(isPostValid()){ doPublishPost(post) }else{ throw new Error('文章不合法') } }else{ throw new Error('文章不能为空') } }else{ throw new Error('用户未登录') }}// goodconst publishPost =(post)=>{ if(!isLoggenIn){ throw new Error('用户未登录') } if(!post){ throw new Error('文章不能为空') } if(!isPostValid()){ throw new Error('文章不合法') } doPublishPost(post)}// badconst createElement =(item)=>{ if(item.type==='ball'){ cosnt div = document.createElement('div') div.className = 'ball' div.style.backgroundColor = item.color return div }else if(item.type==='block'){ const div = document.createElement('div') div.className = 'block' div.style.backgroundColor = item.color return div }else if(item.type==='square'){ const div = document.createElement('div') div.className = 'square' div.style.backgroundColor = item.color return div }else{ throw new Error('未知元素类型') }}// goodcosnt createElement =(item)=>{ const validTypes = ['ball', 'block', 'image'] if(!validTypes.includes(item.type)){ throw new Error('未知元素类型') } cosnt div = document.createElement('div') div.className = item.type div.style.backgroundColor = item.color return div}// badlet commodity = { phone: '手机', computer: '电脑', television: '电视', gameBoy: '游戏机',} function price(name) { if (name === commodity.phone) { console.log(1999) } else if (name === commodity.computer) { console.log(9999) } else if (name === commodity.television) { console.log(2999) } else if (name === commodity.gameBoy) { console.log(3999) }}price('手机') // 1999// goodconst commodity = new Map([ ['phone', 1999], ['computer', 9999], ['television', 2999], ['gameBoy', 3999],]) const price = (name) => { return commodity.get(name)}price('phone') // 199912、判断非空(使用空值合并操作符——??)
// badif(value !==null && value !==undefined && value !==''){ ....}// goodif((value??'') !==''){ ...}补充常规的—>目录结构规范:
项目根目录下创建 src 目录,src 目录下创建 api 目录、assets 目录、components 目录、directive 目录、router 目录、store 目录、utils 目录、views 目录。
一、api 目录存放所有页面API。
建议将每个页面的API封装成一个单独的js文件,文件名与页面名称相同(防止增删查改接口命名重复),并且都放在api下的modules目录下。
import request from '@/utils/request'export function afterSaleApplyRefund(data) { return request({ url: `/web/refundApplyOrder/applyRefund`, method: 'put', data })}export function getStoreList(params) { return request({ url: `/webWaterStore/getMarkStoreTree`, method: 'get', params })}....建议API目录下新建index.js文件,用于统一导出所有API,在main.js引入并将api挂载到vue的原型上Vue.prototype.$api = api;在页面直接使用this.$api.xxx调用接口。
WebPack自动加载配置API(使用require.context)
// 自动加载apiconst commonApiObj = {}const finalObj = {}const modulesApi = require.context('./modules', true, /\.js$/)modulesApi.keys().forEach(key => { const newKey = key.replace(/(\.\/|\.js)/g, '') commonApiObj[newKey] = require(`./modules/${newKey}`)})Object.values(commonApiObj).map(x => Object.assign(finalObj, x))// console.log('所有业务接口--', finalObj)export default { ...finalObj}Vite自动加载配置API(使用import.meta.globEager)
(注册全局api方法 )instance.config.globalProperties.$api = api;
// 自动导入modulesconst files: any = import.meta.globEager("./modules/*.ts");let modules: any = {};// eslint-disable-next-line @typescript-eslint/no-unused-varsObject.entries(files).forEach(([k, v]) => { Object.assign(modules, v);});export default { ...modules};// useApiimport { ComponentInternalInstance, getCurrentInstance } from "vue";export default function useApi() { const { appContext } = getCurrentInstance() as ComponentInternalInstance; const proxy = appContext.config.globalProperties; return { proxy };}//页面使用<script setup lang="ts">import useApi from "@/hooks/useApi";const { proxy } = useApi();const getData = async () => { const res = await proxy.$api.xxx(接口名); if (res.success) { ... }}</script>二、assets 目录存放静态资源,如图片、字体、公共scss等。
三、components 目录存放公共组件(store也可以如下方式自动导入)。
建议将公共组件拆分为基础组件(baseComponents)和业务组件(pageComponents),基础组件存放一些通用的组件,如按钮、输入框、表格等,业务组件存放与具体业务相关的组件,如用户管理组件、权限管理组件等。
基础组件命名方式大驼峰,如:TTable;业务组件命名方式是小驼峰,如:importExcel。
组件文件夹下必须包含index.vue文件,index.vue文件中必须包含组件的name属性,name属性值必须与组件文件夹名一致。
基础组件复用性高,通常情况都是全局注册
components 基础组件全局注册---->Webpack方式
import Vue from 'vue'// 全局自动注册baseComponents下的基础组件const requireComponent = require.context('./baseComponents', true, /\.vue$/)// 找到组件文件夹下以.vue命名的文件,如果文件名为index,那么取组件中的name作为注册的组件名requireComponent.keys().forEach(filePath => { const componentConfig = requireComponent(filePath) const fileName = validateFileName(filePath) const componentName = fileName.toLowerCase() === 'index' ? capitalizeFirstLetter(componentConfig.default.name) : fileName Vue.component(componentName, componentConfig.default || componentConfig)})//首字母大写function capitalizeFirstLetter (str) { return str && str.charAt(0).toUpperCase() + str.slice(1)}// 对符合'xx/xx.vue'组件格式的组件取组件名function validateFileName (str) { return /^\S+\.vue$/.test(str) && str.replace(/^\S+\/(\w+)\.vue$/, (rs, $1) => capitalizeFirstLetter($1))}全局注册main.js
import '@/components/index.js' // 全局基础组件注入页面组件使用
<template> <div> <t-table></t-table> </div></template>components 基础组件全局注册—Vite方式
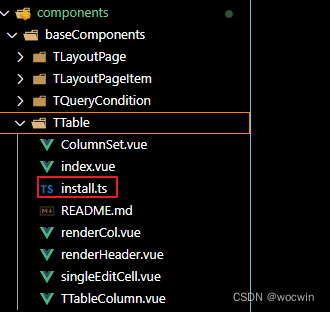
1、在每个基础组件文件夹下引入index.ts(我的命名是:install.ts),代码如下

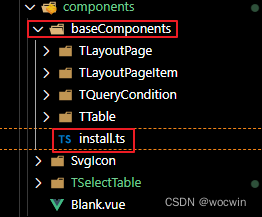
import { App } from 'vue'import Component from './index.vue'export default { install(app: App) { app.component('TTable', Component) }}2、在baseComponents文件夹下引入index.ts(我的命名是:install.ts),代码如下

/* 统一注册 baseComponents 目录下的全部组件 */import { App } from 'vue'export default { install: (app: App) => { // 引入所有组件下的安装模块 const modules:any = import.meta.globEager('./**/install.ts') for (const path in modules) { app.use(modules[path].default) } }}3、全局注册main.ts,代码如下
import baseComponentsInstall from '@/components/baseComponents/install'const instance = createApp(App)instance.use(baseComponentsInstall)四、utils 目录存放公共方法,如全局loading,axios封装,正则校验等。
axios封装(request.js)
import axios from 'axios'import { Notification, MessageBox, Message } from 'element-ui'import store from '@/store'import { getToken } from '@/utils/auth'export default function (config) { // 创建axios实例 const service = axios.create({ // baseURL: process.env.VUE_APP_BASE_API, baseURL: process.env.VUE_APP_BASE_API , // 超时 b timeout: 50000 }) // request拦截器 service.interceptors.request.use( config => { getToken() && (config.headers['Authorization'] = getToken()) localStorage.getItem('store_id') && (config.headers['Store-Id'] = localStorage.getItem('store_id')) config.headers['Content-Type'] = config.headers['Content-Type'] || 'application/json' // 8080 if (config.type == 'file') { config.headers['content-type'] = 'application/multipart/form-data' } else if (config.type == 'form') { config.headers['Content-type'] = 'application/x-www-form-urlencoded' } if (config.method.toLowerCase() === 'get') { config.data = true } return config }, error => { console.log(error) Promise.reject(error) } ) // 响应拦截器 service.interceptors.response.use(res => { const code = res.data.code if (code === 401) { MessageBox.confirm( '登录状态已过期,您可以继续留在该页面,或者重新登录', '系统提示', { confirmButtonText: '重新登录', cancelButtonText: '取消', type: 'warning' } ).then(() => { store.dispatch('FedLogOut').then(() => { if (!window.__POWERED_BY_QIANKUN__) { // 为了重新实例化vue-router对象 避免bug location.reload() } else { window.location.href = '/' } }) }) } else if (code !== 200) { Notification.error({ title: res.data.msg }) return Promise.reject('error') } else { return res.data } }, error => { console.log('err' + error) Message({ message: error.message, type: 'error', duration: 5 * 1000 }) return Promise.reject(error) } ) return service(config)}相关文章
基于ElementUi再次封装基础组件文档
基于ant-design-vue再次封装基础组件文档
vue3+ts基于Element-plus再次封装基础组件文档