【ESP-NOW Web 服务器传感器仪表板 (ESP-NOW + Wi-Fi)】
1. 前言2. 同时使用 ESP-NOW 和 Wi-Fi3. 项目概况4. 先决条件4.1 环境配置4.2 DHT 库4.3 ESPAsyncWebSrv服务器库4.4 Arduino_JSON4.5 所需零件4.6 获取接收板 MAC 地址4.7 ESP32 发送电路 5. ESP32 接收器 (ESP-NOW + Web Server)5.1 代码的工作原理5.2 数据结构5.3 创建事件源5.4 OnDataRecv() 函数5.5 构建网页5.6 处理事件5.7 setup()5.8 处理请求5.9 服务器事件源5.10 loop() 6. ESP32 发送码 (ESP-NOW)6.1 代码的工作原理6.2 设置板 ID6.3 DHT传感器6.4 接收方的MAC地址6.5 数据结构6.6 定时器间隔6.7 更改 Wi-Fi 信道6.8 读数温度6.9 读数湿度6.10 OnDataSent 回调函数6.11 setup()6.12 WiFi.mode(WIFI_STA);6.13 添加对等节点6.14 loop()6.14 发送 ESP-NOW 消息 7. 示范8. 总结
1. 前言
在本项目中,您将学习如何托管 ESP32 Web 服务器并同时使用 ESP-NOW 通信协议。您可以让多个 ESP32 开发板通过 ESP-NOW 将传感器读数发送到一个 ESP32 接收器,该接收器在 Web 服务器上显示所有读数。这些板将使用Arduino IDE进行编程。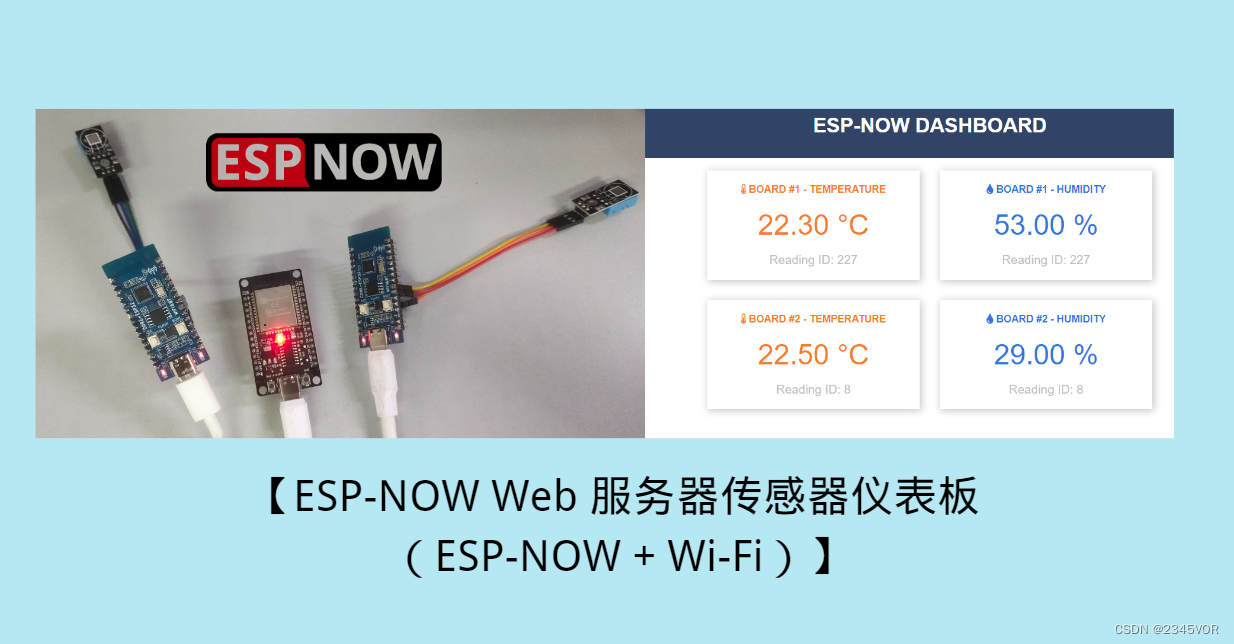
ESP32:使用 Arduino IDE 的 ESP-NOW Web 服务器传感器仪表板(同时使用 ESP-NOW 和 Wi-Fi)
我们还有其他与 ESP-NOW 相关的指南,您可能对此感兴趣:
观看视频教程
注意:我们更新了本教程,增加了同时使用 ESP-NOW 和 Wi-Fi 的更好方法。视频不使用此当前方法。您仍然可以观看视频以了解一切是如何工作的,但我们建议您查看书面文章。
2. 同时使用 ESP-NOW 和 Wi-Fi
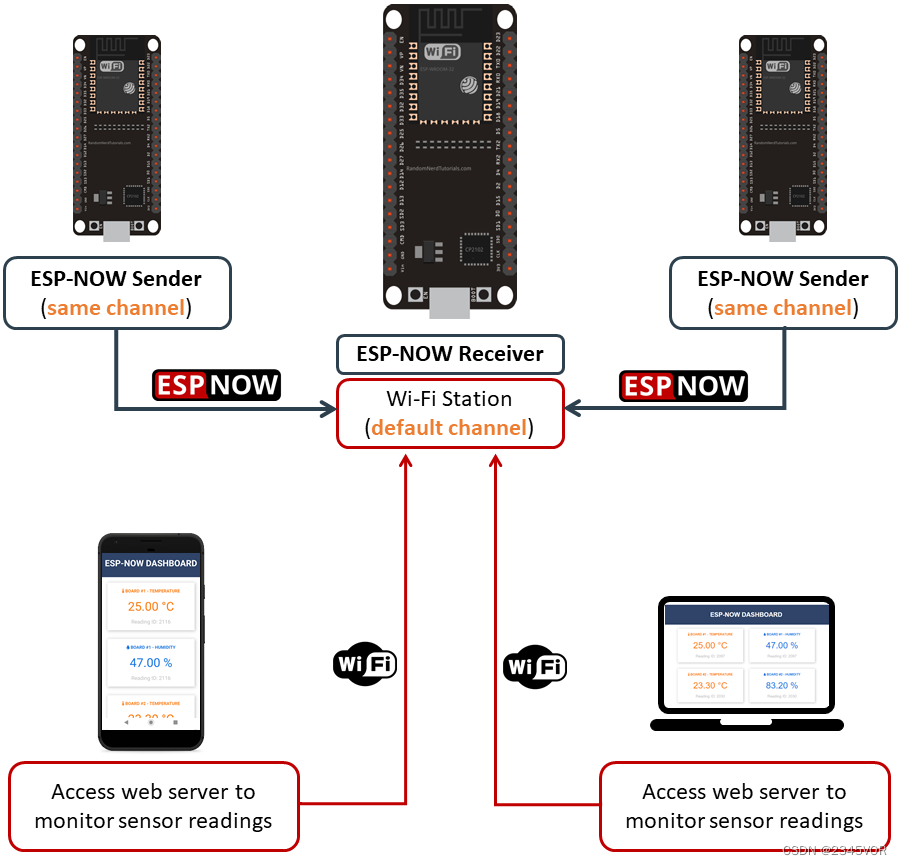
如果您想使用 Wi-Fi 托管 Web 服务器并同时使用 ESP-NOW 接收来自其他开发板的传感器读数,您需要考虑以下几点:
ESP32 发送板必须使用与接收板相同的 Wi-Fi 通道。接收器板的 Wi-Fi 通道由您的 Wi-Fi 路由器自动分配。接收板的Wi-Fi 模式必须是接入点和站点 (WIFI_AP_STA).您可以手动设置相同的 Wi-Fi 信道,也可以在发送器上添加一个简单的代码,以将其 Wi-Fi 信道设置为与接收板相同的信道。3. 项目概况
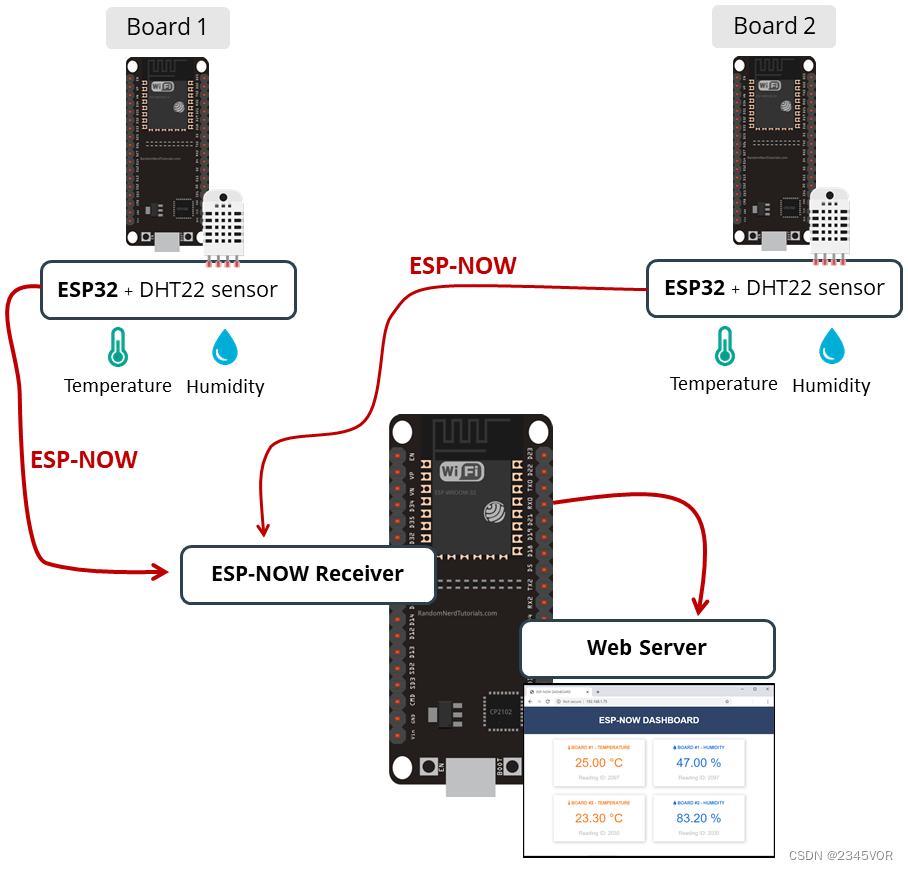
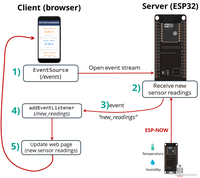
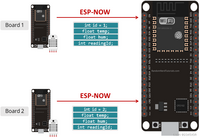
下图显示了我们将要生成的项目的高级概述。
4. 先决条件
在继续此项目之前,请确保检查以下先决条件。
我们将使用 Arduino IDE 对 ESP32/ESP8266 开发板进行编程,因此在继续本教程之前,请确保已在 Arduino IDE 中安装这些开发板。
4.1 环境配置
Arduino IDE:下载并安装 Arduino IDE;ESP32 开发板库:在 Arduino IDE 中添加 ESP32 支持;参考博客:【esp32c3配置arduino IDE教程】
为安装过程留出一些时间,具体时间可能因您的互联网连接而异。
4.2 DHT 库
ESP32 发送板将发送来自 DHT22 传感器的温度和湿度读数。
要从 DHT 传感器读取数据,我们将使用 Adafruit 的 DHT 库。要使用此库,您还需要安装 Adafruit Unified Sensor 库。按照以下步骤安装这些库。
打开Arduino IDE,然后转到“Sketch”>“包含库”>“管理库”。库管理器应打开。
在搜索框中搜索“DHT”,然后从 Adafruit 安装 DHT 库。

点击全部安装会自动“Adafruit Unified Sensor”。
要了解有关 DHT11 或 DHT22 温度传感器的更多信息,请阅读我们的指南:使用 Arduino IDE 的 ESP32 和DHT11/DHT22 温湿度传感器。
4.3 ESPAsyncWebSrv服务器库
要构建 Web 服务器,您需要安装以下库:
ESPAsyncWebServerAsyncTCP您需要安装 ESPAsyncWebSrv库。您可以在 Arduino IDE 库管理器中安装此库。只需转到“草图”>“包含库”>“管理库”,然后搜索库名称,如下所示:
4.4 Arduino_JSON
您需要安装 Arduino_JSON库。您可以在 Arduino IDE 库管理器中安装此库。只需转到“草图”>“包含库”>“管理库”,然后搜索库名称,如下所示: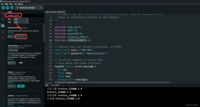
4.5 所需零件
要学习本教程,您需要多个 ESP32 开发板。我们将使用三个 ESP32 开发板。您还需要:
3 x ESP32(阅读最佳 ESP32开发板)2 x DHT22 温湿度传感器 – ESP32 的 DHT指南6 x 母对母杜邦线您可以使用上述链接或直接去淘宝找到适合您项目的所有零件!
4.6 获取接收板 MAC 地址
要通过 ESP-NOW 发送消息,您需要知道接收板的 MAC 地址。每个开发板都有一个唯一的 MAC 地址(了解如何获取和更改 ESP32 MAC 地址)。
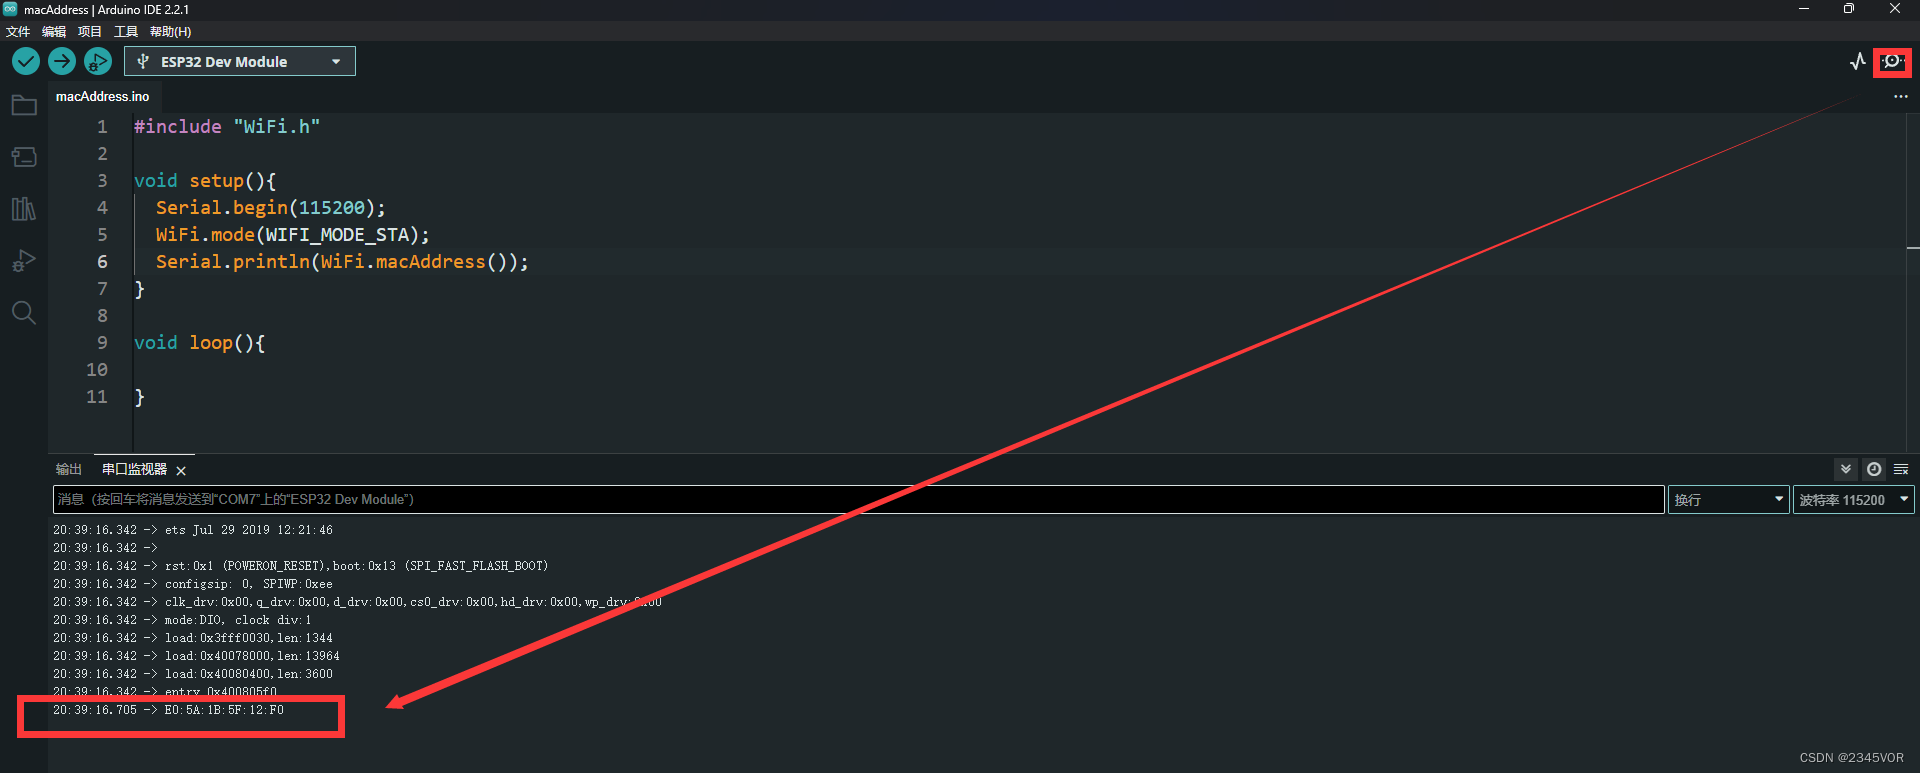
将以下代码上传到 ESP32 接收器板以获取其 MAC 地址。
// Complete Instructions to Get and Change ESP MAC Address: https://RandomNerdTutorials.com/get-change-esp32-esp8266-mac-address-arduino/#ifdef ESP32 #include <WiFi.h>#else #include <ESP8266WiFi.h>#endifvoid setup(){ Serial.begin(115200); Serial.println(); Serial.print("ESP Board MAC Address: "); Serial.println(WiFi.macAddress());} void loop(){}上传代码后,按 RST/EN 按钮,MAC 地址应显示在串行监视器上。
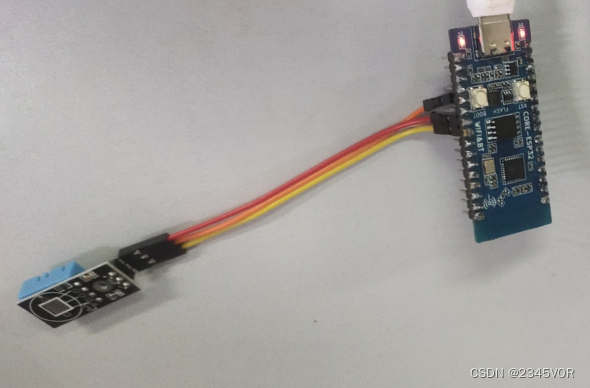
4.7 ESP32 发送电路
ESP32 发送板连接到 DHT22 温湿度传感器。数据引脚连接到通用IO 4(D4端口).您可以选择任何其他合适的 GPIO(阅读 ESP32 引脚分配指南)。按照下图对电路进行接线。
5. ESP32 接收器 (ESP-NOW + Web Server)
ESP32 接收板接收来自发送板的数据包,并托管一个 Web 服务器以显示最新接收到的读数。
将以下代码上传到您的接收器板 - 该代码已准备好接收来自两个不同板的读数。
/* Rui Santos Complete project details at https://RandomNerdTutorials.com/esp32-esp-now-wi-fi-web-server/ Permission is hereby granted, free of charge, to any person obtaining a copy of this software and associated documentation files. The above copyright notice and this permission notice shall be included in all copies or substantial portions of the Software.*/#include <esp_now.h>#include <WiFi.h>#include <AsyncTCP.h>#include <Arduino_JSON.h>#include <ESPAsyncWebSrv.h>// Replace with your network credentials (STATION)const char* ssid = "J09 502";const char* password = "qwertyuiop111";// Structure example to receive data// Must match the sender structuretypedef struct struct_message { int id; float temp; float hum; unsigned int readingId;} struct_message;struct_message incomingReadings;JSONVar board;AsyncWebServer server(80);AsyncEventSource events("/events");// callback function that will be executed when data is receivedvoid OnDataRecv(const uint8_t * mac_addr, const uint8_t *incomingData, int len) { // Copies the sender mac address to a string char macStr[18]; Serial.print("Packet received from: "); snprintf(macStr, sizeof(macStr), "%02x:%02x:%02x:%02x:%02x:%02x", mac_addr[0], mac_addr[1], mac_addr[2], mac_addr[3], mac_addr[4], mac_addr[5]); Serial.println(macStr); memcpy(&incomingReadings, incomingData, sizeof(incomingReadings)); board["id"] = incomingReadings.id; board["temperature"] = incomingReadings.temp; board["humidity"] = incomingReadings.hum; board["readingId"] = String(incomingReadings.readingId); String jsonString = JSON.stringify(board); events.send(jsonString.c_str(), "new_readings", millis()); Serial.printf("Board ID %u: %u bytes\n", incomingReadings.id, len); Serial.printf("t value: %4.2f \n", incomingReadings.temp); Serial.printf("h value: %4.2f \n", incomingReadings.hum); Serial.printf("readingID value: %d \n", incomingReadings.readingId); Serial.println();}const char index_html[] PROGMEM = R"rawliteral(<!DOCTYPE HTML><html><head> <title>ESP-NOW DASHBOARD</title> <meta name="viewport" content="width=device-width, initial-scale=1"> <link rel="stylesheet" href="https://use.fontawesome.com/releases/v5.7.2/css/all.css" integrity="sha384-fnmOCqbTlWIlj8LyTjo7mOUStjsKC4pOpQbqyi7RrhN7udi9RwhKkMHpvLbHG9Sr" crossorigin="anonymous"> <link rel="icon" href="data:,"> <style> html {font-family: Arial; display: inline-block; text-align: center;} p { font-size: 1.2rem;} body { margin: 0;} .topnav { overflow: hidden; background-color: #2f4468; color: white; font-size: 1.7rem; } .content { padding: 20px; } .card { background-color: white; box-shadow: 2px 2px 12px 1px rgba(140,140,140,.5); } .cards { max-width: 700px; margin: 0 auto; display: grid; grid-gap: 2rem; grid-template-columns: repeat(auto-fit, minmax(300px, 1fr)); } .reading { font-size: 2.8rem; } .packet { color: #bebebe; } .card.temperature { color: #fd7e14; } .card.humidity { color: #1b78e2; } </style></head><body> <div class="topnav"> <h3>ESP-NOW DASHBOARD</h3> </div> <div class="content"> <div class="cards"> <div class="card temperature"> <h4><i class="fas fa-thermometer-half"></i> BOARD #1 - TEMPERATURE</h4><p><span class="reading"><span id="t1"></span> °C</span></p><p class="packet">Reading ID: <span id="rt1"></span></p> </div> <div class="card humidity"> <h4><i class="fas fa-tint"></i> BOARD #1 - HUMIDITY</h4><p><span class="reading"><span id="h1"></span> %</span></p><p class="packet">Reading ID: <span id="rh1"></span></p> </div> <div class="card temperature"> <h4><i class="fas fa-thermometer-half"></i> BOARD #2 - TEMPERATURE</h4><p><span class="reading"><span id="t2"></span> °C</span></p><p class="packet">Reading ID: <span id="rt2"></span></p> </div> <div class="card humidity"> <h4><i class="fas fa-tint"></i> BOARD #2 - HUMIDITY</h4><p><span class="reading"><span id="h2"></span> %</span></p><p class="packet">Reading ID: <span id="rh2"></span></p> </div> </div> </div><script>if (!!window.EventSource) { var source = new EventSource('/events'); source.addEventListener('open', function(e) { console.log("Events Connected"); }, false); source.addEventListener('error', function(e) { if (e.target.readyState != EventSource.OPEN) { console.log("Events Disconnected"); } }, false); source.addEventListener('message', function(e) { console.log("message", e.data); }, false); source.addEventListener('new_readings', function(e) { console.log("new_readings", e.data); var obj = JSON.parse(e.data); document.getElementById("t"+obj.id).innerHTML = obj.temperature.toFixed(2); document.getElementById("h"+obj.id).innerHTML = obj.humidity.toFixed(2); document.getElementById("rt"+obj.id).innerHTML = obj.readingId; document.getElementById("rh"+obj.id).innerHTML = obj.readingId; }, false);}</script></body></html>)rawliteral";void setup() { // Initialize Serial Monitor Serial.begin(115200); // Set the device as a Station and Soft Access Point simultaneously WiFi.mode(WIFI_AP_STA); Serial.println(WiFi.macAddress()); // WiFi.softAPsetHostname("ESP_vor"); // Set device as a Wi-Fi Station WiFi.begin(ssid, password); while (WiFi.status() != WL_CONNECTED) { delay(1000); Serial.println("Setting as a Wi-Fi Station.."); } Serial.print("Station IP Address: "); Serial.println(WiFi.localIP()); Serial.print("Wi-Fi Channel: "); Serial.println(WiFi.channel()); // Init ESP-NOW if (esp_now_init() != ESP_OK) { Serial.println("Error initializing ESP-NOW"); return; } // Once ESPNow is successfully Init, we will register for recv CB to // get recv packer info esp_now_register_recv_cb(OnDataRecv); server.on("/", HTTP_GET, [](AsyncWebServerRequest *request){ request->send_P(200, "text/html", index_html); }); events.onConnect([](AsyncEventSourceClient *client){ if(client->lastId()){ Serial.printf("Client reconnected! Last message ID that it got is: %u\n", client->lastId()); } // send event with message "hello!", id current millis // and set reconnect delay to 1 second client->send("hello!", NULL, millis(), 10000); }); server.addHandler(&events); server.begin();} void loop() { static unsigned long lastEventTime = millis(); static const unsigned long EVENT_INTERVAL_MS = 5000; if ((millis() - lastEventTime) > EVENT_INTERVAL_MS) { events.send("ping",NULL,millis()); lastEventTime = millis(); }}5.1 代码的工作原理
首先,包括必要的库。
#include <esp_now.h>#include <WiFi.h>#include <AsyncTCP.h>#include <Arduino_JSON.h>#include <ESPAsyncWebSrv.h>这Arduino_JSON图书馆是必需的,因为我们将创建一个 JSON 变量,其中包含从每个板接收的数据。此 JSON 变量将用于将所有需要的信息发送到网页,稍后将在本项目中看到。
在以下行中插入您的网络凭据,以便 ESP32 可以连接到您的本地网络。
const char* ssid = "REPLACE_WITH_YOUR_SSID";const char* password = "REPLACE_WITH_YOUR_PASSWORD";5.2 数据结构
然后,创建一个包含我们将接收的数据的结构。我们称这种结构为struct_message它包含电路板 ID、温度和湿度读数以及读数 ID。
typedef struct struct_message { int id; float temp; float hum; int readingId;} struct_message;创建一个类型的新变量struct_message这被称为incoming读数这将存储变量的值。
struct_message incomingReadings;创建一个名为板.
JSONVar board;在端口 80 上创建异步 Web 服务器。
AsyncWebServer server(80);5.3 创建事件源
为了在收到新读数时自动在 Web 服务器上显示信息,我们将使用服务器发送事件 (SSE)。
以下行在 上创建一个新的事件源/事件.
AsyncEventSource events("/events");服务器发送事件允许网页(客户端)从服务器获取更新。当新的 ESP-NOW 数据包到达时,我们将使用它在 Web 服务器页面上自动显示新的读数。
5.4 OnDataRecv() 函数
这OnDataRecv()函数将在收到新的 ESP-NOW 数据包时执行。
void OnDataRecv(const uint8_t * mac_addr, const uint8_t *incomingData, int len) 在该函数中,打印发件人的MAC地址:
// Copies the sender mac address to a stringchar macStr[18];Serial.print("Packet received from: ");snprintf(macStr, sizeof(macStr), "%02x:%02x:%02x:%02x:%02x:%02x", mac_addr[0], mac_addr[1], mac_addr[2], mac_addr[3], mac_addr[4], mac_addr[5]);Serial.println(macStr);复制传入数据变量添加到incoming读数结构变量。
memcpy(&incomingReadings, incomingData, sizeof(incomingReadings));然后,使用接收到的信息创建一个 JSON 字符串变量 (json字符串变量):
board["id"] = incomingReadings.id;board["temperature"] = incomingReadings.temp;board["humidity"] = incomingReadings.hum;board["readingId"] = String(incomingReadings.readingId);String jsonString = JSON.stringify(board);下面是一个示例,说明如何json字符串变量在收到读数后可能看起来像:
board = { "id": "1", "temperature": "24.32", "humidity" = "65.85", "readingId" = "2"}在收集了所有接收到的数据后json字符串变量,则该信息作为事件(“new_readings”).
events.send(jsonString.c_str(), "new_readings", millis());稍后,我们将看到如何在客户端处理这些事件。
最后,将接收到的信息打印到Arduino IDE串行监视器上,以便进行调试:
Serial.printf("Board ID %u: %u bytes\n", incomingReadings.id, len);Serial.printf("t value: %4.2f \n", incomingReadings.temp);Serial.printf("h value: %4.2f \n", incomingReadings.hum);Serial.printf("readingID value: %d \n", incomingReadings.readingId);Serial.println();5.5 构建网页
这index_html变量包含用于构建网页的所有 HTML、CSS 和 JavaScript。我们不会详细介绍 HTML 和 CSS 的工作原理。我们只看一下如何处理服务器发送的事件。
5.6 处理事件
创建一个新的事件源对象,并指定发送更新的页面的 URL。在我们的例子中,它是/事件.
if (!!window.EventSource) { var source = new EventSource('/events');实例化事件源后,可以使用以下命令开始侦听来自服务器的消息addEventListener().
这些是默认事件侦听器,如 AsyncWebServer 文档中所示。
source.addEventListener('open', function(e) { console.log("Events Connected");}, false);source.addEventListener('error', function(e) { if (e.target.readyState != EventSource.OPEN) { console.log("Events Disconnected"); }}, false);source.addEventListener('message', function(e) { console.log("message", e.data);}, false);然后,为“new_readings”.
source.addEventListener('new_readings', function(e) 当 ESP32 收到新数据包时,它会发送一个 JSON 字符串,其中包含作为事件 (“new_readings”) 发送给客户端。以下行处理浏览器收到该事件时发生的情况。
console.log("new_readings", e.data);var obj = JSON.parse(e.data);document.getElementById("t"+obj.id).innerHTML = obj.temperature.toFixed(2);document.getElementById("h"+obj.id).innerHTML = obj.humidity.toFixed(2);document.getElementById("rt"+obj.id).innerHTML = obj.readingId;document.getElementById("rh"+obj.id).innerHTML = obj.readingId;基本上,在浏览器控制台上打印新的读数,并将接收到的数据放入网页上具有相应 id 的元素中。
5.7 setup()
在setup(),将 ESP32 接收器设置为接入点和 Wi-Fi 站:
WiFi.mode(WIFI_AP_STA);以下几行将 ESP32 连接到本地网络并打印 IP 地址和 Wi-Fi 通道:
// Set device as a Wi-Fi StationWiFi.begin(ssid, password);while (WiFi.status() != WL_CONNECTED) { delay(1000); Serial.println("Setting as a Wi-Fi Station..");}Serial.print("Station IP Address: ");Serial.println(WiFi.localIP());Serial.print("Wi-Fi Channel: ");Serial.println(WiFi.channel());初始化 ESP-NOW。
if (esp_now_init() != ESP_OK) { Serial.println("Error initializing ESP-NOW"); return;}注册OnDataRecvcallback 函数,以便在新的 ESP-NOW 数据包到达时执行。
esp_now_register_recv_cb(OnDataRecv);5.8 处理请求
当您访问根 URL 上的 ESP32 IP 地址时,发送存储在/index_html变量来构建网页。
server.on("/", HTTP_GET, [](AsyncWebServerRequest *request){ request->send_P(200, "text/html", index_html);});5.9 服务器事件源
在服务器上设置事件源。
events.onConnect([](AsyncEventSourceClient *client){ if(client->lastId()){ Serial.printf("Client reconnected! Last message ID that it got is: %u\n", client->lastId()); } // send event with message "hello!", id current millis // and set reconnect delay to 1 second client->send("hello!", NULL, millis(), 10000); ); server.addHandler(&events);最后,启动服务器。
server.begin();5.10 loop()
在loop(),每 5 秒发送一次 ping。这用于在客户端检查服务器是否仍在运行。
static unsigned long lastEventTime = millis();static const unsigned long EVENT_INTERVAL_MS = 5000;if ((millis() - lastEventTime) > EVENT_INTERVAL_MS) { events.send("ping",NULL,millis()); lastEventTime = millis();}下图总结了服务器发送的事件如何在此项目上工作,以及它如何在不刷新网页的情况下更新值。
将代码上传到接收器板后,按板载 EN/RST 按钮。ESP32 IP 地址应打印在串行监视器和 Wi-Fi 通道上。
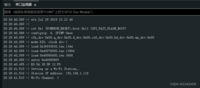
6. ESP32 发送码 (ESP-NOW)
每个发送板都会通过 ESP-NOW 发送一个结构,其中包含板 ID(以便您可以识别哪个板发送了读数)、温度、湿度和读数 ID。读取 ID 是一个 int 数字,用于了解发送了多少条消息。
将以下代码上传到每个发送方板。别忘了增加编号每个发送器板的编号,然后将您的 SSID 插入WIFI_SSID变量。
/* Rui Santos Complete project details at https://RandomNerdTutorials.com/esp32-esp-now-wi-fi-web-server/ Permission is hereby granted, free of charge, to any person obtaining a copy of this software and associated documentation files. The above copyright notice and this permission notice shall be included in all copies or substantial portions of the Software.*/#include <esp_now.h>#include <esp_wifi.h>#include <WiFi.h>#include <Adafruit_Sensor.h>#include <DHT.h>// Set your Board ID (ESP32 Sender #1 = BOARD_ID 1, ESP32 Sender #2 = BOARD_ID 2, etc)#define BOARD_ID 1// Digital pin connected to the DHT sensor#define DHTPIN 4 // Uncomment the type of sensor in use:#define DHTTYPE DHT11 // DHT 11// #define DHTTYPE DHT22 // DHT 22 (AM2302)//#define DHTTYPE DHT21 // DHT 21 (AM2301)DHT dht(DHTPIN, DHTTYPE);//MAC Address of the receiver uint8_t broadcastAddress[] = {0xE0, 0x5A, 0x1B, 0x5F, 0x12, 0xF0};//Structure example to send data//Must match the receiver structuretypedef struct struct_message { int id; float temp; float hum; int readingId;} struct_message;//Create a struct_message called myDatastruct_message myData;unsigned long previousMillis = 0; // Stores last time temperature was publishedconst long interval = 10000; // Interval at which to publish sensor readingsunsigned int readingId = 0;// Insert your SSIDconstexpr char WIFI_SSID[] = "vor";int32_t getWiFiChannel(const char *ssid) { if (int32_t n = WiFi.scanNetworks()) { for (uint8_t i=0; i<n; i++) { if (!strcmp(ssid, WiFi.SSID(i).c_str())) { return WiFi.channel(i); } } } return 0;}float readDHTTemperature() { // Sensor readings may also be up to 2 seconds 'old' (its a very slow sensor) // Read temperature as Celsius (the default) float t = dht.readTemperature(); // Read temperature as Fahrenheit (isFahrenheit = true) //float t = dht.readTemperature(true); // Check if any reads failed and exit early (to try again). if (isnan(t)) { Serial.println("Failed to read from DHT sensor!"); return 0; } else { Serial.println(t); return t; }}float readDHTHumidity() { // Sensor readings may also be up to 2 seconds 'old' (its a very slow sensor) float h = dht.readHumidity(); if (isnan(h)) { Serial.println("Failed to read from DHT sensor!"); return 0; } else { Serial.println(h); return h; }}// callback when data is sentvoid OnDataSent(const uint8_t *mac_addr, esp_now_send_status_t status) { Serial.print("\r\nLast Packet Send Status:\t"); Serial.println(status == ESP_NOW_SEND_SUCCESS ? "Delivery Success" : "Delivery Fail");} void setup() { //Init Serial Monitor Serial.begin(115200); dht.begin(); // Set device as a Wi-Fi Station and set channel WiFi.mode(WIFI_STA); int32_t channel = getWiFiChannel(WIFI_SSID); WiFi.printDiag(Serial); // Uncomment to verify channel number before esp_wifi_set_promiscuous(true); esp_wifi_set_channel(channel, WIFI_SECOND_CHAN_NONE); esp_wifi_set_promiscuous(false); WiFi.printDiag(Serial); // Uncomment to verify channel change after //Init ESP-NOW if (esp_now_init() != ESP_OK) { Serial.println("Error initializing ESP-NOW"); return; } // Once ESPNow is successfully Init, we will register for Send CB to // get the status of Trasnmitted packet esp_now_register_send_cb(OnDataSent); //Register peer esp_now_peer_info_t peerInfo; memcpy(peerInfo.peer_addr, broadcastAddress, 6); peerInfo.encrypt = false; //Add peer if (esp_now_add_peer(&peerInfo) != ESP_OK){ Serial.println("Failed to add peer"); return; }} void loop() { unsigned long currentMillis = millis(); if (currentMillis - previousMillis >= interval) { // Save the last time a new reading was published previousMillis = currentMillis; //Set values to send myData.id = BOARD_ID; myData.temp = readDHTTemperature(); myData.hum = readDHTHumidity(); myData.readingId = readingId++; //Send message via ESP-NOW esp_err_t result = esp_now_send(broadcastAddress, (uint8_t *) &myData, sizeof(myData)); if (result == ESP_OK) { Serial.println("Sent with success"); } else { Serial.println("Error sending the data"); } }}6.1 代码的工作原理
首先导入所需的库:
#include <esp_now.h>#include <esp_wifi.h>#include <WiFi.h>#include <Adafruit_Sensor.h>#include <DHT.h>6.2 设置板 ID
定义 ESP32 发送板 ID,例如为 ESP1 发送板 #32 设置 BOARD_ID 1,以此类推…
// Set your Board ID (ESP32 Sender #1 = BOARD_ID 1, ESP32 Sender #2 = BOARD_ID 2, etc)#define BOARD_ID 16.3 DHT传感器
定义 DHT 传感器连接到的引脚。在我们的示例中,它连接到通用IO 4.
#define DHTPIN 4选择您正在使用的 DHT 传感器类型。我们正在使用 DHT11。
// Uncomment the type of sensor in use:#define DHTTYPE DHT11 // DHT 11//#define DHTTYPE DHT22 // DHT 22 (AM2302)//#define DHTTYPE DHT21 // DHT 21 (AM2301)创建一个DHT(DHT)引脚上的对象和前面定义的类型。
DHT dht(DHTPIN, DHTTYPE);6.4 接收方的MAC地址
在下一行插入接收方的 MAC 地址(例如):
uint8_t broadcastAddress[] = {0xE0, 0x5A, 0x1B, 0x5F, 0x12, 0xF0};6.5 数据结构
然后,创建一个包含我们要发送的数据的结构。这struct_message包含电路板 ID、温度读数、湿度读数和读数 ID。
typedef struct struct_message { int id; float temp; float hum; int readingId;} struct_message;创建一个类型的新变量struct_message这被称为myData(我的数据)存储变量的值。
struct_message myData;6.6 定时器间隔
创建一些辅助计时器变量,每 10 秒发布一次读数。您可以在间隔变量。
unsigned long previousMillis = 0; // Stores last time temperature was publishedconst long interval = 10000; // Interval at which to publish sensor readings初始化readingId变量 – 它跟踪发送的读数数量。
unsigned int readingId = 0;6.7 更改 Wi-Fi 信道
现在,我们将获得接收器的 Wi-Fi 频道。这很有用,因为它允许我们自动将相同的 Wi-Fi 信道分配给发送板。
为此,您必须在以下行中插入SSID:
constexpr char WIFI_SSID[] = "vor";然后,getWiFiChannel()函数扫描您的网络并获取其频道。
int32_t getWiFiChannel(const char *ssid) { if (int32_t n = WiFi.scanNetworks()) { for (uint8_t i=0; i<n; i++) { if (!strcmp(ssid, WiFi.SSID(i).c_str())) { return WiFi.channel(i); } } } return 0;}这段代码是由 Stephane(我们的读者之一)提出的。你可以在这里看到他的完整例子。
6.8 读数温度
这readDHTTemperature()函数从 DHT 传感器读取并返回温度。如果它无法获得温度读数,它会返回0.
float readDHTTemperature() { // Sensor readings may also be up to 2 seconds 'old' (its a very slow sensor) // Read temperature as Celsius (the default) float t = dht.readTemperature(); // Read temperature as Fahrenheit (isFahrenheit = true) //float t = dht.readTemperature(true); // Check if any reads failed and exit early (to try again). if (isnan(t)) { Serial.println("Failed to read from DHT sensor!"); return 0; } else { Serial.println(t); return t; }}6.9 读数湿度
这readDHTHumidity()函数读取并返回来自 DHT 传感器的湿度。如果它无法获得湿度读数,它会返回0.
float readDHTHumidity() { // Sensor readings may also be up to 2 seconds 'old' (its a very slow sensor) float h = dht.readHumidity(); if (isnan(h)) { Serial.println("Failed to read from DHT sensor!"); return 0; } else { Serial.println(h); return h; }}注意:要了解有关从 DHT22 或 DHT11 传感器获取温度和湿度的更多信息,请阅读:使用 Arduino IDE 的 ESP32 和 DHT11/DHT22 温湿度传感器。
6.10 OnDataSent 回调函数
这OnDataSent()发送消息时将执行回调函数。在这种情况下,此函数将打印消息是否成功传递。
void OnDataSent(const uint8_t *mac_addr, esp_now_send_status_t status) { Serial.print("\r\nLast Packet Send Status:\t"); Serial.println(status == ESP_NOW_SEND_SUCCESS ? "Delivery Success" : "Delivery Fail");}6.11 setup()
初始化串行监视器。
Serial.begin(115200);将 ESP32 设置为 Wi-Fi 站。
6.12 WiFi.mode(WIFI_STA);
设置其频道以匹配接收器的 Wi-Fi 频道:
int32_t channel = getWiFiChannel(WIFI_SSID);WiFi.printDiag(Serial); // Uncomment to verify channel number beforeesp_wifi_set_promiscuous(true);esp_wifi_set_channel(channel, WIFI_SECOND_CHAN_NONE);esp_wifi_set_promiscuous(false);WiFi.printDiag(Serial); // Uncomment to verify channel change after初始化 ESP-NOW。
if (esp_now_init() != ESP_OK) { Serial.println("Error initializing ESP-NOW"); return;}成功初始化 ESP-NOW 后,注册发送消息时将调用的回调函数。在这种情况下,请注册OnDataSent()之前创建的函数。
esp_now_register_send_cb(OnDataSent);6.13 添加对等节点
要将数据发送到另一块板(接收器),您需要将其配对为对等体。以下行注册接收方并将其添加为对等体。
// Register peeresp_now_peer_info_t peerInfo;memcpy(peerInfo.peer_addr, broadcastAddress, 6);peerInfo.encrypt = false;// Add peerif (esp_now_add_peer(&peerInfo) != ESP_OK){ Serial.println("Failed to add peer"); return;}6.14 loop()
在loop(),检查是否是时候获取和发送新读数了。
unsigned long currentMillis = millis();if (currentMillis - previousMillis >= interval) { // Save the last time a new reading was published previousMillis = currentMillis;6.14 发送 ESP-NOW 消息
最后,通过 ESP-NOW 发送消息结构。
// Send message via ESP-NOWesp_err_t result = esp_now_send(broadcastAddress, (uint8_t *) &myData, sizeof(myData));if (result == ESP_OK) { Serial.println("Sent with success");}else { Serial.println("Error sending the data");}将代码上传到发件人看板。您应该注意到,这些板将其 Wi-Fi 通道更改为接收器板的通道。在我们的例子中,电路板将其 Wi-Fi 信道号更改为 6。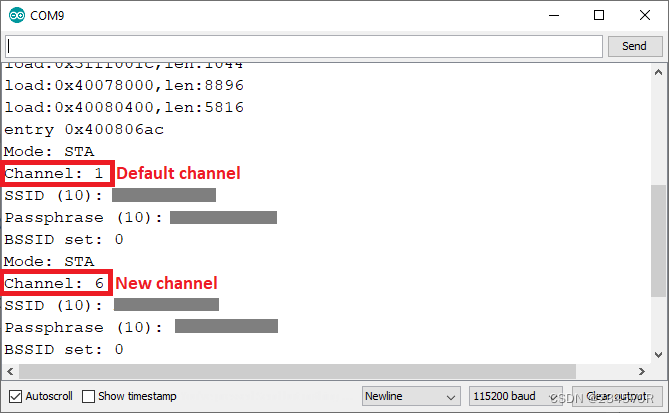
7. 示范
将代码上传到所有开发板后,如果一切按预期进行,ESP32 接收器开发板应开始接收来自其他开发板的传感器读数。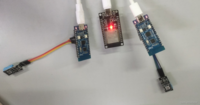
ESP32 ESP-NOW Web 服务器传感器仪表板 ESP-NOW 和 Wi-Fi 演示传感器读数
在本地网络上打开浏览器并输入 ESP32 IP 地址。
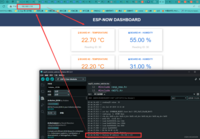
它应该加载每个板的温度、湿度和读数 ID。收到新数据包后,您的网页会自动更新,而无需刷新网页。

8. 总结
???现在,我们在本教程中,您学习了如何使用 ESP-NOW 和 Wi-Fi 设置 Web 服务器以接收来自多个开发板的 ESP-NOW 数据包(多对一配置)。???从而实现对外部世界进行感知,充分认识这个有机与无机的环境,后期会持续分享esp32跑freertos实用案列???科学地合理地进行创作和发挥效益,然后为人类社会发展贡献一点微薄之力。???
参考文献:
【ESP-NOW ESP32 开发板之间的双向通信】【ESP-NOW 入门(ESP32 with Arduino IDE)】【ESP-NOW with ESP32:向多个开发板发送数据(一对多)】【ESP-NOW with ESP32:从多个开发板接收数据(多对一)】ESP32: ESP-NOW Web Server Sensor Dashboard (ESP-NOW + Wi-Fi)