前言
Kettle简介 Kettle是一款国外开源的ETL工具,纯Java编写,可以在Window、Linux、Unix上运行,绿色无需安装,数据抽取高效稳定
WebSpoon是Kettle的Web版本,由Kettle社区维护,不受Pentaho支持,实现了Kettle的大部分功能
拉取代码
仓库地址:https://github.com/HiromuHota/pentaho-kettle
git clone https://github.com/HiromuHota/pentaho-kettle.git编译
配置 maven 的环境变量
将settings.xml 放在你用户目录下 /.m2 中并修改
本地构建以下依赖库:
pentaho-xul-swt
git clone -b webspoon-9.0 https://github.com/HiromuHota/pentaho-commons-xul.gitcd pentaho-commons-xulmvn clean install -pl swt -DskipTestsrap
拉取代码后,进入 rap/releng/org.eclipse.rap.build 目录修改 pom.xml 文件, 找到 properties 标签
将 jetty-repo.url 标签值改为 https://download.eclipse.org/jetty/updates/jetty-bundles-9.x/9.4.44.v20210927/
将 rap-extra-repo.url 标签值改为 https://download.eclipse.org/rt/rap/base-platforms/3.14/extra-dependencies/
git clone -b webspoon-3.12.0 https://github.com/HiromuHota/rap.gitcd rapmvn clean install -DskipTestspentaho-vfs-browser
git clone -b webspoon-9.0 https://github.com/HiromuHota/apache-vfs-browser.gitcd apache-vfs-browsermvn clean install -DskipTests以上操作无误后,执行 mvn clean install -DskipTests 构建项目
构建成功后可在 assemblies/client/target 目录下找到 spoon.war 部署包
也可直接在 https://github.com/HiromuHota/pentaho-kettle/releases 下载已经构建好的 war 包
部署
tomcat 部署
将 spoon.war 放入 tomcat/webapps 目录下
点击下载 9.x 版本的 pdi-ce-xxxx.zip 并解压
将 system 和 plugins 目录放入 tomcat/bin 下
启动 tomcat, 访问
Docker部署
# 拉取镜像docker pull hiromuhota/webspoon# 运行, 访问 http://localhost:8080docker run -d -p 8080:8080 hiromuhota/webspoonDocker-compose 部署
docker-compose.yml 文件:
version: "3.3"services: kettle: image: hiromuhota/webspoon:latest volumes: # 如需添加jar包则将jar包挂载进docker容器 - ./volumes/lib/mysql-connector-java-5.1.48.jar:/usr/local/tomcat/webapps/spoon/WEB-INF/lib/mysql-connector-java-5.1.48.jar # 保证重启后资源库数据不丢失,需挂载此目录 # 需要提前创建好该文件, 并授权: mkdir -m 777 ./volumes/.kettle - ./volumes/.kettle:/home/tomcat/.kettle # 如需汉化,挂载此目录并添加配置 - ./volumes/setenv.sh:/usr/local/tomcat/bin/setenv.sh environment: - LANG=zh_CN.UTF-8 ports: - "9002:8080"setenv.sh 文件
CLASSPATH=/usr/local/tomcat/lib/webspoon-security-9.0.0.0-423-22.jarCATALINA_OPTS="-Dorg.apache.tomcat.util.buf.UDecoder.ALLOW_ENCODED_SLASH=true"JAVA_OPTS="-Duser.language=zh -Duser.region=CN -Dfile.encoding=UTF-8"启动与停止
# 在 docker-compose.yml 文件所在路径下执行# 启动docker compose up -d# 停止docker compose down远程调试
开启远程调试服务
docker run -d -p 8080:8080 -p 9003:8000 \-e JPDA_ADDRESS=8000 \-e CATALINA_OPTS="-Dorg.eclipse.rap.rwt.developmentMode=true" \hiromuhota/webspoon catalina.sh jpda run或配置为 docker-compose.yml 文件
version: "3.3"services: kettle: image: hiromuhota/webspoon:latest environment: - JPDA_ADDRESS=8000 - CATALINA_OPTS="-Dorg.eclipse.rap.rwt.developmentMode=true" ports: - "8080:8080" - "9003:8000" command: ["catalina.sh", "jpda", "run"]idea 打开本地编译好的源码
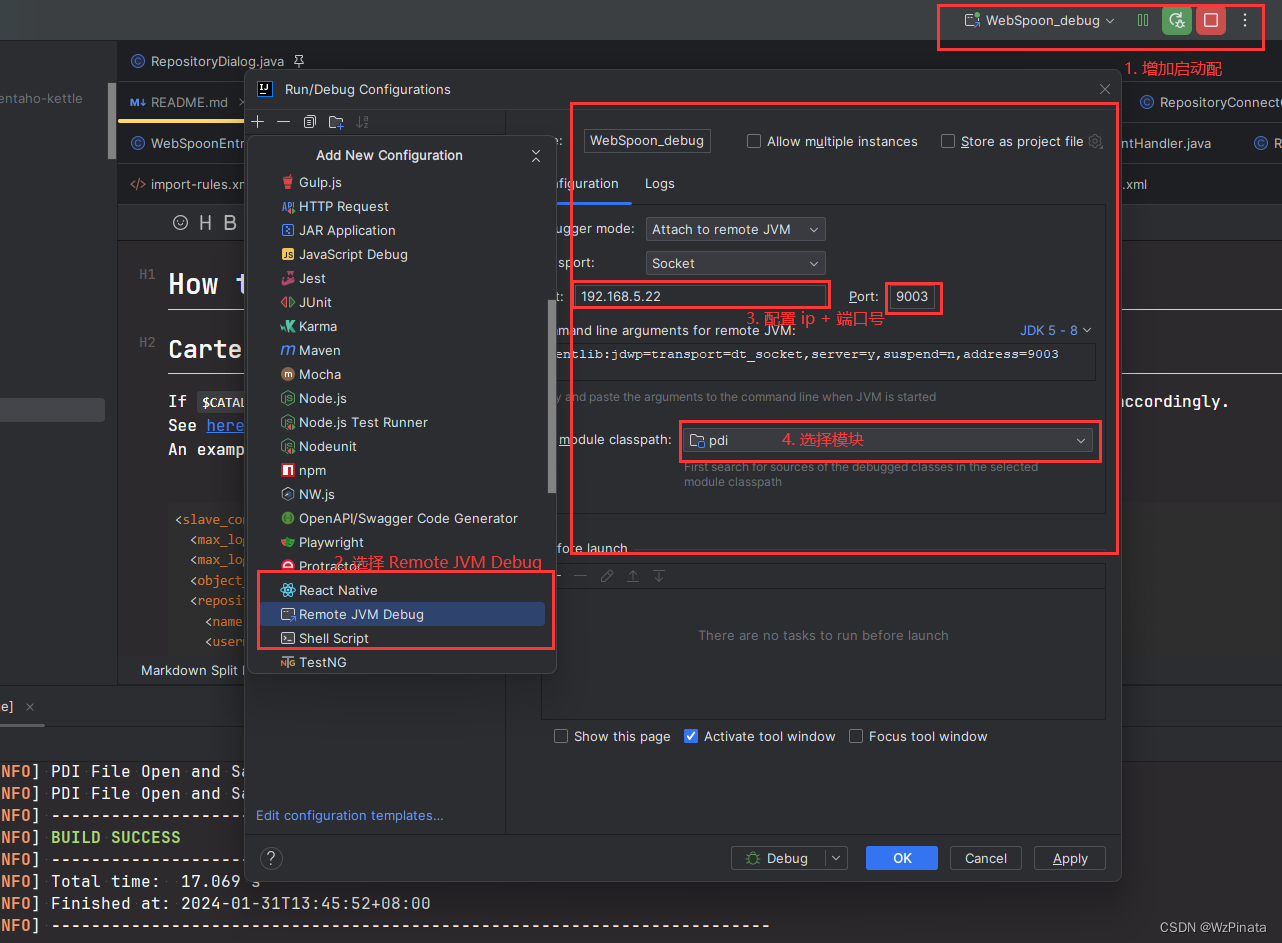
增加远程调试配置 Remote JVM debuge, 随后启动
控制台打印如下内容即可
Connected to the target VM, address: ‘192.168.5.22:9003’, transport: ‘socket’