文章目录
一、环境二、预训练词向量三、模型1、BiLSTM- 不使用预训练字向量- 使用预训练字向量 2、CRF3、BiLSTM + CRF- 不使用预训练词向量- 使用预训练词向量 4、Bert + BiLSTM + CRF 总结
一、环境
torch==1.10.2transformers==4.16.2其他的缺啥装啥
二、预训练词向量
在TextCNN文本分类Pytorch文章中,我们的实验结果证实了加入预训练词向量对模型提升效果是有帮助的,因此,在这篇文章中,我也会对比加入预训练词向量前后的结果。
NER本质还是对字分类,所以,我们只需要字向量。在这里,我使用了科大讯飞的chinese_wwm_ext_pytorch的中文预训练bert模型来获取字向量。
模型下载地址:https://github.com/ymcui/Chinese-BERT-wwm
字向量构建:
class GetPretrainedVec: def __init__(self): self.bert_path = get_chinese_wwm_ext_pytorch_path() def load(self): self.bert = BertModel.from_pretrained(self.bert_path) self.token = BertTokenizerFast.from_pretrained(self.bert_path) # Bert 字向量生成 def get_data(self, path, char=False): words = [] with open(path, "r", encoding="utf-8") as f: sentences = f.readlines() if char: for sent in sentences: words.extend([word.strip() for word in sent.strip().replace(" ", "") if word not in words]) else: for sentence in sentences: cut_word = jieba.lcut(sentence.strip().replace(" ", "")) words.extend([w for w in cut_word if w not in words]) return words def get_bert_embed(self, src_path, vec_save_path, char=False): words = self.get_data(src_path, char) words.append("<unk>") words.append("<pad>") words.append("<start>") words.append("<end>") # 字向量 if char: file_char = open(vec_save_path, "a+", encoding="utf-8") file_char.write(str(len(words)) + " " + "768" + "\n") for word in tqdm(words, desc="编码字向量:"): inputs = self.token.encode_plus(word, padding="max_length", truncation=True, max_length=10, add_special_tokens=True, return_tensors="pt") out = self.bert(**inputs) out = out[0].detach().numpy().tolist() out_str = " ".join("%s" % embed for embed in out[0][1]) embed_out = word + " " + out_str + "\n" file_char.write(embed_out) file_char.close() else: file_word = open(vec_save_path, "a+", encoding="utf-8") file_word.write(str(len(words)) + " " + "768" + "\n") # 词向量 (采用字向量累加求均值) for word in tqdm(words, desc="编码词向量:"): words_embed = np.zeros(768) # bert tensor shape is 768 inputs = self.token.encode_plus(word, padding="max_length", truncation=True, max_length=50, add_special_tokens=True, return_tensors="pt") out = self.bert(**inputs) word_len = len(word) out_ = out[0].detach().numpy() for i in range(1, word_len + 1): out_str = out_[0][i] words_embed += out_str words_embed = words_embed / word_len words_embedding = words_embed.tolist() result = word + " " + " ".join("%s" % embed for embed in words_embedding) + "\n" file_word.write(result) file_word.close() @staticmethod def get_w2v_weight(embedding_size, vec_path, word2id_path, id2word_path): w2v_model = KeyedVectors.load_word2vec_format(vec_path, binary=False) word2id = load_pickle_obj(word2id_path) id2word = load_pickle_obj(id2word_path) vocab_size = len(word2id) embedding_size = embedding_size weight = torch.zeros(vocab_size, embedding_size) for i in range(len(w2v_model.index2word)): try: index = word2id[w2v_model.index2word[i]] except: continue weight[index, :] = torch.from_numpy(w2v_model.get_vector(id2word[word2id[w2v_model.index2word[i]]])) return weight三、模型
在这篇博客中,我总共使用了三种模型来训练,对比训练效果。分别是
BiLSTMBiLSTM + CRFBert + BiLSTM + CRF1、BiLSTM
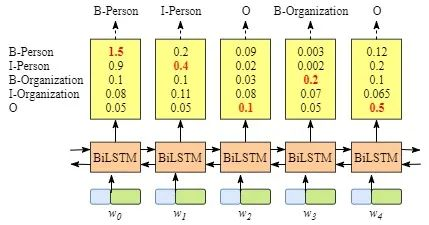
模型大致结构
只用BiLSTM来做NER的话,实际上就是多分类,既然是多分类,那么它的损失函数就可以用交叉熵来表示。模型构建及损失计算如下:
class BiLSTM(nn.Module): def __init__(self, vocab_size, emb_size, hidden_size, out_size, drop_out=0.5, use_pretrained_w2v=False): super(BiLSTM, self).__init__() self.embedding = nn.Embedding(vocab_size, emb_size) if use_pretrained_w2v: print("加载预训练字向量...") vec_path = get_pretrained_char_vec_path() word2id_path = get_word2id_path() id2word_path = get_id2word_path() embedding_pretrained = GetPretrainedVec.get_w2v_weight(emb_size, vec_path, word2id_path, id2word_path) self.embedding.weight.data.copy_(embedding_pretrained) self.embedding.weight.requires_grad = True self.bilstm = nn.LSTM(emb_size, hidden_size, batch_first=True, bidirectional=True) self.fc = nn.Linear(hidden_size*2, out_size) self.dropout = nn.Dropout(drop_out) self.device = torch.device("cuda" if torch.cuda.is_available() else "cpu") def forward(self, x, lengths): x = x.to(self.device) emb = self.embedding(x) emb = self.dropout(emb) emb = nn.utils.rnn.pack_padded_sequence(emb, lengths, batch_first=True) emb, _ = self.bilstm(emb) output, _ = nn.utils.rnn.pad_packed_sequence(emb, batch_first=True, padding_value=0., total_length=x.shape[1]) scores = self.fc(output) return scores def predict(self, x, lengths, _): scores = self.forward(x, lengths) _, batch_tagids = torch.max(scores, dim=2) return batch_tagidsdef cal_bilstm_loss(logits, targets, tag2id): PAD = tag2id.get('<pad>') assert PAD is not None mask = (targets != PAD) targets = targets[mask] out_size = logits.size(2) logits = logits.masked_select( mask.unsqueeze(2).expand(-1, -1, out_size) ).contiguous().view(-1, out_size) assert logits.size(0) == targets.size(0) loss = F.cross_entropy(logits, targets) return loss这里我们可以选择是否使用预训练字向量来作为embeeding层的初始化参数,且参数会在模型训练期间进行更新。
在计算准确率时,我抛弃了标签级准确率,选择了对ner任务更为合理的实体级准确率
计算方法如下:
from .help import flatten_listsdef _find_tag(labels, B_label="B-COM",I_label="M-COM", E_label="E-COM", S_label="S-COM"): result = [] lenth = 0 for num in range(len(labels)): if labels[num] == B_label: song_pos0 = num if labels[num] == B_label and labels[num+1] == E_label: lenth = 2 result.append((song_pos0,lenth)) if labels[num] == I_label and labels[num-1] == B_label: lenth = 2 for num2 in range(num,len(labels)): if labels[num2] == I_label and labels[num2-1] == I_label: lenth += 1 if labels[num2] == E_label: lenth += 1 result.append((song_pos0,lenth)) break if labels[num] == S_label: lenth = 1 song_pos0 = num result.append((song_pos0,lenth)) return resulttags = [("B-NAME","M-NAME", "E-NAME", "S-NAME"), ("B-TITLE","M-TITLE", "E-TITLE", "S-TITLE"), ("B-ORG","M-ORG", "E-ORG", "S-ORG"), ("B-RACE","M-RACE", "E-RACE", "S-RACE"), ("B-EDU","M-EDU", "E-EDU", "S-EDU"), ("B-CONT","M-CONT", "E-CONT", "S-CONT"), ("B-LOC","M-LOC", "E-LOC", "S-LOC"), ("B-PRO","M-PRO", "E-PRO", "S-PRO")] def find_all_tag(labels): result = {} for tag in tags: res = _find_tag(labels, B_label=tag[0], I_label=tag[1], E_label=tag[2], S_label=tag[3]) result[tag[0].split("-")[1]] = res return resultdef precision(pre_labels,true_labels): ''' :param pre_tags: list :param true_tags: list :return: ''' pre = [] pre_labels = flatten_lists(pre_labels) true_labels = flatten_lists(true_labels) pre_result = find_all_tag(pre_labels) true_result = find_all_tag(true_labels) result_dic = {} for name in pre_result: for x in pre_result[name]: if result_dic.get(name) is None: result_dic[name] = [] if x: if pre_labels[x[0]:x[0]+x[1]] == true_labels[x[0]:x[0]+x[1]]: result_dic[name].append(1) else: result_dic[name].append(0) # print(f'tag: {name} , length: {len(result_dic[name])}') sum_result = 0 for name in result_dic: sum_result += sum(result_dic[name]) # print(f'tag2: {name} , length2: {len(result_dic[name])}') result_dic[name] = sum(result_dic[name]) / len(result_dic[name]) for name in pre_result: for x in pre_result[name]: if x: if pre_labels[x[0]:x[0]+x[1]] == true_labels[x[0]:x[0]+x[1]]: pre.append(1) else: pre.append(0) total_precision = sum(pre)/len(pre) return total_precision, result_dic模型效果:
- 不使用预训练字向量
curren best val loss: 2.845144033432007实体级准确率为: 0.0027247956403269754各实体对应的准确率为: { "NAME": 0.009708737864077669, "TITLE": 0.002797202797202797, "ORG": 0.0019267822736030828, "RACE": 0.0, "EDU": 0.0, "CONT": 0.0}这准确率低到你不得不打开pycharm去调试。。。
调试完了发现确实很低
我们来拿条数据测试下吧:
text = "张铁柱,大学本科,毕业于东华理工大学,汉族。"输出:
['B-NAME', 'O', 'O', 'O', 'B-EDU', 'M-EDU', 'M-EDU', 'E-EDU', 'O', 'O', 'O', 'O', 'B-ORG', 'M-ORG', 'M-ORG', 'M-ORG', 'M-ORG', 'E-ORG', 'O', '<end>', '<end>', 'O']实体标签
{'ORG': ['东华理工大学'], 'EDU': ['大学本科']}- 使用预训练字向量
curren best val loss: 2.830146700143814实体级准确率为: 0.002779708130646282各实体对应的准确率为: { "NAME": 0.009615384615384616, "TITLE": 0.002894356005788712, "ORG": 0.0019342359767891683, "EDU": 0.0, "CONT": 0.0}为了更能说明问题,我们改了一下测试数据
text = "张铁柱,大学本科,毕业于东华理工大学,汉族,江西抚州人"输出:
['B-NAME', 'M-NAME', 'E-NAME', 'O', 'B-EDU', 'M-EDU', 'M-EDU', 'E-EDU', 'O', 'O', 'O', 'O', 'O', 'M-ORG', 'M-ORG', 'M-PRO', 'M-EDU', 'E-EDU', 'O', 'B-EDU', 'E-EDU', 'O', 'B-ORG', 'M-ORG', 'M-TITLE', 'M-ORG', '<end>']{'NAME': ['张铁柱'], 'EDU': ['汉族', '大学本科']}两个模型都差不多,效果非常差
我们再来观察下预测的结果,从中选取一部分:
'M-ORG', 'M-ORG', 'M-PRO', 'M-EDU', 'E-EDU'分析:M-ORG标签后跟了个M-EDU标签,仔细想想,M标签后应该跟E标签才对,M标签之前应该是B标签才对,BiLSTM模型,在预测标签时取的是最大得分的标签,标签与标签之间不存在约束关系,但是我们从上面的例子可以看出:在NER任务中,标签与标签之间是存在关系的。
综上所述,引入CRF层是必要的。
2、CRF

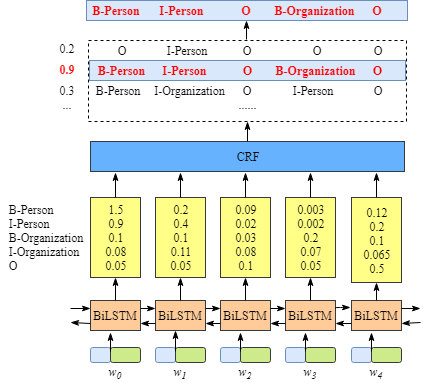
在这里,CRF层其实就是一个 out_size * out_size大小的矩阵,out_size为标签个数。
CRF层可以向最终的预测标签添加一些约束,以确保它们是有效的。这些约束可以由CRF层在训练过程中从训练数据集自动学习。
句子中第一个单词的标签应该以“B-”或“O”开头,而不是“M-”“B-label1 M-label2 M-label3 E-label4”,在这个模式中,label1、label2、label3、label4应该是相同的命名实体标签。例如,“B-Person M-Person E-Person”是有效的,但是“B-Person M-Organization”是无效的。“O M-label”无效。一个命名实体的第一个标签应该以“B-”而不是“M-”开头,换句话说,有效的模式应该是“O B-label”…有了这些有用的约束,无效预测标签序列的数量将显著减少。
下面我们来看看加入CRF层后的模型代码:
class BiLSTM_CRF(nn.Module): def __init__(self, vocab_size, emb_size, hidden_size, out_size, dropout, use_pretrained_w2v): super(BiLSTM_CRF, self).__init__() self.bilstm = BiLSTM(vocab_size, emb_size, hidden_size, out_size, dropout, use_pretrained_w2v) self.transition = nn.Parameter(torch.ones(out_size, out_size) * 1 / out_size) self.device = torch.device("cuda" if torch.cuda.is_available() else "cpu") def forward(self, sents_tensor, lengths): emission = self.bilstm(sents_tensor, lengths).to(self.device) batch_size, max_len, out_size = emission.size() crf_scores = emission.unsqueeze(2).expand(-1, -1, out_size, -1) + self.transition.unsqueeze(0) return crf_scores可以看出,确实只是比BiLSTM多了个out_size*out_size大小的转移矩阵。
但是,加入CRF层后的损失函数,就不再是交叉熵损失了。加入CRF层后损失函数,由真实路径得分和所有可能路径的总得分组成。在所有可能的路径中,真实路径的得分应该是最高的。
训练的过程,就是最大化真实路径与所有可能路径的比值,一般我们更习惯将最大化问题转换成最小化问题,在Loss函数前加个负号即变成了最小化问题。
关于CRF Loss计算的问题,更详细的内容可以参考-通俗易懂!BiLSTM上的CRF,用命名实体识别任务来解释CRF,为了避免篇幅过长(其实是懒),这里不再赘述。
加入CRF后Loss计算过程:
def cal_bilstm_crf_loss(crf_scores, targets, tag2id): pad_id = tag2id.get('<pad>') start_id = tag2id.get('<start>') end_id = tag2id.get('<end>') device = torch.device("cuda" if torch.cuda.is_available() else "cpu") batch_size, max_len = targets.size() target_size = len(tag2id) mask = (targets != pad_id) lengths = mask.sum(dim=1) targets = indexed(targets, target_size, start_id) targets = targets.masked_select(mask) flatten_scores = crf_scores.masked_select( mask.view(batch_size, max_len, 1, 1).expand_as(crf_scores) ).view(-1, target_size*target_size).contiguous() golden_scores = flatten_scores.gather( dim=1, index=targets.unsqueeze(1)).sum() scores_upto_t = torch.zeros(batch_size, target_size).to(device) for t in range(max_len): batch_size_t = (lengths > t).sum().item() if t == 0: scores_upto_t[:batch_size_t] = crf_scores[:batch_size_t, t, start_id, :] else: scores_upto_t[:batch_size_t] = torch.logsumexp( crf_scores[:batch_size_t, t, :, :] + scores_upto_t[:batch_size_t].unsqueeze(2), dim=1 ) all_path_scores = scores_upto_t[:, end_id].sum() loss = (all_path_scores - golden_scores) / batch_size return lossdef indexed(targets, tagset_size, start_id): batch_size, max_len = targets.size() for col in range(max_len-1, 0, -1): targets[:, col] += (targets[:, col-1] * tagset_size) targets[:, 0] += (start_id * tagset_size) return targets下面我们直接来看BiLSM+CRF模型在NER任务上的效果:
3、BiLSTM + CRF
- 不使用预训练词向量
实体级准确率为: 0.9232673267326733各实体对应的准确率为: { "NAME": 0.9905660377358491, "TITLE": 0.9320261437908497, "ORG": 0.8971119133574007, "RACE": 1.0, "EDU": 0.9298245614035088, "CONT": 1.0, "LOC": 1.0, "PRO": 0.8125}实体级准确率提高至92.3%,果然,加入CRF层之后,模型确实是学到了标签之间的约束关系。
测试数据:
text = "张铁柱,大学本科,毕业于东华理工大学,汉族。"输出:
['B-NAME', 'M-NAME', 'E-NAME', 'O', 'B-EDU', 'M-EDU', 'M-EDU', 'E-EDU', 'O', 'O', 'O', 'O', 'B-ORG', 'M-ORG', 'M-ORG', 'M-ORG', 'M-ORG', 'E-ORG', 'O', 'B-RACE', 'E-RACE', 'O']{'NAME': ['张铁柱'], 'ORG': ['东华理工大学'], 'RACE': ['汉族'], 'EDU': ['大学本科']}效果确实可以
一些tricks:
训练时加入learning rate decay
self.scheduler = ExponentialLR(self.optimizer, gamma = 0.8)更新模型时,替换平均loss为验证集的实体级准确率,保存最高准确率下的模型为best model
- 使用预训练词向量
实体级准确率为: 0.9362229102167182各实体对应的准确率为: { "NAME": 1.0, "TITLE": 0.951058201058201, "ORG": 0.8969804618117229, "RACE": 1.0, "EDU": 0.9818181818181818, "CONT": 1.0, "LOC": 1.0, "PRO": 0.8}准确率提高了1%,还不错
测试数据:
text = "张铁柱,大学本科,毕业于东华理工大学,汉族。"输出:
['B-NAME', 'M-NAME', 'E-NAME', 'O', 'B-EDU', 'M-EDU', 'M-EDU', 'E-EDU', 'O', 'O', 'O', 'O', 'B-ORG', 'M-ORG', 'M-ORG', 'M-ORG', 'M-ORG', 'E-ORG', 'O', 'B-RACE', 'E-RACE', 'O']{'NAME': ['张铁柱'], 'ORG': ['东华理工大学'], 'RACE': ['汉族'], 'EDU': ['大学本科']}下面我们来看看加入Bert后的效果:
4、Bert + BiLSTM + CRF
模型结构:
class BertBiLstmCrf(nn.Module): def __init__(self, vocab_size, emb_size, hidden_size, out_size, drop_out=0.1, use_pretrained_w2v=False): super(BertBiLstmCrf, self).__init__() self.bert_path = get_chinese_wwm_ext_pytorch_path() self.bert_config = BeitConfig.from_pretrained(self.bert_path) self.bert = BertModel.from_pretrained(self.bert_path) emb_size = 768 for param in self.bert.parameters(): param.requires_grad = True self.bilstm = nn.LSTM(emb_size, hidden_size, batch_first=True, bidirectional=True) self.fc = nn.Linear(hidden_size*2, out_size) self.dropout = nn.Dropout(drop_out) self.transition = nn.Parameter(torch.ones(out_size, out_size) * 1 / out_size) self.device = torch.device("cuda" if torch.cuda.is_available() else "cpu") def forward(self, x, lengths): emb = self.bert(x)[0] emb = nn.utils.rnn.pack_padded_sequence(emb, lengths, batch_first=True) emb, _ = self.bilstm(emb) output, _ = nn.utils.rnn.pad_packed_sequence(emb, batch_first=True, padding_value=0., total_length=x.shape[1]) output = self.dropout(output) emission = self.fc(output) batch_size, max_len, out_size = emission.size() crf_scores = emission.unsqueeze(2).expand(-1, -1, out_size, -1) + self.transition.unsqueeze(0) return crf_scores与BiLSTM + CRF相比,Bert + BiLSTM + CRF只是将embedding层换成了bert,在计算loss与预测时,与BiLSTM + CRF都一样,没任何差别。理论上应该与加入预训练词向量的BiLSTM + CRF模型效果差不多。
我们直接来看看结果:
将第16个epoch训练完成后得到的模型去计算实体级准确率,结果,报错了。。。
curren best val loss: 179.17918825149536/opt/anaconda3/lib/python3.8/site-packages/torch/nn/modules/rnn.py:694: UserWarning: RNN module weights are not part of single contiguous chunk of memory. This means they need to be compacted at every call, possibly greatly increasing memory usage. To compact weights again call flatten_parameters(). (Triggered internally at ../aten/src/ATen/native/cudnn/RNN.cpp:925.) result = _VF.lstm(input, batch_sizes, hx, self._flat_weights, self.bias,Epoch: 75%|█████████████████████████████████████████████████████████████████████████████████████████▎ | 15/20 [04:22<01:27, 17.52s/it]Traceback (most recent call last): File "main.py", line 10, in <module> model_train.train(use_pretrained_w2v=use_pretrained_w2v, model_type=model_type) File "BiLSTM-CRF-NER/src/train/train.py", line 82, in train ner_model.train(train_word_lists, train_tag_lists, dev_word_lists, dev_tag_lists, test_word_lists, test_tag_lists, word2id, tag2id) File "BiLSTM-CRF-NER/src/train/train_helper.py", line 87, in train self.test(test_word_lists, test_tag_lists, word2id, tag2id) File "BiLSTM-CRF-NER/src/train/train_helper.py", line 158, in test total_precision, result_dic = precision(pre_tag_lists, tag_lists) File "BiLSTM-CRF-NER/src/tools/get_ner_level_acc.py", line 86, in precision total_precision = sum(pre)/len(pre)ZeroDivisionError: division by zero大致意思就是,模型一个标签也没正确预测出来。
有可能是代码原因,眼尖的同学可以帮忙找找。
emmm…
效果很差,真是出乎意料。
看了下保存的模型大小,发现已经达到了快400M,非常大。
而BilSTM + CRF使用预训练词向量后训练出来的模型,只有13.4M的大小。
在实际的生产环境中,模型效果与模型大小之间需要有一个平衡,有时候,即使大模型效果更好,我们也不一定会选择大模型。如果Bert+BiLSTM+CRF的模型仅比BiLSTM+CRF准确率不到五个百分比的话,我更倾向于BiLSTM+CRF。
总结
仅使用BiLSTM来训练NER模型的效果竟然如此之差,有点刷新认知,原先以为只是有点差,但没想到这么差,实验出真知。即使大模型准确率更高,但也会带来内存占用太大的问题,模型大小与模型效果需要有个平衡。 全部代码及数据集已上传至Github,路过的小伙伴可以动动小手点个 star ?
链接:https://github.com/seanzhang-zhichen/BiLSTM-CRF-NER
有需要自己标注数据集的同学,推荐使用NER标注神器Label-Studio,具体用法可以参考:命名实体识别(NER)标注神器——Label Studio 简单使用
代码中有任何错误请在Github中提issue,文章中有任何错误希望各位可以指正,非常感谢您的宝贵意见?