前言
其实小编之前一直都是用的Java来开发Android,但是工作需求,开始了Kotlin的编程,接触到了JetPack,发现其中的Navigation特别有意思,今天来给大家分享一下,我们做一个四个页面吧,从APP的 欢迎页面——>新手引导页面——>注册登录页面——>APP主页面 ,我来带大家入门,希望大家不要嫌弃
Navigation的优势
站在Fragment角度:不用把Fragment添加到集合里面去操作了,也不用去操作SupportFragmentManager了
站在Activity角度:可以减少大量的Activity,增加Fragment的使用,毕竟Fragment有更加详细的生命周期,更好的传递信息
站在开发者角度:Navigation的可视化导航图非常优美,导航路径清晰可见,让开发人员更方便的开发
Navigation开发流程
一.注入依赖
// Kotlin Navigation implementation("androidx.navigation:navigation-fragment-ktx:2.5.1") implementation("androidx.navigation:navigation-ui-ktx:2.5.1")
二.创建Fragment和XML视图
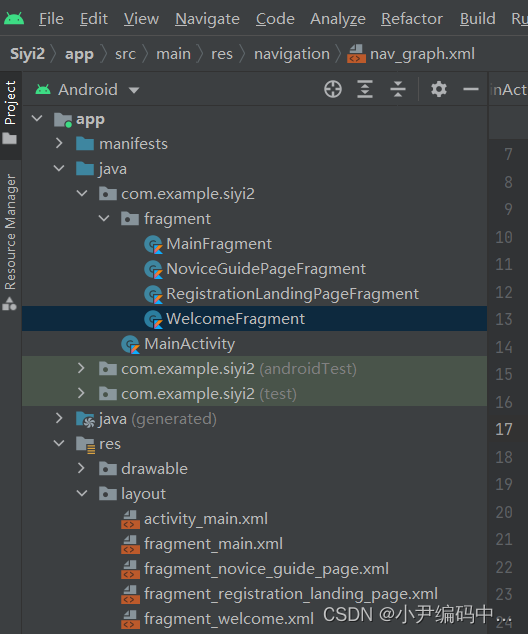
在app/java/com.example.项目名目录下 先创建一个Fragment文件夹,在文件夹中创建4个Fragment,分别为 WelcomeFragment(欢迎页面),NoviceGuidePageFragment(新手引导页面),RegistrationLandingPageFragment(注册登录页面),MainFragment(APP主页面),具体如下图所示:
在app/res/layout文件夹下创建4个XML,分别为fragment_welcome.xml,fragment_novice_guide_page.xml,fragment_registration_landing_page.xml,fragment_main.xml,具体如下图所示:
WelcomeFragment.kt:
package com.example.siyi2.fragmentimport android.os.Bundleimport android.view.LayoutInflaterimport android.view.Viewimport android.view.ViewGroupimport androidx.fragment.app.Fragmentimport com.example.siyi2.Rclass WelcomeFragment : Fragment() { override fun onCreateView( inflater: LayoutInflater, container: ViewGroup?, savedInstanceState: Bundle? ): View? { val view = inflater.inflate(R.layout.fragment_welcome, container, false) return view }}
fragment_welcome.xml:
<?xml version="1.0" encoding="utf-8"?><androidx.constraintlayout.widget.ConstraintLayout xmlns:android="http://schemas.android.com/apk/res/android" xmlns:tools="http://schemas.android.com/tools" android:layout_width="match_parent" android:layout_height="match_parent"> <TextView android:id="@+id/to_fragment_novice_guide" android:layout_width="match_parent" android:layout_height="match_parent" android:text="欢迎页面" android:textSize="30dp" android:textColor="@color/black" android:gravity="center"/></androidx.constraintlayout.widget.ConstraintLayout>
NoviceGuidePageFragment.kt:
package com.example.siyi2.fragmentimport android.os.Bundleimport android.view.LayoutInflaterimport android.view.Viewimport android.view.ViewGroupimport android.widget.TextViewimport androidx.fragment.app.Fragmentimport androidx.navigation.Navigationimport com.example.siyi2.Rclass NoviceGuidePageFragment : Fragment() { override fun onCreateView( inflater: LayoutInflater, container: ViewGroup?, savedInstanceState: Bundle? ): View? { val view = inflater.inflate(R.layout.fragment_novice_guide_page, container, false) return view }}
fragment_novice_guide_page.xml:
<?xml version="1.0" encoding="utf-8"?><androidx.constraintlayout.widget.ConstraintLayout xmlns:android="http://schemas.android.com/apk/res/android" android:layout_width="match_parent" android:layout_height="match_parent"> <TextView android:id="@+id/to_fragment_registration_landing_page" android:layout_width="match_parent" android:layout_height="match_parent" android:text="新手引导页面" android:textSize="30dp" android:textColor="#F18C8C" android:gravity="center"/></androidx.constraintlayout.widget.ConstraintLayout>
RegistrationLandingPageFragment.kt:
package com.example.siyi2.fragmentimport android.os.Bundleimport android.view.LayoutInflaterimport android.view.Viewimport android.view.ViewGroupimport android.widget.TextViewimport androidx.fragment.app.Fragmentimport androidx.navigation.Navigationimport com.example.siyi2.Rclass RegistrationLandingPageFragment :Fragment(){ override fun onCreateView(inflater: LayoutInflater, container: ViewGroup?, savedInstanceState: Bundle? ): View? { val view = inflater.inflate(R.layout.fragment_registration_landing_page,container,false) return view }}
fragment_registration_landing_page.xml
<?xml version="1.0" encoding="utf-8"?><androidx.constraintlayout.widget.ConstraintLayout xmlns:android="http://schemas.android.com/apk/res/android" android:layout_width="match_parent" android:layout_height="match_parent"> <TextView android:id="@+id/to_fragment_main" android:layout_width="match_parent" android:layout_height="match_parent" android:text="登录注册页面" android:textSize="30dp" android:textColor="#DC0404" android:gravity="center"/></androidx.constraintlayout.widget.ConstraintLayout>
MainFragment.kt:
package com.example.siyi2.fragmentimport android.os.Bundleimport android.view.LayoutInflaterimport android.view.Viewimport android.view.ViewGroupimport android.widget.TextViewimport androidx.fragment.app.Fragmentimport androidx.navigation.Navigationimport com.example.siyi2.Rclass MainFragment :Fragment(){ override fun onCreateView(inflater: LayoutInflater, container: ViewGroup?, savedInstanceState: Bundle? ): View? { val view = inflater.inflate(R.layout.fragment_main,container,false) return view }}
fragment_main.xml:
<?xml version="1.0" encoding="utf-8"?><androidx.constraintlayout.widget.ConstraintLayout xmlns:android="http://schemas.android.com/apk/res/android" android:layout_width="match_parent" android:layout_height="match_parent"> <TextView android:id="@+id/main_fragment" android:layout_width="match_parent" android:layout_height="match_parent" android:text="APP主页面" android:textSize="30dp" android:textColor="@color/teal_200" android:gravity="center"/></androidx.constraintlayout.widget.ConstraintLayout>
三. 建立Navigation导航图并关联
1.建立导航图
在app/res目录下新建一个文件夹取名navigation,在navigation文件夹下新建nav_graph.xml,如下图所示

提醒大家一下,我们开发过程中,大家的这个文件夹的名字和XML的名字大家尽量去一些见名知义的名字,方便开发人员和后续维护
nav_graph.xml:
<?xml version="1.0" encoding="utf-8"?><navigation xmlns:android="http://schemas.android.com/apk/res/android" xmlns:app="http://schemas.android.com/apk/res-auto" android:id="@+id/nav_graph" app:startDestination="@id/fragment_welcome"> <fragment android:id="@+id/fragment_welcome" android:name="com.example.siyi2.fragment.WelcomeFragment" android:label="WelcomeFragment" > <action android:id="@+id/action_fragment_welcome_to_fragment_noviceGuide" app:destination="@id/fragment_noviceGuide" /> </fragment> <fragment android:id="@+id/fragment_noviceGuide" android:name="com.example.siyi2.fragment.NoviceGuidePageFragment" android:label="NoviceGuideFragment" > <action android:id="@+id/fragment_noviceGuide_to_fragment_registarationLandingpage" app:destination="@+id/fragment_registrationLandingPage" /> </fragment> <fragment android:id="@+id/fragment_registrationLandingPage" android:name="com.example.siyi2.fragment.RegistrationLandingPageFragment" android:label="RegistrationLandingPageFragment" > <action android:id="@+id/fragment_registrationLandingPage_to_fragment_main" app:destination="@+id/fragment_main" /> </fragment> <fragment android:id="@+id/fragment_main" android:name="com.example.siyi2.fragment.MainFragment" android:label="MainFragment" > </fragment></navigation>
navigation是根标签,通过startDestinationlai配置默认启动时的第一个页面,小编这里配置的第一个fragment_welcome,我们也可以在代码中动态修改启动时的第一个Fragment,也可以在可视化面板中去修改
fragment标签就代表着这是一个Fragment
name指的是Fragment在项目中的路径
action标签定义了页面跳转的行为,也就是Navigation导航图的每一条线
destination定义跳转的Fragment目标,还可以加入跳转时的动画
Navigation首先要有起始页面,叫startDestination,处于栈底,是启动时的第一个页面,也是返回可见的最后一个页面。多个destination连接起来就构成了一个Navigation导航图,类似于一种栈结构,页面先进后出。destination之间的连接叫做action。
Navigation导航图如下图所示:
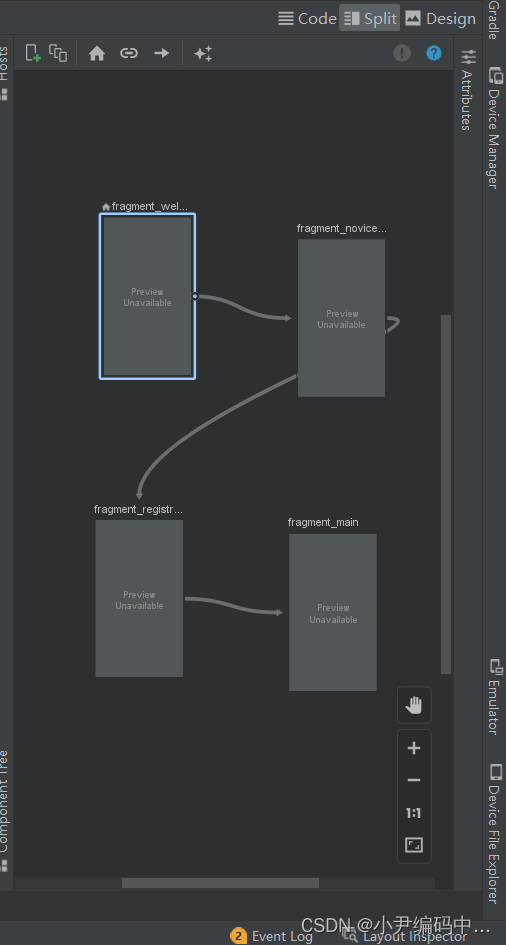
大家可以看到,这样的可视化页面流程导航图非常好看,对吧,这也是Google官方推荐大家使用的,便于开发和维护
2. 为Navigation导航绑定在Activity上
我们的navigation导航图也必须依赖于一个Activity上
MainActivity.kt:
package com.example.siyi2import androidx.appcompat.app.AppCompatActivityimport android.os.Bundleclass MainActivity : AppCompatActivity() { override fun onCreate(savedInstanceState: Bundle?) { super.onCreate(savedInstanceState) setContentView(R.layout.activity_main) }}
activity_main.xml:
<?xml version="1.0" encoding="utf-8"?><androidx.constraintlayout.widget.ConstraintLayout xmlns:android="http://schemas.android.com/apk/res/android" xmlns:app="http://schemas.android.com/apk/res-auto" xmlns:tools="http://schemas.android.com/tools" android:layout_width="match_parent" android:layout_height="match_parent" tools:context=".MainActivity"> <fragment android:id="@+id/nav_host_fragment" app:defaultNavHost="true" app:navGraph="@navigation/nav_graph" android:name="androidx.navigation.fragment.NavHostFragment" android:layout_width="match_parent" android:layout_height="match_parent" /></androidx.constraintlayout.widget.ConstraintLayout>
3. 为Navigation导航页面添加跳转事件
WelcomeFragment.kt:
package com.example.siyi2.fragmentimport android.os.Bundleimport android.view.LayoutInflaterimport android.view.Viewimport android.view.ViewGroupimport android.widget.TextViewimport androidx.fragment.app.Fragmentimport androidx.navigation.Navigationimport com.example.siyi2.R class WelcomeFragment : Fragment() { override fun onCreateView( inflater: LayoutInflater, container: ViewGroup?, savedInstanceState: Bundle? ): View? { val view = inflater.inflate(R.layout.fragment_welcome, container, false) view.findViewById<TextView>(R.id.to_fragment_novice_guide) .setOnClickListener { Navigation.findNavController(view) .navigate(R.id.action_fragment_welcome_to_fragment_noviceGuide) } return view }}
NoviceGuidePageFragment.kt:
package com.example.siyi2.fragmentimport android.os.Bundleimport android.view.LayoutInflaterimport android.view.Viewimport android.view.ViewGroupimport android.widget.TextViewimport androidx.fragment.app.Fragmentimport androidx.navigation.Navigationimport com.example.siyi2.Rclass NoviceGuidePageFragment : Fragment() { override fun onCreateView( inflater: LayoutInflater, container: ViewGroup?, savedInstanceState: Bundle? ): View? { val view = inflater.inflate(R.layout.fragment_novice_guide_page, container, false) view.findViewById<TextView>(R.id.to_fragment_registration_landing_page) .setOnClickListener { Navigation.findNavController(view) .navigate(R.id.fragment_noviceGuide_to_fragment_registarationLandingpage) } return view }}
RegistrationLandingPageFragment.kt:
package com.example.siyi2.fragmentimport android.os.Bundleimport android.view.LayoutInflaterimport android.view.Viewimport android.view.ViewGroupimport android.widget.TextViewimport androidx.fragment.app.Fragmentimport androidx.navigation.Navigationimport com.example.siyi2.Rclass RegistrationLandingPageFragment :Fragment(){ override fun onCreateView(inflater: LayoutInflater, container: ViewGroup?, savedInstanceState: Bundle? ): View? { val view = inflater.inflate(R.layout.fragment_registration_landing_page,container,false) view.findViewById<TextView>(R.id.to_fragment_main) .setOnClickListener { Navigation.findNavController(view) .navigate(R.id.fragment_registrationLandingPage_to_fragment_main) } return view }}
MainFragment.kt:
package com.example.siyi2.fragmentimport android.os.Bundleimport android.view.LayoutInflaterimport android.view.Viewimport android.view.ViewGroupimport android.widget.TextViewimport androidx.fragment.app.Fragmentimport androidx.navigation.Navigationimport com.example.siyi2.Rclass MainFragment :Fragment(){ override fun onCreateView(inflater: LayoutInflater, container: ViewGroup?, savedInstanceState: Bundle? ): View? { val view = inflater.inflate(R.layout.fragment_main,container,false) return view }}
到此为止,我们就万事俱备,只欠东风了,直接运行,上效果图
四. Navigation效果演示
Navigation开发
不知道大家是否对JetPack中的Navigation感兴趣了呢?请在评论区留言哦!