第1章 Android Studio运行第一个程序
1.1 Android Studio下载:
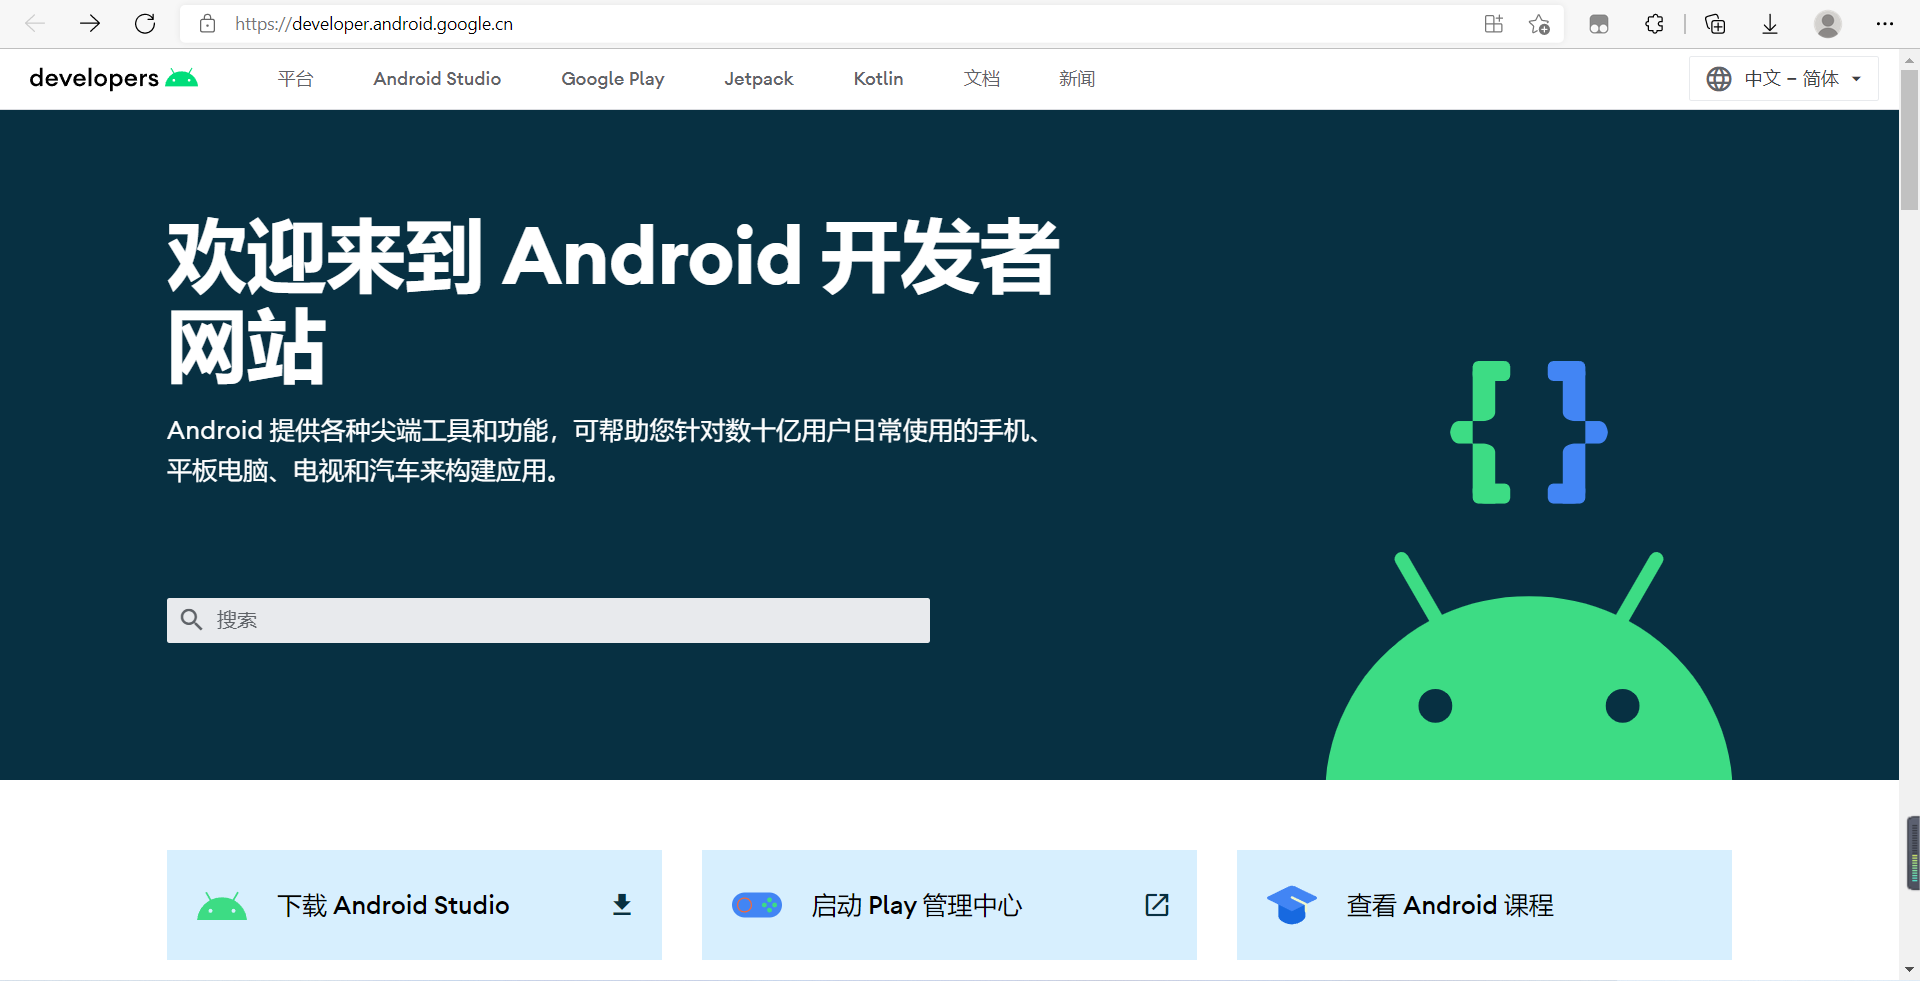
1.1.1 Android开发者官网:
https://developer.android.google.cn
1.1.2 下载Android Studio开发者工具:
进入Android开发者官网;找到Android Studio工具下载页面;点击“Download option”按钮选择与自己系统对应的版本(本人使用的是Windows版本);同意“条款和条件”并点击下载;
1.2 Android Studio安装:
双击下载好的Android Studio工具; 直接点击“Next”到安装处点击“Install”安装;(中途有:欢迎安装界面-->选择上虚拟设备-->安装路径)等待安装完成后点“Next”如下图所示表示安装完成; 运行Android Studio;(由于是第一次安装,没有配置文件,直接点击“OK”)
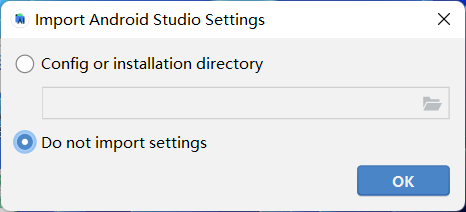 点击“Cancel”;
  会弹出欢迎界面,提示会提醒是否将使用情况统计信息发送到“Google”;(单纯让谷歌知道多了一位Android开发者)来到欢迎配置Android Studio开发环境,点击”Next“直接到License Agreement[许可协议];(【Install Type:安装类型】[Standard:标准]-->【Select Ul Theme:选择UI主题】-->【Verify Settings:验证配置】)阅读并同意安装组件的许可协议,点击“Finish”;([License Agreement:许可协议]、[Accept:接受])下载完成后,点击“Finish”;
1.3 Android Studio卸载:
卸载Android Studio软件;(默认安装路径:C:\Program Files\Android\Android Studio)删除SDK文件夹;(默认路径:C:\用户\Administrator[用户名]\AppData\Local\Android\sdk)删除相关文件夹;(默认路径:C:\用户\Administrator[用户名]\)删除.android 文件夹
删除 .AndroidStudioX.X 文件夹
删除.gradle 文件夹

具体详见:https://blog.csdn.net/weixin_45048331/article/details/111868109
1.4 第一个Android应用程序:
1.4.1 创建Android工程项目:
将Android Studio工具的快捷启动放到桌面; 点击“New Project”;选择Phone and Table-->选择“Empty Activity”-->点击“Next”;【Name:app的名字】-->【Package name:包名】-->【Save location:保存路径】-->【Language:语言】-->【点击“Finish”】;
 然后等待下载完成Gradle配置工具;(某些用户可能会弹出防火墙的“安全中心警告”,点击“允许访问”)打开“activity_main.xml”文件,视图效果和模拟器上运行的效果差不多;
1.4.2 运行第一个Android应用程序:
添加手机模拟器点击下图右边第4个像手机一样的图标;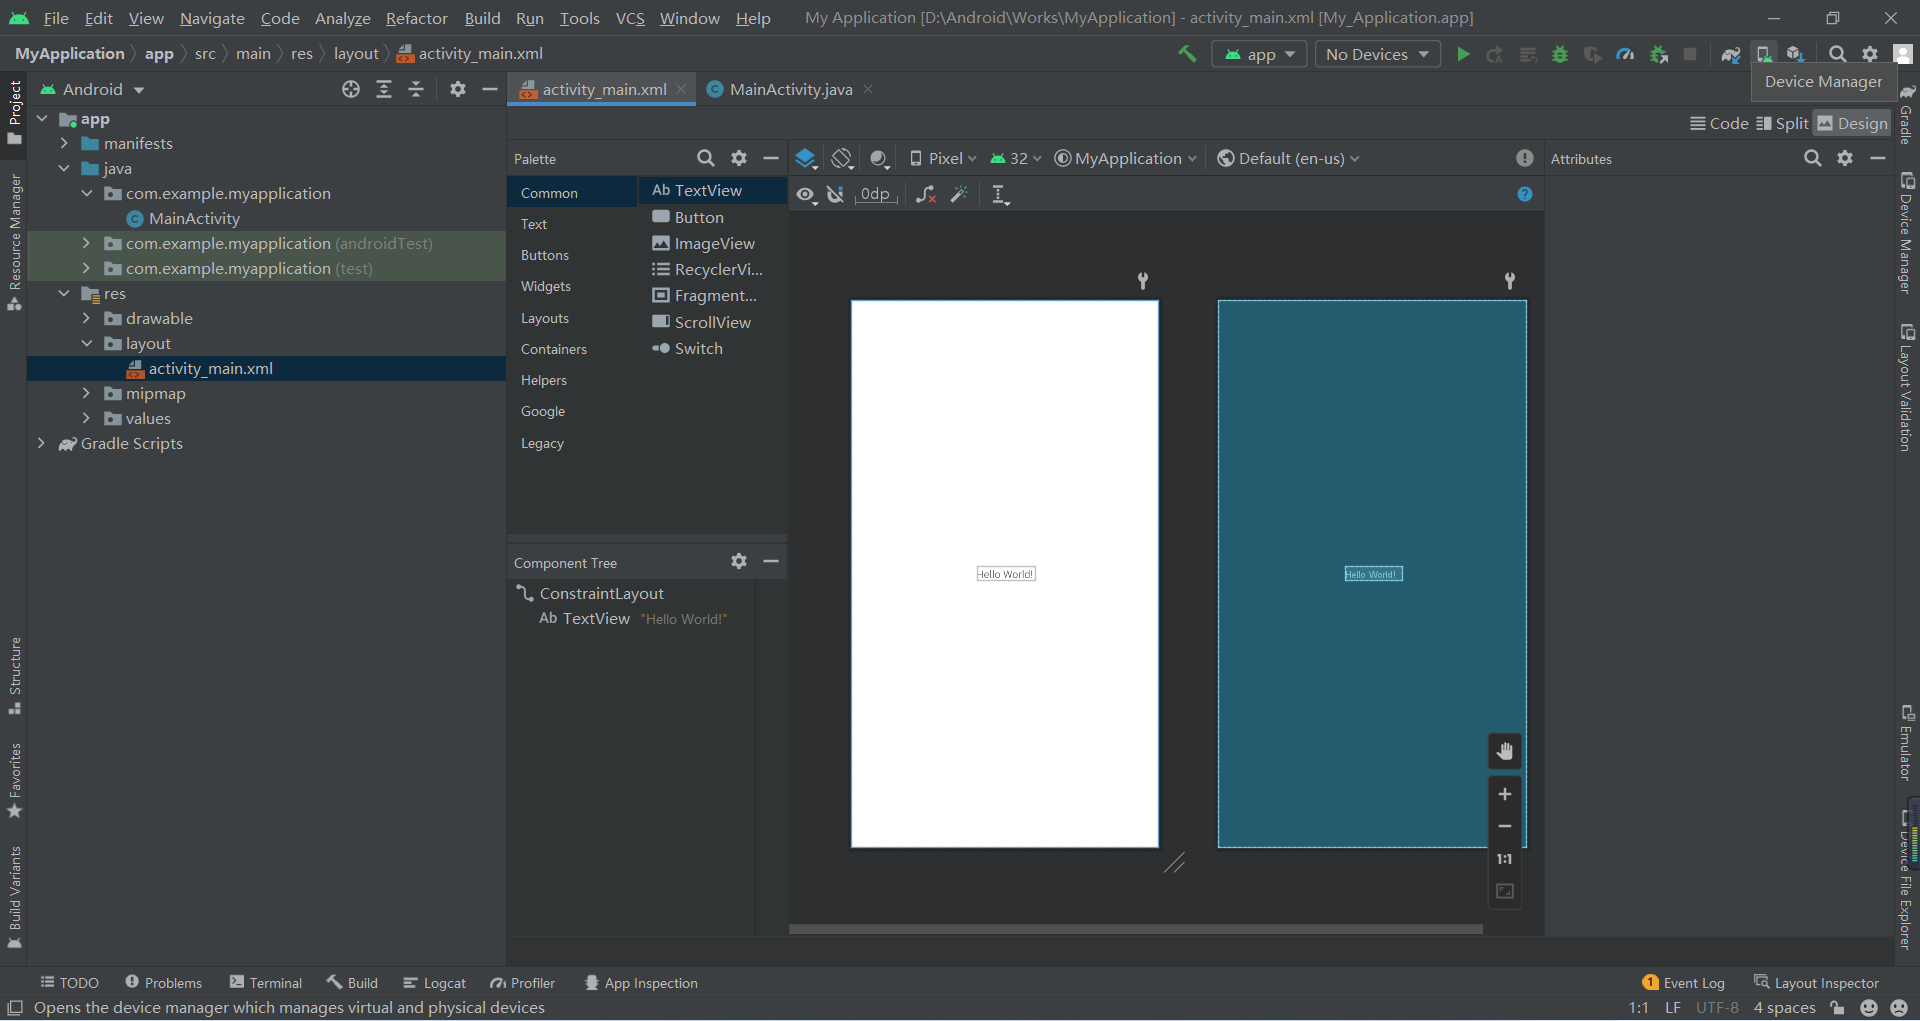 点击“Create virtual device”添加手机模拟器;选上自己喜欢的设备,然后点击“Next”;(可点击“New Hardware Profile”自定义模拟设备)
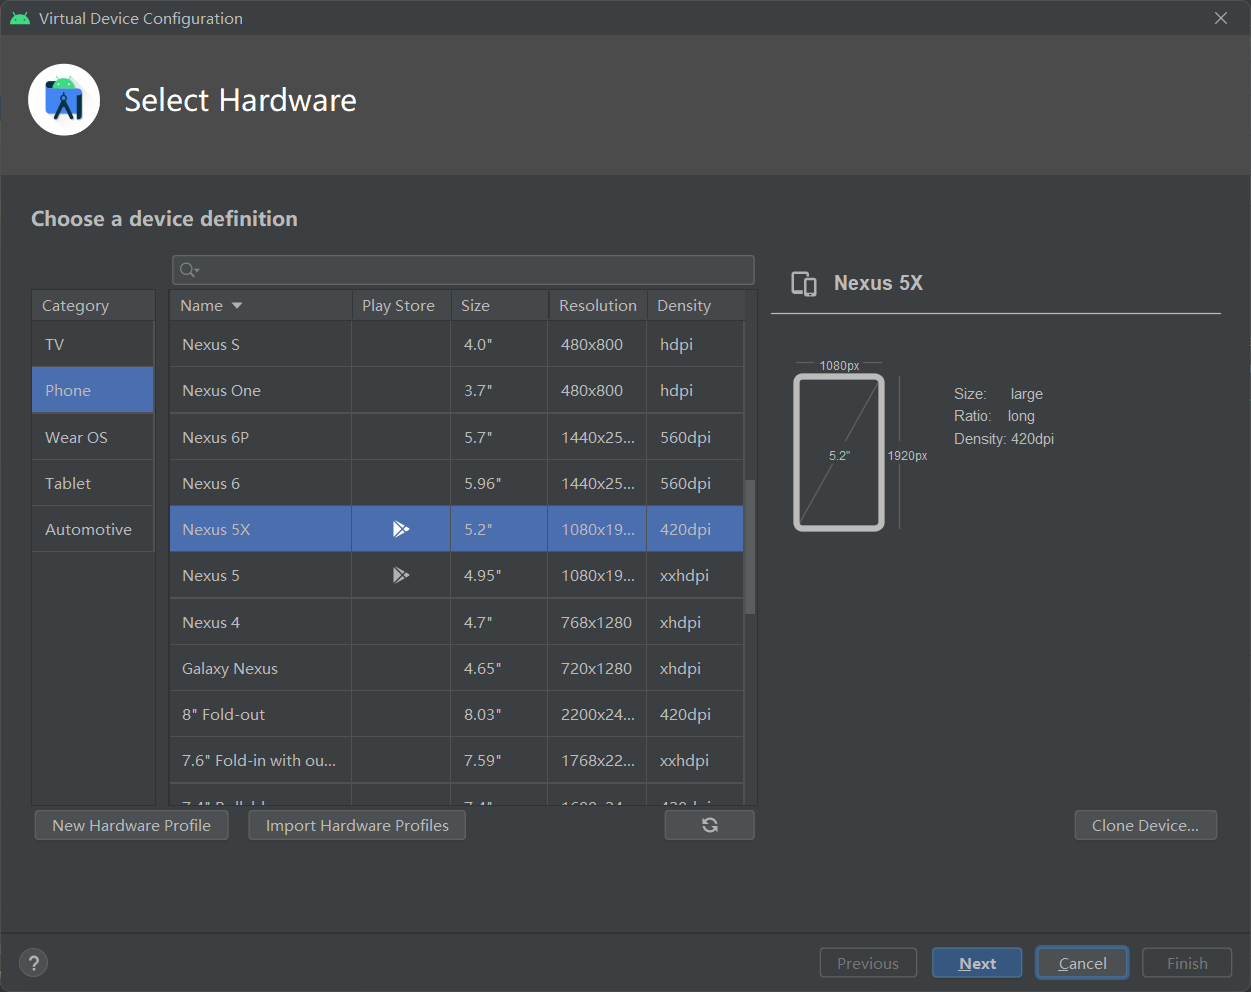 点击“Download”下载模拟设备的系统镜像;选择已下载的模拟设备系统镜像,点击“Next”;
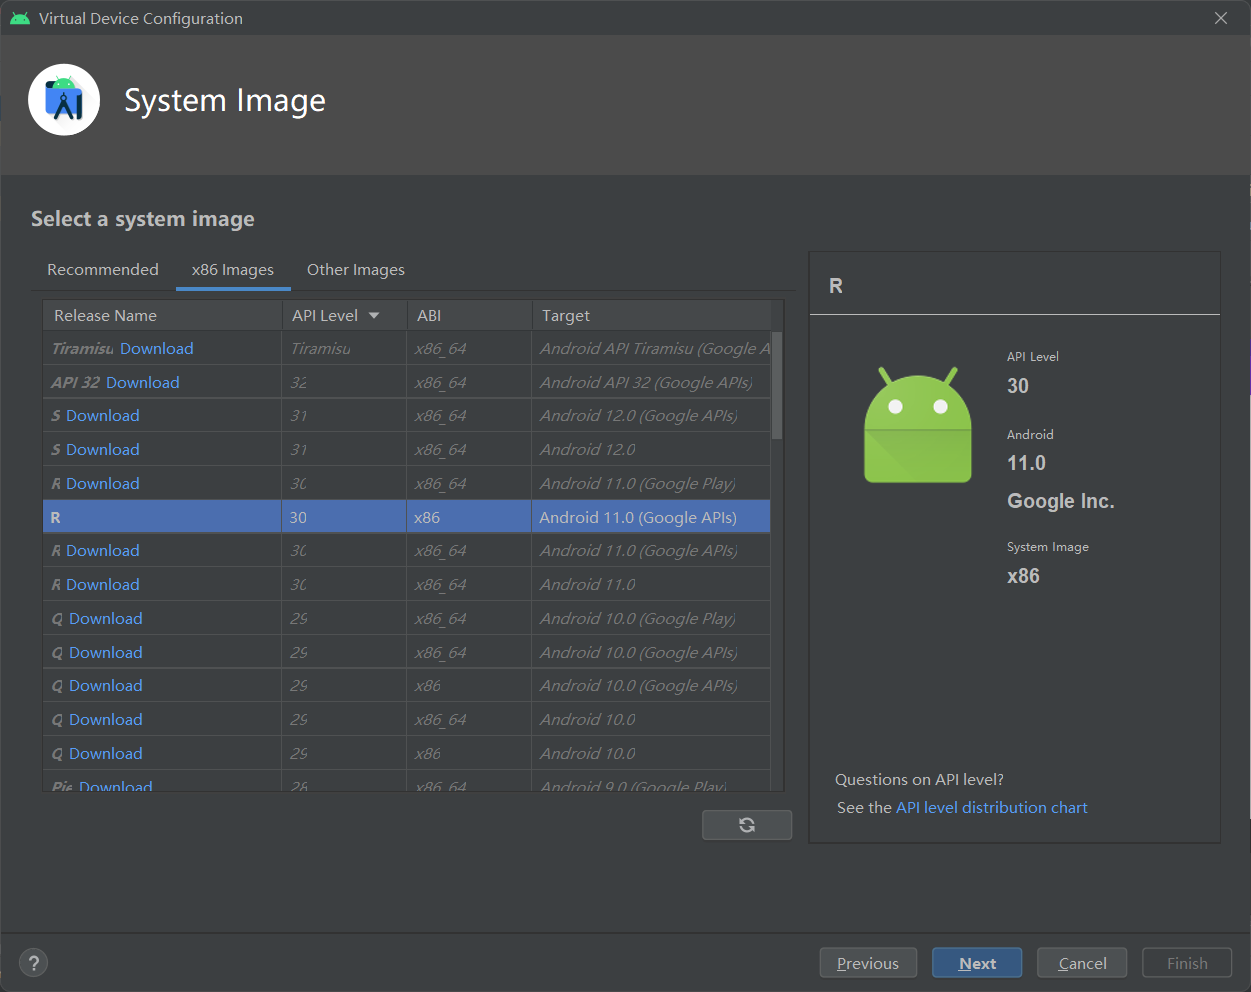 给模拟设备命名,点击“”Finish;点击“播放按钮”给模拟设备开机; 手机仿真器视图显示设置;
 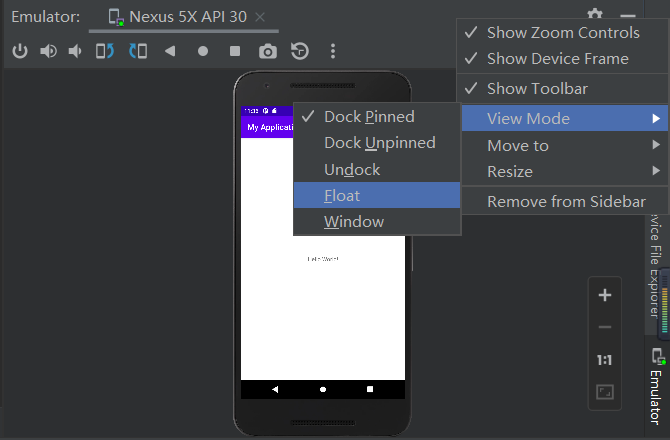 点击运行按钮后的运行结果;
 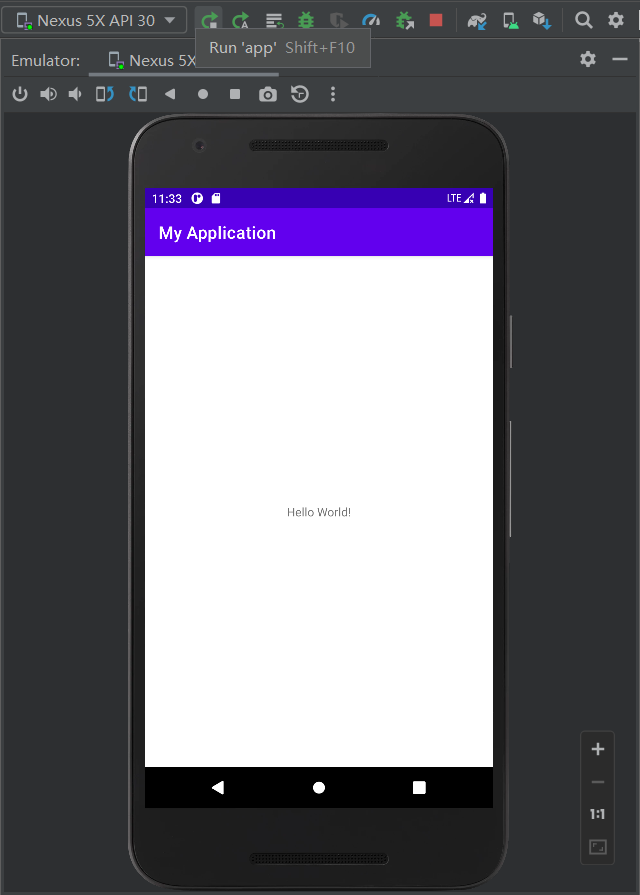 编码方式与视图设计方式切换在编辑框的右上角,仿真器隐藏后在编辑框的右边栏最下方(【Code、Split、Design】、【Emulator:仿真器】);
1.4.3 仿真程序进程终止问题
问题描述:Android Studio运行自带模拟器报“The emulator process for AVD Pixel_4a_Edited_API_28 has terminated.”原因分析:虚拟机安装路径存在中文符号导致乱码。因为Android Studio会默认安装虚拟机在用户目录下,如果你的电脑用户名带中文,比如C:\Users\ 张三,因为当前用户路径有中文符号,导致一些配置文件中的路径会乱码,这时虚拟机就会运行失败。解决方法:解决Android Studio运行模拟器报:The emulator process for AVD Pixel_4a_Edited_API_28 has terminated._晨曦的博客-CSDN博客
1.5 Android工程结构介绍
修改工程结构显示方式,将Android修改成Project[以目录结构显示];为不影响显示效果此部分内容请使用PC端查看
├── .gradle # AS自动生成的文件,AS会自动修改它的,项目打包时也会删除;
├── .idea # AS自动生成的文件,AS会自动修改它的,项目打包时也会删除;
├── app # 应用相关的东西都在里面,工作的核心目录
│ ├── build # 编译的产物。某些情况下,可以手动把它整个删掉。
│ ├── libs # 依赖包可以放这里,比如一些jar文件。
│ ├── src # 代码在这。非常重要。
│ │ ├── main
│ │ │ ├── java # 放Java代码的地方
│ │ │ ├── res
│ │ │ │ ├── drawable # 应用图标
│ │ │ │ ├── layout # Android布局文件夹
│ │ │ │ ├── mipmap # 桌面图标
│ │ │ │ ├── layout # Android布局文件夹
│ │ │ │ └── values # 颜色、样式、字符集配置文件夹
│ ├── .gitignore # 版本控制
│ ├── build.gradle # 非常重要,app的构建配置。俗称“app的gradle文件”。
│ └── proguard-rules.pro # 先不管。这个是混淆配置。
├── gradle # 它是一个构建起配置文件
├── .gitignore # 整个工程的版本控制
├── build.gradle # 很重要。项目级的配置。俗称“项目gradle文件”。
├── gradle.properties # 全局的gradle配置文件
├── gradlew # Linux/mac上执行gradle命令
├── gradlew.bat # Windows上执行gradle命令
├── local.properties # 本地配置文件,一般不上传
└── settings.gradle # gralde的项目级配置
第2章 Android的UI控件
注:控件的属性值可以【Ctrl+鼠标左键】进行查看
2.1 TextView(文本框)
本节前言:
dp(dip): device independent pixels(设备独立像素). 不同设备有不同的显示效果,这个和设备硬件有关,一般我们为了支持WVGA、HVGA和QVGA 推荐使用这个,不依赖像素。
px: pixels(像素). 不同设备显示效果相同,一般我们HVGA代表320x480像素,这个用的比较多。
pt: point,是一个标准的长度单位,1pt=1/72英寸,用于印刷业,非常简单易用;
sp: scaled pixels(放大像素). 主要用于字体显示best for textsize。
2.1.1 基础属性详解:
id:为TextView设置一个组件id,根据id,我们可以在Java代码中通过findViewById(R.id.tv_one)的方法获取到该对象,然后进行相关属性的设置,又或者使用RelativeLayout时,参考组件用的也是id!layout_width:组件的宽度,一般写:**wrap_content**或者**match_parent(fill_parent)**,前者是控件显示的内容多大,控件就多大,而后者会填满该控件所在的父容器;当然也可以设置成特定的大小,比如我这里为了显示效果,设置成了200dp。layout_height:组件的高度,内容同上。gravity:设置控件中内容的对齐方向,TextView中是文字,ImageView中是图片等等。text:设置显示的文本内容,一般我们是把字符串写到src/main/res/values/string.xml文件中,然后通过@String/xxx取得对应的字符串内容的,这里为了方便我直接就写到""里,不建议这样写!!!textColor:设置字体颜色,同上,通过src/main/res/values/colors.xml资源来引用,然后通过@String/xxx进行引用,别直接这样写!textStyle:设置字体风格,三个可选值:**normal**(无效果),**bold**(加粗),**italic**(斜体)textSize:字体大小,单位一般是用sp!background:控件的背景颜色,可以理解为填充整个控件的颜色,可以是图片哦!XML代码:
<TextView android:id="@+id/tv_one" android:layout_width="200dp" android:layout_height="200dp" android:gravity="center" android:text="Android学习" android:textColor="#FF000000" android:textSize="30sp" android:textStyle="italic" android:background="#FFFF0000" />
2.1.2 带阴影的TextView
android:shadowColor:设置阴影颜色,需要与shadowRadius一起使用哦!android:shadowRadius:设置阴影的模糊程度,设为0.1就变成字体颜色了,建议使用3.0android:shadowDx:设置阴影在水平方向的偏移,就是水平方向阴影开始的横坐标位置android:shadowDy:设置阴影在竖直方向的偏移,就是竖直方向阴影开始的纵坐标位置XML代码:
<TextView android:id="@+id/tv_one" android:layout_width="200dp" android:layout_height="200dp" android:gravity="center" android:shadowColor="@color/red" android:shadowRadius="3.0" android:shadowDx="10.0" android:shadowDy="10.0" android:text="@string/tv_one" android:textColor="#FF000000" android:textSize="30sp" android:textStyle="italic" />
2.1.3 实际开发例子——跑马灯效果
android:singleLine:内容单行显示android:focusable:是否可以获取焦点android:focusablelnTouchMode:用于控制视图在触摸模式下是否可以聚焦android:ellipsize:在哪里省略文本android:marqueeRepeatLimit:字幕动画重复的次数更多详见:2.3.1 TextView(文本框)详解 | 菜鸟教程 (runoob.com)
XML代码:
<TextView android:id="@+id/tv_one" android:layout_width="200dp" android:layout_height="200dp" android:gravity="center" android:shadowColor="@color/red" android:shadowRadius="3.0" android:shadowDx="10.0" android:shadowDy="10.0" android:singleLine="true" android:ellipsize="marquee" android:marqueeRepeatLimit="marquee_forever" android:focusable="true" android:focusableInTouchMode="true" android:text="@string/tv_one" android:textColor="#FF000000" android:textSize="30sp" android:textStyle="italic" />默认情况下没有效果:
开启可点击:android:clickable="true"添加一个请求标签: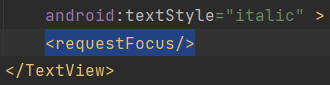 写一个类继承TextView实现其方法,并重写isFocused()方法返回true,然后将TextView标签给出自定义的全类名
2.2 Button(按钮)
本节前言:
Button是TextView的子类,所以TextView上很多属性也可以应用到Button 上!我们实际开发中对于Button的,无非是对按钮的几个状态做相应的操作,比如:按钮按下的时候 用一种颜色,弹起又一种颜色,或者按钮不可用的时候一种颜色这样!上述实现无非是通过 StateListDrawable这种Drawable资源来实现,即编写一个drawable的资源文件。
2.2.1 StateListDrawable介绍:
StateListDrawable是Drawable资源的一种,可以根据不同的状态,设置不同的图片效果,关键节点 < selector >,我们只需要将Button的background属性设置为该drawable资源即可轻松实现,按下 按钮时不同的按钮颜色或背景!
drawable:引用的Drawable位图,我们可以把他放到最前面,就表示组件的正常状态~state_focused:是否获得焦点state_window_focused:是否获得窗口焦点state_enabled:控件是否可用state_checkable:控件可否被勾选,eg:checkboxstate_checked:控件是否被勾选state_selected:控件是否被选择,针对有滚轮的情况state_pressed:控件是否被按下state_active:控件是否处于活动状态,eg:slidingTabstate_single:控件包含多个子控件时,确定是否只显示一个子控件state_first:控件包含多个子控件时,确定第一个子控件是否处于显示状态state_middle:控件包含多个子控件时,确定中间一个子控件是否处于显示状态state_last:控件包含多个子控件时,确定最后一个子控件是否处于显示状态更多详见:3.3.3 Button(按钮)与ImageButton(图像按钮) | 菜鸟教程 (runoob.com)
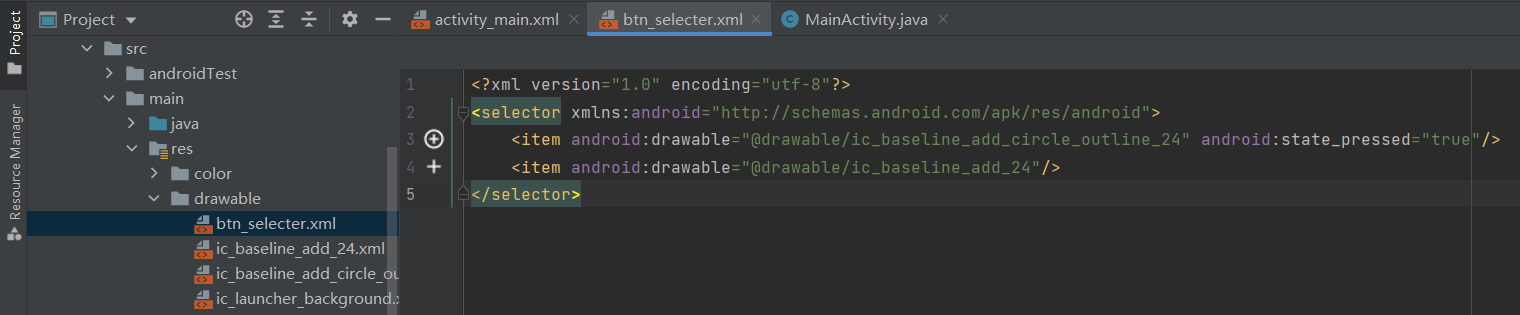
在src/main/res/drawable中添加位矢图和new按钮选择器【btn_selecter.xml】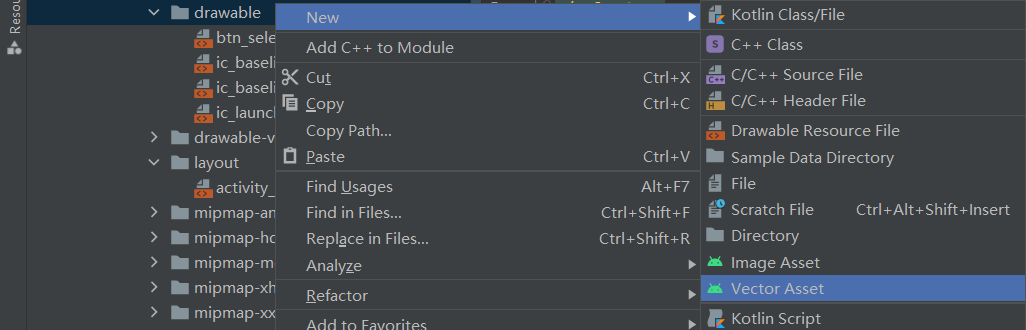

 默认情况下新版本的AS设置背景颜色是无效果的,需要修改themes.xml文件
 在src/main/res中new按钮的颜色选择器【color/btn_color_selecter.xml】
XML代码:
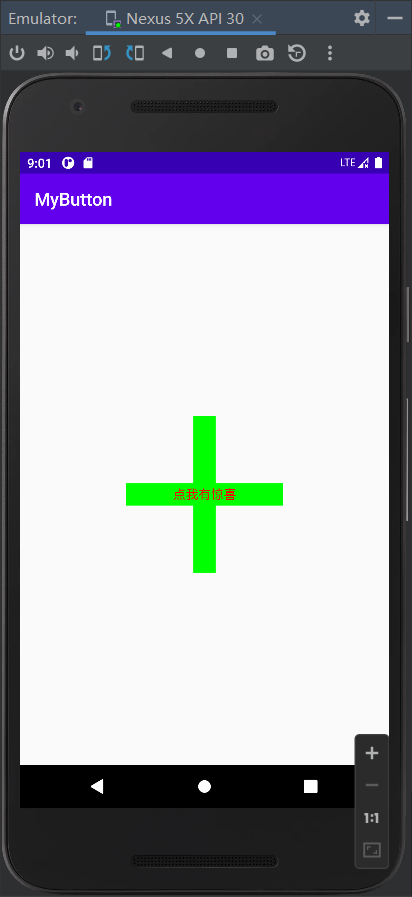
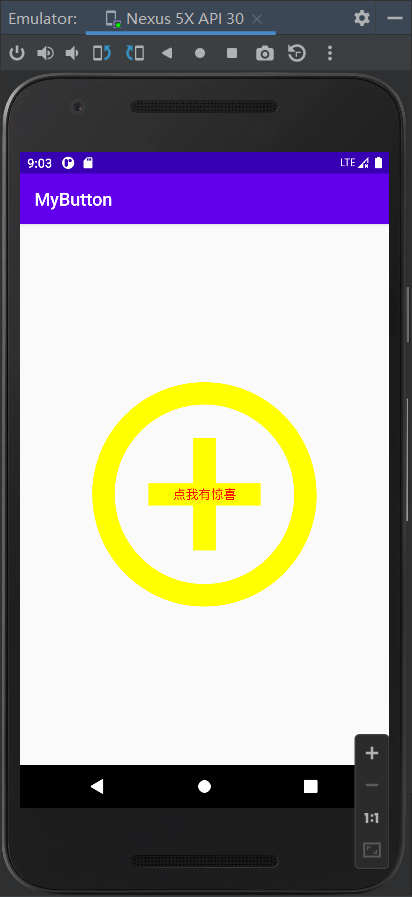
<Button android:text="点我有惊喜" android:textColor="#FFFF0000" android:layout_width="300dp" android:layout_height="300dp" android:background="@drawable/btn_selecter" android:backgroundTint="@color/btn_color_selecter" android:layout_gravity="center" />运行效果图:
2.2.2 常见的Button事件:
单击事件:setOnClickListener()长按事件:setOnLongClickListener()触摸/移动事件:setOnTouchListener()代码中TAG的值为“leo”
运行结果1(长按+移动):setOnLongClickListener()与setOnTouchListener()的返回值为false
运行结果2(长按+移动):setOnLongClickListener()返回值为false,setOnTouchListener()的返回值为true,会将setOnLongClickListener()取代(即触摸/移动也会触发)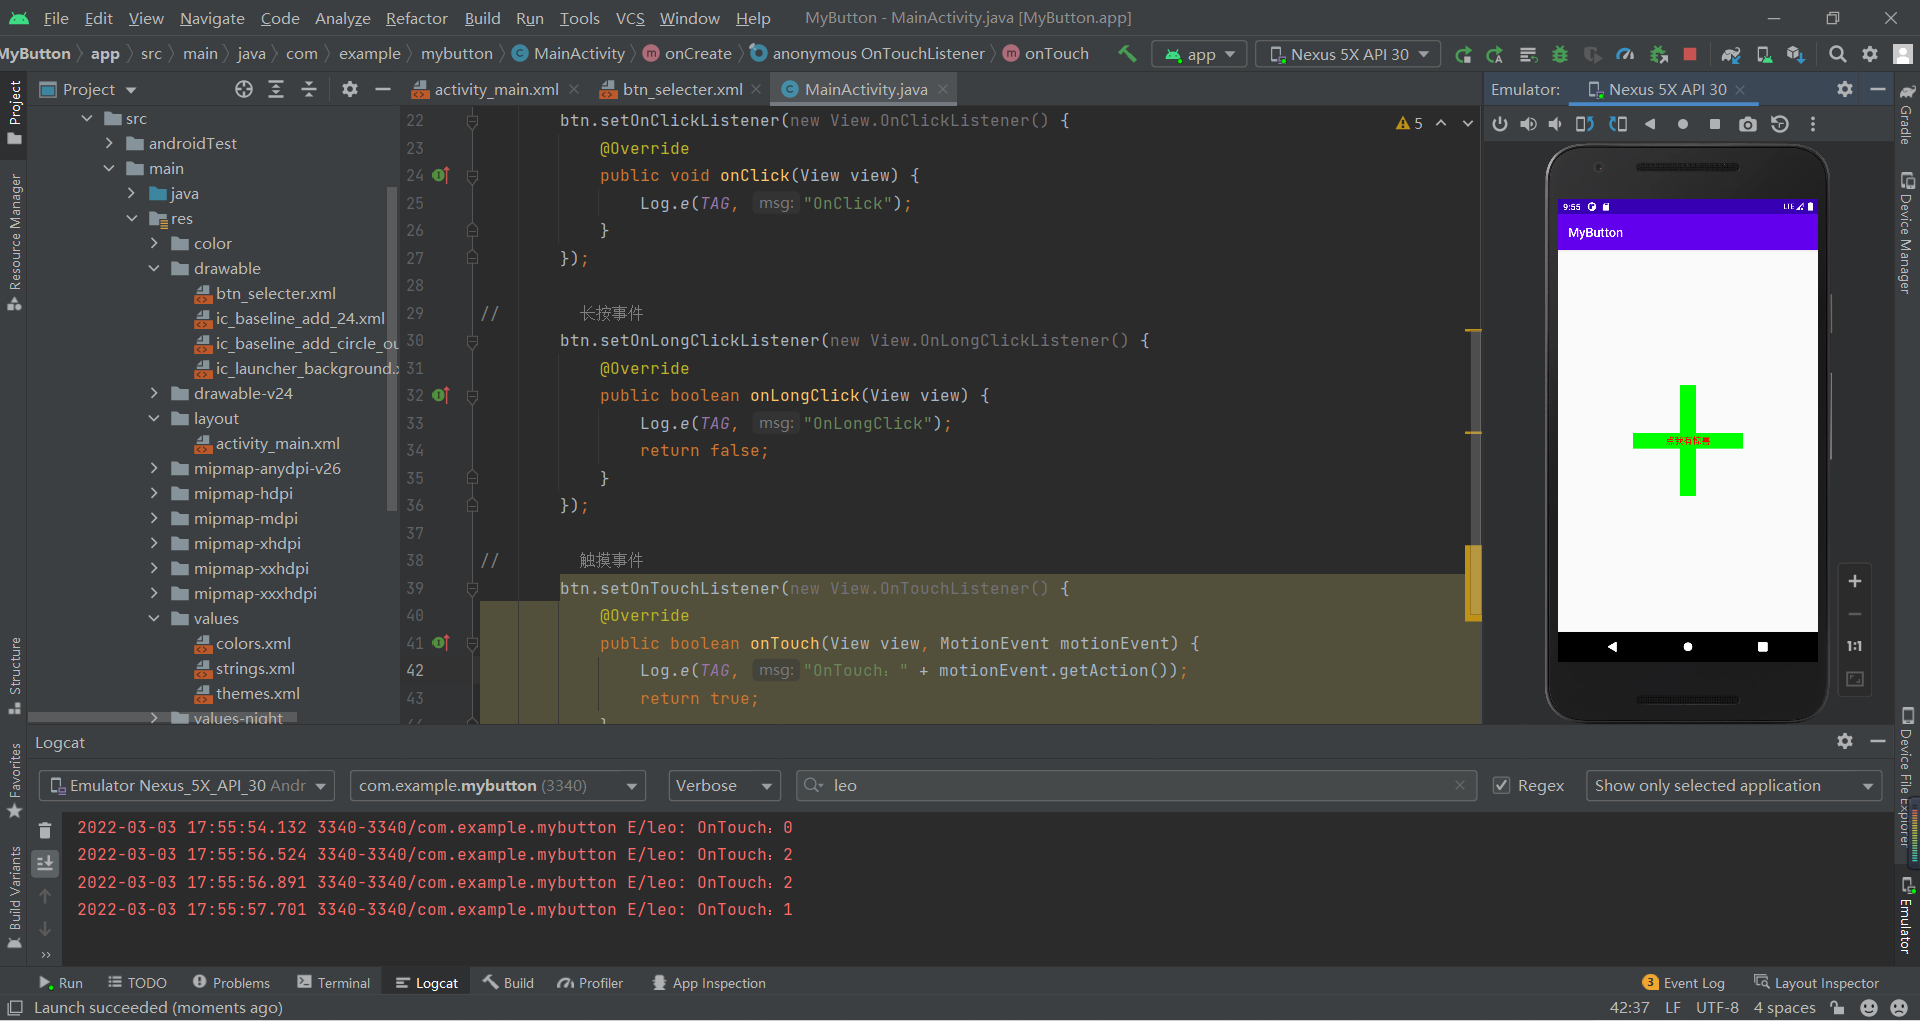
运行结果3(长按+移动):setOnLongClickListener()返回值为true,setOnTouchListener()的返回值为false,setOnClickListener()不会执行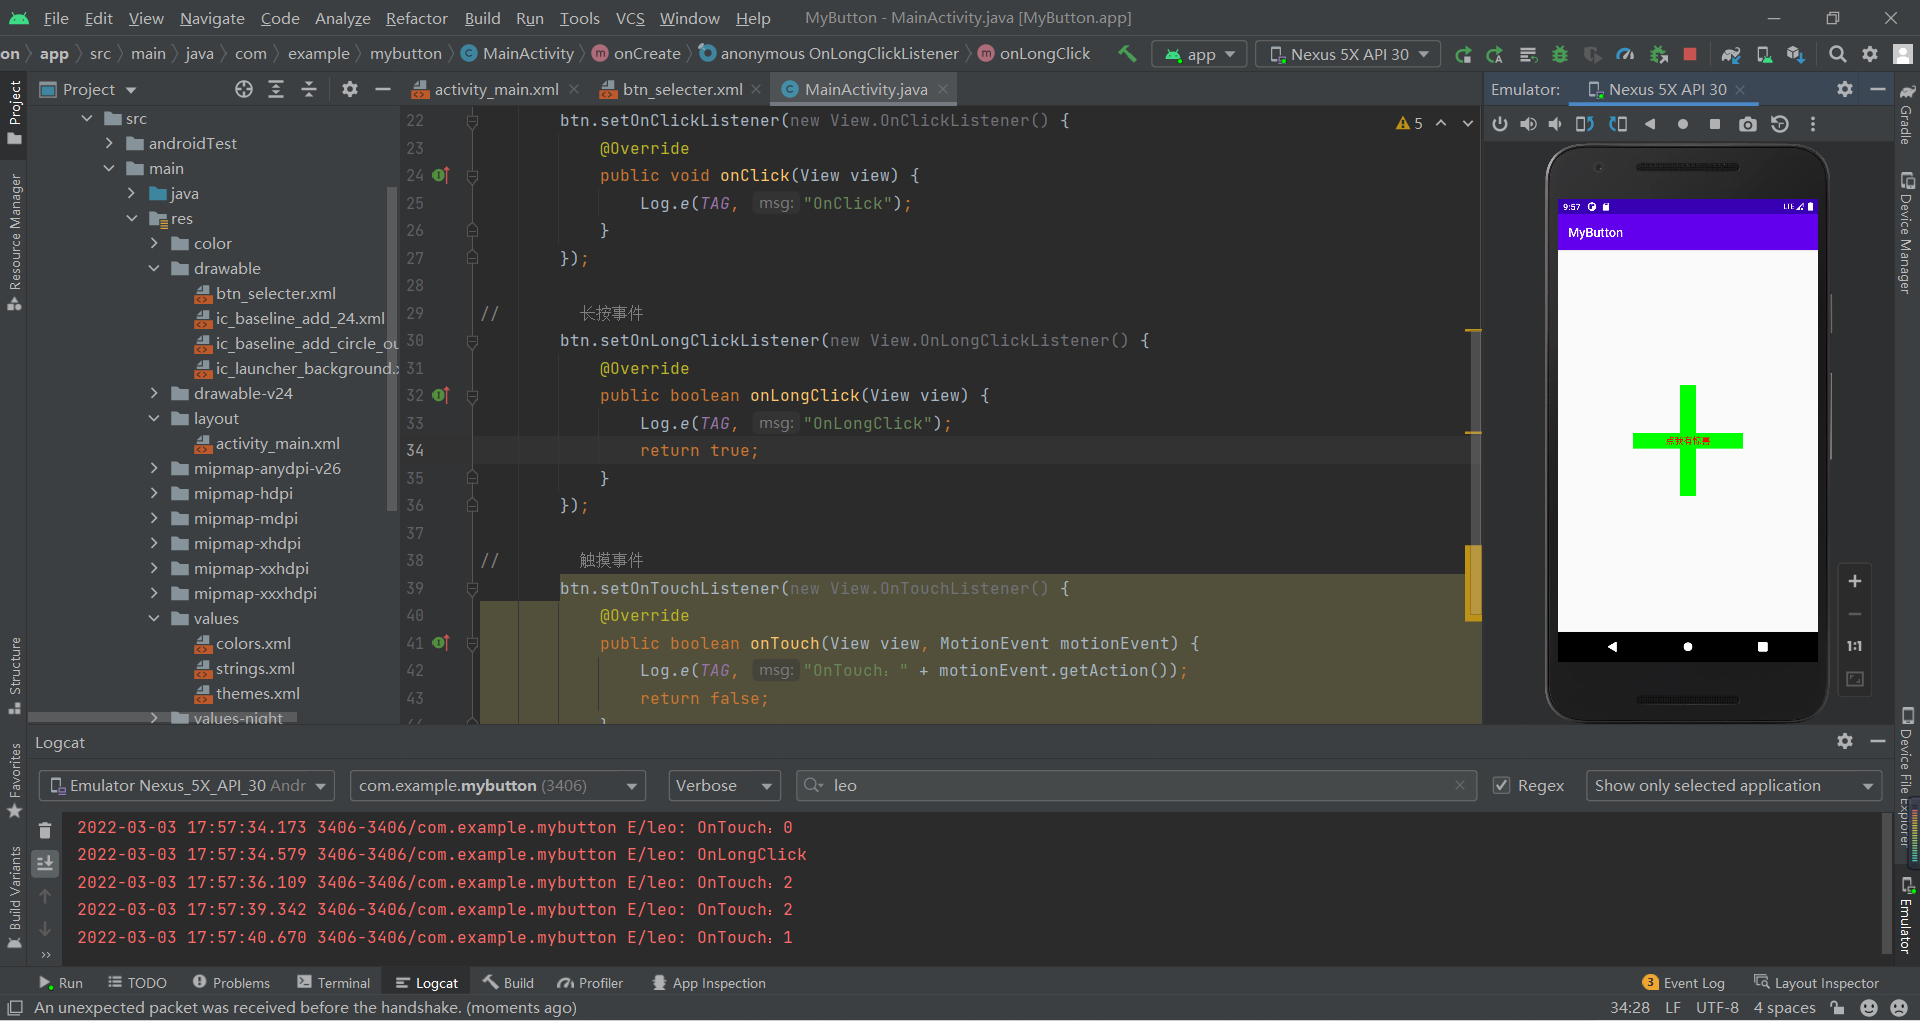
onClickListener()的另一种写法:在activity_main.xml的Button标签中写android:onClick="leoClick",再按住Alt+Enter创建leoClick方法,优先级低于setOnClickListener()
2.3 EditText(输入框)
2.3.1 主要属性
android:hint输入提示android:textColorHint输入提示文字的颜色android:inputType输入类型android:drawableXxoxx在输入框的指定方位添加图片android:drawablePadding设置图片与输入内容的间距android:paddingXxxx设置内容与边框的间距android:background背景色更多详见:2.3.2 EditText(输入框)详解 | 菜鸟教程 (runoob.com)
XML代码:
<EditText android:id="@+id/username" android:hint="请输入用户名" android:textColorHint="#FF95A1AA" android:inputType="text" android:background="@drawable/edit_background" android:layout_margin="10dp" android:drawableLeft="@drawable/ic_baseline_person_24" android:drawablePadding="5dp" android:padding="5dp" android:layout_width="300dp" android:layout_height="50dp" /> <EditText android:id="@+id/password" android:hint="请输入密码" android:textColorHint="#FF95A1AA" android:inputType="textPassword" android:background="@drawable/edit_background" android:layout_margin="10dp" android:drawableLeft="@drawable/ic_baseline_lock_24" android:drawablePadding="5dp" android:padding="5dp" android:layout_width="300dp" android:layout_height="50dp" /> <EditText android:id="@+id/phone" android:hint="电话" android:textColorHint="#FF95A1AA" android:inputType="phone" android:background="@drawable/edit_background" android:layout_margin="10dp" android:drawableLeft="@drawable/ic_baseline_phone_24" android:drawablePadding="5dp" android:padding="5dp" android:layout_width="300dp" android:layout_height="50dp" /> <Button android:id="@+id/submit_btn" android:text="提交" android:layout_width="wrap_content" android:layout_height="wrap_content" /> 运行效果图: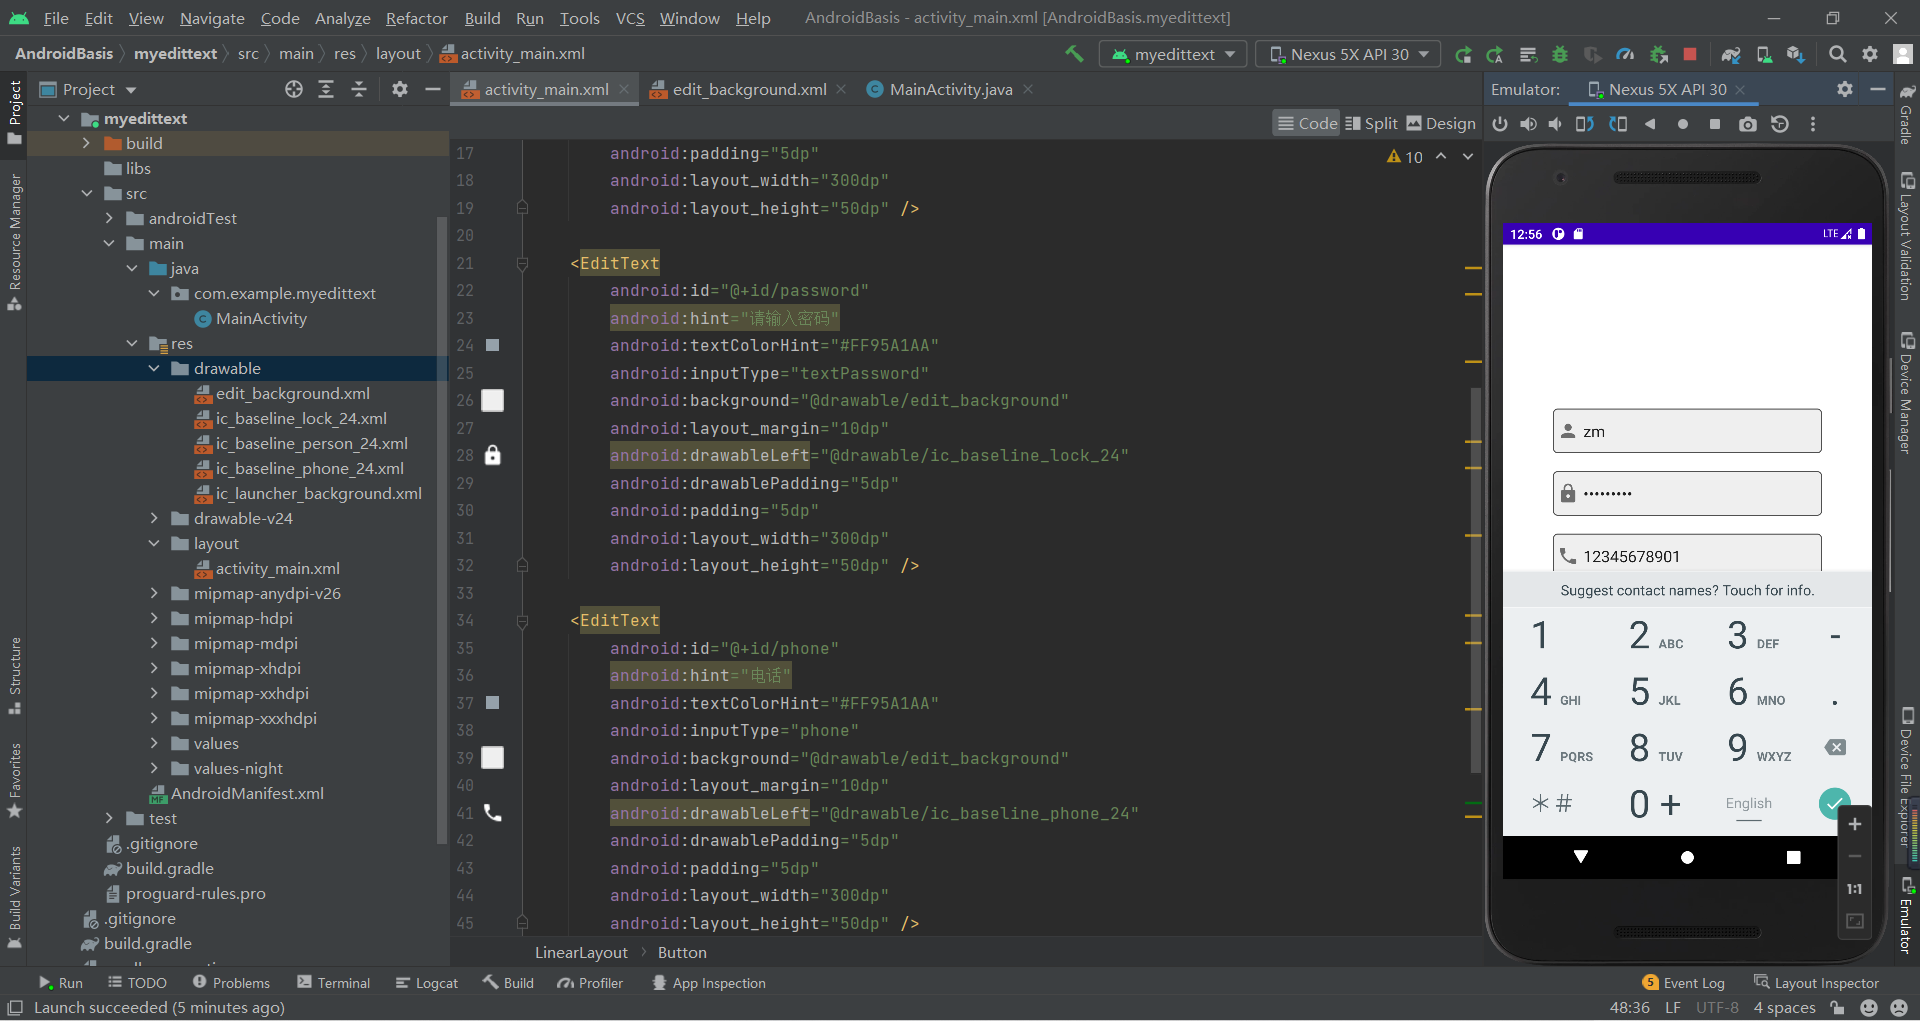
2.3.2 实际开发例子——用户登录
运行效果图:edit_background.xml是文本框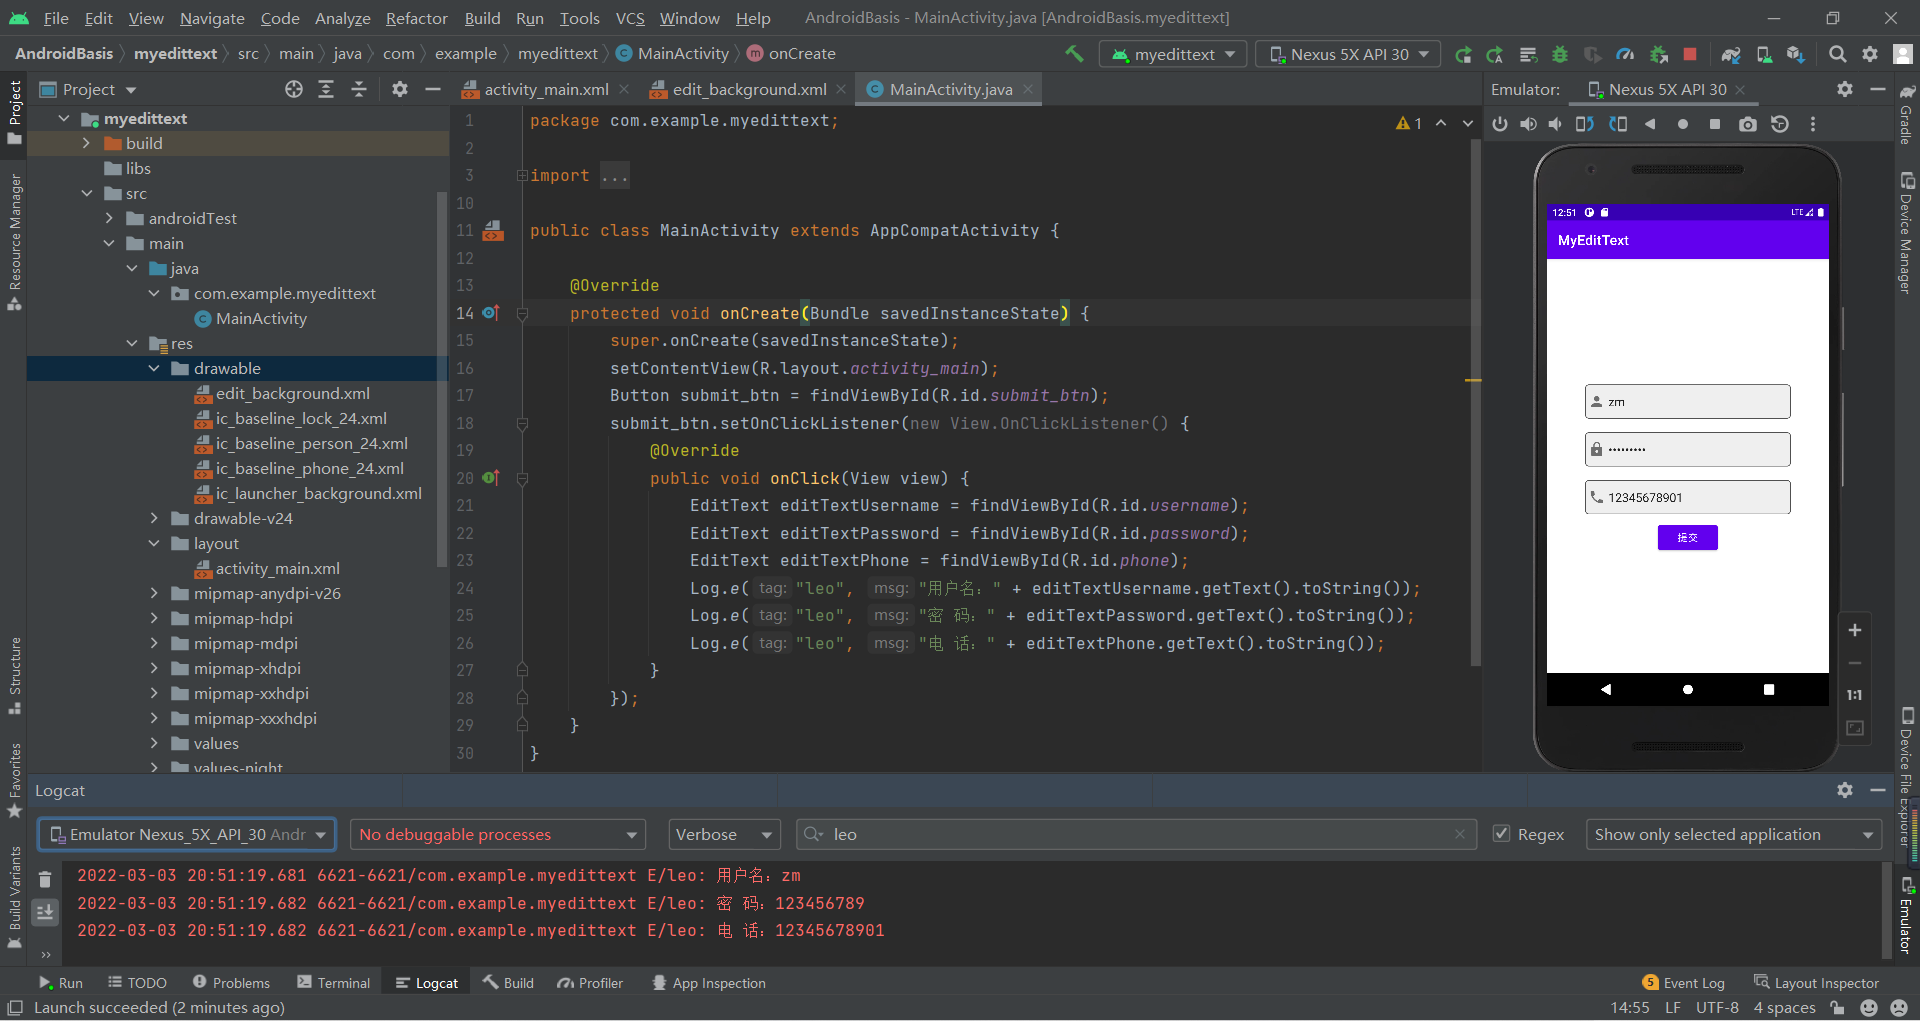
2.4 ImageView(图像视图)
2.4.1 主要属性
android:src设置图片资源android:scaleType设置图片缩放类型android:maxHeight最大高度android:maxWidth最大宽度android:adjustViewBounds是否调整View的界限XML代码:
<ImageView android:src="@drawable/ceshi" android:layout_width="300dp" android:layout_height="300dp" /> <ImageView android:src="@drawable/ceshi" android:maxHeight="300dp" android:maxWidth="300dp" android:adjustViewBounds="true" android:layout_width="wrap_content" android:layout_height="wrap_content" />运行效果图: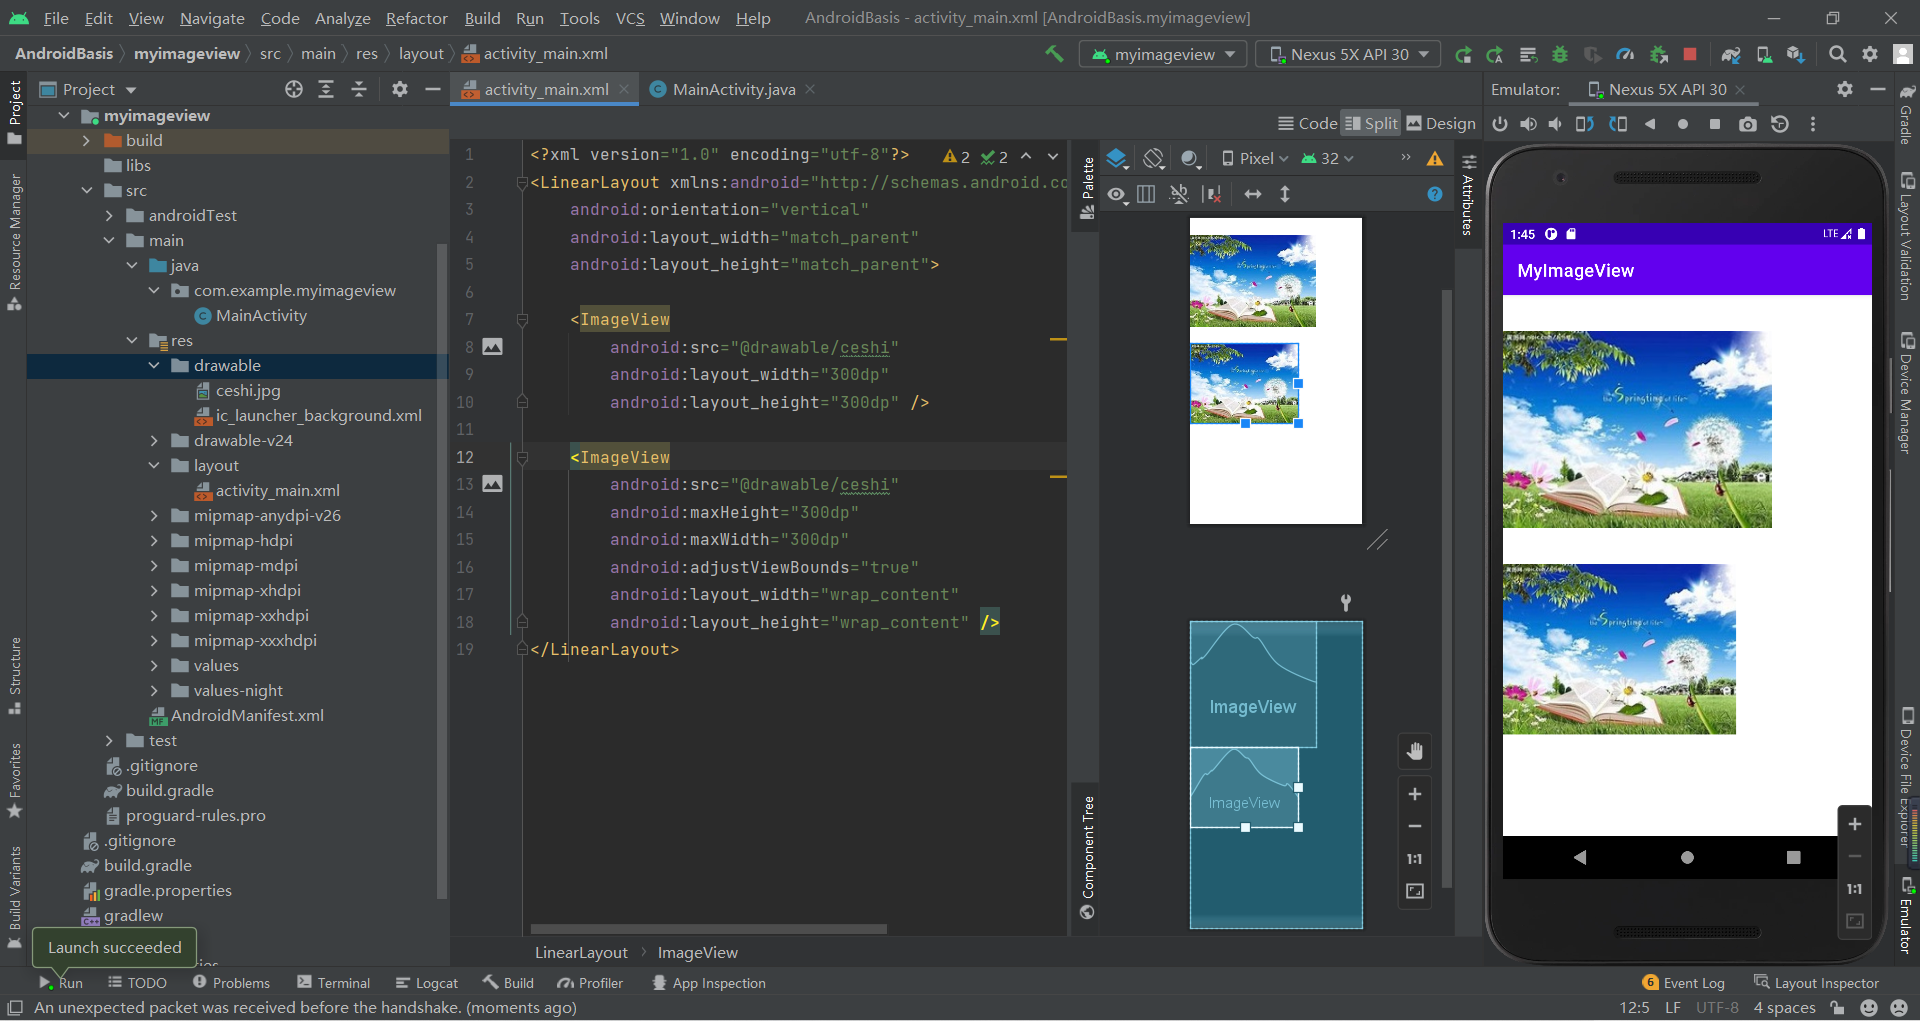
2.4.2 scaleType的属性
fitStart:保持宽高比缩放图片,直到较长的边与lmage的边长相等缩放完成后将图片放在ImageView的左上角fitCenter:默认值,同上,缩放后放于中间fitEnd:同上,缩放后放于右下角fitXY:对图像的横纵方向进行独立缩放,使得该图片完全适应lmageView,但是图片的宽高比可能会发生改变center:保持原图的大小,显示在ImageView的中心。 当原图的size大于ImageView的size,超过部分裁剪处理。centerCrop:保持宽高比缩放图片,直到完全覆盖ImageView,可能会出现图片的显示不完全centerInside:保持宽高比缩放图片,直到ImageView能够完全地显示图片matrix:不改变原图的大小,从ImageView的左上角开始绘制原图,原图超过ImageView的部分作裁剪处理更多详见:2.3.4 ImageView(图像视图) | 菜鸟教程 (runoob.com)
2.5 ProgressBar(进度条)
2.5.1 常用属性详解
android:max:进度条的最大值android:progress:进度条已完成进度值android:indeterminate:如果设置成true,则进度条不精确显示进度style="?android:attr/progressBarStyleHorizontal"水平进度条更多详见:ProgressBar(进度条) | 菜鸟教程 (runoob.com)
XML代码:
<ProgressBar android:id="@+id/pb1" android:layout_width="wrap_content" android:layout_height="wrap_content" /> <Button android:text="显示/隐藏进度条" android:onClick="leoClick" android:layout_width="wrap_content" android:layout_height="wrap_content" /> <!--水平进度条--> <ProgressBar android:id="@+id/pb2" style="?android:attr/progressBarStyleHorizontal" android:max="100" android:layout_width="350dp" android:layout_height="wrap_content" /> <Button android:text="模拟下载按钮" android:onClick="loadClick" android:layout_width="wrap_content" android:layout_height="wrap_content" /> <ProgressBar style="?android:attr/progressBarStyleHorizontal" android:max="100" android:indeterminate="true" android:layout_width="350dp" android:layout_height="wrap_content" />Java代码:
public class MainActivity extends AppCompatActivity { private ProgressBar pb1; private ProgressBar pb2; private Integer speed; @Override protected void onCreate(Bundle savedInstanceState) { super.onCreate(savedInstanceState); setContentView(R.layout.activity_main); pb1 = findViewById(R.id.pb1); pb2 = findViewById(R.id.pb2); speed = (int)(pb2.getMax() * 0.1); } public void leoClick(View view) { if (pb1.getVisibility() == View.GONE) { pb1.setVisibility(View.VISIBLE); //显示 } else { pb1.setVisibility(View.GONE); } } public void loadClick(View view) { int progress = pb2.getProgress(); pb2.setProgress(progress + speed); }}运行效果图: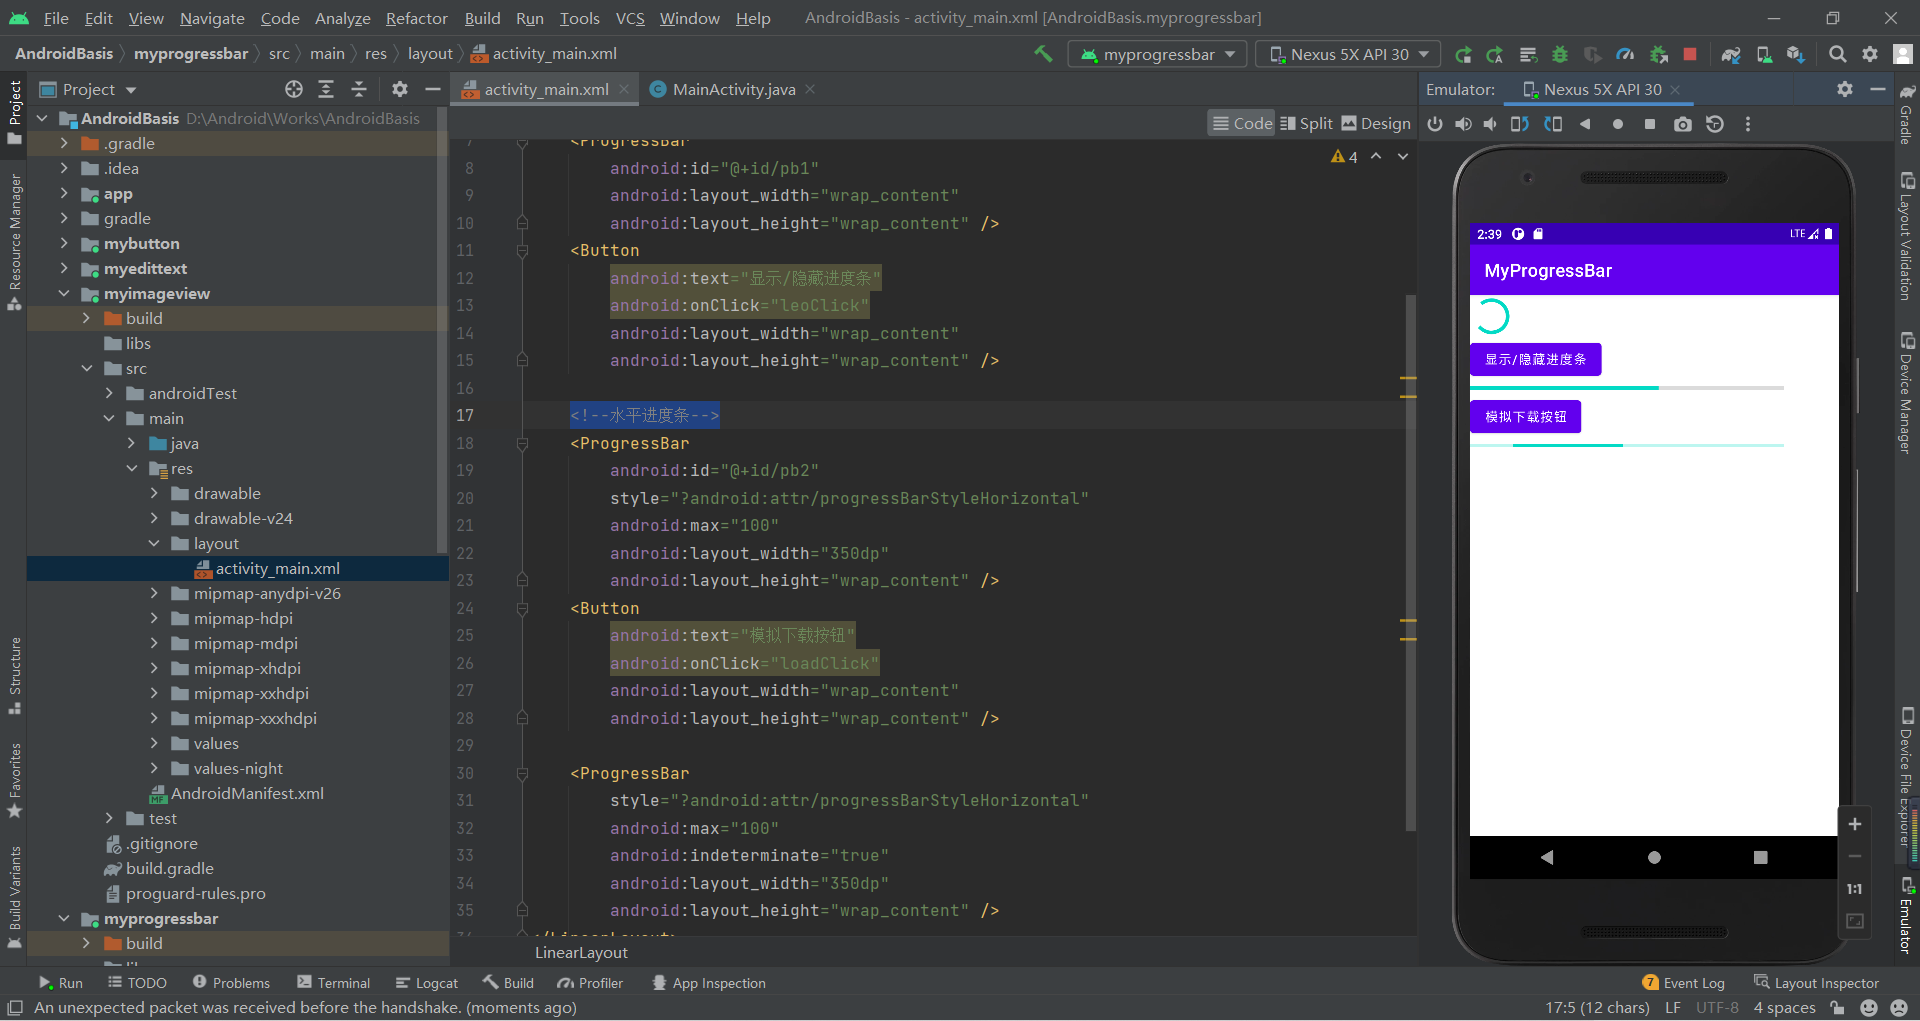
2.6 Notification(状态栏通知)
2.6.1 Notification的基本使用流程
状态通知栏主要涉及到2个类:Notification 和NotificationManager
Notification:通知信息类,它里面对应了通知栏的各个属性
NotificationManager:是状态栏通知的管理类,负责发通知、清除通知等操作。
使用的基本流程:
Step 1. 获得NotificationManager对象: NotificationManager nManager = (NotificationManager) getSystemService(NOTIFICATION_SERVICE);Step 2. 创建一个通知栏的Builder构造类: Notification.Builder nBuilder = new Notification.Builder(this);在老的版本中是使用Notification()
新的版本是使用Notification.Builder()
为了兼容性现在使用NotificationCompat.Builder()Step 3. 对Builder进行相关的设置,比如标题,内容,图标,动作等!Step 4. 调用Builder的build()方法为notification赋值Step 5. 调用NotificationManager的notify()方法发送通知!PS:另外我们还可以调用NotificationManager的cancel()方法取消通知
2.6.2 NotificationChannel(通知渠道)
通知渠道,Android 8.0引入了通知渠道,其允许您为要显示的每种通知类型创建用户可自定义的渠道。
通知重要程度设置,NotificationManager类中
2.6.3 Notification的常见方法
setContentTitle(String string):设置标题setContentText(String string):设置文本内容setSmalllcon(int icon):设置小图标setLargelcon(Bitmap icon):设置通知的大图标setColor(int argb):设置小图标的颜色setContentlntent(Pendinglntent intent):设置点击通知后的跳转意图setAutoCancel(boolean boolean):设置点击通知后自动清除通知setWhen(long when):设置通知被创建的时间注意:Android从5.0系统开始,对于通知栏图标的设计进行了修改。现在Google要求,所有应用程序的通知栏图标,应该只使用alpha图层来进行绘制,而不应该包括RGB图层。
2.6.3 实际例子——模拟通知
XML代码:
Java代码:
运行效果:
更多详见:2.5.8 Notification(状态栏通知)详解 | 菜鸟教程 (runoob.com)
2.7 Toolbar(工具栏目)
2.7.1 常用属性详解
取消系统默认的标题栏目:src/main/res/values/themes.xml --> style标签 --> parent="Theme.MaterialComponents.DayNight.NoActionBar"
android:layout_width="match_parent"android:layout_height=""?attr/actionBarSize":使用的是ActionBar的高度android:background="#FFFF00"app:navigationlcon=" @drawable/ic_baseline_arrow_back_24""app:title="主标题"app:titleTextColor="#FF0000"app:titleMarginStart="90dp":左间距app:subtitle="子标题"app:subtitleTextColor="#00FFFFF"app:logo="@mipmap/ic_launcher"使用ToolBar替换系统默认的DarkActionBar:
XML代码:
<?xml version="1.0" encoding="utf-8"?><LinearLayout xmlns:android="http://schemas.android.com/apk/res/android" xmlns:app="http://schemas.android.com/apk/res-auto" android:orientation="vertical" android:layout_width="match_parent" android:layout_height="match_parent"> <androidx.appcompat.widget.Toolbar android:id="@+id/tb" android:layout_width="match_parent" android:layout_height="?attr/actionBarSize" app:navigationIcon="@drawable/ic_baseline_arrow_back_24" app:title="标题" app:titleTextColor="@color/red" app:titleMarginStart="90dp" android:background="@color/teal_200"/></LinearLayout>Java代码:
public class MainActivity extends AppCompatActivity { @Override protected void onCreate(Bundle savedInstanceState) { super.onCreate(savedInstanceState); setContentView(R.layout.activity_main); Toolbar toolbar = findViewById(R.id.tb); //androidx.appcompat.widget.Toolbar toolbar.setNavigationOnClickListener(new View.OnClickListener() { @Override public void onClick(View view) { Log.e("leo","ToolBar被点击了!"); } }); }}运行效果图: 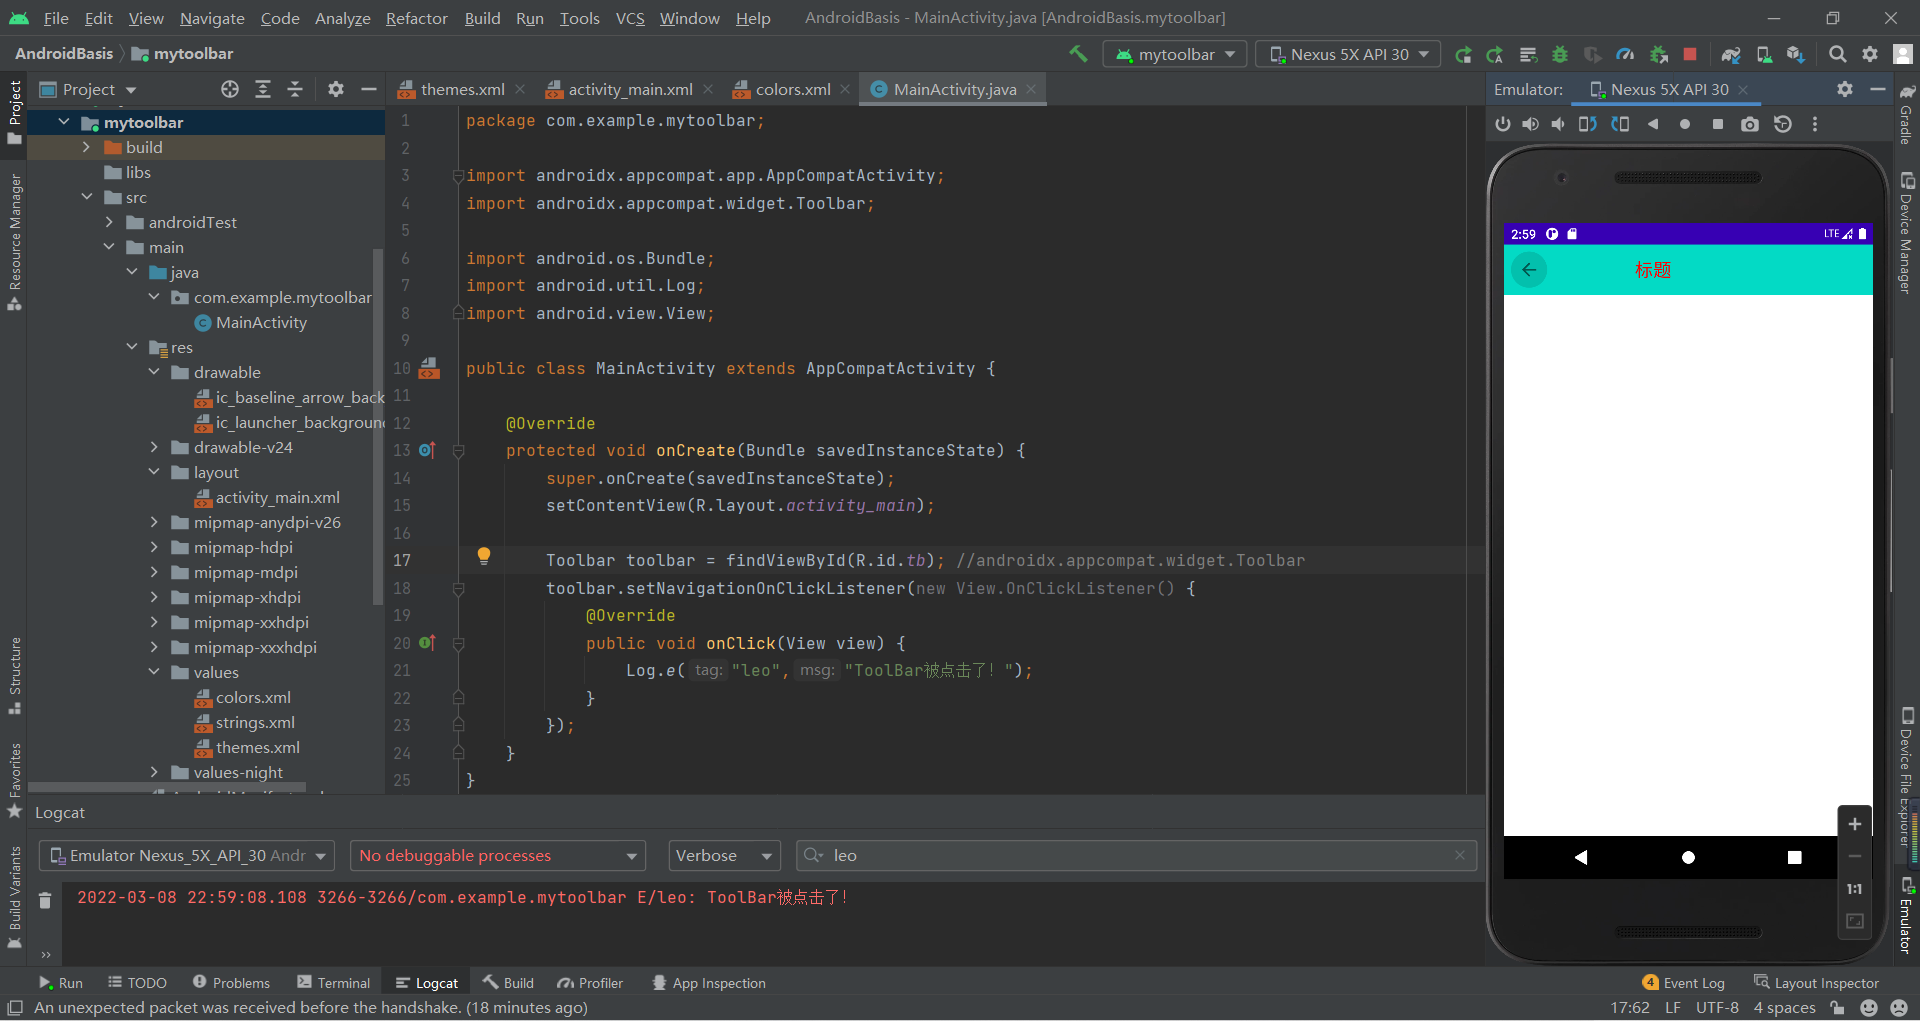
2.7.2 标题居中显示
代码及运行效果: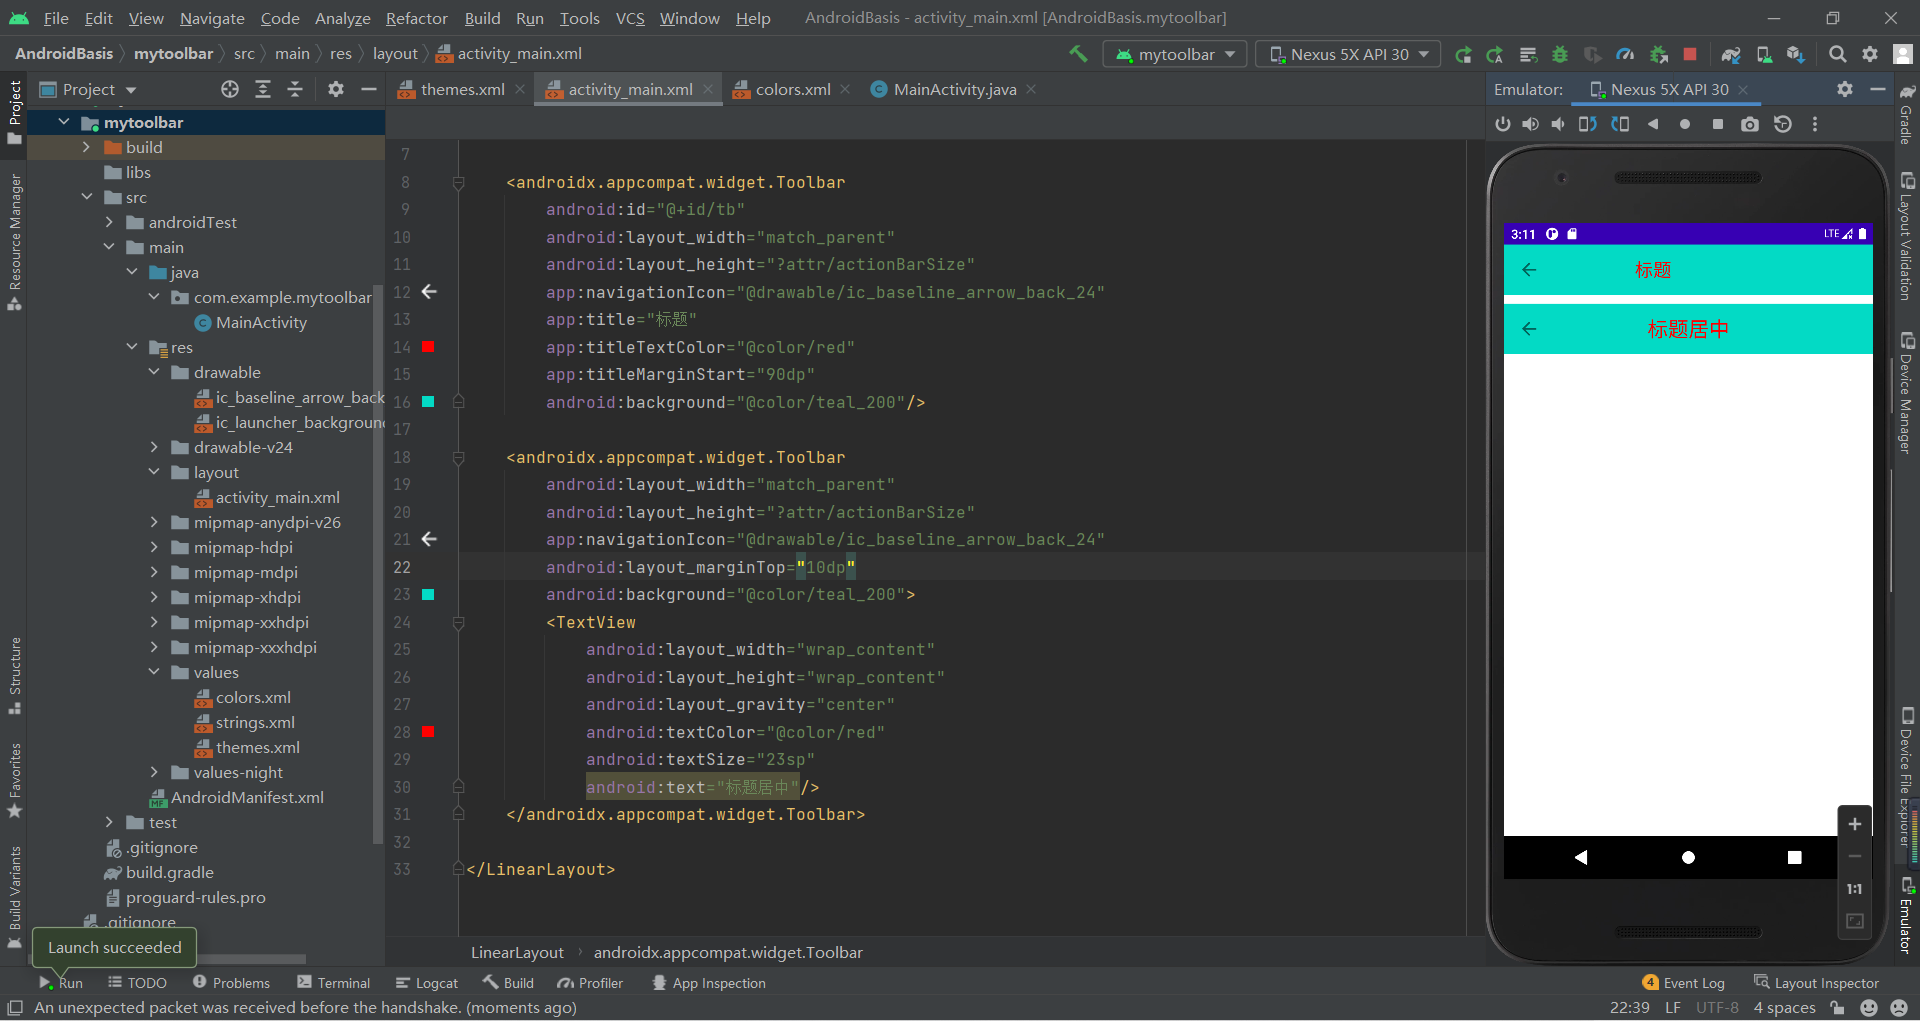
2.8 AlertDialog(对话框)
2.8.1 实现方式/使用流程
AlertDialog.Builder builder = new AlertDialog.Builder(context); 构建Dialog的各种参数Builder.setlcon(int iconld); 添加ICONBuilder.setTitle(CharSequence title); 添加标题Builder.setMessage(CharSequence message);添加消息Builder.setView(View view); 设置自定义布局setPositiveButton:确定按钮setNegativeButton:取消按钮setNeutralButton:中间按钮Builder.create(); 创建DialogBuilder.show(); 显示对话框使用流程:
Step 1:创建AlertDialog.Builder对象;Step 2:调用setIcon()设置图标,setTitle()或setCustomTitle()设置标题;Step 3:设置对话框的内容:setMessage()还有其他方法来指定显示的内容;Step 4:调用setPositive/Negative/NeutralButton()设置:确定,取消,中立按钮;Step 5:调用create()方法创建这个对象,再调用show()方法将对话框显示出来;更多详见:2.5.9 AlertDialog(对话框)详解 | 菜鸟教程 (runoob.com)
XML代码:
<?xml version="1.0" encoding="utf-8"?><LinearLayout xmlns:android="http://schemas.android.com/apk/res/android" android:orientation="vertical" android:layout_width="match_parent" android:layout_height="match_parent"> <Button android:layout_width="wrap_content" android:layout_height="wrap_content" android:onClick="leoClick" android:text="显示对话框"/></LinearLayout>Java代码:
public class MainActivity extends AppCompatActivity { private static final String TAG = "leo"; @Override protected void onCreate(Bundle savedInstanceState) { super.onCreate(savedInstanceState); setContentView(R.layout.activity_main); } public void leoClick(View view) { AlertDialog.Builder builder = new AlertDialog.Builder(this); //androidx.appcompat.app.AlertDialog; builder.setIcon(R.mipmap.ic_launcher) .setTitle("对话框") .setMessage("今天天气怎么样?") .setPositiveButton("确定", new DialogInterface.OnClickListener() { @Override public void onClick(DialogInterface dialogInterface, int i) { Log.e(TAG, "点击了确定按钮"); } }) .setNegativeButton("取消", new DialogInterface.OnClickListener() { @Override public void onClick(DialogInterface dialogInterface, int i) { Log.e(TAG, "点击了取消按钮"); } }) .setNeutralButton("中间/其他", new DialogInterface.OnClickListener() { @Override public void onClick(DialogInterface dialogInterface, int i) { Log.e(TAG, "点击了中间/其他按钮"); } }) .create() .show(); //最后两个位置不能交换 }}运行效果图1(无setView()):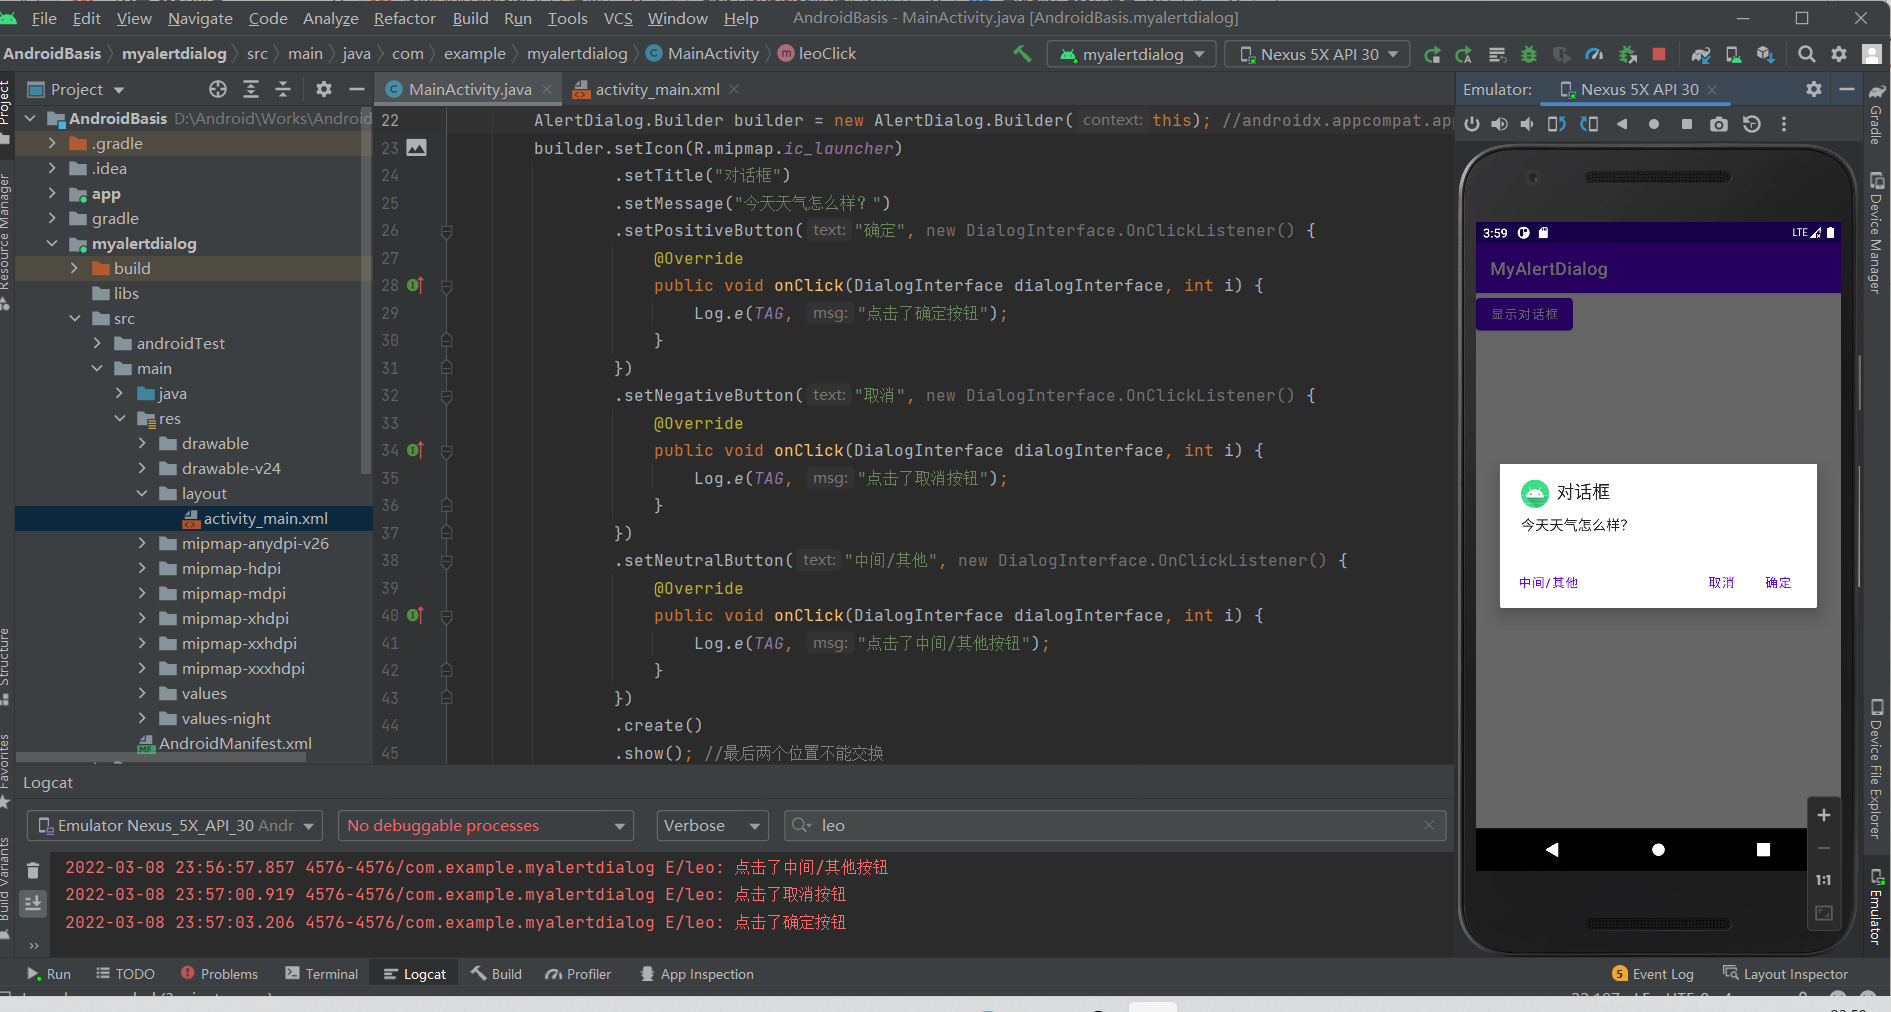
dialog_view.xml代码:
<?xml version="1.0" encoding="utf-8"?><LinearLayout xmlns:android="http://schemas.android.com/apk/res/android" xmlns:app="http://schemas.android.com/apk/res-auto" android:orientation="horizontal" android:background="#66FFFF00" android:layout_width="match_parent" android:layout_height="match_parent"> <TextView android:layout_width="wrap_content" android:layout_height="wrap_content" android:text="今天天气很好!" android:textSize="18sp"/> <ImageView android:layout_width="wrap_content" android:layout_height="wrap_content" android:src="@drawable/ic_baseline_tag_faces_24" app:tint="#00FF00" /></LinearLayout> 运行效果2: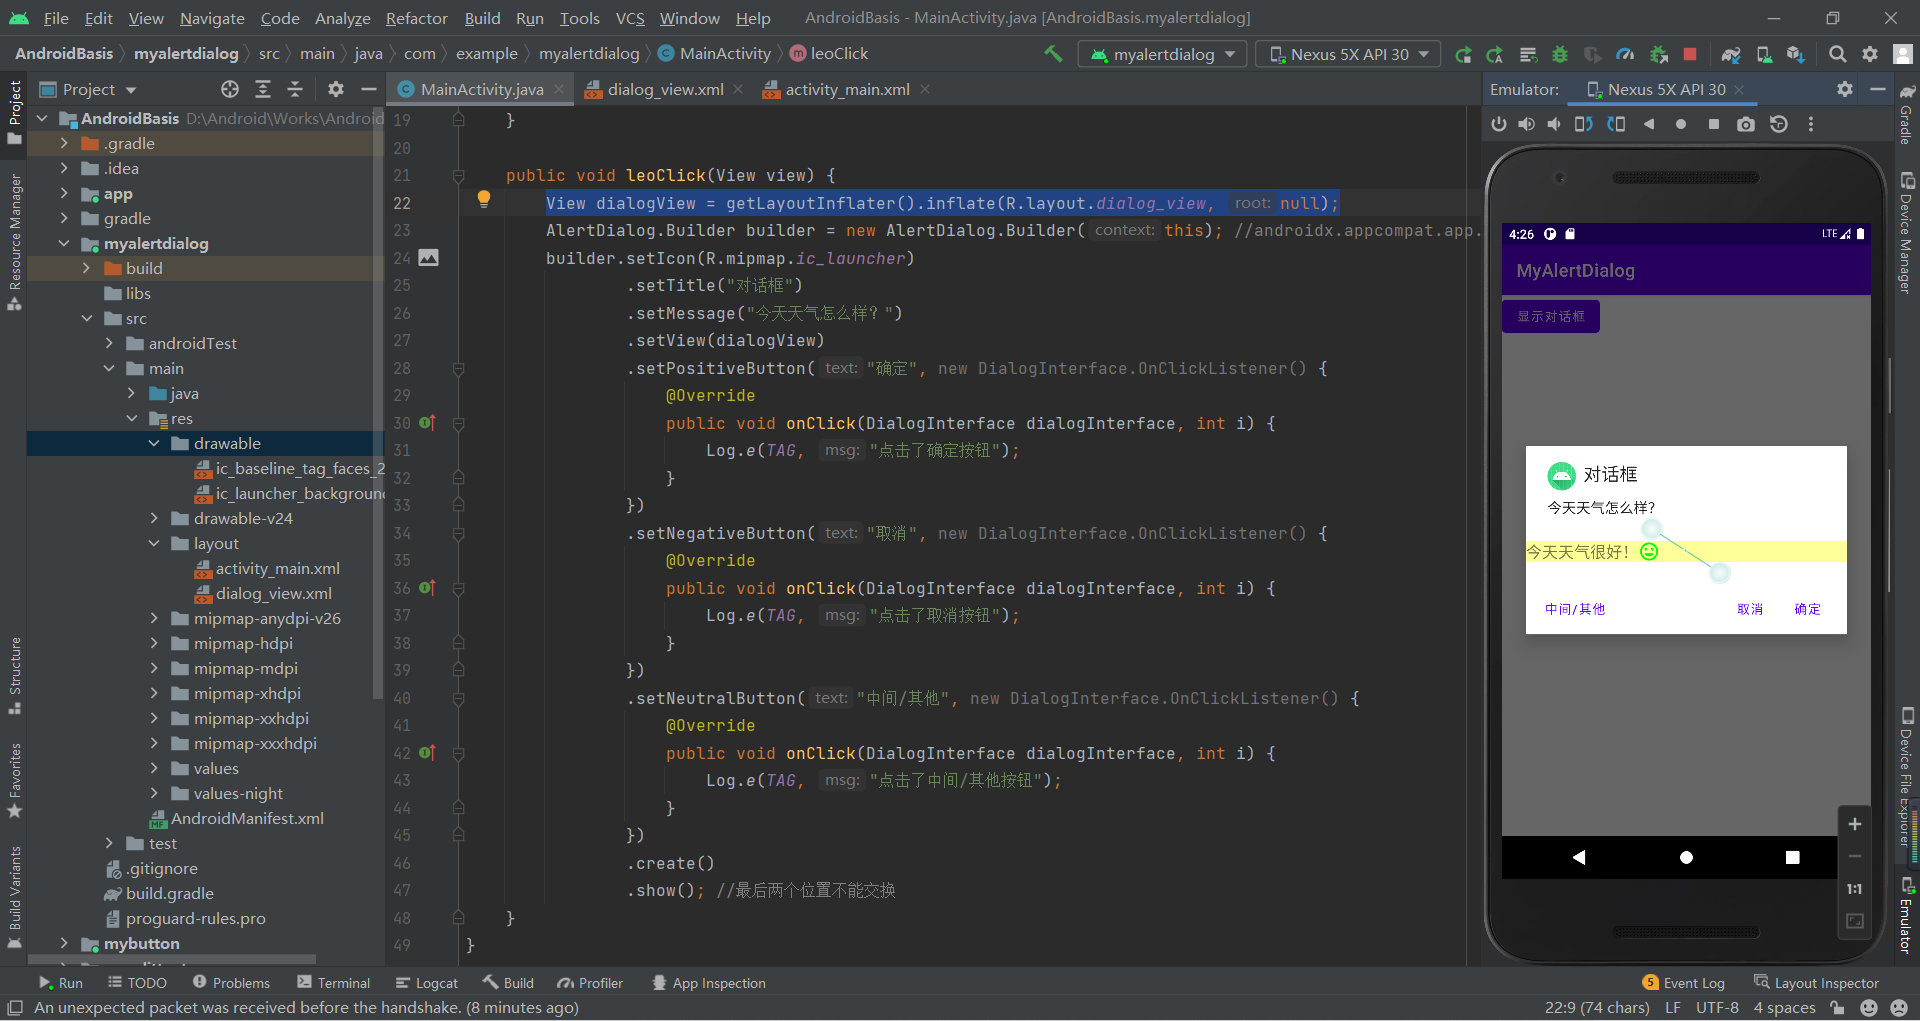
2.9 PopupWindow(悬浮框)
2.9.1 常用方法
setContentView(View contentView):设置PopupWindow显示的viewshowAsDropDown(View anchor):相对某个控件的位置〈正左下方),无偏移showAsDropDown(View anchor, int xoff, int yoff):相对某个控件的位置,有偏移setFocusable(boolean focusable):设置是否获取焦点setBackgroundDrawable(Drawable background):设置背景dismiss()关闭弹窗setAnimationStyle(int animationStyle):设置加载动画setTouchable(boolean touchable):设置触摸使能setOutsideTouchable(boolean touchable):设置PopupWindow外面的触摸使能更多详见:2.6.1 PopupWindow(悬浮框)的基本使用 | 菜鸟教程 (runoob.com)
XML代码:
<?xml version="1.0" encoding="utf-8"?><LinearLayout xmlns:android="http://schemas.android.com/apk/res/android" android:orientation="vertical" android:layout_width="match_parent" android:layout_height="match_parent"> <Button android:layout_width="wrap_content" android:layout_height="wrap_content" android:text="弹出PopupWIndow" android:onClick="leoClick"/></LinearLayout>popup_view.xml代码:
<?xml version="1.0" encoding="utf-8"?><LinearLayout xmlns:android="http://schemas.android.com/apk/res/android" android:orientation="vertical" android:background="@mipmap/ic_launcher" android:layout_width="match_parent" android:layout_height="match_parent"> <Button android:id="@+id/btn1" android:layout_width="wrap_content" android:layout_height="wrap_content" android:padding="5dp" android:text="上海" android:textSize="18sp"/> <Button android:id="@+id/btn2" android:layout_width="wrap_content" android:layout_height="wrap_content" android:padding="5dp" android:text="北京" android:textSize="18sp"/></LinearLayout>Java代码:
public class MainActivity extends AppCompatActivity { private static final String TAG = "leo"; @Override protected void onCreate(Bundle savedInstanceState) { super.onCreate(savedInstanceState); setContentView(R.layout.activity_main); } public void leoClick(View view) { View popupView = getLayoutInflater().inflate(R.layout.popup_view, null); //视图、宽、高、是否获取焦点(点击空白处取消) PopupWindow popupWindow = new PopupWindow(popupView, ViewGroup.LayoutParams.WRAP_CONTENT, ViewGroup.LayoutParams.WRAP_CONTENT, true); popupWindow.setBackgroundDrawable(getResources().getDrawable(R.drawable.ceshi)); //设置背景 popupWindow.showAsDropDown(view, 50,0); Log.e(TAG, "leoClick: 111111"); Button btn1 = popupView.findViewById(R.id.btn1); Button btn2 = popupView.findViewById(R.id.btn2); btn1.setOnClickListener(new View.OnClickListener() { @Override public void onClick(View view) { Log.e(TAG, "onClick: 按钮1被点击"); } }); btn2.setOnClickListener(new View.OnClickListener() { @Override public void onClick(View view) { Log.e(TAG, "onClick: 按钮2被点击"); } }); }}运行结果图: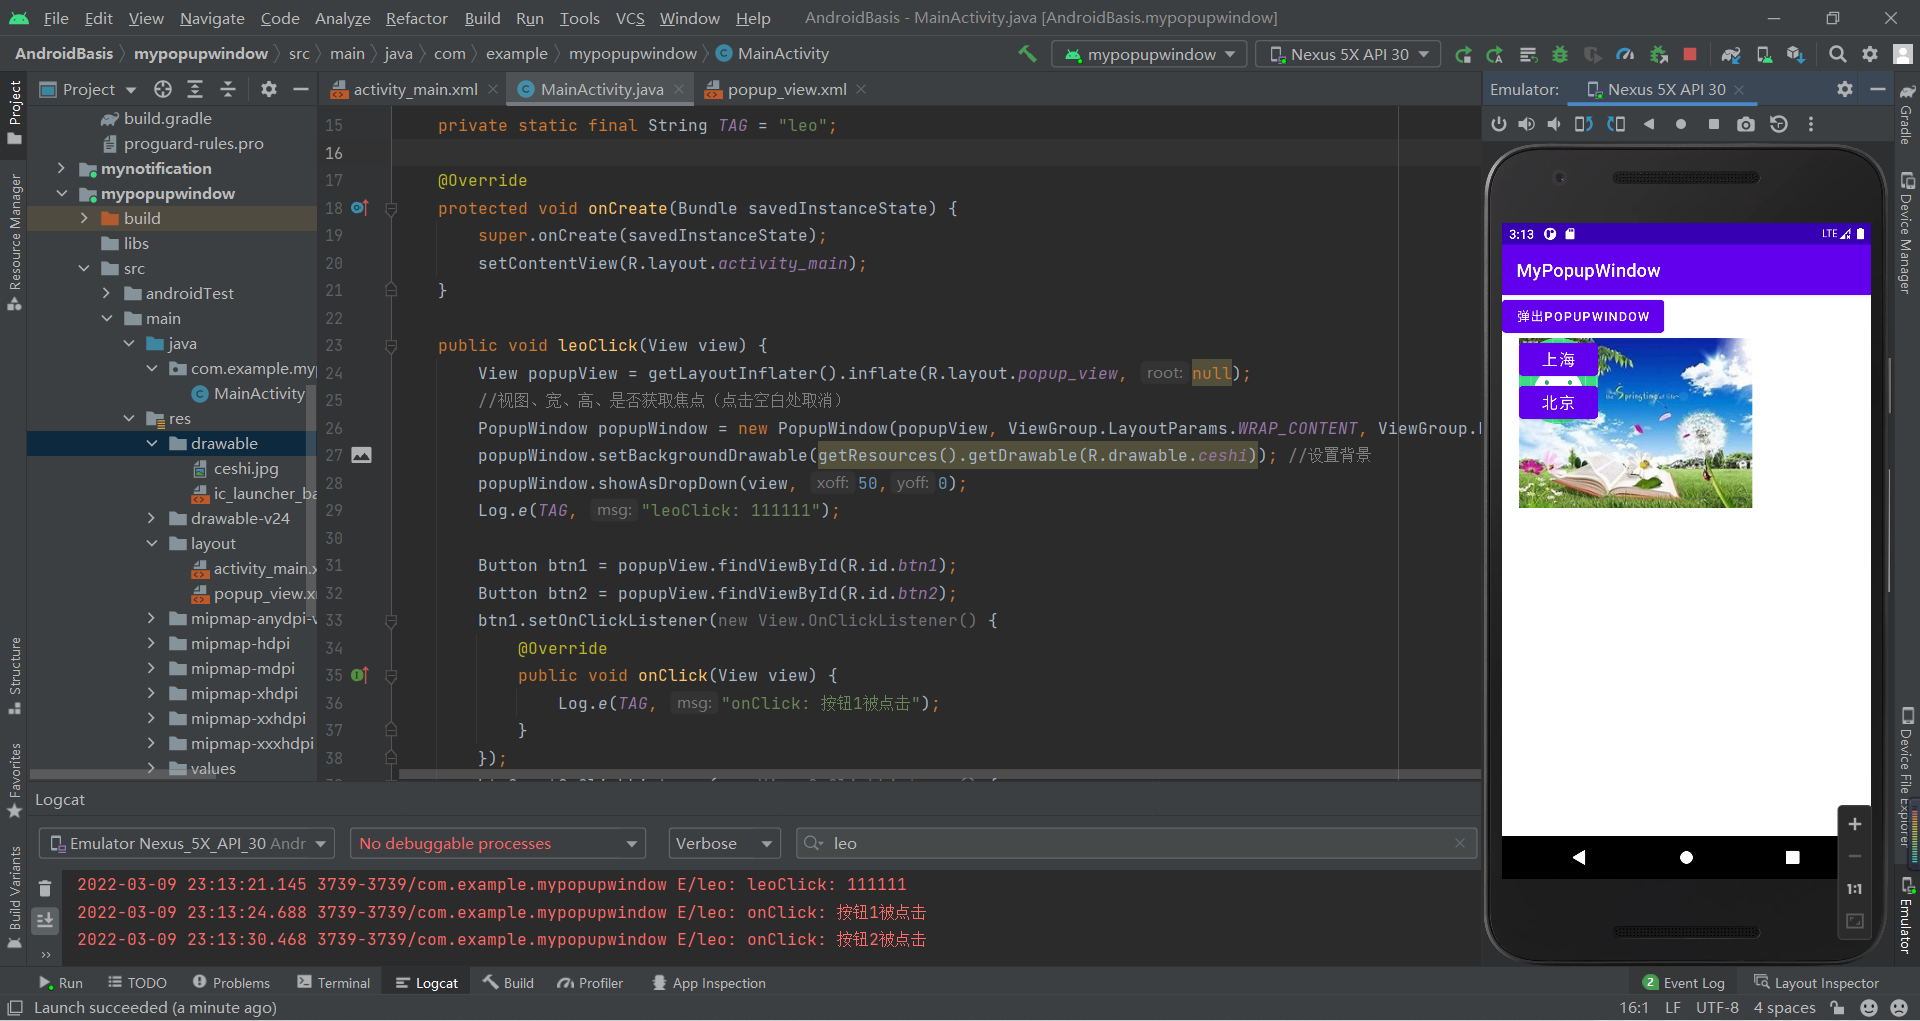
ListView(列表条目)
使用步骤:
Step 1:在布局文件中添加一个LisetViewStep 2:新建一个条目布局文件,这里为list_item.xml,在此文件中写好每一个条目的布局内容Step 3:创建item对应的JavaBeanStep 4:创建待填充的数据data集合并添加数据Step 5:创建辅助类Adapter(适配器)需继承BaseAdapter并实现其方法,这里命名为MyAdapter,此类中包含适配的数据和Context。实现getView的时候,需要创建View并将其返回,然后需要在此方法中通过view的findById获取list_item中的组件并填充内容Step 6: 创建并初始化MyAdpter适配器,然后获取布局中的ListView,通过set方法将创建好的MyAdpter适配器复值给ListView的Adapter方法就可以完成了inflate()方法解析:
public View inflate(@LayoutRes int resource, @Nullable ViewGroup root, boolean attachToRoot)true:将第一个参数表示的布局添加到第二参数的布局中。
false:不将第一个参数表示的布局添加到第二参数的布局中。
既然不添加,那么为什么第二个参数不设置为null呢。
不添加的话,这个函数就只剩下一个作用了,那就是获取布局,为了使第一个参数的宽高属性不失效,所以要为他指定一个父布局
更多详见:2.4.5 ListView简单实用 | 菜鸟教程 (runoob.com)
MyActivity.java:
public class MainActivity extends AppCompatActivity { private ArrayList<Bean> data = new ArrayList<>(); @Override protected void onCreate(Bundle savedInstanceState) { super.onCreate(savedInstanceState); setContentView(R.layout.activity_main); for (int i = 0; i < 20; i++) { Bean bean = new Bean("享学"+i); data.add(bean); } ListView listView = findViewById(R.id.lv); listView.setAdapter(new MyAdapter(data, this)); listView.setOnItemClickListener(new AdapterView.OnItemClickListener() { @Override public void onItemClick(AdapterView<?> adapterView, View view, int i, long l) { Log.e("TAG", "onItemClick: " + i); } }); }}Bean.java:
package com.example.mylistview;public class Bean { private String name; public Bean(String name) { this.name = name; } public String getName() { return name; } public void setName(String name) { this.name = name; }}MyAdapter.java:
public class MyAdapter extends BaseAdapter { private ArrayList<Bean> data; private Context context; public MyAdapter(ArrayList<Bean> data, Context context) { this.data = data; this.context = context; } @Override public int getCount() { return data.size(); } @Override public Object getItem(int i) { return data.get(i); } @Override public long getItemId(int i) { return i; } @Override public View getView(int i, View view, ViewGroup viewGroup) { if (view == null) { view = LayoutInflater.from(context).inflate(R.layout.list_item,viewGroup,false); } TextView tv = view.findViewById(R.id.tv); tv.setText(data.get(i).getName()); Log.e("TAG", "getView: " + i); return view; }}activity_main.xml:
<?xml version="1.0" encoding="utf-8"?><LinearLayout xmlns:android="http://schemas.android.com/apk/res/android" xmlns:tools="http://schemas.android.com/tools" android:layout_width="match_parent" android:layout_height="match_parent" tools:context=".MainActivity"> <ListView android:id="@+id/lv" android:layout_width="match_parent" android:layout_height="match_parent" /></LinearLayout>list_item.xml:
<?xml version="1.0" encoding="utf-8"?><LinearLayout xmlns:android="http://schemas.android.com/apk/res/android" android:layout_width="match_parent" android:layout_height="match_parent"> <TextView android:id="@+id/tv" android:layout_width="wrap_content" android:layout_height="wrap_content" android:text="享学0" android:textSize="30sp" /></LinearLayout>运行效果图:
优化后的MyAdapter.java:即用viewHolder存储传过来的view,并为view绑定绑定上viewHolder对象
public class MyAdapter extends BaseAdapter { private ArrayList<Bean> data; private Context context; public MyAdapter(ArrayList<Bean> data, Context context) { this.data = data; this.context = context; } @Override public int getCount() { return data.size(); } @Override public Object getItem(int i) { return data.get(i); } @Override public long getItemId(int i) { return i; } @Override public View getView(int i, View view, ViewGroup viewGroup) { ViewHolder viewHolder; if (view == null) { viewHolder = new ViewHolder(); view = LayoutInflater.from(context).inflate(R.layout.list_item,viewGroup,false); viewHolder.textView = view.findViewById(R.id.tv); view.setTag(viewHolder); } else{ viewHolder = (ViewHolder) view.getTag(); } viewHolder.textView.setText(data.get(i).getName()); Log.e("TAG", "getView: " + i); return view; } public final class ViewHolder{ TextView textView; }}
RecyclerView(大量数据集合的列表)
1 什么是RecycylerView:
RecycylerView是support-v7包中的新组件,是一个强大的滑动组件,是一个增强版的ListView,与经典的ListView相比,同样拥
不仅可以实现和ListView同样的效果,还优化了ListView中存在的各种不足之处,这一点从它的名字Recyclerview即回收view也可以看出。ResyslerView 能够实现横向滚动,这是ListView所不能实现的
2 如何使用:
Step 1:添加RecycylerView的依赖:
Step 2:创建布局:
activity_main.xmlitem.xmlStep 3:创建适配器:
创建适配器类继承RecyclerView.Adapter<>类,传入泛型为RecyclerView.ViewHolder的子类(第2点)。创建内部类即RecyclerView.ViewHolder类的子类,并为其绑定item控件。实现RecyclerView.Adapter类的相关方法(快捷键为Alt+Enter)。public MyViewHolder onCreateViewHolder(@NonNull ViewGroup parent, int viewType);public void onBindViewHolder(@NonNull MyViewHolder holder, int position);//为MyViewHolder绑定上数据public int getItemCount();//返回数据的条目数Step 4:在MainActivity.java中使用RecyclerView:
获取RecyclerView对象 。准备适配的数据 。适配器实例化 。设置LayoutManager布局方式。设置Adapter 。MyActivity.java:
public class MainActivity extends AppCompatActivity { @Override protected void onCreate(Bundle savedInstanceState) { super.onCreate(savedInstanceState); setContentView(R.layout.activity_main); ArrayList<Bean> data = new ArrayList<>(); for (int i = 0; i < 20; i++) { Bean bean = new Bean("享学"+i); data.add(bean); } RecyclerView recyclerView = findViewById(R.id.rv); MyAdapter myAdapter = new MyAdapter(data, this); LinearLayoutManager manager = new LinearLayoutManager(this); manager.setOrientation(LinearLayoutManager.VERTICAL); recyclerView.setLayoutManager(manager); recyclerView.setAdapter(myAdapter); }}Bean.java:
public class Bean { private String name; public Bean(String name) { this.name = name; } public String getName() { return name; } public void setName(String name) { this.name = name; }}MyAdapter.java:
public class MyAdapter extends RecyclerView.Adapter<MyAdapter.MyViewHolder> { private ArrayList<Bean> data; private Context context; public MyAdapter(ArrayList<Bean> data, Context context) { this.data = data; this.context = context; } @NonNull @Override public MyViewHolder onCreateViewHolder(@NonNull ViewGroup parent, int viewType) { View view = View.inflate(context, R.layout.recycler_item, null); MyViewHolder myViewHolder = new MyViewHolder(view); return myViewHolder; } @Override public void onBindViewHolder(@NonNull MyViewHolder holder, int position) { holder.textView.setText(data.get(position).getName()); } @Override public int getItemCount() { return data==null?0:data.size(); } public class MyViewHolder extends RecyclerView.ViewHolder{ TextView textView; public MyViewHolder(@NonNull View itemView) { super(itemView); textView = itemView.findViewById(R.id.tv); } }}activity_main.xml:
<?xml version="1.0" encoding="utf-8"?><LinearLayout xmlns:android="http://schemas.android.com/apk/res/android" xmlns:tools="http://schemas.android.com/tools" android:layout_width="match_parent" android:layout_height="match_parent" tools:context=".MainActivity"> <androidx.recyclerview.widget.RecyclerView android:id="@+id/rv" android:layout_width="match_parent" android:layout_height="match_parent" /></LinearLayout>recycler_item.xml:
<?xml version="1.0" encoding="utf-8"?><RelativeLayout xmlns:android="http://schemas.android.com/apk/res/android" android:layout_width="match_parent" android:layout_height="match_parent"> <TextView android:id="@+id/tv" android:layout_width="wrap_content" android:layout_height="wrap_content" android:text="享学0" android:textSize="25dp"/></RelativeLayout>运行效果图: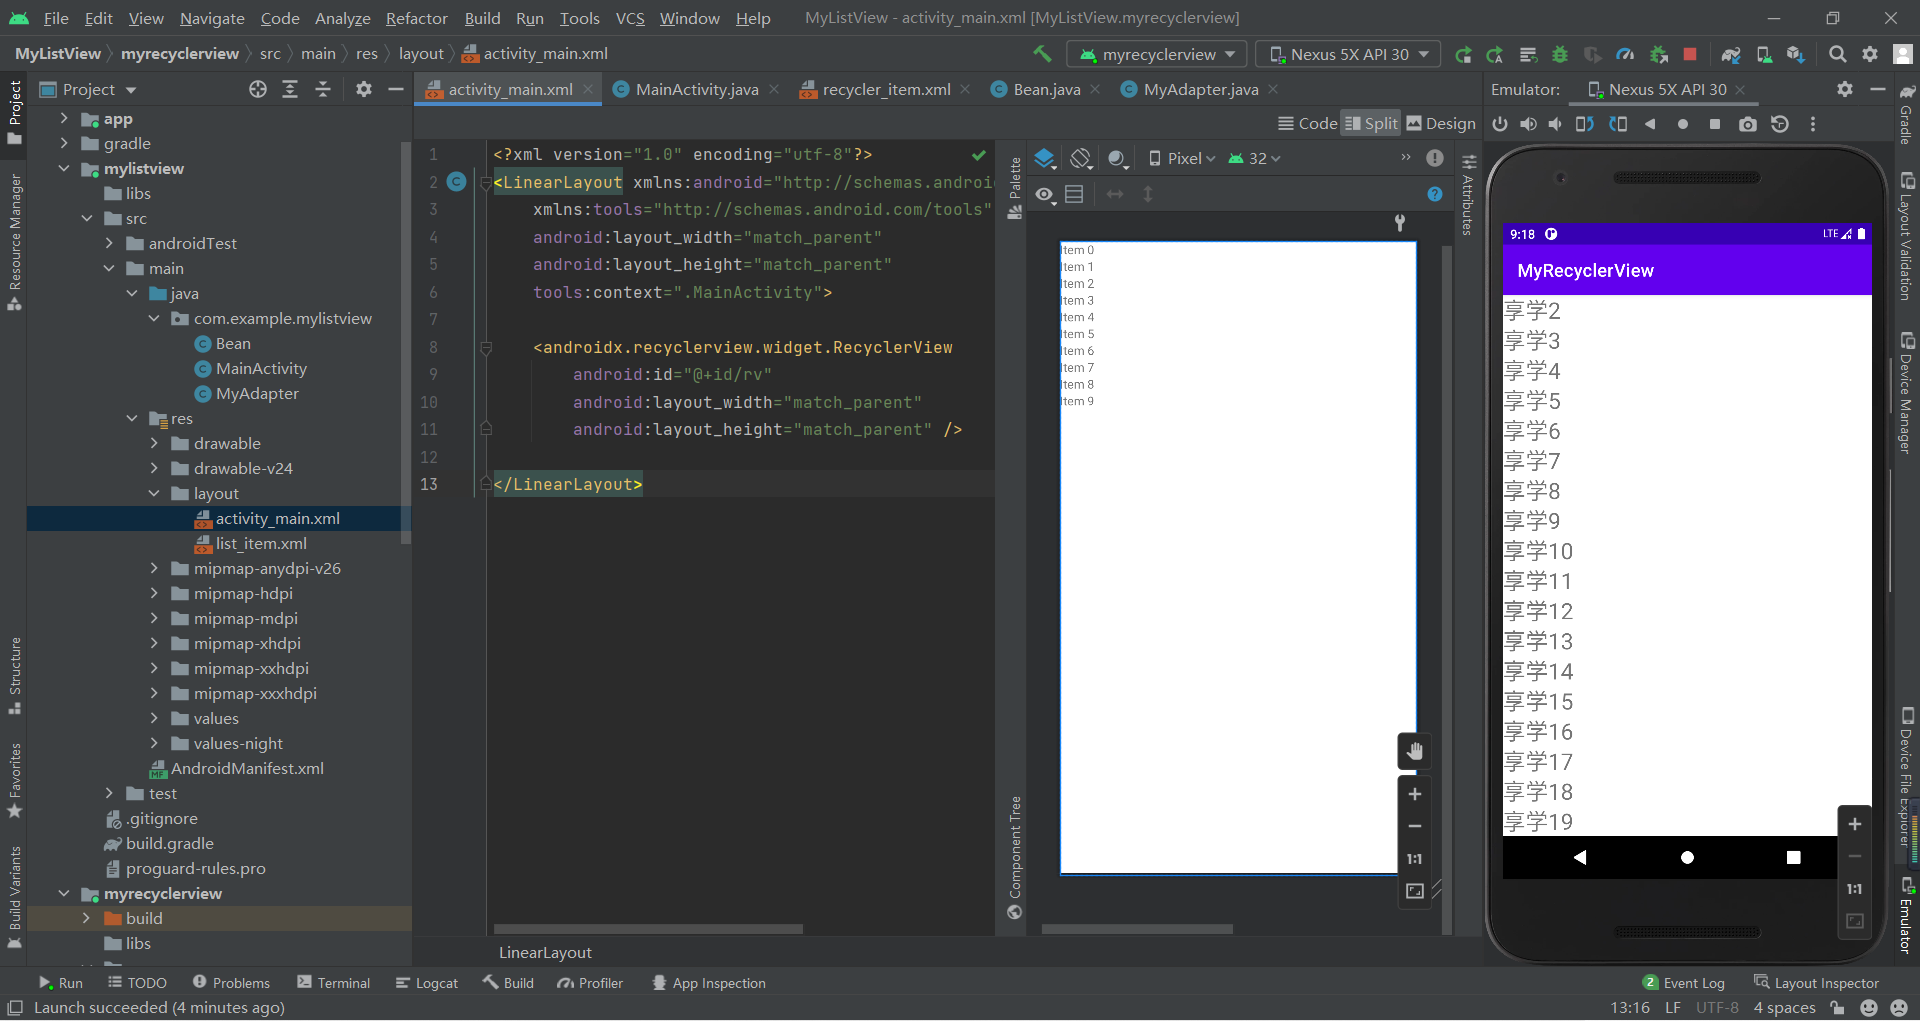
RecyclerView的点击事件
RecyclerView并没有像ListView一样暴露出Item点击事件或者长按事件处理的api,也就是说使用RecyclerView时候,需要我们自己来实现Item的点击和长按等事件的处理。实现方法有多种:
可以监听RecyclerView的Touch事件然后判断手势做相应的处理也可以在通过在绑定ViewHolder的时候设置监听,然后通过Apater回调出去这里选择第二种方法,更加直观和简单。
思路为:
通过在适配器中设置一个包含onItemClick函数的接口,然后添加setOnItemClickListener方法用于接收用户创建的该接口的实现类对象,最后在onBindViewHolder函数中调用onItemClick方法执行用于传入的对象的onItemClick方法。
设置步骤:
Step 1:创建OnItemClickListener接口 public interface OnItemClickListener{ void onItemClick(View view, int position); void onItemLongClick(View view, int position); } public void setOnItemClickListener(OnItemClickListener listenser) { this.onItemClickListener = listener; } //第1种实现方法 @Override public void onBindViewHolder(@NonNull MyViewHolder holder, int position) { holder.textView.setText(data.get(position).getName()); holder.itemView.setOnClickListener(new View.OnClickListener() { @Override public void onClick(final View v) { if(onItemClickListener != null) { int pos = holder.getLayoutPosition(); onItemClickListener.onItemClick(holder.itemView, pos); } } }); holder.itemView.setOnLongClickListener(new View.OnLongClickListener() { @Override public boolean onLongClick(View v) { if(onItemClickListener != null) { int pos = holder.getLayoutPosition(); onItemClickListener.onItemLongClick(holder.itemView, pos); } //表示此事件已经消费,不会触发单击事件 return true; } }); } //第2种实现方法 public class MyViewHolder extends RecyclerView.ViewHolder{ TextView textView; public MyViewHolder(@NonNull View itemView) { super(itemView); textView = itemView.findViewById(R.id.tv); itemView.setOnClickListener(new View.OnClickListener() { @Override public void onClick(View view) { if(onItemClickListener != null) { onItemClickListener.onItemClick(itemView, getLayoutPosition()); } } }); itemView.setOnLongClickListener(new View.OnLongClickListener() { @Override public boolean onLongClick(View view) { if(onItemClickListener != null) { onItemClickListener.onItemLongClick(itemView, getLayoutPosition()); } return false; } }); } }Step 5:调用setOnItemClickListener方法传入OnItemClickListener的实现类对象
myAdapter.setOnItemClickListener(new MyAdapter.OnItemClickListener() { @Override public void onItemClick(View view, int position) { Log.e("TAG", "onItemClick: " + position); } @Override public void onItemLongClick(View view, int position) { Log.e("TAG", "onLongItemClick: " + position); } });MyAdapter.java的完整代码:
public class MyAdapter extends RecyclerView.Adapter<MyAdapter.MyViewHolder> { private ArrayList<Bean> data; private Context context; public MyAdapter(ArrayList<Bean> data, Context context) { this.data = data; this.context = context; } @NonNull @Override public MyViewHolder onCreateViewHolder(@NonNull ViewGroup parent, int viewType) { View view = View.inflate(context, R.layout.recycler_item, null); MyViewHolder myViewHolder = new MyViewHolder(view); return myViewHolder; } @Override public void onBindViewHolder(@NonNull MyViewHolder holder, int position) { holder.textView.setText(data.get(position).getName()); holder.itemView.setOnClickListener(new View.OnClickListener() { @Override public void onClick(final View v) { if(onItemClickListener != null) { int pos = holder.getLayoutPosition(); onItemClickListener.onItemClick(holder.itemView, pos); } } }); holder.itemView.setOnLongClickListener(new View.OnLongClickListener() { @Override public boolean onLongClick(View v) { if(onItemClickListener != null) { int pos = holder.getLayoutPosition(); onItemClickListener.onItemLongClick(holder.itemView, pos); } //表示此事件已经消费,不会触发单击事件 return true; } }); } @Override public int getItemCount() { return data==null?0:data.size(); } public interface OnItemClickListener{ void onItemClick(View view, int position); void onItemLongClick(View view, int position); } private OnItemClickListener onItemClickListener; public void setOnItemClickListener(MyAdapter.OnItemClickListener listener) { this.onItemClickListener = listener; } public class MyViewHolder extends RecyclerView.ViewHolder{ TextView textView; public MyViewHolder(@NonNull View itemView) { super(itemView); textView = itemView.findViewById(R.id.tv);// itemView.setOnClickListener(new View.OnClickListener() {// @Override// public void onClick(View view) {// if(onItemClickListener != null) {// onItemClickListener.onItemClick(itemView, getLayoutPosition());// }// }// });// itemView.setOnLongClickListener(new View.OnLongClickListener() {// @Override// public boolean onLongClick(View view) {// if(onItemClickListener != null) {// onItemClickListener.onItemLongClick(itemView, getLayoutPosition());// }// return false;// }// }); } }}recycler_itme.xml:
<?xml version="1.0" encoding="utf-8"?><RelativeLayout xmlns:android="http://schemas.android.com/apk/res/android" android:layout_width="match_parent" android:layout_height="match_parent"> <TextView android:id="@+id/tv" android:layout_width="match_parent" android:layout_height="wrap_content" android:text="享学0" android:textSize="25dp"/></RelativeLayout>运行效果图: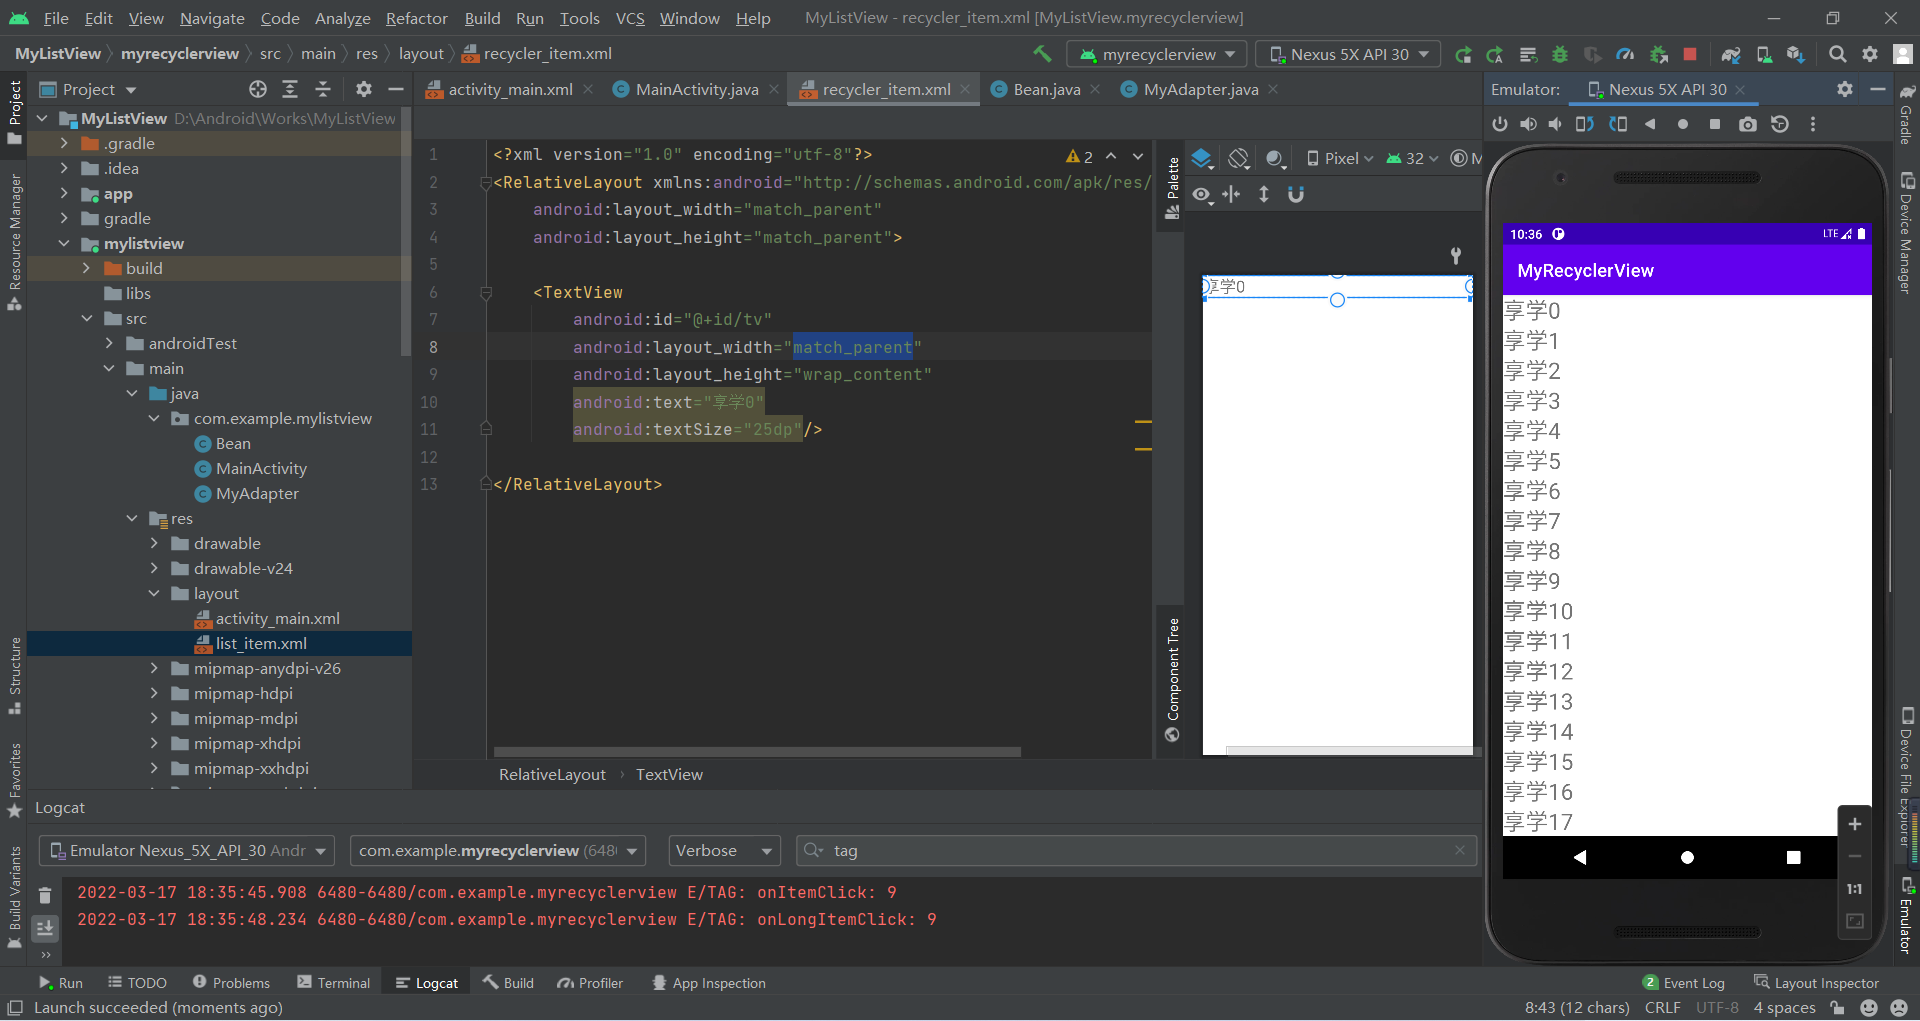
第3章 Android的布局方式
3.1 LinearLayout(线性布局)
3.1.1 常用属性
orientation:布局中组件的排列方式gravity:控制组件所包含的子元素的对齐方式,可多个组合layout_gravity:控制该组件在父容器里的对其方式background:为该组件设置一个背景图片,或者是直接用颜色覆盖divider:分割线(可以使用View来设置分割线的效果)showDividers:设置分割线所在的位置,none(无),beginning(开始),end(结束),middle(每两个组件间)dividerPadding:设置分割线的paddinglayout_weight(权重):该属性是用来按比例划分剩余的区域,按控件的对齐方式更多详见:2.2.1 LinearLayout(线性布局) | 菜鸟教程 (runoob.com)
XML代码:
<?xml version="1.0" encoding="utf-8"?><LinearLayout xmlns:android="http://schemas.android.com/apk/res/android" android:orientation="vertical" android:layout_width="match_parent" android:layout_height="match_parent"> <LinearLayout android:layout_width="300dp" android:layout_height="0dp" android:layout_weight="3" android:background="#FF0000"/> <View android:layout_width="match_parent" android:layout_height="1dp" android:background="#000000" android:layout_marginVertical="10dp"/> <LinearLayout android:layout_width="300dp" android:layout_height="0dp" android:layout_weight="2" android:background="#00FF00"/> <LinearLayout android:layout_width="300dp" android:layout_height="0dp" android:layout_weight="1" android:background="#0000FF"/></LinearLayout>运行效果图: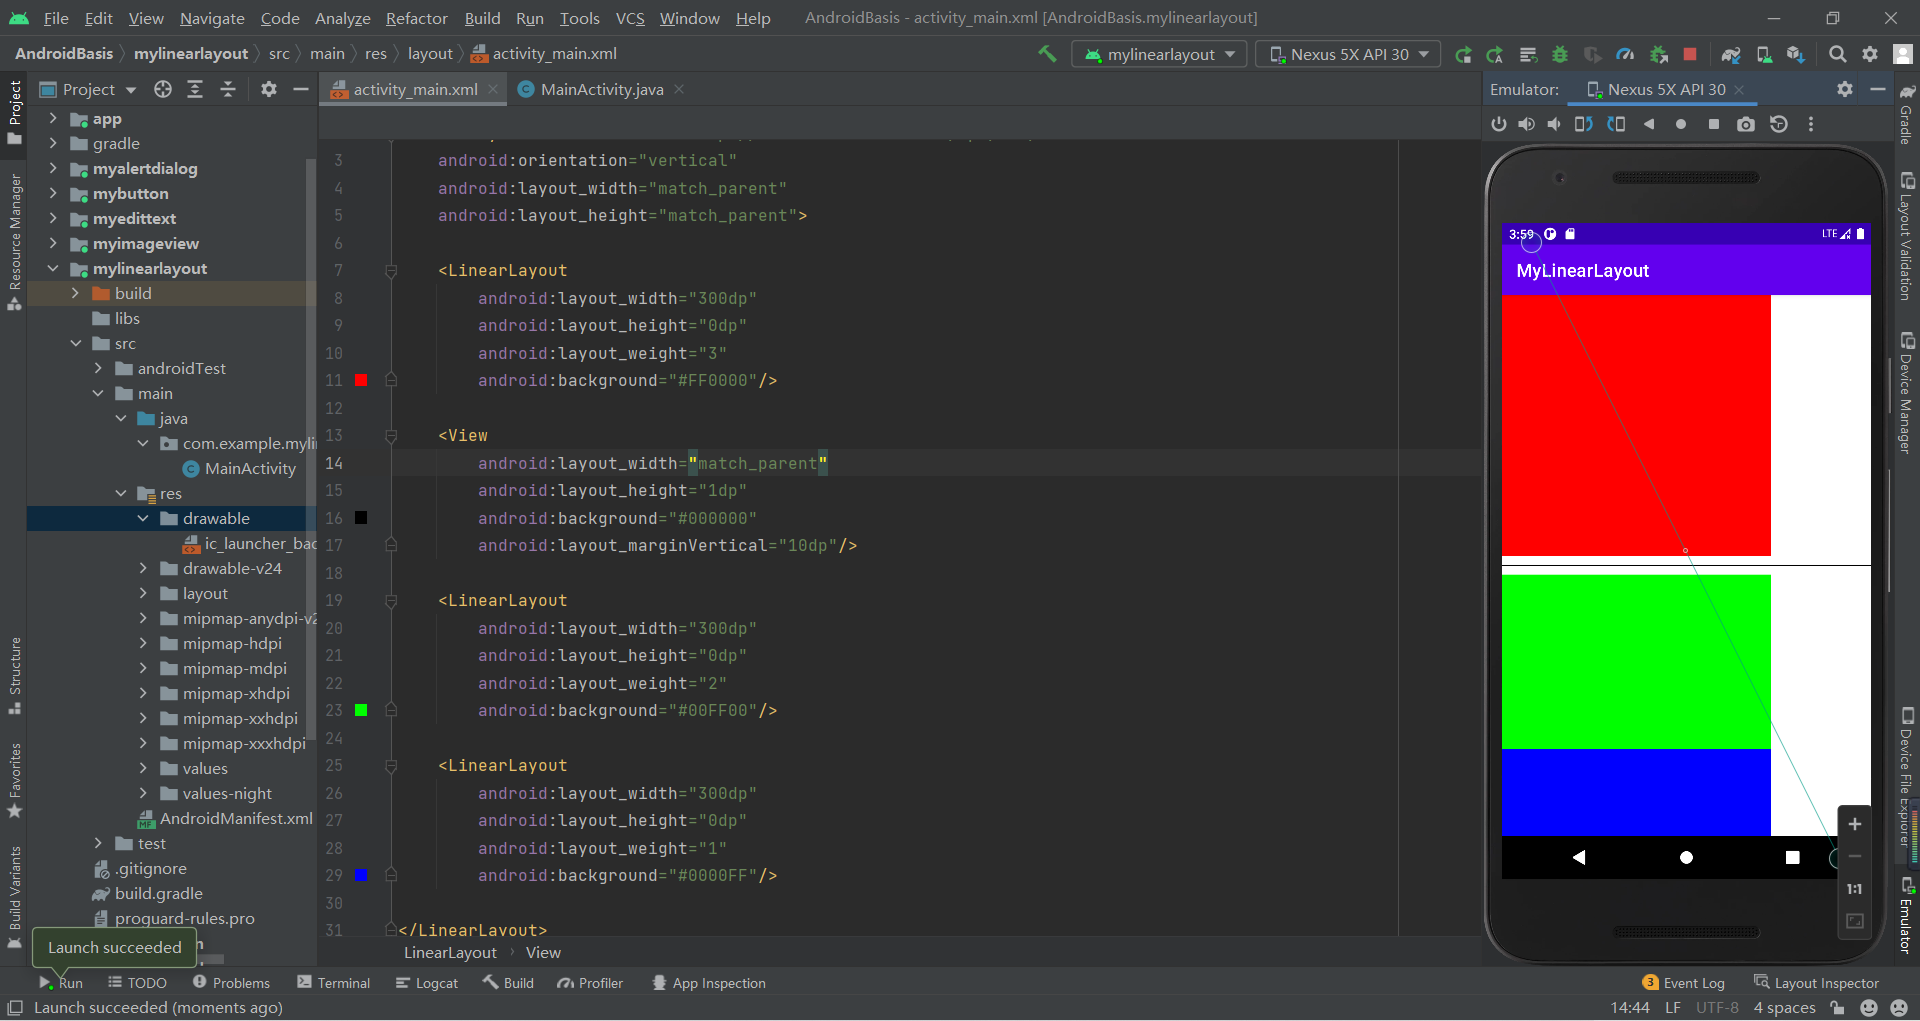
3.2 RelativeLayout(相对布局)
3.2.1 相对父容器定位
layout_alignParentLeft:左对齐layout_alignParentRight:右对齐layout_alignParentTop:顶部对齐layout_alignParentBottom:底部对齐layout_centerHorizontal:水平居中layout_centerVertical:垂直居中layout_centerInParent:中间位置3.2.2 相对兄弟容器定位
layout_toLeftOf:放置于参考组件的左边layout_toRightOf:放置于参考组件的右边layout_above:放置于参考组件的上方layout_below:放置于参考组件的下方layout_alignTop:对齐参考组件的上边界layout_alignBottom:对齐参考组件的下边界layout_alignLeft:对齐参考组件的左边界layout_alignRight:对齐参考组件的右边界3.2.3 通用属性
margin设置组件与父容器的边距
layout_margin:上下左右偏移layout_marginLeft:左边距layout_marginRight:右边距layout_marginTop:上边距layout_margiBottom:下边距padding设置组件与子容器的边距
layout_padding:上下左右偏移layout_paddingLeft:左边距layout_paddingRight:右边距layout_paddingTop:上边距layout_paddingBottom:下边距更多详见:2.2.2 RelativeLayout(相对布局) | 菜鸟教程 (runoob.com)
XML代码:
<?xml version="1.0" encoding="utf-8"?><RelativeLayout xmlns:android="http://schemas.android.com/apk/res/android" android:layout_width="match_parent" android:layout_height="match_parent"> <RelativeLayout android:id="@+id/rl1" android:layout_width="200dp" android:layout_height="100dp" android:layout_centerInParent="true" android:background="#FF0000"/> <RelativeLayout android:layout_width="100dp" android:layout_height="100dp" android:layout_above="@+id/rl1" android:background="#00FF00"/> <RelativeLayout android:layout_width="100dp" android:layout_height="100dp" android:layout_alignTop="@+id/rl1" android:background="#0000FF"/> <RelativeLayout android:layout_width="100dp" android:layout_height="100dp" android:layout_marginLeft="100dp" android:background="#FFFF00"/></RelativeLayout>运行效果图: 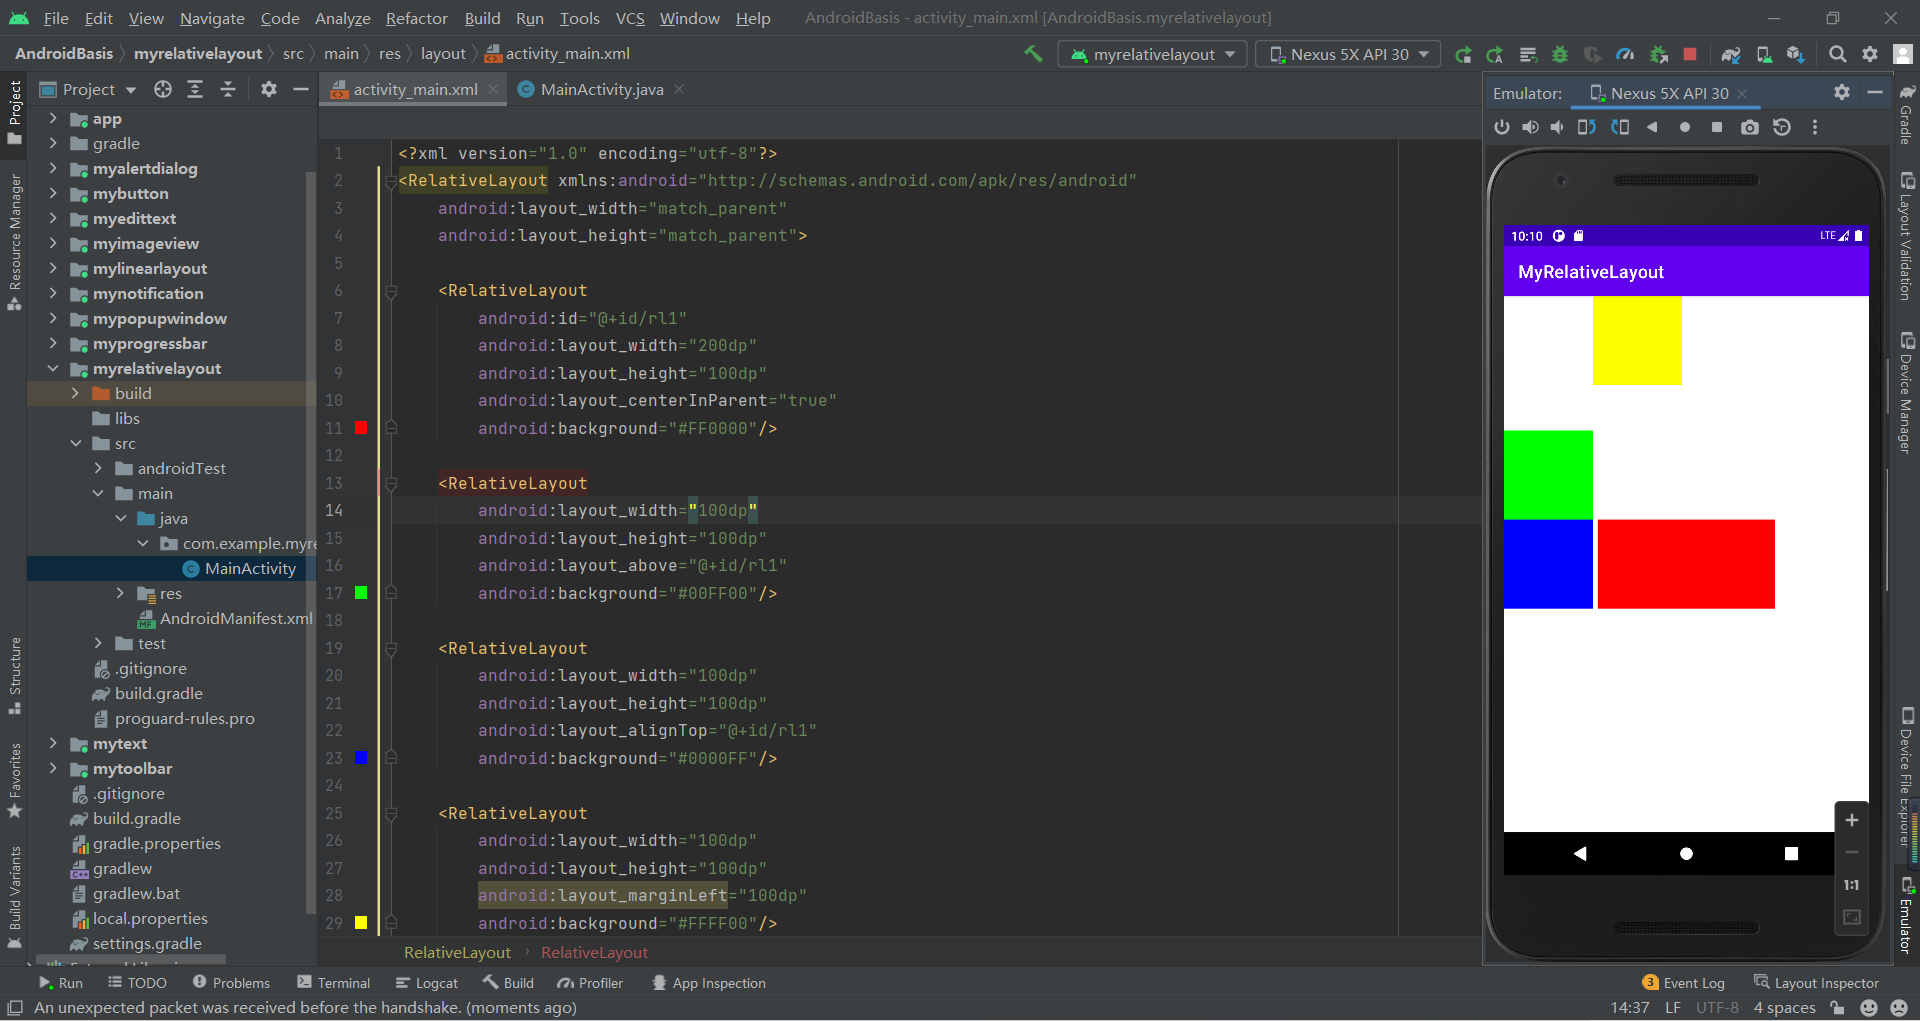
3.3 TableLayout(表格布局)
3.3.1 常见属性
android:collapseColumns:设置需要被隐藏的列的序号,从0开始android:stretchColumns:设置允许被拉伸的列的列序号,从0开始,要有被拉伸的空间才有效ndroid:shrinkColumns:设置允许被收缩的列的列序号,从0开始,要有超出的空间才有效3.3.2 子控件设置属性
android:layout_column:显示在第几列android:layout_span:横向跨几列更多详见:2.2.3 TableLayout(表格布局) | 菜鸟教程 (runoob.com)
XML代码:
<?xml version="1.0" encoding="utf-8"?><TableLayout xmlns:android="http://schemas.android.com/apk/res/android" android:layout_width="match_parent" android:layout_height="match_parent"> <TableRow> <Button android:layout_width="wrap_content" android:layout_height="wrap_content" android:text="第0个"/> <Button android:layout_width="wrap_content" android:layout_height="wrap_content" android:text="第1个"/> <Button android:layout_width="wrap_content" android:layout_height="wrap_content" android:text="第2个"/> <Button android:layout_width="wrap_content" android:layout_height="wrap_content" android:text="第3个"/> </TableRow> <TableRow> <Button android:layout_column="1" android:layout_span="2" android:layout_width="wrap_content" android:layout_height="wrap_content" android:text="第0个"/> <Button android:layout_width="wrap_content" android:layout_height="wrap_content" android:text="第1个"/> <Button android:layout_width="wrap_content" android:layout_height="wrap_content" android:text="第2个"/> <Button android:layout_width="wrap_content" android:layout_height="wrap_content" android:text="第3个"/> </TableRow></TableLayout>运行效果图: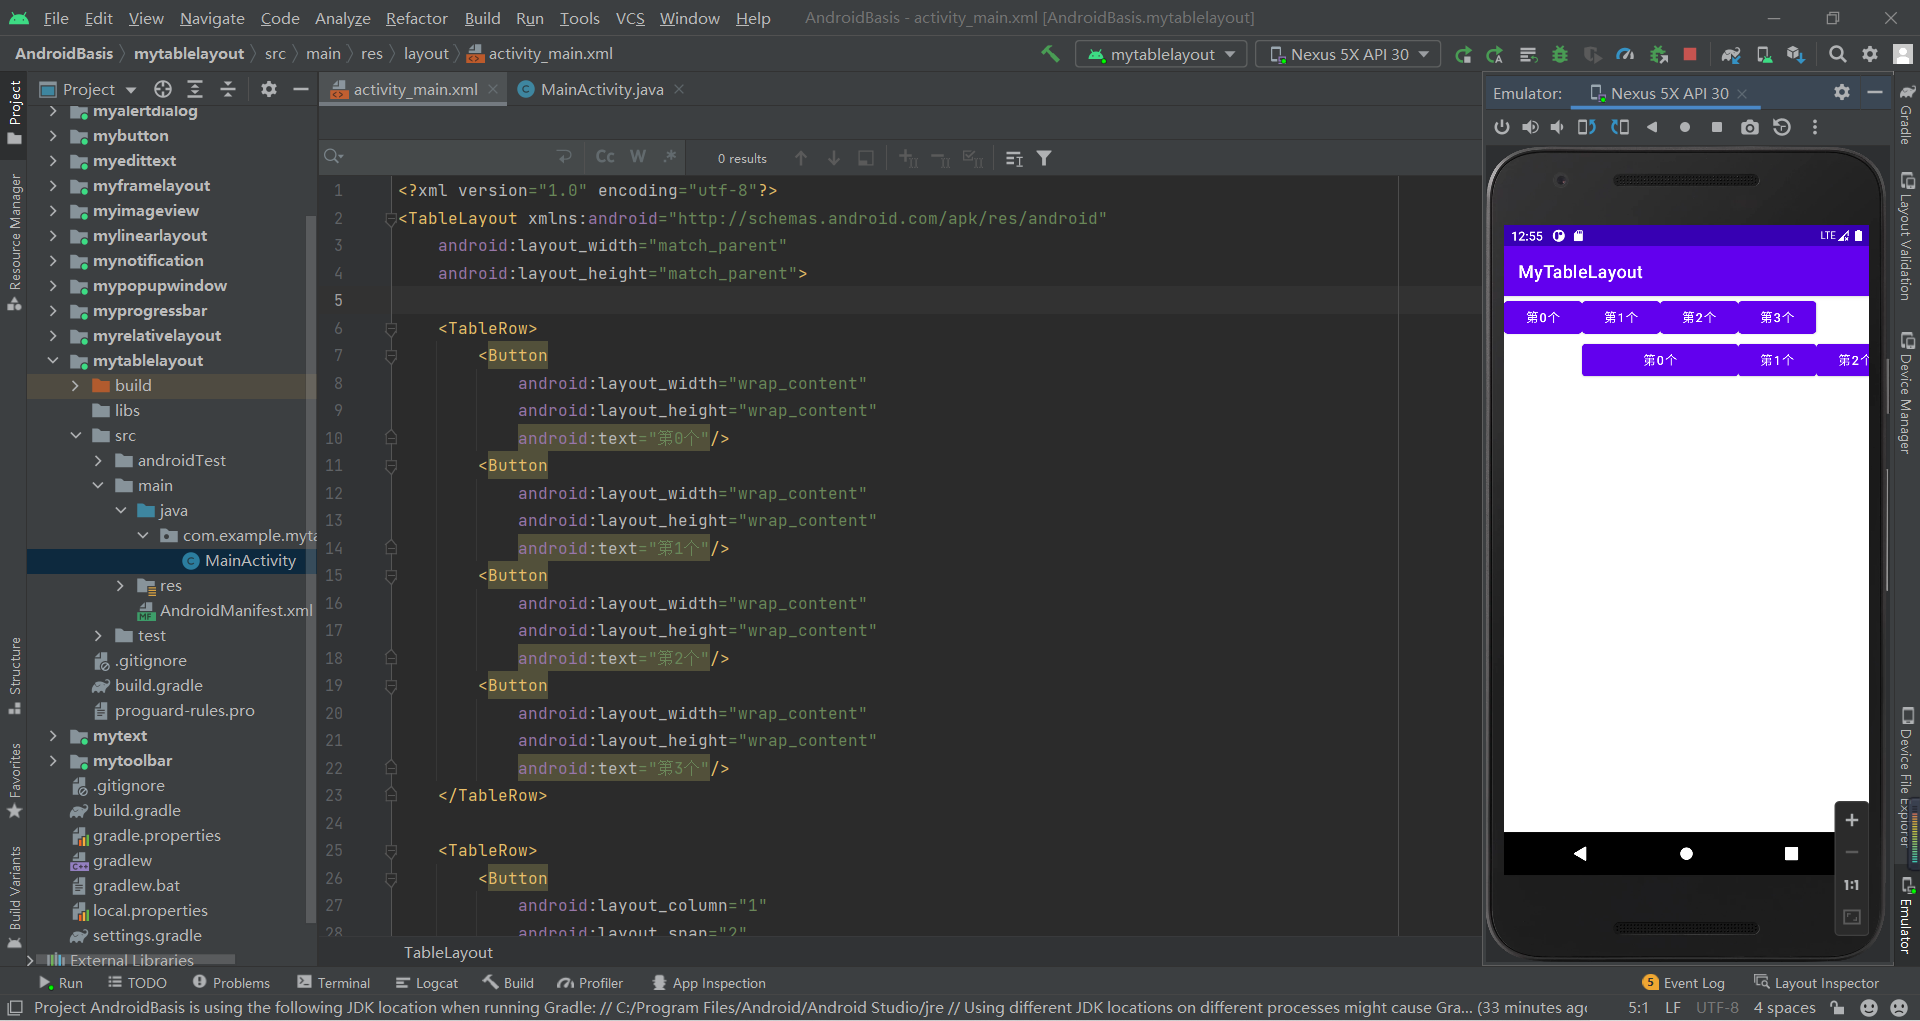
3.4 FrameLayout(帧布局)
3.4.1 常用属性
android:foreground设置前景android:foregroundGravity设置前景位置更多详见:2.2.4 FrameLayout(帧布局) | 菜鸟教程 (runoob.com)
XML代码:
<?xml version="1.0" encoding="utf-8"?><FrameLayout xmlns:android="http://schemas.android.com/apk/res/android" android:layout_width="match_parent" android:layout_height="match_parent"> <FrameLayout android:layout_width="400dp" android:layout_height="400dp" android:background="#FF0000"/> <FrameLayout android:layout_width="300dp" android:layout_height="300dp" android:background="#00FF00" android:foreground="@drawable/ceshi" android:foregroundGravity="right|bottom"/> <FrameLayout android:layout_width="200dp" android:layout_height="200dp" android:background="#0000FF"/></FrameLayout>运行效果图: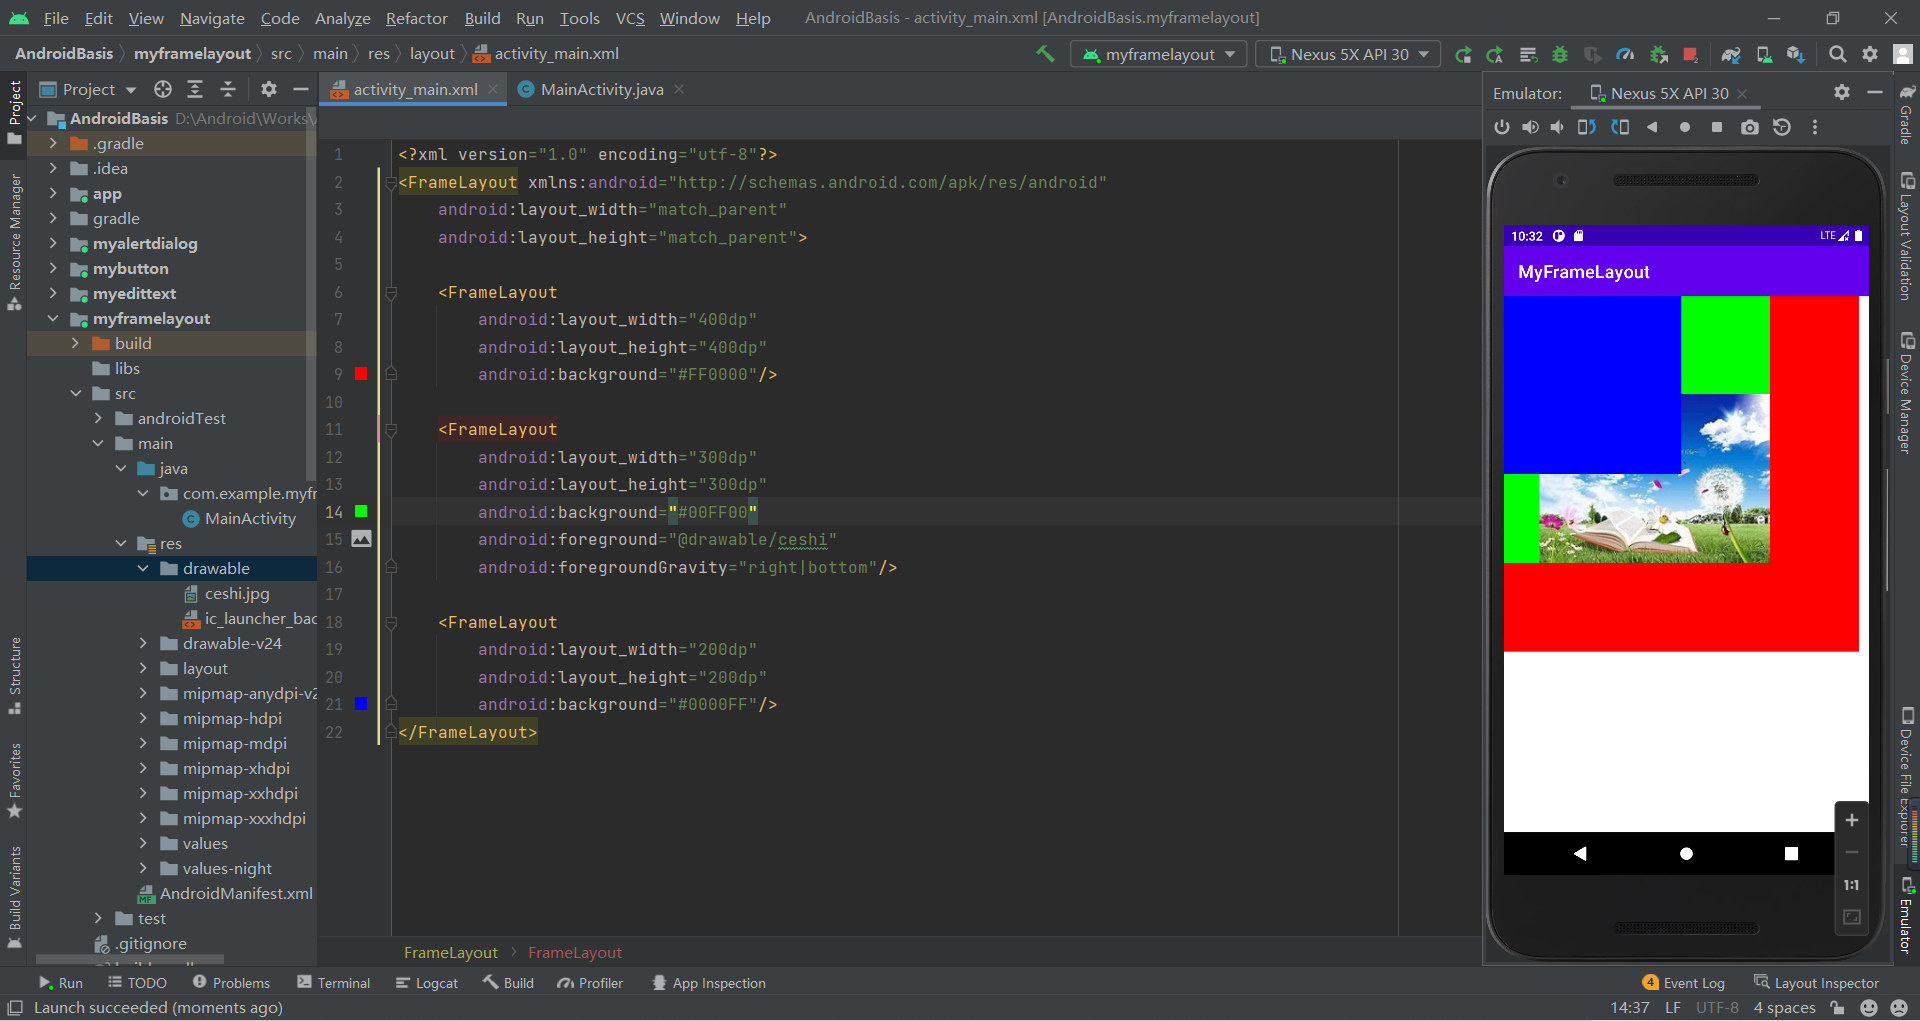
3.5 GridLayout(网格布局)
3.5.1 常见属性
android:orientation:设置水平显示还是垂直显示android:columnCount:设置行的显示个数android:rowCount:设置列的显示个数3.5.2 子控件属性
android:layout_column:显示在第几列android:layout_columnSpan:横向跨几列android:layout_columnWeight:横向剩余空间分配方式android:layout_gravity:在网格中的显示位置android:layout_row:显示在第几行android:layout_rowSpan:横向跨几行android:layout_rowWeight:纵向剩余空间分配方式更多详见:2.2.5 GridLayout(网格布局) | 菜鸟教程 (runoob.com)
XML代码:
<?xml version="1.0" encoding="utf-8"?><GridLayout xmlns:android="http://schemas.android.com/apk/res/android" android:columnCount="2" android:layout_width="match_parent" android:layout_height="match_parent"> <Button android:layout_width="wrap_content" android:layout_height="wrap_content" android:text="第0个"/> <Button android:layout_width="wrap_content" android:layout_height="wrap_content" android:text="第1个"/> <Button android:layout_width="wrap_content" android:layout_height="wrap_content" android:layout_column="1" android:layout_row="1" android:text="第2个"/> <Button android:layout_width="wrap_content" android:layout_height="wrap_content" android:layout_rowWeight="1" android:text="第3个"/> <Button android:layout_width="wrap_content" android:layout_height="wrap_content" android:text="第4个"/></GridLayout>运行效果图: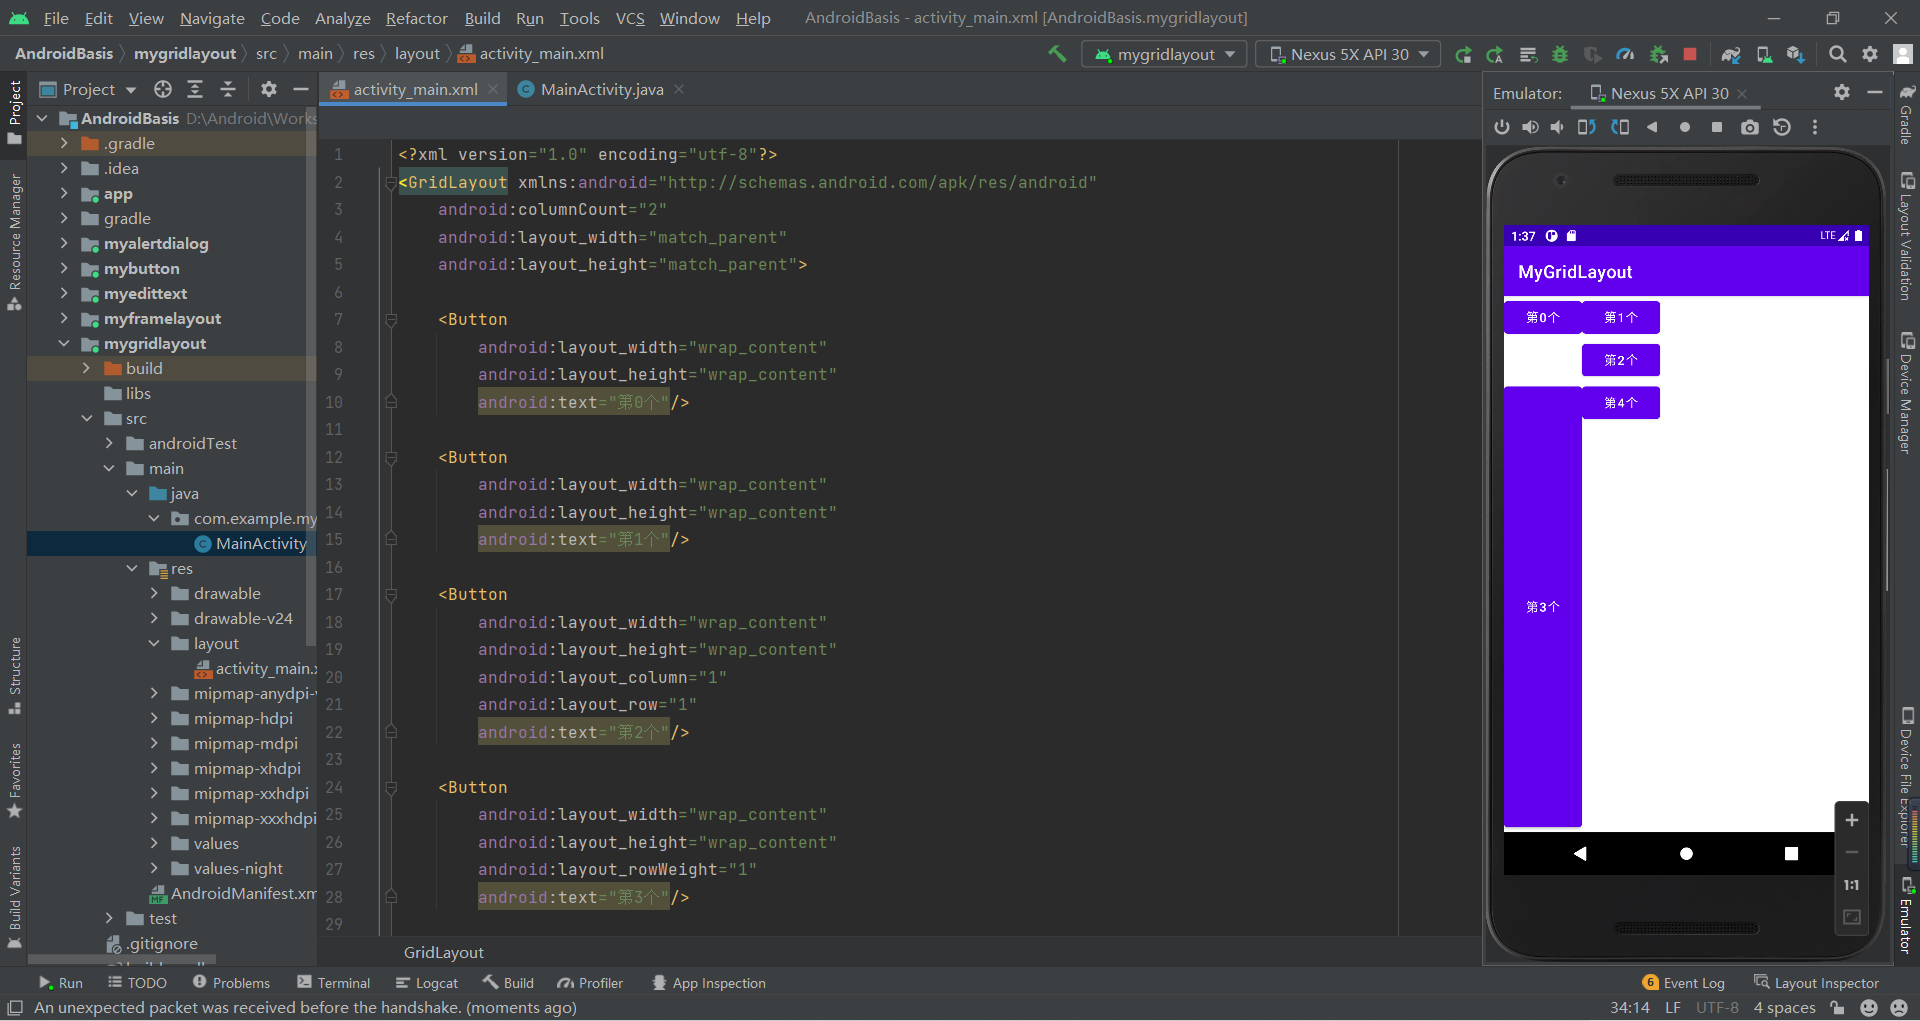
第4章 ConstraintLayout(约束布局)
ConstraintLayout采用方向约束的方式对控件进行定位,至少要保证水平和垂直方向都至少有一个约束才能确定控件的位置
4.1 布局的分类
4.1.1 相对定位
我自己的XX位置和谁的YY位置对齐
注意:前四个不能与后四个的对应(Left-->Start、Right-->End)效果相同,但是它们不能交叉使用,否则后者无效果,后面内容同理
XML代码:
<?xml version="1.0" encoding="utf-8"?><androidx.constraintlayout.widget.ConstraintLayout xmlns:android="http://schemas.android.com/apk/res/android" android:layout_width="match_parent" android:layout_height="match_parent" xmlns:app="http://schemas.android.com/apk/res-auto"> <TextView android:id="@+id/tv1" android:layout_width="wrap_content" android:layout_height="wrap_content" android:text="20" android:textColor="@color/black" android:textSize="50sp" android:textStyle="bold" app:layout_constraintStart_toStartOf="parent" app:layout_constraintTop_toTopOf="parent" /> <TextView android:id="@+id/tv2" android:layout_width="wrap_content" android:layout_height="wrap_content" android:text="¥" android:textColor="@color/black" android:textSize="20sp" app:layout_constraintBaseline_toBaselineOf="@id/tv1" app:layout_constraintStart_toEndOf="@id/tv1" /></androidx.constraintlayout.widget.ConstraintLayout>运行效果图: 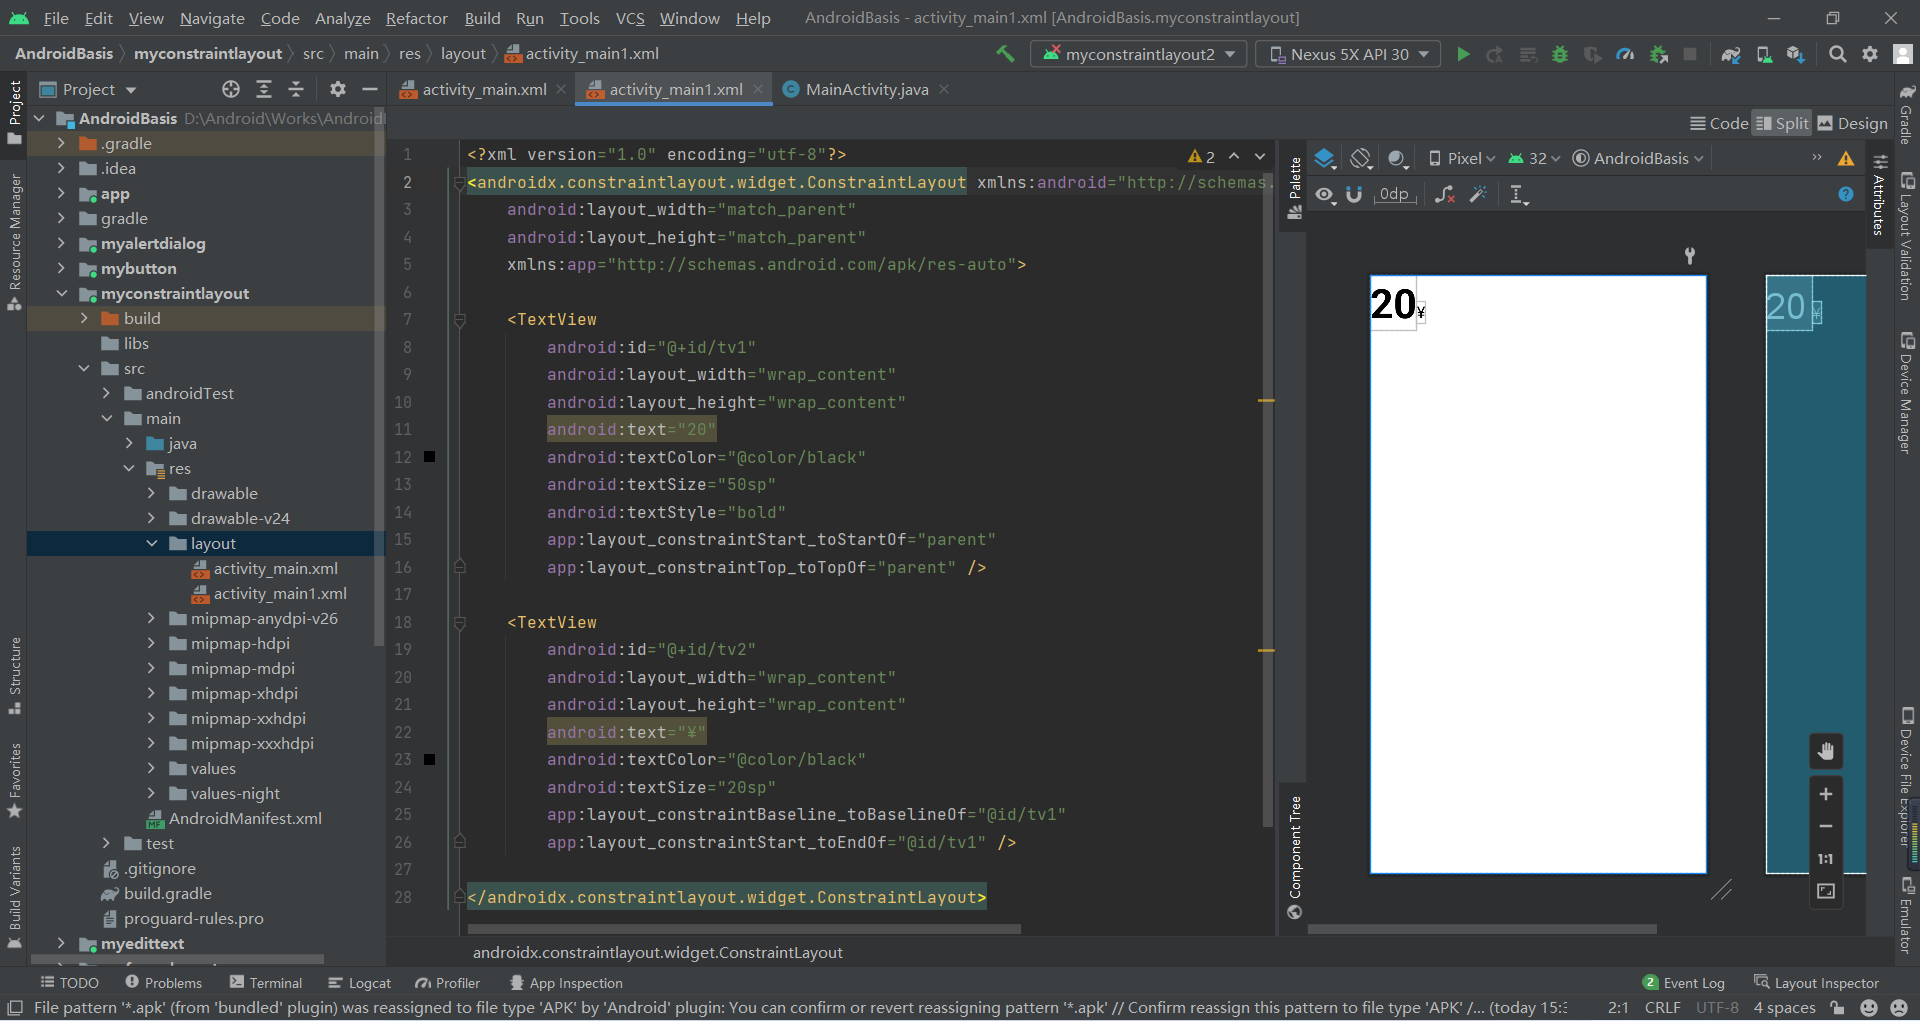
4.1.2 外边距、内边距及goneMargin
外边距(margin):
android:layout_marginandroid:layout_marginLeftandroid:layout_marginTopandroid:layout_marginRightandroid:layout_marginBottomandroid:layout_marginStartandroid:layout_marginEnd内边距(padding):
android:paddingandroid:paddingLeftandroid:paddingTopandroid:paddingRightandroid:paddingBottomandroid:paddingStartandroid:paddingEndgoneMargin:
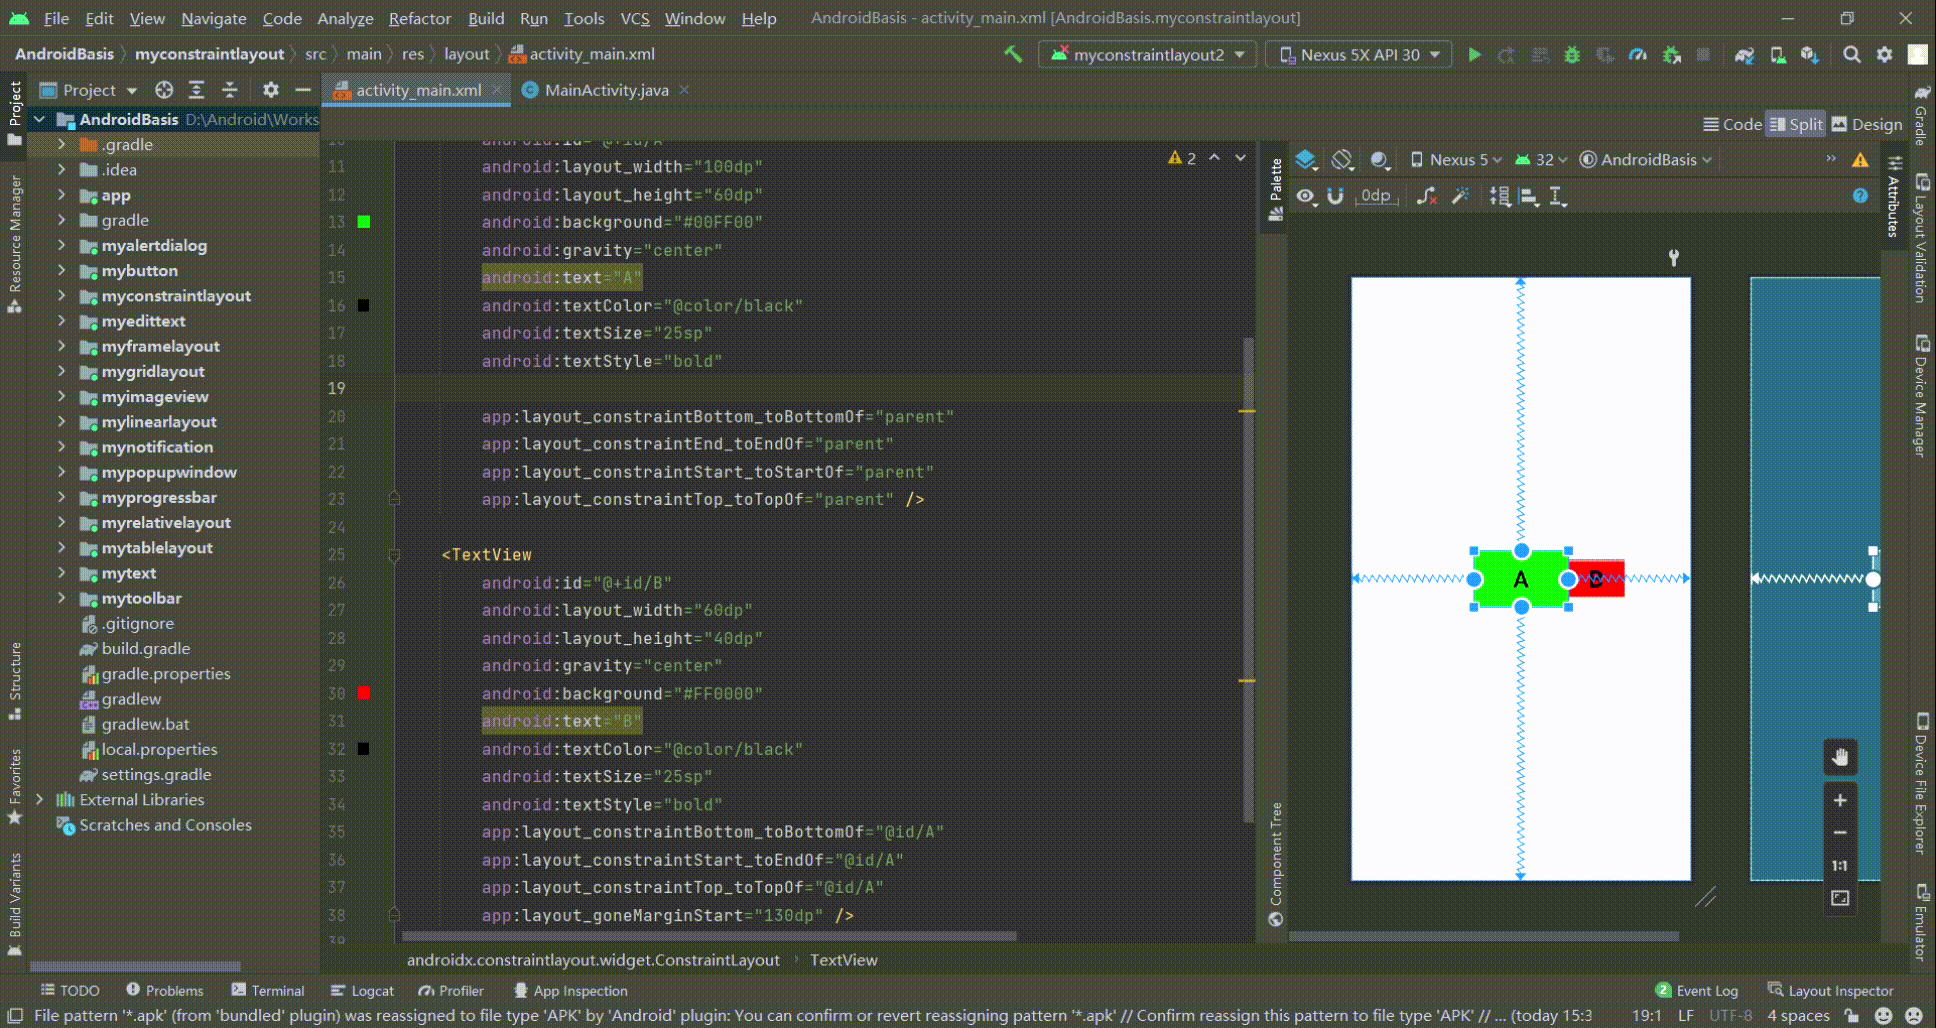
goneMargin是一个依赖于目标的属性,当依赖的目标隐藏(android:visibility="gone")时才会生效,例如A被B依赖约束,当A隐藏时B设置的goneMargin就会生效,为不影响布局,往往会为B控件设置goneMargin,属性如下:
layout_goneMarginLeftlayout_goneMarginToplayout_goneMarginRightlayout_goneMarginBottomlayout_goneMarginStartlayout_goneMarginEndXML代码:
<?xml version="1.0" encoding="utf-8"?><androidx.constraintlayout.widget.ConstraintLayout xmlns:android="http://schemas.android.com/apk/res/android" xmlns:app="http://schemas.android.com/apk/res-auto" xmlns:tools="http://schemas.android.com/tools" android:layout_width="match_parent" android:layout_height="match_parent" tools:context=".MainActivity"> <TextView android:id="@+id/A" android:layout_width="100dp" android:layout_height="60dp" android:background="#00FF00" android:gravity="center" android:text="A" android:textColor="@color/black" android:textSize="25sp" android:textStyle="bold"android:visibility="gone" app:layout_constraintBottom_toBottomOf="parent" app:layout_constraintEnd_toEndOf="parent" app:layout_constraintStart_toStartOf="parent" app:layout_constraintTop_toTopOf="parent" /> <TextView android:id="@+id/B" android:layout_width="60dp" android:layout_height="40dp" android:gravity="center" android:background="#FF0000" android:text="B" android:textColor="@color/black" android:textSize="25sp" android:textStyle="bold" app:layout_constraintBottom_toBottomOf="@id/A" app:layout_constraintStart_toEndOf="@id/A" app:layout_constraintTop_toTopOf="@id/A" app:layout_goneMarginStart="130dp" /></androidx.constraintlayout.widget.ConstraintLayout>运行效果:
4.1.3 偏移
layout_constraintHorizontal_bias:水平偏移,默认值0.5(水平居中)layout_constraintVertical_bias:垂直偏移,默认值0.5(垂直居中)4.1.4 角度约束
app:layout_constraintCircle:目标控件idapp:layout_constraintCircleRadius:到目标中心的距离app:layout_constraintCircleAngle:对于目标的角度(0-360),正上方为04.1.5 尺寸约束及0dp值
约束控件的最小、最大尺寸:
android:minwidthandroid:minHeightandroid:maxWidthandroid:maxHeight控件大小的0dp值:
设置控件的大小除了传统的wrap_content 、指定具体尺寸、match_parent 外,ConstraintLayout还可以设置为0dp (MATCH_CONSTRAINT),并且 0dp的作用会根据设置的类型而产生不同的作用,进行设置类型的属性是:
layout_constraintWidth_default:水平方向控制layout_constraintHeight_default:垂直方向控制其属性可取值如下:
spread(默认):固定占用所有符合约束限制的空间,内容占用的空间不会侵占margin部分wrap:匹配内容大小但不超过约束限制,内容占用的空间不会侵占margin部分percent:父布局尺寸的一定比例,该模式需要配合layout_constrainWidth_prcent使用,但是写了layout_constrainWidth_prcent后,layout_constraintWidth_default="percent"其实就可以省略掉了,内容占用的空间不够时会侵占margin部分。注意:当空间的尺寸设置成wrap_content时内容占用的空间会去侵占margin部分,可通过以下属性是否强制限制
app:layout_constrainedWidth="true|false"app:layout_constrainedHeight="true|false"0dp下的其他属性值:
layout_constraintWidth_min和layout_constraintHeight_min:设置维度的最小大小layout_constraintWidth_max和layout_constraintHeight_max:设置维度的最大大小layout_constraintWidth_percent和layout_constraintHeight_percent:会将维度的大小设置为父维度的百分比XML代码:
<?xml version="1.0" encoding="utf-8"?><androidx.constraintlayout.widget.ConstraintLayout xmlns:android="http://schemas.android.com/apk/res/android" android:layout_width="match_parent" android:layout_height="match_parent" xmlns:app="http://schemas.android.com/apk/res-auto"> <TextView android:id="@+id/A1" android:layout_width="0dp" android:layout_height="50dp" android:layout_marginStart="100dp" android:layout_marginTop="30dp" android:layout_marginEnd="100dp" android:background="#0FF0F0" android:gravity="center" android:text="spread" android:textColor="@color/black" android:textStyle="bold" app:layout_constraintEnd_toEndOf="parent" app:layout_constraintStart_toStartOf="parent" app:layout_constraintTop_toTopOf="parent" app:layout_constraintWidth_default="spread" /> <TextView android:id="@+id/A2" android:layout_width="0dp" android:layout_height="50dp" android:layout_marginStart="100dp" android:layout_marginTop="100dp" android:layout_marginEnd="100dp" android:background="#0FF0F0" android:gravity="center" android:text="app:layout_constraintWidth_defaultspread" android:textColor="@color/black" android:textStyle="bold" app:layout_constraintEnd_toEndOf="parent" app:layout_constraintStart_toStartOf="parent" app:layout_constraintTop_toTopOf="parent" app:layout_constraintWidth_default="spread" /> <TextView android:id="@+id/B1" android:layout_width="0dp" android:layout_height="50dp" android:layout_marginStart="100dp" android:layout_marginTop="180dp" android:layout_marginEnd="100dp" android:background="#0FF0F0" android:gravity="center" android:text="wrap" android:textColor="@color/black" android:textStyle="bold" app:layout_constraintEnd_toEndOf="parent" app:layout_constraintStart_toStartOf="parent" app:layout_constraintTop_toTopOf="parent" app:layout_constraintWidth_default="wrap" /> <TextView android:id="@+id/B2" android:layout_width="0dp" android:layout_height="50dp" android:layout_marginStart="100dp" android:layout_marginTop="260dp" android:layout_marginEnd="100dp" android:background="#0FF0F0" android:gravity="center" android:text="app:layout_constraintWidth_default=wrap" android:textColor="@color/black" android:textStyle="bold" app:layout_constraintEnd_toEndOf="parent" app:layout_constraintStart_toStartOf="parent" app:layout_constraintTop_toTopOf="parent" app:layout_constraintWidth_default="wrap" /> <TextView android:id="@+id/C1" android:layout_width="0dp" android:layout_height="50dp" android:layout_marginStart="100dp" android:layout_marginTop="340dp" android:layout_marginEnd="100dp" android:background="#0FF0F0" android:gravity="center" android:text="percent" android:textColor="@color/black" android:textStyle="bold" app:layout_constraintEnd_toEndOf="parent" app:layout_constraintStart_toStartOf="parent" app:layout_constraintTop_toTopOf="parent" app:layout_constraintWidth_default="percent"/> <TextView android:id="@+id/C2" android:layout_width="0dp" android:layout_height="50dp" android:layout_marginStart="100dp" android:layout_marginTop="420dp" android:layout_marginEnd="100dp" android:background="#0FF0F0" android:gravity="center" android:text="app:layout_constraintWidth_default=percent" android:textColor="@color/black" android:textStyle="bold" app:layout_constraintEnd_toEndOf="parent" app:layout_constraintStart_toStartOf="parent" app:layout_constraintTop_toTopOf="parent" app:layout_constraintWidth_default="percent"/> <TextView android:id="@+id/C3" android:layout_width="0dp" android:layout_height="50dp" android:layout_marginStart="100dp" android:layout_marginTop="500dp" android:layout_marginEnd="100dp" android:background="#0FF0F0" android:gravity="center" android:text="app:layout_constraintWidth_percent=0.5" android:textColor="@color/black" android:textStyle="bold" app:layout_constraintEnd_toEndOf="parent" app:layout_constraintStart_toStartOf="parent" app:layout_constraintTop_toTopOf="parent" app:layout_constraintWidth_percent="0.5"/></androidx.constraintlayout.widget.ConstraintLayout>运行效果: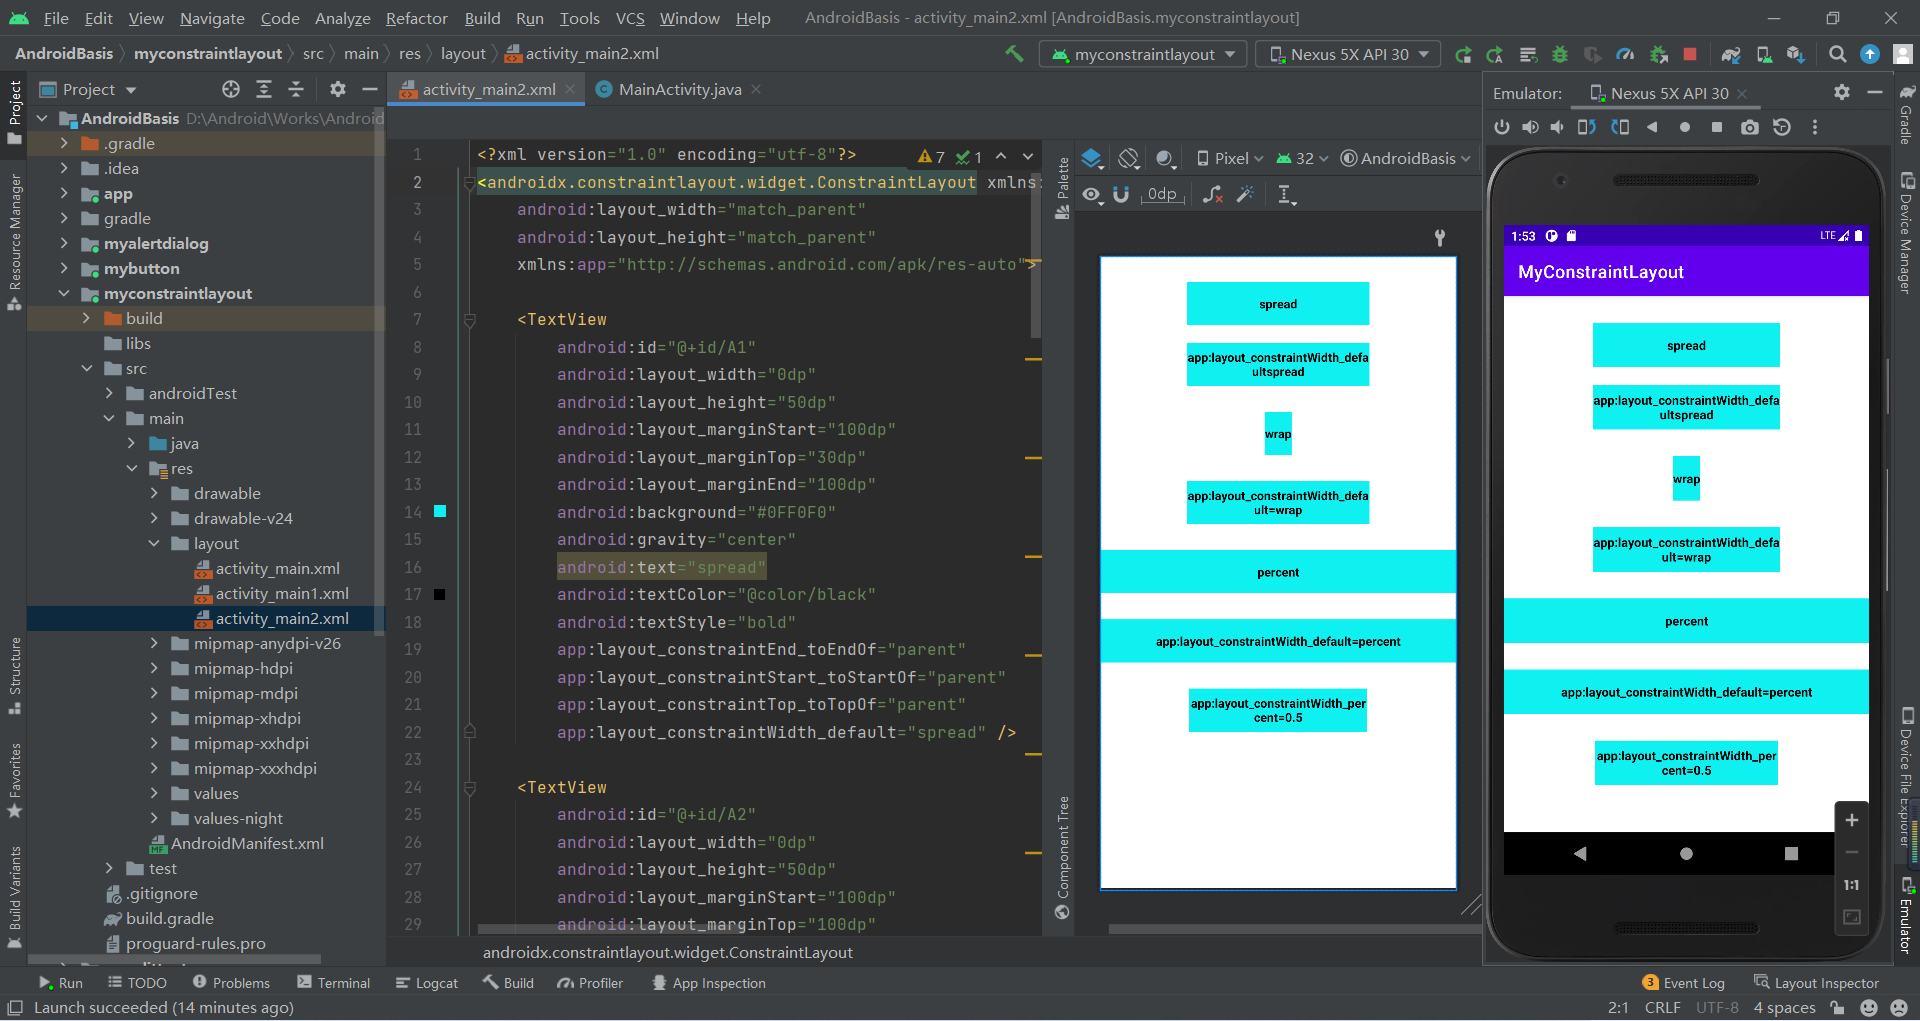
4.1.6 宽高比例约束(Ratio)
ConstraintLayout中可以对宽高设置比例,前提是至少有一个约束维度设置为0dp,这样比例才会生效,若两个都设置为0dp则以父元素的宽作为参考,该属性可使用两种设置:
app:layout_constraintDimensionRatio="宽度:高度":表示宽度和高度之间形式的比率app:layout_constraintDimensionRatio="浮点值":表示宽度和高度之间的比率注意:两个属性都有两个参数,第一个参数(W/H)可以省略,W表示宽度通过壁纸计算得来,H表示高度通过壁纸计算得来
XML代码:
<?xml version="1.0" encoding="utf-8"?><androidx.constraintlayout.widget.ConstraintLayout xmlns:android="http://schemas.android.com/apk/res/android" android:layout_width="match_parent" android:layout_height="match_parent" xmlns:app="http://schemas.android.com/apk/res-auto"> <TextView android:id="@+id/A" android:layout_width="160dp" android:layout_height="0dp" android:background="#00FF00" android:gravity="center" android:text="A" android:textColor="@color/black" android:textSize="25sp" android:textStyle="bold" app:layout_constraintDimensionRatio="16:9" app:layout_constraintStart_toStartOf="parent" app:layout_constraintEnd_toEndOf="parent" app:layout_constraintTop_toTopOf="parent" /></androidx.constraintlayout.widget.ConstraintLayout>运行效果图:
4.1.7 Chains(链)
Chains(链)它是将许多个控件在水平或者垂直方向,形成一条链,用于平衡这些控件的位置,设置成链的方式如下:
layout_constraintHorizontal_chainStyle:水平成链layout_constraintVertical_chainStyle:垂直成链 可以属性如下:
Chains(链)还支持weight(权重)的配置,使用如下属性进行设置链元素的权重:
layout_constraintHorizontal_weight:水平方向权重分配layout_constraintVertical_weight:垂直方向权重分配 注意:若需要进行权重设置,则该方向的上的尺寸设置为0dp
Chains(链)还支持bias(偏移)的配置,使用如下属性进行设置链元素的偏移:
layout_constraintHorizontal_bias:水平方向偏移,0.5表示居中layout_constraintVertical_bias:垂直方向的偏移,0.5表示居中 组合使用: 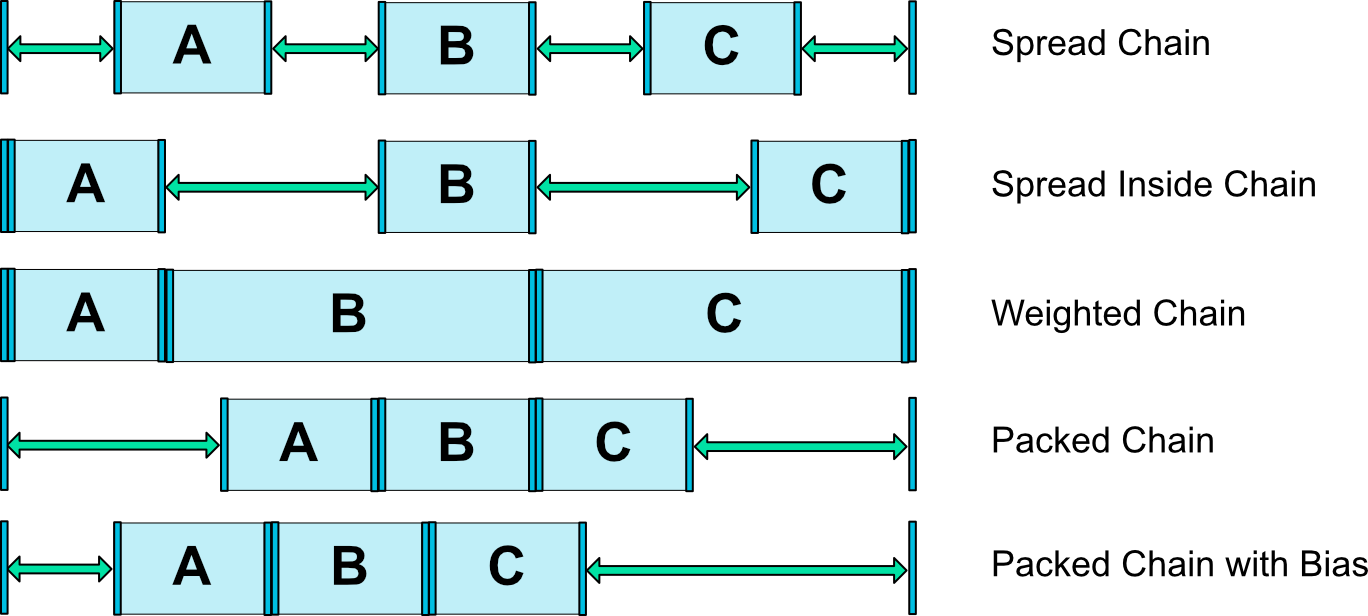
XML代码:
<?xml version="1.0" encoding="utf-8"?><androidx.constraintlayout.widget.ConstraintLayout xmlns:android="http://schemas.android.com/apk/res/android" android:layout_width="match_parent" android:layout_height="match_parent" xmlns:app="http://schemas.android.com/apk/res-auto"> <TextView android:id="@+id/A" android:layout_width="80dp" android:layout_height="80dp" android:background="#00FF00" android:gravity="center" android:text="A" android:textColor="@color/black" android:textSize="25sp" android:textStyle="bold" app:layout_constraintHorizontal_chainStyle="spread" app:layout_constraintStart_toStartOf="parent" app:layout_constraintEnd_toStartOf="@id/B" app:layout_constraintTop_toTopOf="parent" /> <TextView android:id="@+id/B" android:layout_width="80dp" android:layout_height="80dp" android:background="#00FF00" android:gravity="center" android:text="B" android:textColor="@color/black" android:textSize="25sp" android:textStyle="bold" app:layout_constraintStart_toEndOf="@id/A" app:layout_constraintEnd_toStartOf="@id/C" app:layout_constraintTop_toTopOf="parent" /> <TextView android:id="@+id/C" android:layout_width="80dp" android:layout_height="80dp" android:background="#00FF00" android:gravity="center" android:text="C" android:textColor="@color/black" android:textSize="25sp" android:textStyle="bold" app:layout_constraintStart_toEndOf="@id/B" app:layout_constraintEnd_toEndOf="parent" app:layout_constraintTop_toTopOf="parent" /> <TextView android:id="@+id/A1" android:layout_width="80dp" android:layout_height="80dp" android:layout_marginTop="100dp" android:background="#00FF00" android:gravity="center" android:text="A1" android:textColor="@color/black" android:textSize="25sp" android:textStyle="bold" app:layout_constraintHorizontal_chainStyle="spread_inside" app:layout_constraintStart_toStartOf="parent" app:layout_constraintEnd_toStartOf="@id/B1" app:layout_constraintTop_toTopOf="parent" /> <TextView android:id="@+id/B1" android:layout_width="80dp" android:layout_height="80dp" android:background="#00FF00" android:layout_marginTop="100dp" android:gravity="center" android:text="B1" android:textColor="@color/black" android:textSize="25sp" android:textStyle="bold" app:layout_constraintStart_toEndOf="@id/A1" app:layout_constraintEnd_toStartOf="@id/C1" app:layout_constraintTop_toTopOf="parent" /> <TextView android:id="@+id/C1" android:layout_width="80dp" android:layout_height="80dp" android:background="#00FF00" android:layout_marginTop="100dp" android:gravity="center" android:text="C1" android:textColor="@color/black" android:textSize="25sp" android:textStyle="bold" app:layout_constraintStart_toEndOf="@id/B1" app:layout_constraintEnd_toEndOf="parent" app:layout_constraintTop_toTopOf="parent" /> <TextView android:id="@+id/A2" android:layout_width="0dp" android:layout_height="80dp" android:layout_marginTop="200dp" android:background="#00FF00" android:gravity="center" android:text="A2" android:textColor="@color/black" android:textSize="25sp" android:textStyle="bold" app:layout_constraintHorizontal_weight="1" app:layout_constraintStart_toStartOf="parent" app:layout_constraintEnd_toStartOf="@id/B2" app:layout_constraintTop_toTopOf="parent" /> <TextView android:id="@+id/B2" android:layout_width="0dp" android:layout_height="80dp" android:background="#00FF00" android:layout_marginTop="200dp" android:gravity="center" android:text="B2" android:textColor="@color/black" android:textSize="25sp" android:textStyle="bold" app:layout_constraintHorizontal_weight="2" app:layout_constraintStart_toEndOf="@id/A2" app:layout_constraintEnd_toStartOf="@id/C2" app:layout_constraintTop_toTopOf="parent" /> <TextView android:id="@+id/C2" android:layout_width="0dp" android:layout_height="80dp" android:background="#00FF00" android:layout_marginTop="200dp" android:gravity="center" android:text="C2" android:textColor="@color/black" android:textSize="25sp" android:textStyle="bold" app:layout_constraintHorizontal_weight="2" app:layout_constraintStart_toEndOf="@id/B2" app:layout_constraintEnd_toEndOf="parent" app:layout_constraintTop_toTopOf="parent" /> <TextView android:id="@+id/A3" android:layout_width="80dp" android:layout_height="80dp" android:layout_marginTop="300dp" android:background="#00FF00" android:gravity="center" android:text="A3" android:textColor="@color/black" android:textSize="25sp" android:textStyle="bold" app:layout_constraintHorizontal_chainStyle="packed" app:layout_constraintStart_toStartOf="parent" app:layout_constraintEnd_toStartOf="@id/B3" app:layout_constraintTop_toTopOf="parent" /> <TextView android:id="@+id/B3" android:layout_width="80dp" android:layout_height="80dp" android:background="#00FF00" android:layout_marginTop="300dp" android:gravity="center" android:text="B3" android:textColor="@color/black" android:textSize="25sp" android:textStyle="bold" app:layout_constraintStart_toEndOf="@id/A3" app:layout_constraintEnd_toStartOf="@id/C3" app:layout_constraintTop_toTopOf="parent" /> <TextView android:id="@+id/C3" android:layout_width="80dp" android:layout_height="80dp" android:background="#00FF00" android:layout_marginTop="300dp" android:gravity="center" android:text="C3" android:textColor="@color/black" android:textSize="25sp" android:textStyle="bold" app:layout_constraintStart_toEndOf="@id/B3" app:layout_constraintEnd_toEndOf="parent" app:layout_constraintTop_toTopOf="parent" /> <TextView android:id="@+id/A4" android:layout_width="80dp" android:layout_height="80dp" android:layout_marginTop="400dp" android:background="#00FF00" android:gravity="center" android:text="A4" android:textColor="@color/black" android:textSize="25sp" android:textStyle="bold" app:layout_constraintHorizontal_chainStyle="packed" app:layout_constraintHorizontal_bias="0.3" app:layout_constraintStart_toStartOf="parent" app:layout_constraintEnd_toStartOf="@id/B4" app:layout_constraintTop_toTopOf="parent" /> <TextView android:id="@+id/B4" android:layout_width="80dp" android:layout_height="80dp" android:background="#00FF00" android:layout_marginTop="400dp" android:gravity="center" android:text="B4" android:textColor="@color/black" android:textSize="25sp" android:textStyle="bold" app:layout_constraintStart_toEndOf="@id/A4" app:layout_constraintEnd_toStartOf="@id/C4" app:layout_constraintTop_toTopOf="parent" /> <TextView android:id="@+id/C4" android:layout_width="80dp" android:layout_height="80dp" android:background="#00FF00" android:layout_marginTop="400dp" android:gravity="center" android:text="C4" android:textColor="@color/black" android:textSize="25sp" android:textStyle="bold" app:layout_constraintStart_toEndOf="@id/B4" app:layout_constraintEnd_toEndOf="parent" app:layout_constraintTop_toTopOf="parent" /></androidx.constraintlayout.widget.ConstraintLayout>运行效果图: 
4.2 辅助类
ConstraintLayout为了解决嵌套问题还提供了一系列的辅助控件帮助开发者布局
4.2.1 Guideline(参考线)
Guideline是一条参考线,可以帮助开发者进行辅助定位,它并不会真正显示在布局中,像是数学几何中的辅助线一样
XML代码:
<?xml version="1.0" encoding="utf-8"?><androidx.constraintlayout.widget.ConstraintLayout xmlns:android="http://schemas.android.com/apk/res/android" xmlns:app="http://schemas.android.com/apk/res-auto" android:layout_width="match_parent" android:layout_height="match_parent"> <TextView android:id="@+id/A" android:layout_width="120dp" android:layout_height="80dp" android:background="#00FF00" android:gravity="center" android:text="A" android:textColor="@color/black" android:textSize="25sp" android:textStyle="bold" app:layout_constraintStart_toStartOf="@+id/guideline1" app:layout_constraintTop_toTopOf="@+id/guideline2" /> <androidx.constraintlayout.widget.Guideline android:id="@+id/guideline1" android:layout_width="wrap_content" android:layout_height="wrap_content" android:orientation="vertical" app:layout_constraintGuide_begin="60dp" /> <androidx.constraintlayout.widget.Guideline android:id="@+id/guideline2" android:layout_width="wrap_content" android:layout_height="wrap_content" android:orientation="horizontal" app:layout_constraintGuide_begin="120dp" /></androidx.constraintlayout.widget.ConstraintLayout>运行效果图: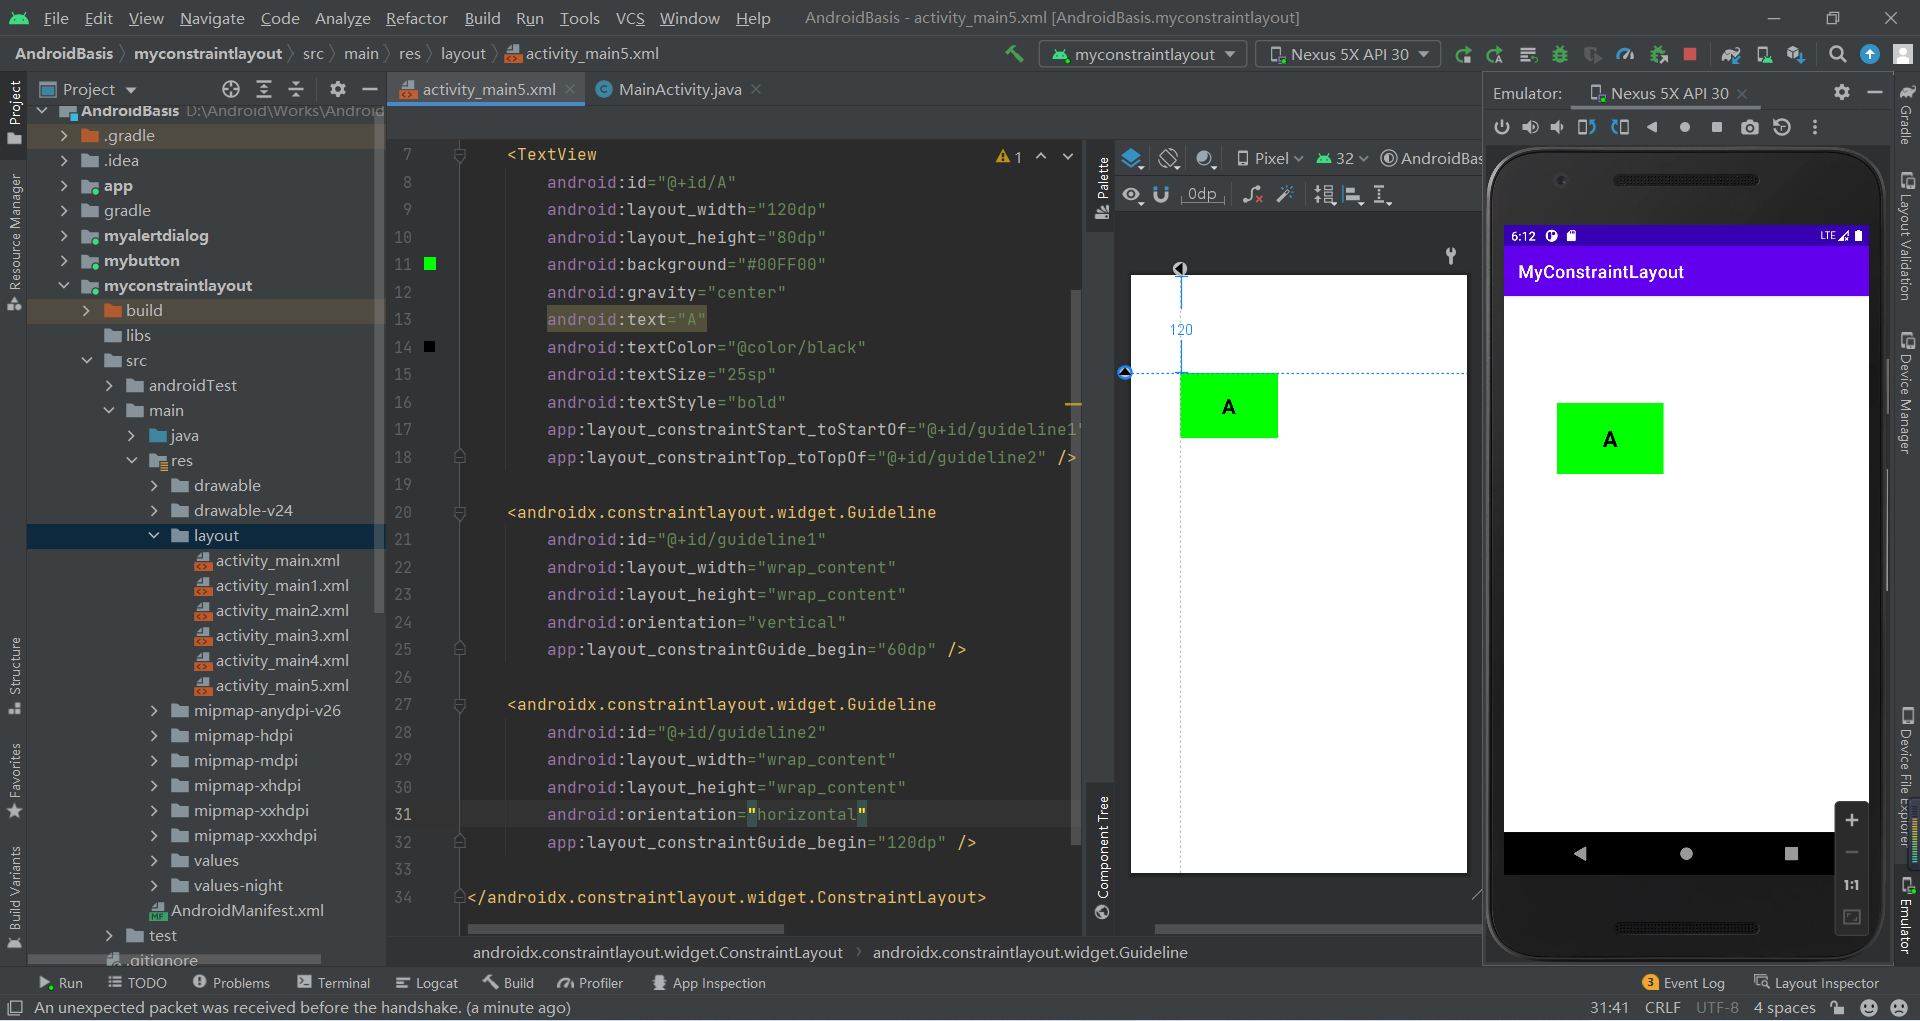
4.2.2 Barrier(屏障)
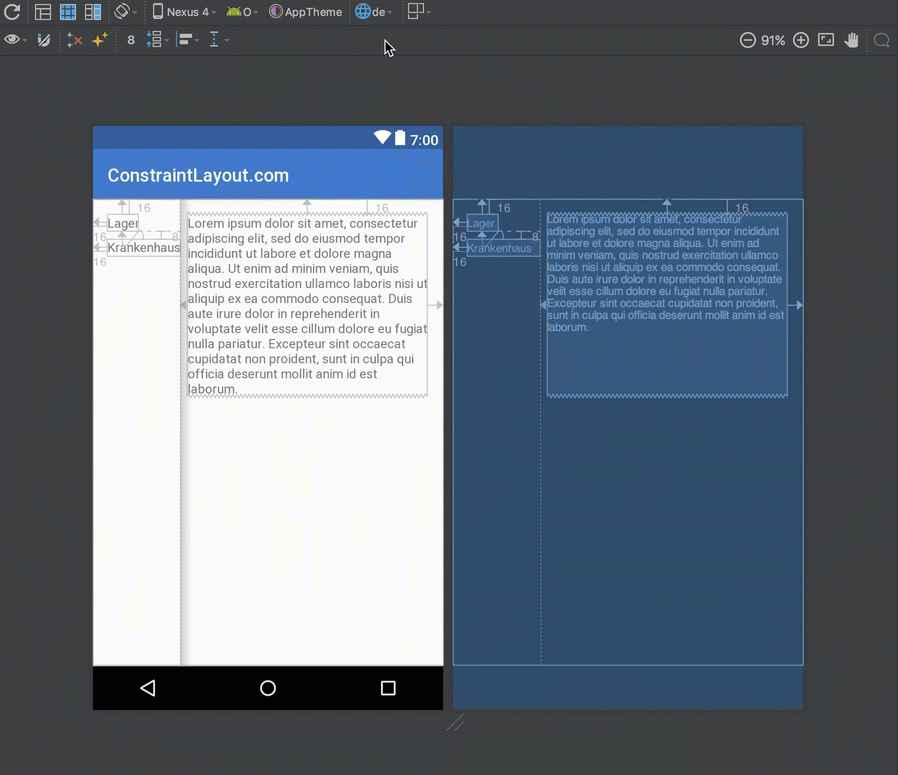
当我们创建Android布局时,有时我们会遇到布局可以根据本地化而变化的情况。下面是一个来自于约束布局 (constraintlayout.com)非常简单的示例:
这里有三个文本视图:左边的textView1和textView2;右边的textView3。textView3被限制在textView1的末尾,这工作得很好——它完全根据我们需要来定位和大小textView3。然而,如果我们需要支持多种语言,事情会变得更加复杂。如果我们添加德语翻译,那么我们就会遇到一个问题,因为在英文版本中,textView1中的文本比textView2中的文本长,而在德语中,textView2中的文本比textView1长:
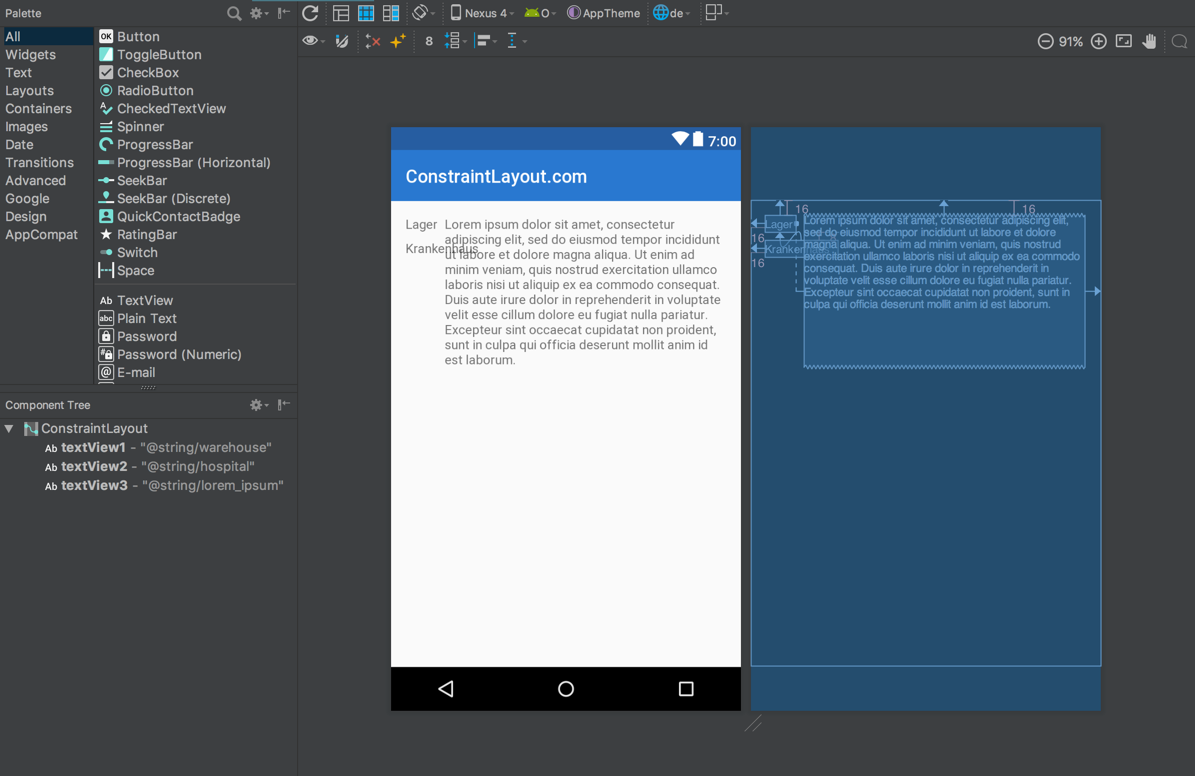
这里的问题在于textView3仍然是相对于textView1的,所以textView2直接插入了textView3中。在设计视图里看起来更明显(白色背景的那个)。比较直接的解决办法是使用TableLayout,或者把 textView1 & textView2 包裹在一个垂直的,android:layout_width="wrap_content" 的 LinearLayout中。然后让textView3约束在这个LinearLayout的后面。但是我们有更好的办法:Barriers。Barriers的配置属性如下:
4.2.3 Group(组)
ConstraintLayout中的Group的作用是对一组控件同时隐藏或显示,没有其他的作用,它的属性如下:
XML代码:
<?xml version="1.0" encoding="utf-8"?><androidx.constraintlayout.widget.ConstraintLayout xmlns:android="http://schemas.android.com/apk/res/android" android:layout_width="match_parent" android:layout_height="match_parent" xmlns:app="http://schemas.android.com/apk/res-auto"> <TextView android:id="@+id/A1" android:layout_width="100dp" android:layout_height="60dp" android:layout_marginTop="60dp" android:background="#0FF0F0" android:gravity="center" android:text="A1" android:textColor="@color/black" android:textSize="25sp" android:textStyle="bold" app:layout_constraintEnd_toEndOf="parent" app:layout_constraintHorizontal_bias="0.1" app:layout_constraintStart_toStartOf="parent" app:layout_constraintTop_toTopOf="parent" /> <TextView android:id="@+id/A2" android:layout_width="100dp" android:layout_height="60dp" android:layout_marginTop="160dp" android:background="#0FF0F0" android:gravity="center" android:text="A2" android:textColor="@color/black" android:textSize="25sp" android:textStyle="bold" app:layout_constraintEnd_toEndOf="parent" app:layout_constraintHorizontal_bias="0.1" app:layout_constraintStart_toStartOf="parent" app:layout_constraintTop_toTopOf="parent" /> <TextView android:id="@+id/B1" android:layout_width="100dp" android:layout_height="60dp" android:layout_marginTop="60dp" android:background="#0FF0F0" android:gravity="center" android:text="B2" android:textColor="@color/black" android:textSize="25sp" android:textStyle="bold" app:layout_constraintEnd_toEndOf="parent" app:layout_constraintHorizontal_bias="0.5" app:layout_constraintStart_toStartOf="parent" app:layout_constraintTop_toTopOf="parent" /> <TextView android:id="@+id/B2" android:layout_width="100dp" android:layout_height="60dp" android:layout_marginTop="60dp" android:background="#0FF0F0" android:gravity="center" android:text="B2" android:textColor="@color/black" android:textSize="25sp" android:textStyle="bold" app:layout_constraintEnd_toEndOf="parent" app:layout_constraintHorizontal_bias="0.9" app:layout_constraintStart_toStartOf="parent" app:layout_constraintTop_toTopOf="parent" /> <TextView android:id="@+id/B3" android:layout_width="100dp" android:layout_height="60dp" android:layout_marginTop="160dp" android:background="#0FF0F0" android:gravity="center" android:text="B2" android:textColor="@color/black" android:textSize="25sp" android:textStyle="bold" app:layout_constraintEnd_toEndOf="parent" app:layout_constraintHorizontal_bias="0.9" app:layout_constraintStart_toStartOf="parent" app:layout_constraintTop_toTopOf="parent" /> <androidx.constraintlayout.widget.Group android:id="@+id/group1" android:layout_width="wrap_content" android:layout_height="wrap_content" android:visibility="visible" app:constraint_referenced_ids="A1,A2" /> <androidx.constraintlayout.widget.Group android:id="@+id/group2" android:layout_width="wrap_content" android:layout_height="wrap_content" android:visibility="visible" app:constraint_referenced_ids="B1,B2,B3" /> <Button android:id="@+id/btn1" android:layout_width="wrap_content" android:layout_height="wrap_content" android:layout_marginStart="28dp" android:layout_marginTop="300dp" android:text="A组隐藏/显示" app:layout_constraintStart_toStartOf="parent" app:layout_constraintTop_toTopOf="parent" /> <Button android:id="@+id/btn2" android:layout_width="wrap_content" android:layout_height="wrap_content" android:layout_marginStart="272dp" android:layout_marginTop="300dp" android:text="B组隐藏/显示" app:layout_constraintStart_toStartOf="parent" app:layout_constraintTop_toTopOf="parent" /></androidx.constraintlayout.widget.ConstraintLayout>Java代码:
public class MainActivity extends AppCompatActivity implements View.OnClickListener { Button btn1,btn2; Group group1,group2; @Override protected void onCreate(Bundle savedInstanceState) { super.onCreate(savedInstanceState); setContentView(R.layout.activity_group); btn1 = findViewById(R.id.btn1); group1 = findViewById(R.id.group1); btn2 = findViewById(R.id.btn2); group2 = findViewById(R.id.group2); btn1.setOnClickListener(this); btn2.setOnClickListener(this); } @Override public void onClick(View view) { if (view.getId() == btn1.getId()){ group1.setVisibility(group1.getVisibility()==Group.VISIBLE?Group.INVISIBLE:Group.VISIBLE); } else{ group2.setVisibility(group2.getVisibility()==Group.VISIBLE?Group.INVISIBLE:Group.VISIBLE); } }}运行效果图:

4.2.4 Placeholder(占位符)
Placeholder的作用就是占位,它可以在布局中占好位置,通过app:content=""属性,或者动态调用setContent()设置内容,来让某个控件移动到此占位符中
XML代码:
<?xml version="1.0" encoding="utf-8"?><androidx.constraintlayout.widget.ConstraintLayout xmlns:android="http://schemas.android.com/apk/res/android" xmlns:app="http://schemas.android.com/apk/res-auto" android:id="@+id/constraintLayout" android:layout_width="match_parent" android:layout_height="match_parent"> <TextView android:id="@+id/A" android:layout_width="100dp" android:layout_height="60dp" android:background="#00FF00" android:gravity="center" android:text="AAA" android:textColor="@color/black" android:textSize="25sp" android:textStyle="bold" app:layout_constraintStart_toStartOf="parent" app:layout_constraintTop_toTopOf="parent" /> <androidx.constraintlayout.widget.Placeholder android:id="@+id/p" android:layout_width="100dp" android:layout_height="60dp" app:layout_constraintEnd_toEndOf="parent" app:layout_constraintTop_toTopOf="parent" /> <Button android:id="@+id/btn1" android:layout_width="wrap_content" android:layout_height="wrap_content" android:layout_marginStart="150dp" android:layout_marginTop="200dp" android:text="移动" app:layout_constraintStart_toStartOf="parent" app:layout_constraintTop_toTopOf="parent" /></androidx.constraintlayout.widget.ConstraintLayout>Java代码:
public class MainActivity extends AppCompatActivity implements View.OnClickListener { Placeholder placeholder; TextView tv1,tv2; ConstraintLayout mConstraintLayout; @Override protected void onCreate(Bundle savedInstanceState) { super.onCreate(savedInstanceState); setContentView(R.layout.activity_placeholder); Button btn1 = findViewById(R.id.btn1); placeholder = findViewById(R.id.p); tv1 = findViewById(R.id.A); tv2 = findViewById(R.id.B); mConstraintLayout = findViewById(R.id.constraintLayout); btn1.setOnClickListener(this); } @Override public void onClick(View view) { TransitionManager.beginDelayedTransition(mConstraintLayout); if (placeholder.getContent() == null) { System.out.println(tv1.getId()); placeholder.setContentId(tv1.getId()); }else { if (placeholder.getContent().getId()==tv1.getId()){ placeholder.setContentId(tv2.getId()); }else { placeholder.setContentId(tv1.getId()); } } }}运行效果图: 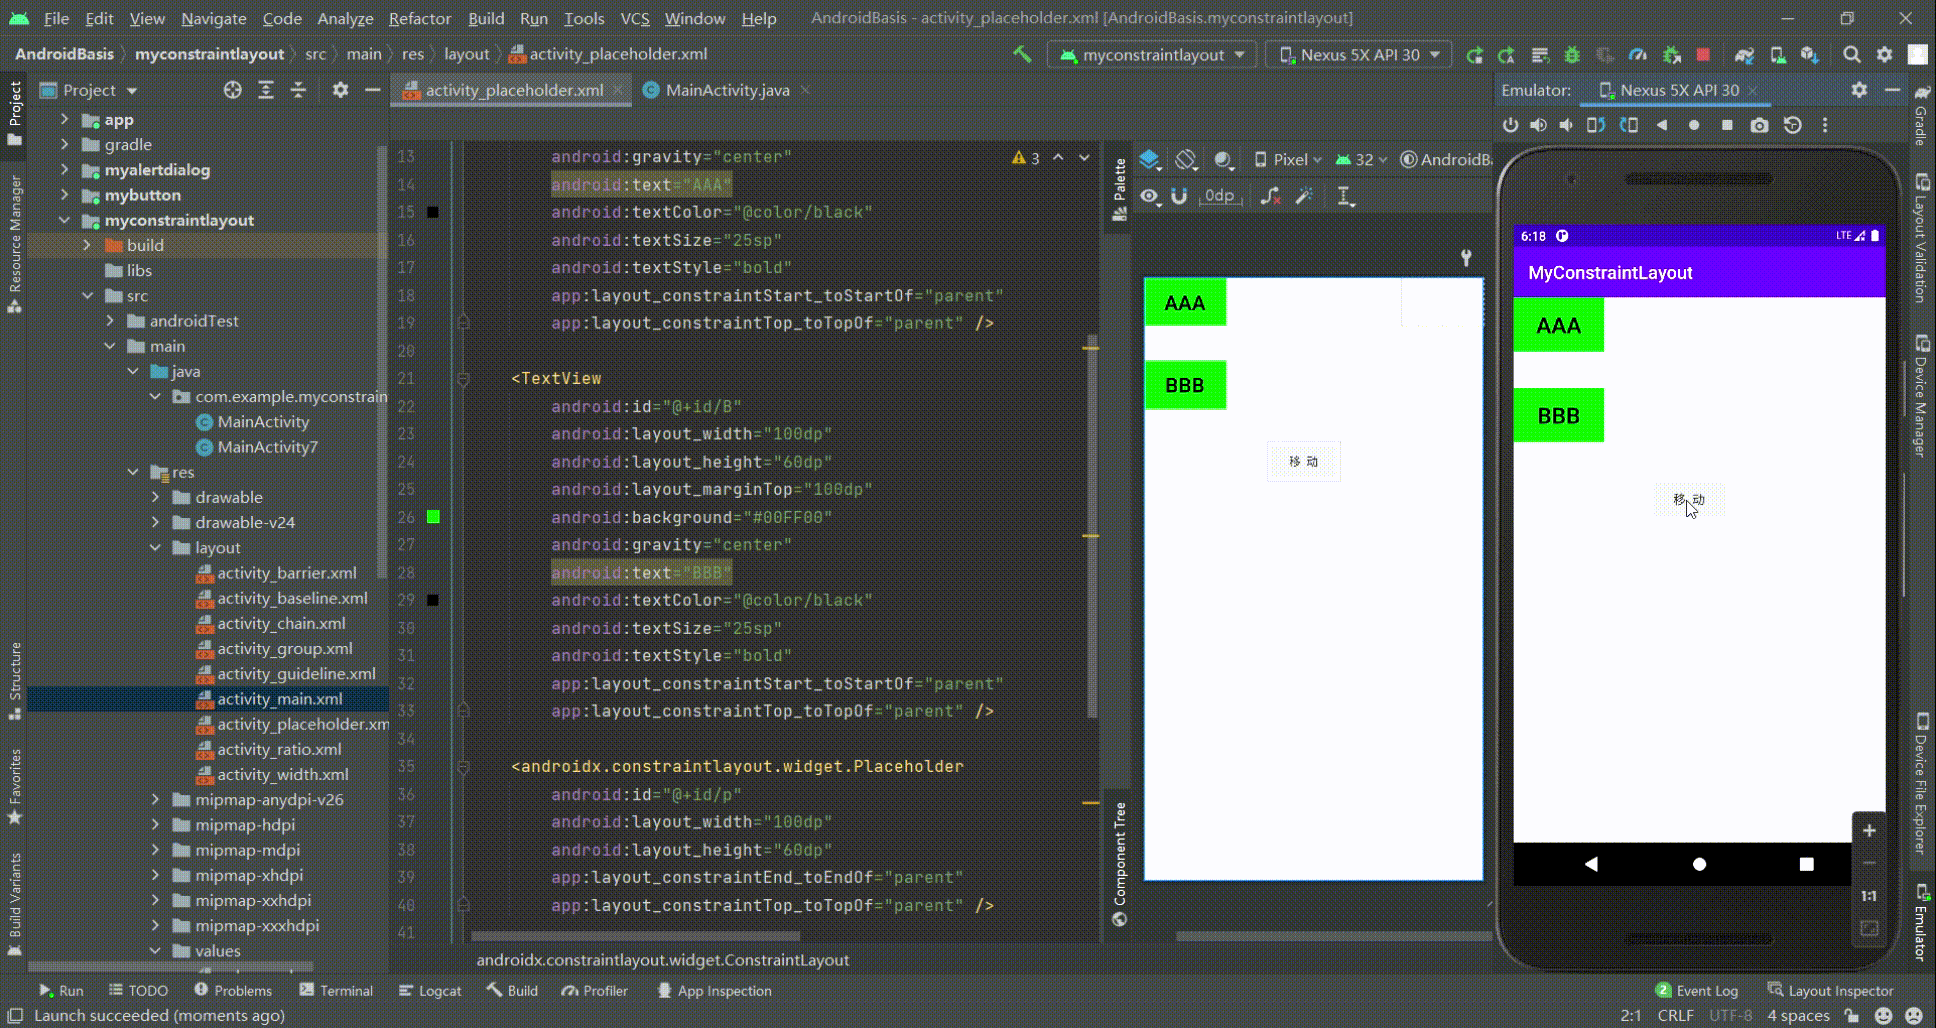
注意:设置文本内容时样式发生了改变,而且placeholder不知如何还原初态
4.2.5 Flow(流式虚拟布局)
Flow是用于构建链的新虚拟布局,当链用完时可以缠绕到下一行甚至屏幕的另一部分。当您在一个链中布置多个项目,但是您不确定容器在运行时的大小时,这很有用。您可以使用它来根据应用程序中的动态尺寸(例如旋转时的屏幕宽度)构建布局。
1. 链约束(针对的时超出屏幕部分)
Flow的constraint_referenced_ids关联的控件是没有设置约束的,这一点和普通的链是不一样的,这种排列方式是Flow的默认方式none,我们可以使用app:flow_wrapMode=""属性来设置排列方式,并且我们还可以使用flow_horizontalGap和flow_verticalGap分别设置两个view在水平和垂直方向的间隔,下面我们再添加几个控件来展示三种排列方式:
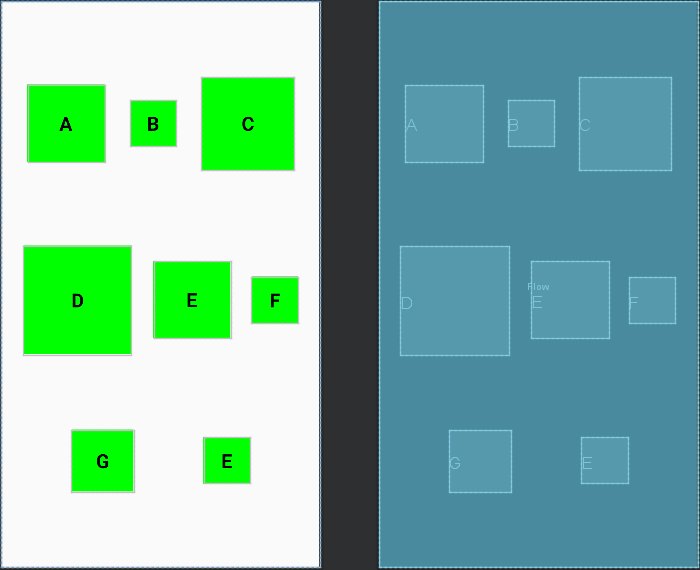
view形成一条链,水平居中,超出屏幕两侧的view不可见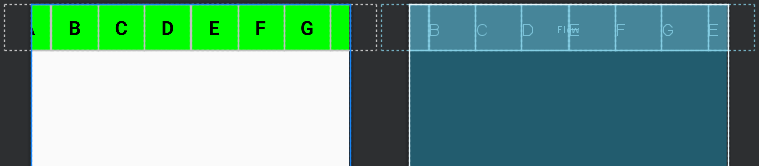 chian:所引用的
view形成一条链,超出部分会自动换行,同行的view会平分宽度,纵横平均分配Flow空间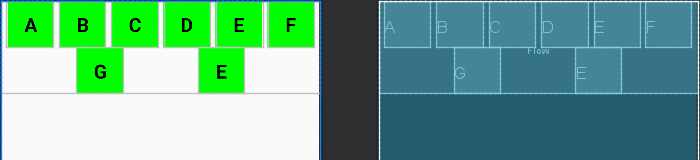 aligned:所引用的
view形成一条链,超出部分会自动换行,同行的view会平分宽度,纵向平均分配Flow空间,横向的view会从start处开始排列,默认从左往右排列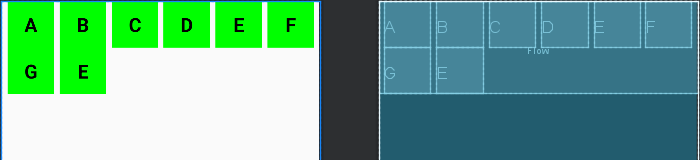
当flow_wrapMode的值是chian或aligned时,我们还可以针对不同的链进行配置,这里就不一一展示效果了,具体的属性如下:
app:flow_wrapMode="chian")app:flow_verticalStyle="packed|spread|spread_inside" 所有垂直链的配置(app:flow_wrapMode="aligned")app:flow_firstHorizontalStyle="packed|spread|spread_inside" 第一条水平链的配置,其他条不生效app:flow_firstVerticalStyle="packed|spread|spread_inside" 第一条垂直链的配置,其他条不生效app:flow_lastHorizontalStyle="packed|spread|spread_inside" 最后一条水平链的配置,其他条不生效 app:flow_lastVerticalStyle="packed|spread|spread_inside" 最后一条垂直链的配置,其他条不生效 XML代码:
<?xml version="1.0" encoding="utf-8"?><androidx.constraintlayout.widget.ConstraintLayout xmlns:android="http://schemas.android.com/apk/res/android" android:layout_width="match_parent" android:layout_height="match_parent" xmlns:app="http://schemas.android.com/apk/res-auto"> <TextView android:id="@+id/A" android:layout_width="60dp" android:layout_height="60dp" android:background="#00FF00" android:gravity="center" android:text="A" android:textColor="@color/black" android:textSize="25sp" android:textStyle="bold" /> <TextView android:id="@+id/B" android:layout_width="60dp" android:layout_height="60dp" android:background="#00FF00" android:gravity="center" android:text="B" android:textColor="@color/black" android:textSize="25sp" android:textStyle="bold" /> <TextView android:id="@+id/C" android:layout_width="60dp" android:layout_height="60dp" android:background="#00FF00" android:gravity="center" android:text="C" android:textColor="@color/black" android:textSize="25sp" android:textStyle="bold" /> <TextView android:id="@+id/D" android:layout_width="60dp" android:layout_height="60dp" android:background="#00FF00" android:gravity="center" android:text="D" android:textColor="@color/black" android:textSize="25sp" android:textStyle="bold" /> <TextView android:id="@+id/E" android:layout_width="60dp" android:layout_height="60dp" android:background="#00FF00" android:gravity="center" android:text="E" android:textColor="@color/black" android:textSize="25sp" android:textStyle="bold" /> <TextView android:id="@+id/F" android:layout_width="60dp" android:layout_height="60dp" android:background="#00FF00" android:gravity="center" android:text="F" android:textColor="@color/black" android:textSize="25sp" android:textStyle="bold" /> <TextView android:id="@+id/G" android:layout_width="60dp" android:layout_height="60dp" android:background="#00FF00" android:gravity="center" android:text="G" android:textColor="@color/black" android:textSize="25sp" android:textStyle="bold" /> <TextView android:id="@+id/H" android:layout_width="60dp" android:layout_height="60dp" android:background="#00FF00" android:gravity="center" android:text="E" android:textColor="@color/black" android:textSize="25sp" android:textStyle="bold" /> <androidx.constraintlayout.helper.widget.Flow android:layout_width="match_parent" android:layout_height="wrap_content" app:constraint_referenced_ids="A,B,C,D,E,F,G,H" app:layout_constraintTop_toTopOf="parent" /></androidx.constraintlayout.widget.ConstraintLayout>2. 对齐约束
当view的大小不同时,Flow也提供了相应的属性进行配置(flow_wrapMode="aligned"时,我试着没有效果)。
使用flow_verticalAlign时,要求orientation的方向是horizontal,
使用flow_horizontalAlign时,要求orientation的方向是vertical
horizontal 水平排列
top
<androidx.constraintlayout.helper.widget.Flow android:layout_width="match_parent" android:layout_height="match_parent" app:flow_wrapMode="chain" android:orientation="horizontal" app:flow_verticalAlign="top" app:constraint_referenced_ids="A,B,C,D,E,F,G,H" app:layout_constraintTop_toTopOf="parent" />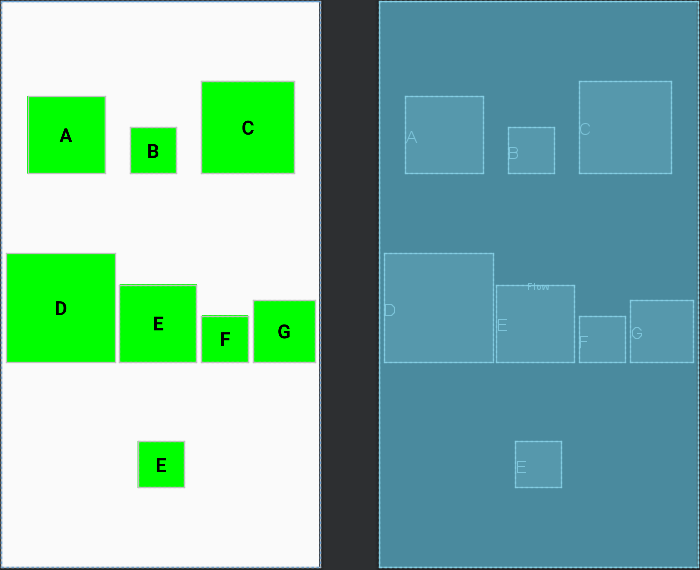
<androidx.constraintlayout.helper.widget.Flow android:layout_width="match_parent" android:layout_height="match_parent" app:flow_wrapMode="chain" android:orientation="horizontal" app:flow_verticalAlign="bottom" app:constraint_referenced_ids="A,B,C,D,E,F,G,H" app:layout_constraintTop_toTopOf="parent" />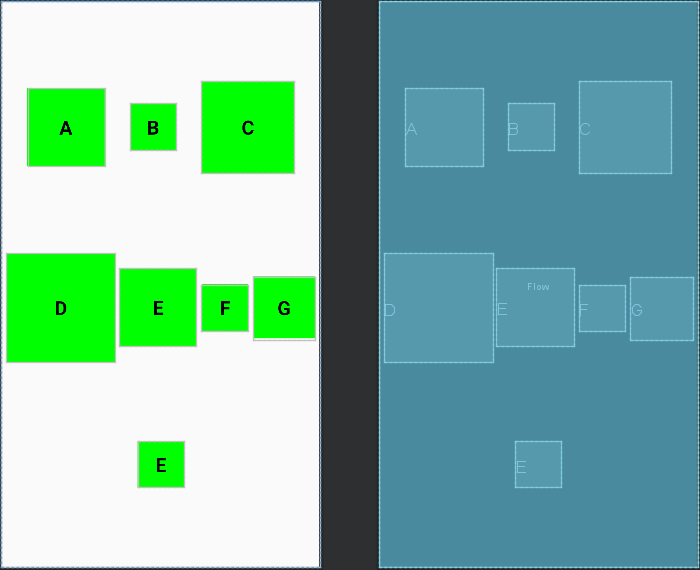
<androidx.constraintlayout.helper.widget.Flow android:layout_width="match_parent" android:layout_height="match_parent" app:flow_wrapMode="chain" android:orientation="horizontal" app:flow_verticalAlign="center" app:constraint_referenced_ids="A,B,C,D,E,F,G,H" app:layout_constraintTop_toTopOf="parent" />垂直方向排列同理
3. 数量约束
当flow_wrapMode属性为aligned或chian时,通过flow_maxElementsWrap属性控制每行最大的子View数量,例如我们设置为flow_maxElementsWrap=4,效果图如下:
4.2.6 ImageFilterButton & ImageFilterView
ImageFilterButton和ImageFilterView是两个控件,他们之间的关系就和ImageButton与ImageView一样,即ImageFilterButton继承ImageButton,而ImageFilterView继承ImageView,所以这里就只拿ImageFilterView来做讲解。它们的大致作用有两部分,一是可以用来做圆角图片,二是可以叠加图片资源进行混合过滤,下面一一展示:
1. 圆角图片
ImageFilterButton和ImageFilterView可以使用两个属性来设置图片资源的圆角,分别是roundPercent和round,roundPercent接受的值类型是0-1的小数,根据数值的大小会使图片在方形和圆形之间按比例过度,round可以设置具体圆角的大小。下面请看例子:
2. 图片过滤
ImageFilterButton和ImageFilterView不但可以使用src来设置图片资源,还可以使用altSrc来设置第二个图片资源,altSrc提供的资源将会和src提供的资源通过crossfade属性形成交叉淡化效果,默认情况下,crossfade=0,altSrc所引用的资源不可见,取值在0-1。下面看例子:
XML代码:
<?xml version="1.0" encoding="utf-8"?><androidx.constraintlayout.widget.ConstraintLayout xmlns:android="http://schemas.android.com/apk/res/android" xmlns:app="http://schemas.android.com/apk/res-auto" android:layout_width="match_parent" android:layout_height="match_parent"> <androidx.constraintlayout.utils.widget.ImageFilterView android:layout_width="100dp" android:layout_height="100dp" android:src="@drawable/mi" app:layout_constraintBottom_toTopOf="@+id/guideline3" app:layout_constraintEnd_toEndOf="parent" app:layout_constraintStart_toStartOf="parent" app:layout_constraintTop_toTopOf="parent" app:roundPercent="0.7" /> <androidx.constraintlayout.widget.Guideline android:id="@+id/guideline3" android:layout_width="wrap_content" android:layout_height="wrap_content" android:orientation="horizontal" app:layout_constraintGuide_begin="300dp" /> <androidx.constraintlayout.utils.widget.ImageFilterView android:id="@+id/view1" android:layout_width="280dp" android:layout_height="280dp" android:src="@drawable/jetpack" app:altSrc="@drawable/bg1" app:crossfade="0.5" app:layout_constraintBottom_toBottomOf="parent" app:layout_constraintEnd_toEndOf="parent" app:layout_constraintHorizontal_bias="0.5" app:layout_constraintStart_toStartOf="parent" app:layout_constraintTop_toTopOf="@+id/guideline3" /></androidx.constraintlayout.widget.ConstraintLayout>运行效果图:
除此之外,还有以下属性(取值范围为:0-10):warmth:调节色温brightness:调节亮度saturation:调节饱和度contrast:调节对比度
第5章 动画效果
5.1 帧动画
Step 1:创建frame.xml。
创建animation-list并编写标签,属性为:drable="资源",duration="持续时间"Step 2:在activity_main.xml文件中引用frame资源为View的背景。
Step 3:获取View的背景强转为AnimationDrawable。
AnimationDrawable animationDrawable = (AnimationDrawable) relativeLayout.getBackground();Step 3:调用AnimationDrawable的方法进行控制
start(); 启动stop(); 停止drawable/frame.xml
<?xml version="1.0" encoding="utf-8"?><animation-list xmlns:android="http://schemas.android.com/apk/res/android"> <item android:drawable="@drawable/frame1" android:duration="100"/> <item android:drawable="@drawable/frame2" android:duration="100"/> <item android:drawable="@drawable/frame3" android:duration="100"/> <item android:drawable="@drawable/frame4" android:duration="100"/></animation-list>activty_main.xml
<?xml version="1.0" encoding="utf-8"?><LinearLayout xmlns:android="http://schemas.android.com/apk/res/android" android:layout_width="match_parent" android:layout_height="match_parent" android:orientation="vertical"> <Button android:id="@+id/btn_start" android:layout_width="wrap_content" android:layout_height="wrap_content" android:text="开始" /> <Button android:id="@+id/btn_stop" android:layout_width="wrap_content" android:layout_height="wrap_content" android:text="停止" /> <ImageView android:id="@+id/frame" android:layout_width="300dp" android:layout_height="300dp" android:layout_gravity="center" android:background="@drawable/frame" /></LinearLayout>MainActivity.java
public class MainActivity extends AppCompatActivity { @Override protected void onCreate(Bundle savedInstanceState) { super.onCreate(savedInstanceState); setContentView(R.layout.activity_main); Button btn_start = findViewById(R.id.btn_start); Button btn_stop = findViewById(R.id.btn_stop); ImageView imageView = findViewById(R.id.frame); AnimationDrawable animationDrawable = (AnimationDrawable) imageView.getBackground(); btn_start.setOnClickListener(new View.OnClickListener() { @Override public void onClick(View view) { animationDrawable.start(); } }); btn_stop.setOnClickListener(new View.OnClickListener() { @Override public void onClick(View view) { animationDrawable.stop(); } }); }}运行效果图: 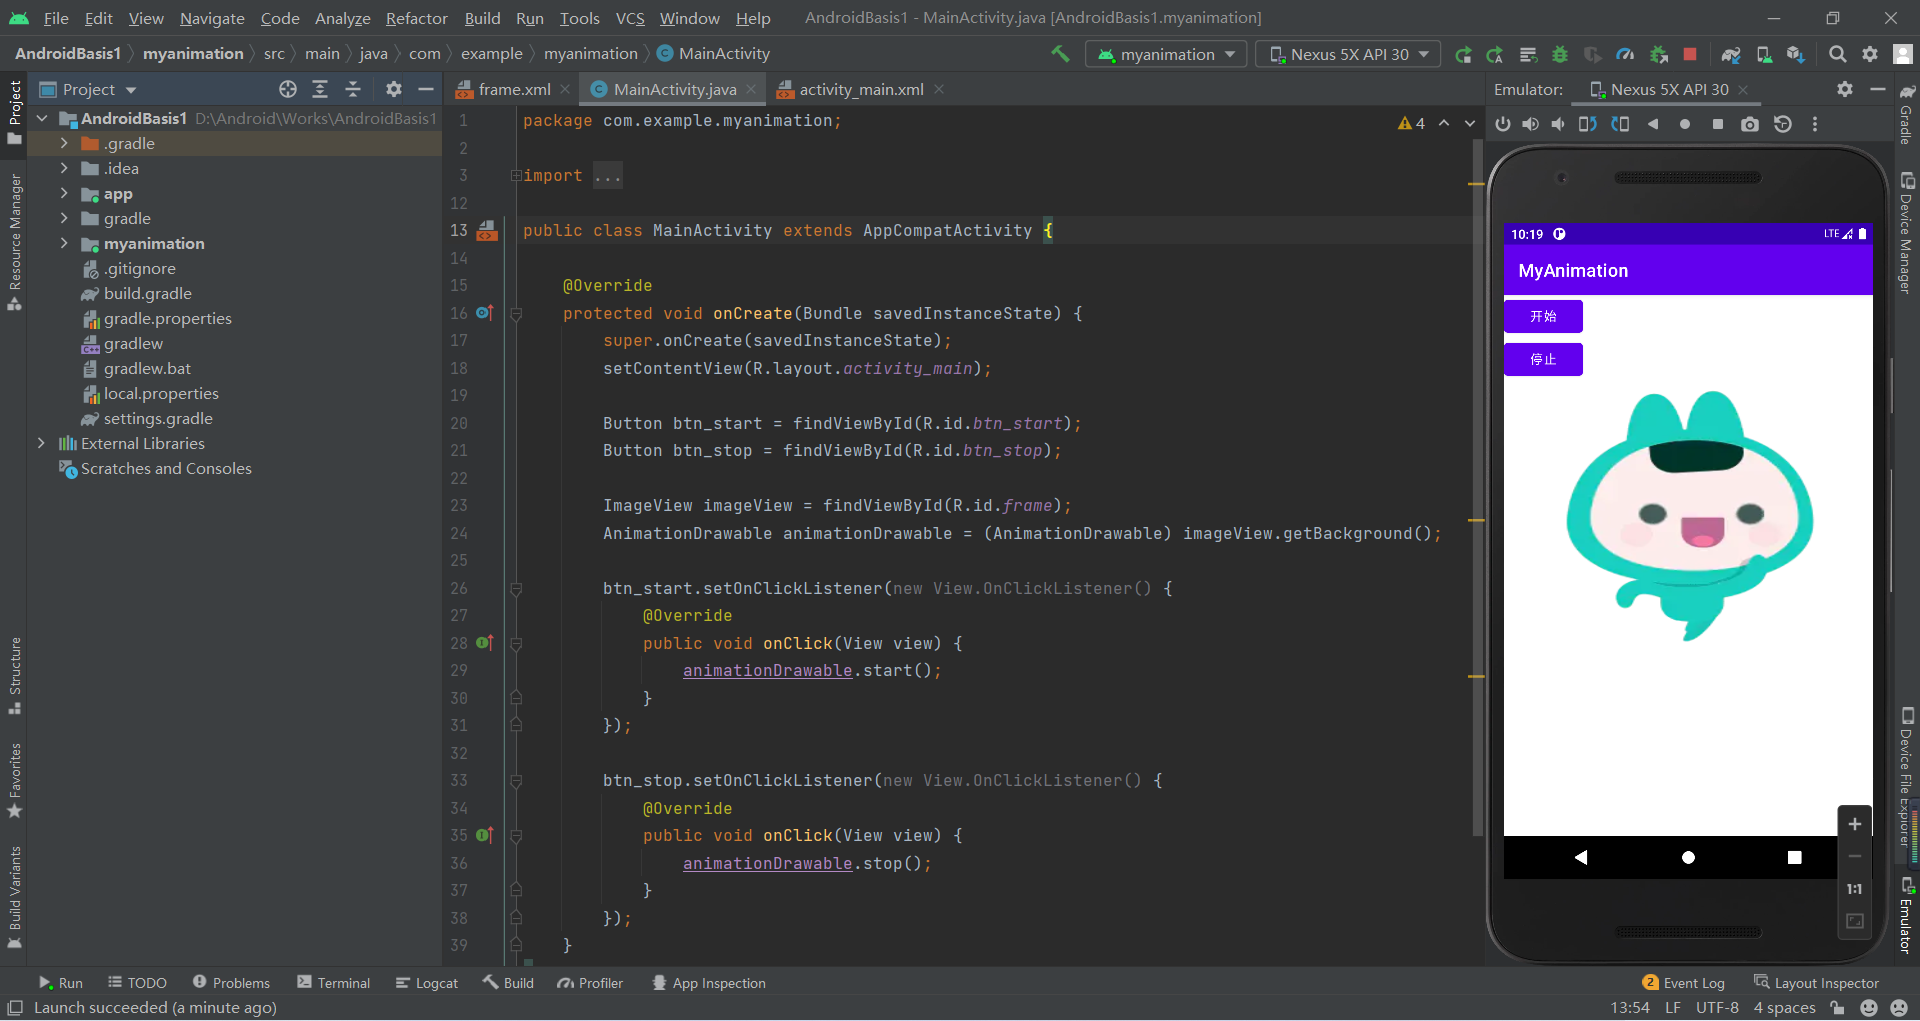
5.2 补间动画
5.2.1 补间动画的介绍
补间动画是一种设定动画开始状态、结束状态,其中间的变化由系统计算补充。
补间动画由Animation类来实现具体效果,包括透明度(AlphaAnimation)、旋转(RotateAnimation)、缩放(ScaleAnimation)、平移(TranslateAnimation)四个子类,四种变化。
5.2.2 透明度(AlphaAnimation)
透明度渐变效果,创建时许指定开始以及结束透明度,还有动画的持续 时间,透明度的变化范围(0,1),0是完全透明,1是完全不透明;对应<alpha/>标签
步骤如下:
Step 1:编写activity_main.xml文件
<?xml version="1.0" encoding="utf-8"?><RelativeLayout xmlns:android="http://schemas.android.com/apk/res/android" android:layout_width="match_parent" android:layout_height="match_parent"> <ImageView android:id="@+id/iv" android:layout_width="wrap_content" android:layout_height="wrap_content" android:layout_marginTop="100dp" android:layout_centerHorizontal="true" android:maxWidth="300dp" android:maxHeight="300dp" android:src="@drawable/ceshi"/> <Button android:id="@+id/btn_alpha" android:layout_width="wrap_content" android:layout_height="wrap_content" android:layout_centerHorizontal="true" android:layout_marginTop="400dp" android:text="透明" /></RelativeLayout>Step 2:res/创建anim目录(Directory)/新建alpha.xml文件(Animation Resource File)
Step 3:编写alpha.xml文件
<?xml version="1.0" encoding="utf-8"?><set xmlns:android="http://schemas.android.com/apk/res/android"> <alpha android:fromAlpha="0" android:toAlpha="1" android:duration="5000"/></set>Step 4:1在ActivityMain.java中获取需要设置alpha的imageview控件,然后加载xml动画设置文件来创建一个 Animation对象,通过控件的imageview.startAnimation(animation)方法来启动动画
public class MainActivity extends AppCompatActivity implements View.OnClickListener { private ImageView imageView; @Override protected void onCreate(Bundle savedInstanceState) { super.onCreate(savedInstanceState); setContentView(R.layout.activity_main); imageView = findViewById(R.id.iv); Button btn_alpha = findViewById(R.id.btn_alpha); btn_alpha.setOnClickListener(this); } @Override public void onClick(View view) { //通过加载xml动画设置文件来创建一个 Animation对象 Animation animation = AnimationUtils.loadAnimation(MainActivity.this, R.anim.alpha); Log.e("TAG", "onClick: " + view.getId()); imageView.startAnimation(animation); }}Step 5:运行效果图: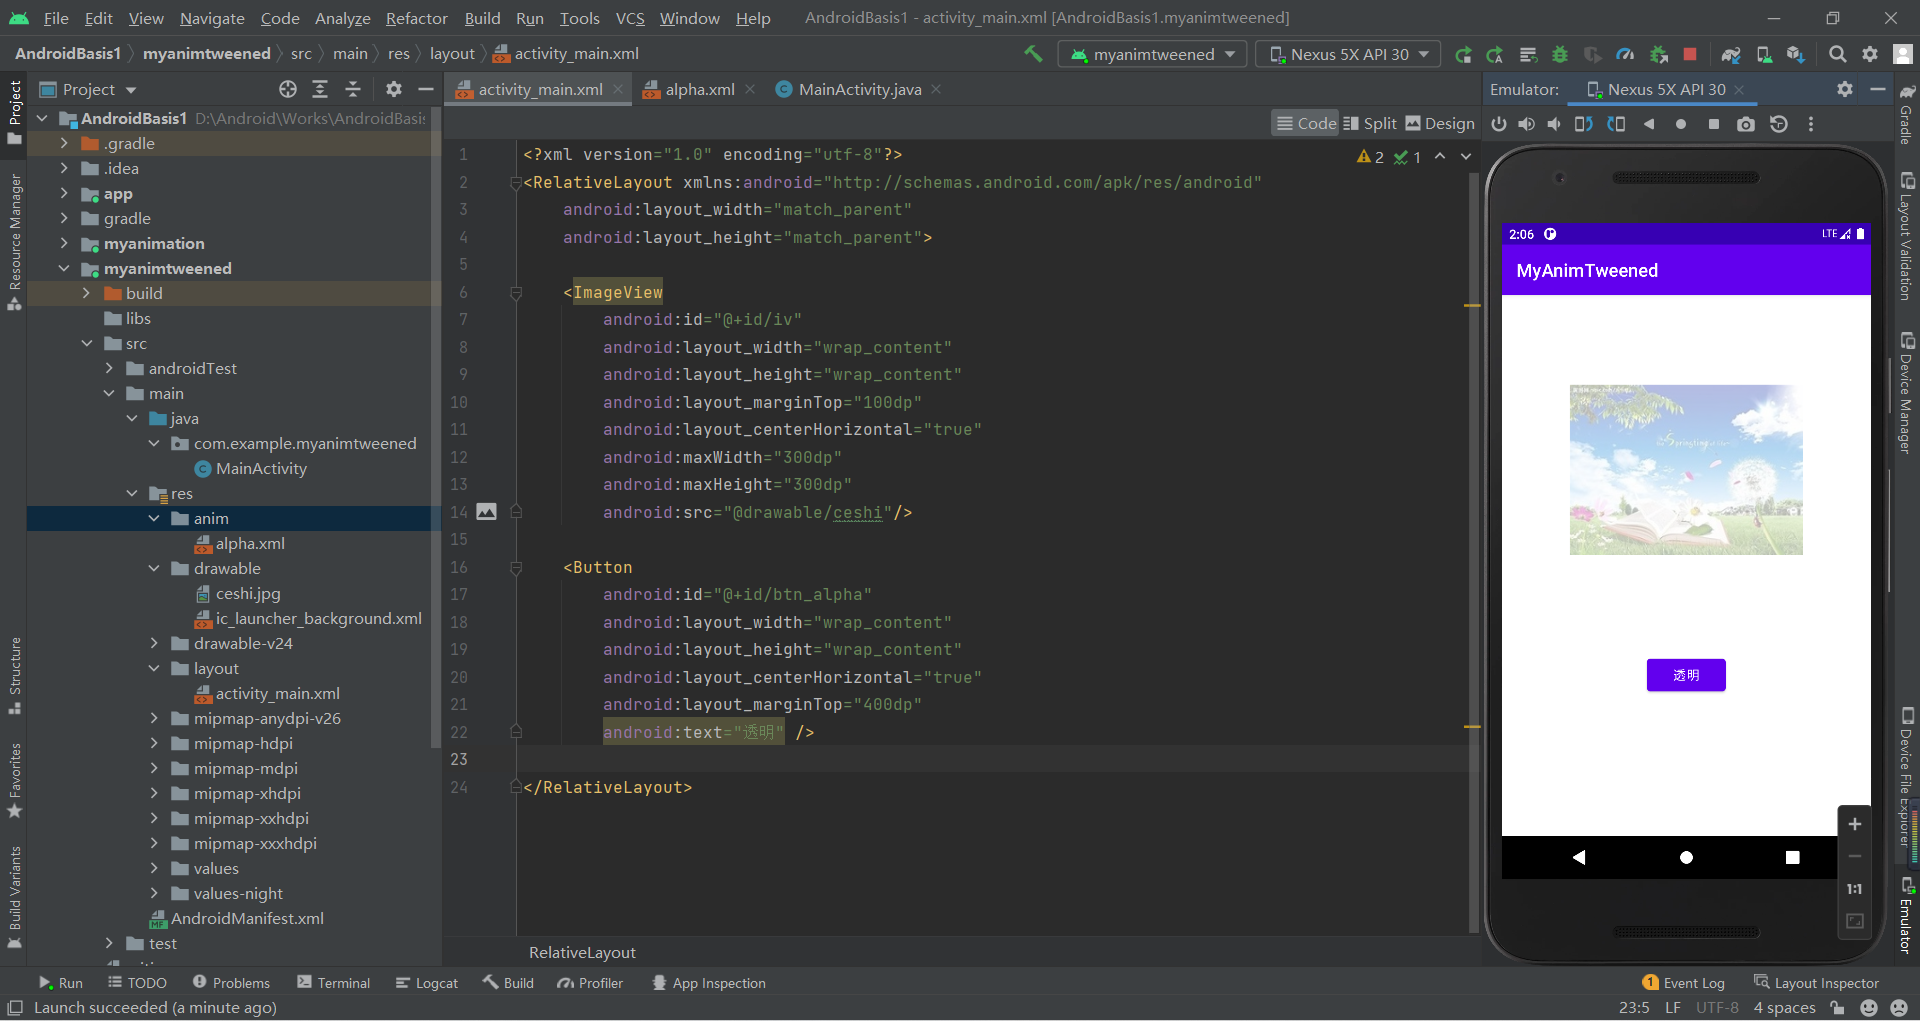
5.2.3 旋转(RotateAnimation)
旋转渐变效果,创建时指定动画起始以及结束的旋转角度,以及动画 持续时间和旋转的轴心;对应<rotate/>标签
步骤:同上
rotate.xml
<?xml version="1.0" encoding="utf-8"?><set xmlns:android="http://schemas.android.com/apk/res/android"> <rotate android:pivotX="50%" android:pivotY="50%" android:fromDegrees="0" android:toDegrees="360" android:duration="5000"/></set>
5.2.4 缩放(ScaleAnimation)
缩放渐变效果,创建时需指定开始以及结束的缩放比,以及缩放参考点, 还有动画的持续时间;对应<scale/>标签
步骤:同上
scale.xml
<?xml version="1.0" encoding="utf-8"?><set xmlns:android="http://schemas.android.com/apk/res/android"> <scale android:pivotY="50%" android:pivotX="50%" android:fromXScale="0.2" android:fromYScale="0.2" android:toXScale="1" android:toYScale="1" android:duration="5000"/></set>
5.2.5 平移(TranslateAnimation)
位移渐变效果,创建时指定起始以及结束位置,并指定动画的持续时间即可;对应<translate/>标签
步骤:同上
translate.xml
<?xml version="1.0" encoding="utf-8"?><set xmlns:android="http://schemas.android.com/apk/res/android"> <translate android:fromXDelta="-40%" android:fromYDelta="0%" android:toXDelta="60%" android:toYDelta="0%" android:duration="5000"/></set>
5.2.6 组合(AnimationSet)
组合渐变,就是前面多种渐变的组合,对应<set/>标签。以最大的时间为渐变时间
步骤:同上
sets.xml
<?xml version="1.0" encoding="utf-8"?><set xmlns:android="http://schemas.android.com/apk/res/android"> <alpha android:fromAlpha="0" android:toAlpha="1" android:duration="5000"/> <rotate android:pivotX="50%" android:pivotY="50%" android:fromDegrees="0" android:toDegrees="360" android:duration="5000"/> <scale android:pivotY="50%" android:pivotX="50%" android:fromXScale="0.2" android:fromYScale="0.2" android:toXScale="1" android:toYScale="1" android:duration="5000"/> <translate android:fromXDelta="-40%" android:fromYDelta="0%" android:toXDelta="60%" android:toYDelta="0%" android:duration="5000"/></set>更多详见:8.4.2 Android动画合集之补间动画 | 菜鸟教程 (runoob.com)
activity.xml
<?xml version="1.0" encoding="utf-8"?><RelativeLayout xmlns:android="http://schemas.android.com/apk/res/android" android:layout_width="match_parent" android:layout_height="match_parent"> <ImageView android:id="@+id/iv" android:layout_width="wrap_content" android:layout_height="wrap_content" android:layout_marginTop="100dp" android:layout_centerHorizontal="true" android:maxWidth="300dp" android:maxHeight="300dp" android:src="@drawable/ceshi"/> <Button android:id="@+id/btn_alpha" android:layout_width="wrap_content" android:layout_height="wrap_content" android:layout_marginLeft="10dp" android:layout_marginTop="400dp" android:text="透明" /> <Button android:id="@+id/btn_rotate" android:layout_width="wrap_content" android:layout_height="wrap_content" android:layout_marginLeft="110dp" android:layout_marginTop="400dp" android:text="旋转" /> <Button android:id="@+id/btn_scale" android:layout_width="wrap_content" android:layout_height="wrap_content" android:layout_marginLeft="210dp" android:layout_marginTop="400dp" android:text="缩放" /> <Button android:id="@+id/btn_translate" android:layout_width="wrap_content" android:layout_height="wrap_content" android:layout_marginLeft="310dp" android:layout_marginTop="400dp" android:text="平移" /> <Button android:id="@+id/btn_sets" android:layout_width="wrap_content" android:layout_height="wrap_content" android:layout_centerHorizontal="true" android:layout_marginTop="460dp" android:text="上诉组合" /></RelativeLayout>ActivityMain.java
public class MainActivity extends AppCompatActivity implements View.OnClickListener { private ImageView imageView; @Override protected void onCreate(Bundle savedInstanceState) { super.onCreate(savedInstanceState); setContentView(R.layout.activity_main); imageView = findViewById(R.id.iv); Button btn_alpha = findViewById(R.id.btn_alpha); Button btn_rotate = findViewById(R.id.btn_rotate); Button btn_scale = findViewById(R.id.btn_scale); Button btn_translate = findViewById(R.id.btn_translate); Button btn_sets = findViewById(R.id.btn_sets); btn_alpha.setOnClickListener(this); btn_rotate.setOnClickListener(this); btn_scale.setOnClickListener(this); btn_translate.setOnClickListener(this); btn_sets.setOnClickListener(this); } @Override public void onClick(View view) { Animation animation = null; switch (view.getId()){ case R.id.btn_alpha: animation = AnimationUtils.loadAnimation(MainActivity.this, R.anim.alpha); break; case R.id.btn_rotate: animation = AnimationUtils.loadAnimation(MainActivity.this, R.anim.rotate); break; case R.id.btn_scale: animation = AnimationUtils.loadAnimation(MainActivity.this, R.anim.scale); break; case R.id.btn_translate: animation = AnimationUtils.loadAnimation(MainActivity.this, R.anim.translate); break; case R.id.btn_sets: animation = AnimationUtils.loadAnimation(MainActivity.this, R.anim.sets); break; } Log.e("TAG", "onClick: " + view.getId()); imageView.startAnimation(animation); }}运行效果图: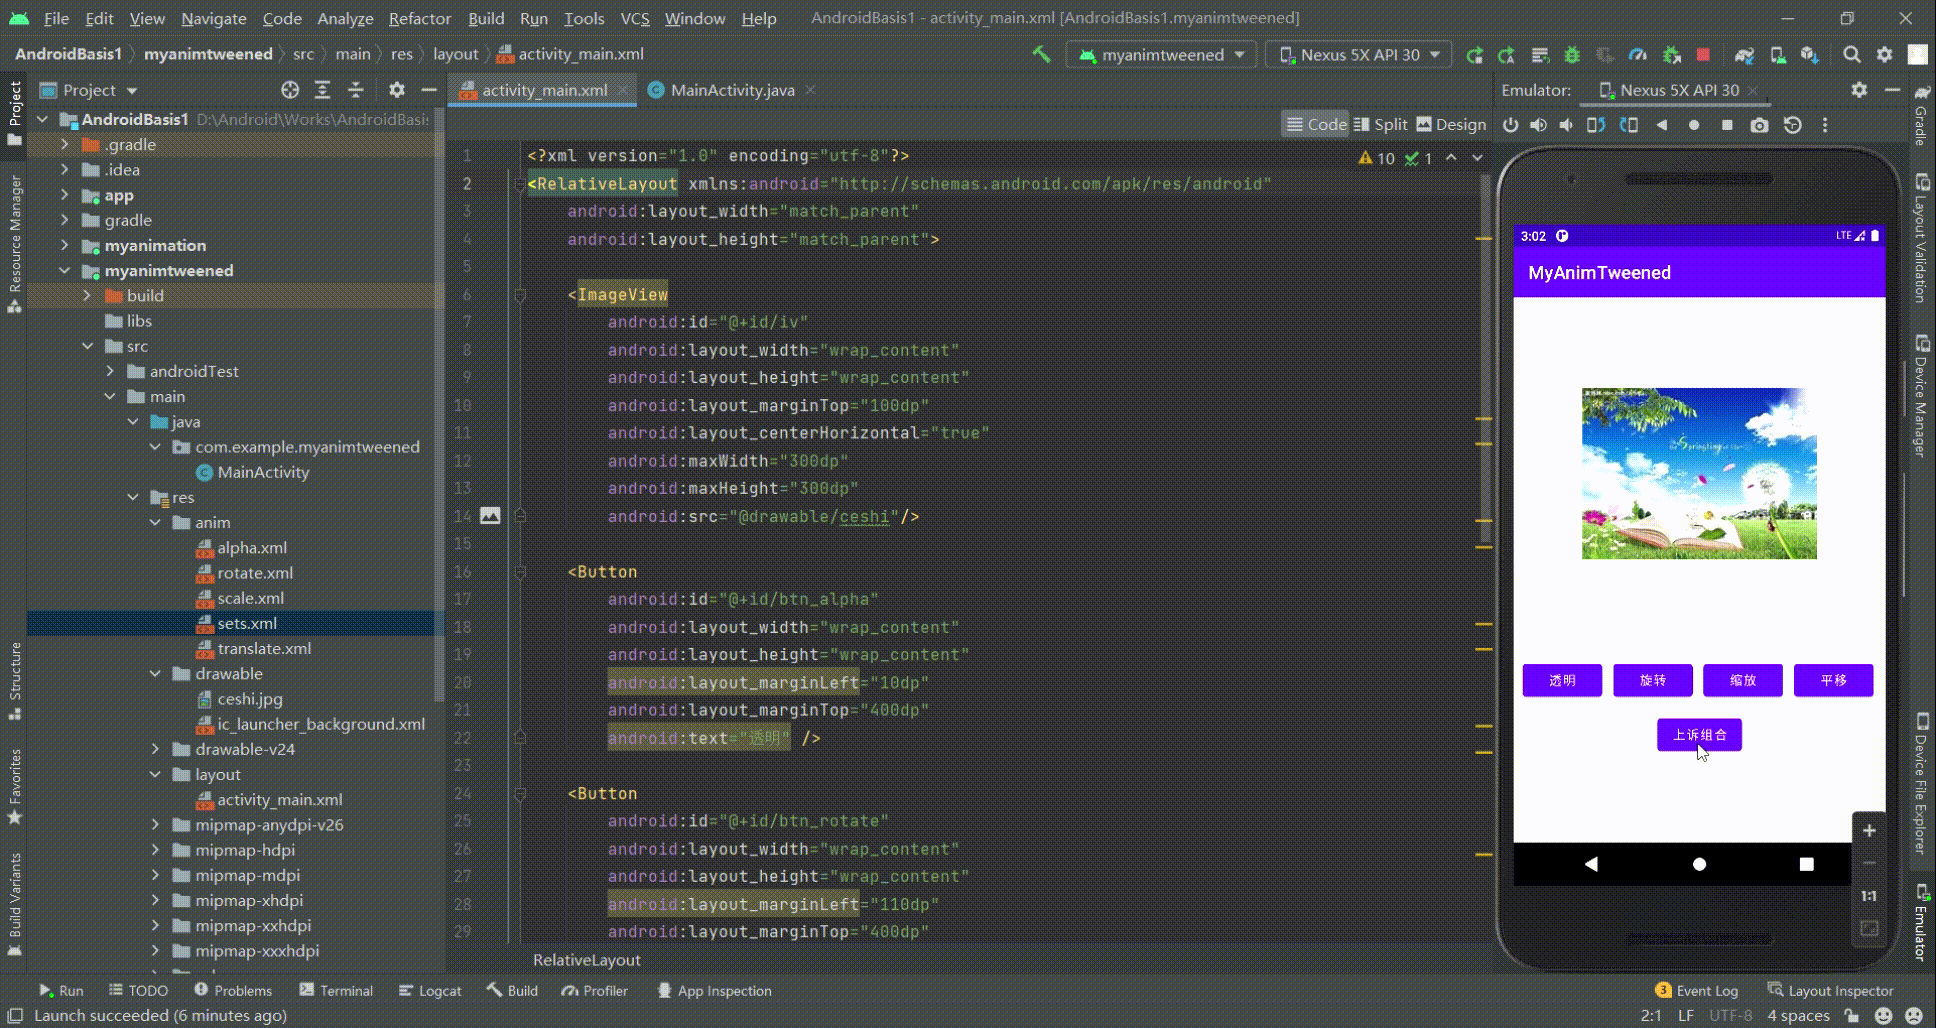
5.3 属性动画
详见:8.4.3 Android动画合集之属性动画-初见 | 菜鸟教程 (runoob.com)
第6章 ViewPager(视图滑动切换)
6.1 ViewPager的简单介绍
ViewPager就是一个简单的页面切换组件,我们可以往里面填充多个View,然后我们可以左 右滑动,从而切换不同的View,我们可以通过setPageTransformer()方法为我们的ViewPager 设置切换时的动画效果,和前面学的ListView,GridView一样,我们也需要一个Adapter (适配器)将我们的View和ViewPager进行绑定,而ViewPager则有一个特定的Adapter—— PagerAdapter!另外,Google官方是建议我们使用Fragment来填充ViewPager的,这样 可以更加方便的生成每个Page,以及管理每个Page的生命周期!给我们提供了两个Fragment 专用的Adapter:FragmentPageAdapter和FragmentStatePagerAdapter 我们简要的来分析下这两个Adapter的区别:
FragmentPageAdapter:和PagerAdapter一样,只会缓存当前的Fragment以及左边一个,右边 一个,即总共会缓存3个Fragment而已,假如有1,2,3,4四个页面:处于1页面:缓存1,2
处于2页面:缓存1,2,3
处于3页面:销毁1页面,缓存2,3,4
处于4页面:销毁2页面,缓存3,4
更多页面的情况,依次类推~FragmentStatePagerAdapter:当Fragment对用户不 见得时,整个Fragment会被销毁, 只会保存Fragment的状态!而在页面需要重新显示的时候,会生成新的页面!
综上,FragmentPageAdapter适合固定的页面较少的场合;而FragmentStatePagerAdapter则适合 于页面较多或者页面内容非常复杂(需占用大量内存)的情况!
使用步骤:
Step 1:在activity_main.xml中编写ViewPage控件
<?xml version="1.0" encoding="utf-8"?><androidx.constraintlayout.widget.ConstraintLayout xmlns:android="http://schemas.android.com/apk/res/android" android:layout_width="match_parent" android:layout_height="match_parent"> <androidx.viewpager.widget.ViewPager android:id="@+id/vp" android:layout_width="match_parent" android:layout_height="match_parent"/></androidx.constraintlayout.widget.ConstraintLayout>Step 2:在layout/创建多个布局layout.xml
Step 3:编写MyPagerAdapter.java继承PagerAdapter并实现其两个方法
public int getCount();public boolean isViewFromObject(@NonNull View view, @NonNull Object object);Step 4:1
6.2 PagerAdapter的使用
我们先来介绍最普通的PagerAdapter,如果想使用这个PagerAdapter需要重写下面的四个方法: 当然,这只是官方建议,实际上我们只需重写getCount()和isViewFromObject()就可以了~
getCount():获得viewpager中有多少个viewdestroyItem():移除一个给定位置的页面。适配器有责任从容器中删除这个视图。 这是为了确保在finishUpdate(viewGroup)返回时视图能够被移除。而另外两个方法则是涉及到一个key的东东:
instantiateItem():①将给定位置的view添加到ViewGroup(容器)中,创建并显示出来
②返回一个代表新增页面的Object(key),通常都是直接返回view本身就可以了,当然你也可以 自定义自己的key,但是key和每个view要一一对应的关系isViewFromObject(): 判断instantiateItem(ViewGroup, int)函数所返回来的Key与一个页面视图是否是 代表的同一个视图(即它俩是否是对应的,对应的表示同一个View),通常我们直接写 return view == object!
6.3 ViewPager的简单实例
Step 1:在activity_main.xml中编写ViewPage控件
<?xml version="1.0" encoding="utf-8"?><androidx.constraintlayout.widget.ConstraintLayout xmlns:android="http://schemas.android.com/apk/res/android" android:layout_width="match_parent" android:layout_height="match_parent"> <androidx.viewpager.widget.ViewPager android:id="@+id/vp" android:layout_width="match_parent" android:layout_height="match_parent"/></androidx.constraintlayout.widget.ConstraintLayout>Step 2:在layout/创建多个布局layouti.xm。
Step 3:编写MyPagerAdapter.java继承PagerAdapter并实现其方法。使用这个PagerAdapter需要重写下面的四个方法: 当然,这只是官方建议,实际上我们只需重写getCount()和isViewFromObject()就可以了
public int getCount();获得viewpager中有多少个viewpublic boolean isViewFromObject(@NonNull View view, @NonNull Object object);
移除一个给定位置的页面。适配器有责任从容器中删除这个视图,这是为了确保在finishUpdate(viewGroup)返回时视图能够被移除。
而另外两个方法则是涉及到一个key的东西:
public Object instantiateItem(@NonNull ViewGroup container, int position);①将给定位置的view添加到ViewGroup(容器)中,创建并显示出来
②返回一个代表新增页面的Object(key),通常都是直接返回view本身就可以了,当然你也可以 自定义自己的key,但是key和每个view要一一对应的关系public void destroyItem(@NonNull ViewGroup container, int position, @NonNull Object object);
判断instantiateItem(ViewGroup, int)函数所返回来的Key与一个页面视图是否是 代表的同一个视图(即它俩是否是对应的,对应的表示同一个View),通常我们直接写 return view == object
MyViewPagerAdapter.java
public class MyPagerAdapter extends PagerAdapter { private ArrayList<View> listView; public MyPagerAdapter(ArrayList<View> listView) { this.listView = listView; } @Override public int getCount() { return listView.size(); } @Override public boolean isViewFromObject(@NonNull View view, @NonNull Object object) { return view == object; } @NonNull @Override public Object instantiateItem(@NonNull ViewGroup container, int position) { container.addView(listView.get(position), 0); return listView.get(position); } @Override public void destroyItem(@NonNull ViewGroup container, int position, @NonNull Object object) { container.removeView(listView.get(position)); }}Step 4:获取加载布局的系统服务。
Step 5:准备数据。利用LayoutInflater对象的inflate()方法获取切换的布局并且添加到列表集合中。
LayoutInflater. inflate() 这个方法的作用类似于 findViewById() 。不同点是 inflate() 是用来找 res/layout/ 下的 xml 布局文件,并且实例化,而 findViewById() 是找 xml 布局文件下的具体 widget 控件Step 6:实例化 PagerAdapter适配器。
MainActivity.java
public class MainActivity extends AppCompatActivity { @Override protected void onCreate(Bundle savedInstanceState) { super.onCreate(savedInstanceState); setContentView(R.layout.activity_main); //获取加载布局的系统服务 LayoutInflater layoutInflater = LayoutInflater.from(this); View view1 = layoutInflater.inflate(R.layout.layout1, null); View view2 = layoutInflater.inflate(R.layout.layout2, null); View view3 = layoutInflater.inflate(R.layout.layout3, null); ArrayList<View> listView = new ArrayList<>(); listView.add(view1); listView.add(view2); listView.add(view3); ViewPager viewPager = findViewById(R.id.vp); MyPagerAdapter myPagerAdapter = new MyPagerAdapter(listView); viewPager.setAdapter(myPagerAdapter); }}运行效果图: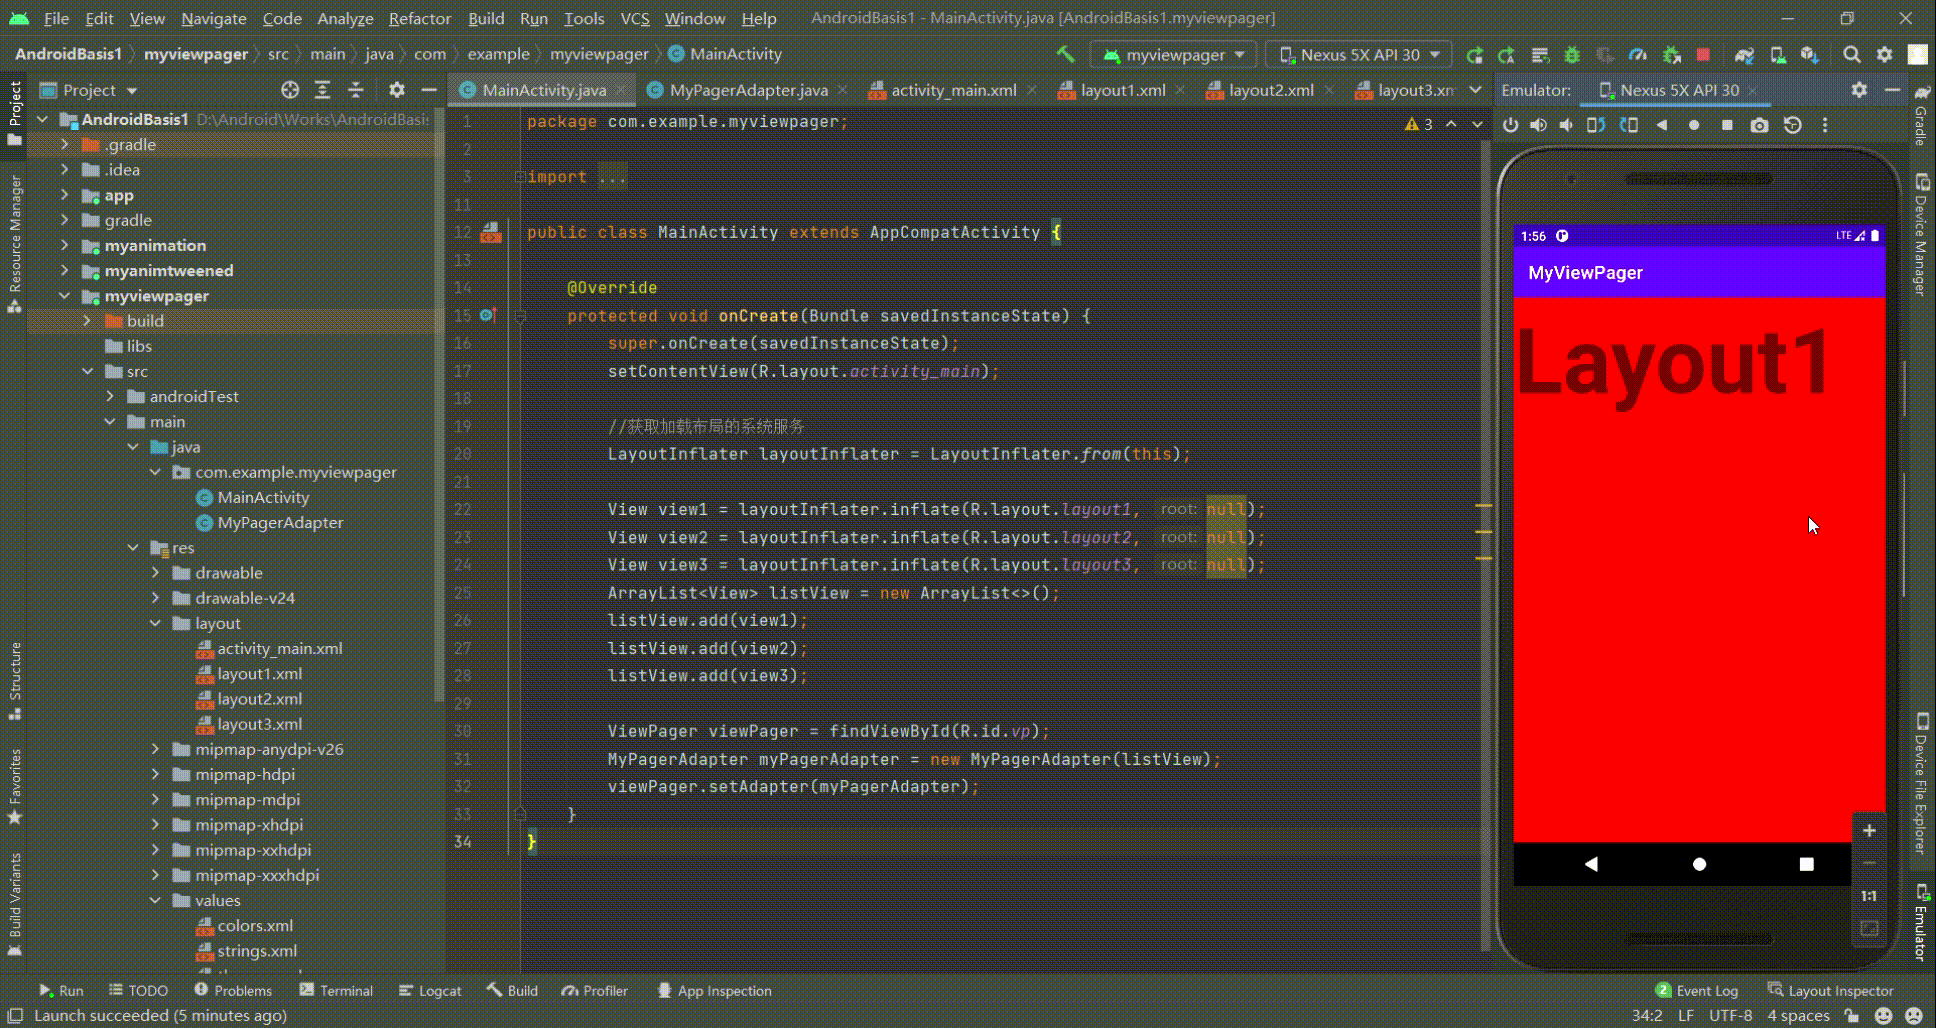
更多详见:2.6.3 ViewPager的简单使用 | 菜鸟教程 (runoob.com)
第7章 Activity(活动)
7.1 Activity的介绍
7.1.1 什么是Activity
定义:Activity是Android的四大组件之一。是用户操作的可视化界面;它为用户提供了一个完成操作指令的窗口。当我们创建完毕Activity之后,需要调用setContentView()方法来完成界面的显示;以此来为用户提供交互的入口。在Android App 中只要能看见的几乎都要依托于Activity,所以Activity是在开发中使用最频繁的一种组件。
7.1.2 Activity的声明
要使应用能使用Activity就需要在AndroidManifest.xml文件中进行声明及其设置特定属性,步骤为:
打开AndroidManifest.xml配置文件在<manifest>标签下的<application>标签中添加<activity>元素并指明android:name=".类名"注意:其中'.'代表<manifest>标签下的package的属性值(包名),或者name属性值也可写Activity的全类名
7.2 Activity的生命周期
7.2.1 Activity的生命周期介绍
在Android中会维持一个Activity Stack(Activity栈),当一个新的Activity创建时,它就会放到栈顶,这个Activity就处于运行状态。当再有一个新的Activity被创建后,会重新压人栈顶,而之前的Activity则会在这个新的Activity底下,就像枪梭压入子弹一样。而且之前的Activity就会进入后台。
一个Activity实质上有四种状态:
7.2.2 Activity的生命周期状态
onCreate:表示窗口正在被创建,比如加载layout布局文件啊(setContentView)。 所以我们可以在这个方法中,做一些初始化的操作。onStart:表示Activity正在被启动,即将开始,此时的窗口已经可见了,但是还没有出现在前台,所以无法和用户进行交互。也就是说此时的窗口正处在 不可见—>可见 的过程中。onRestart:表示窗口正在重新启动。在什么场景下会调用这个呢?比如:从A页面进入B页面,然后点击BACK键(或者自己的返回上一页的按钮)回到A页面,那么就会调用A页面的onRestart方法了。(当前也牵扯到A和B页面的其他生命周期方法的调用,这个我们后面再详细说明)。再比如:点击HOME键回到桌面,然后通过点击任务栏或者点击应用图标再次进入A页面,都可以触发调用这个方法onResume:表示此时的窗口已经可见了,显示在前台并且进行活动了,我们也可以与窗口进行交互了。onPause:表示窗口正在停止,这是我们可以做一些存储数据、或者停止动画等一些不太耗时的操作,因为会影响到下一个Activity的显示。onPause执行完成之后,新的Activity的onResume才会执行。onStop:表示窗口即将停止,此时,可以做一些稍微重量级的回收工作,但是也不能太耗时哈。onDestroy:表示窗口即将被销毁。这是Activity生命周期中的最后一步了。这里,我们可以做一些回收工作和最终的资源释放工作。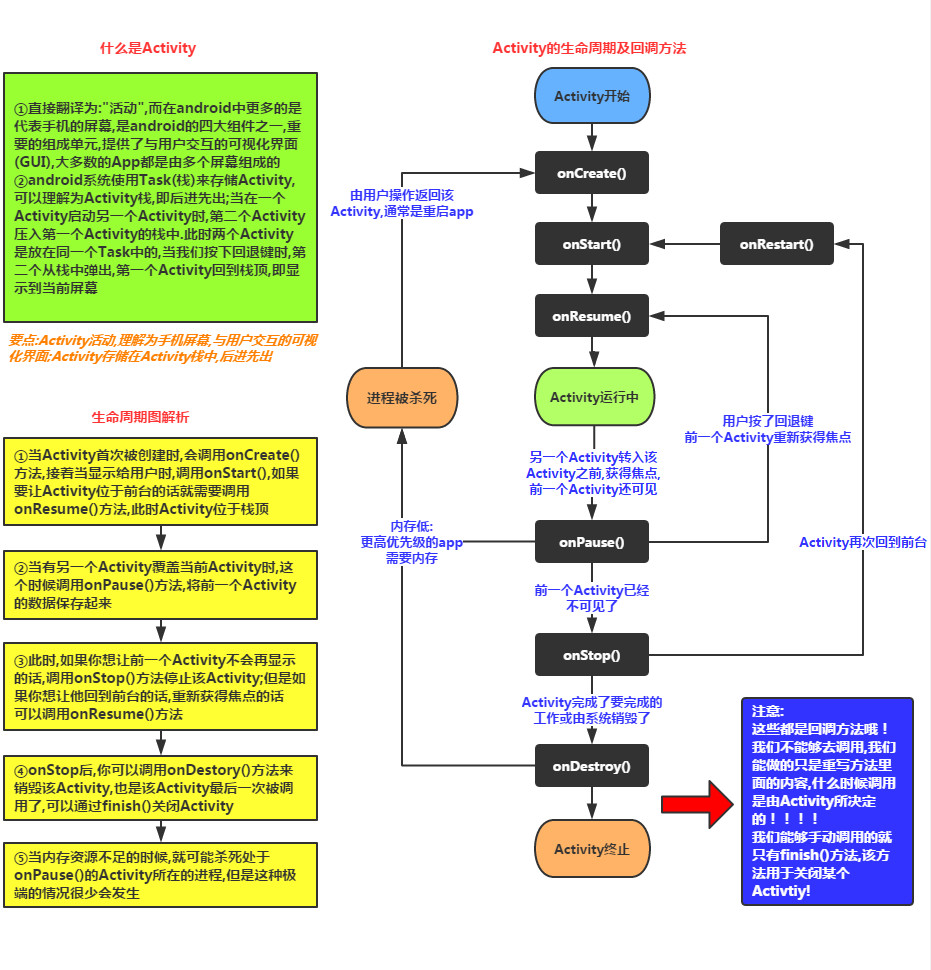
7.2.3 Activity的生命周期调用
启动一个ActivityonCreate()–>onStart()–>onResume()在Activity创建完成后,点击Home回调主界面时
onPause()–>onStop()当点击Home键后,点击App回到Activity时
onRestart()–>onStart()–>onResume()在原有的Activity的基础上打新的Activity时
开启新的Activity,原Activity生命周期执行方法顺序为:onPause()–>onStop(),事实上跟点击home键是一样的。
但是这里有点要注意的是如果新的Activity使用了透明主题,那么当前Activity不会回调onStop方法。同时我们发现新Activity(SecondActivity)生命周期方法是在原Activity的onPause方法执行完成后才可以被回调,这也就是前面我们为什么说在onPause方法不能操作耗时任务的原因了。回退到原来的Activity时不会调用不会调用onRestart()
onCreate()–>onStart()–>onResume()点击Back键回退时,相当于退出了当前Activity,Activity将被销毁
onPause()–>onStop()–>onDestroy()
7.3 Intent和IntentFilter
7.3.1 Intent的基本概念
Intent中文意思指”意图”,按照Android的设计理念,Android使用Intent来封装程序的”调用意图”,不管启动Activity(活动)、Service(服务)、BroadcastReceiver(广播接收器),Android都使用统一的Intent对象来封装这一”启动意图”。此外,Intent也是应用程序组件之间通信的重要媒介。在Android中指定的了具体是某个组件,那么就是显性意图;如果只是提出要求没有指定具体的某个人,在Android中即没有指定某个具体的组件,那么就是隐式意图;所有Intent页面跳转的方式又分为显示跳转和隐式跳转。
7.3.2 Intent和三大组件
Android应用程序包含三种重要组件:Activity(活动)、Service(服务)、BroadcastReceiver(广播接收器),应用程序采用一致的方式启动它们,都是依靠Intent来进行启动的,Intent中封装了程序要启动的意图。
下面是Intent启动不同组件的部分方法:
Activity组件:startActivity(Intent intent);
startActivityForResult(Intent intent,int requestCode);Service组件:
startService(Intent intent);
bindService(Intent intent,ServiceConnection conn,int flags);BroadcastReceiver组件:
sendBroadcast(Intent intent);
sendOrderedBroadcast(Intent intent,String receiverPermission);
7.3.3 Intent的跳转方式
Intent显式跳转页面:显示意图的跳转是Intent对象中包含了目标的class文件
Intent intent = new Intent(this, SecondActivity.class);startActivity(intent);这里的目标文件必须是要在AndroidManifest.xml里面注册。Intent隐式跳转页面:
隐式Intent不会明确指出需要激活的目标组件,它被广泛地应用在不同应用程序之间传递消息。Android系统会使用IntentFilter匹配相应的组件,匹配的属性主要包括以下三个:
action:表示Intent对象要完成的意图动作。
data:指定数据的URL或者数据MIME类型他的值通常与Intent的action属性有关联。
category:表示activity的动作的类别。
注意:在隐式跳转中,匹配的每一个属性可以罗列多个
7.3.3 IntentFilter的基本概念
IntentFilter的意思是“意图过滤器”,当我们隐式的启动系统组件的时候,就会根据IntentFilter来匹配相应的组件进行启动。
7.3.4 IntentFilter的属性
Intent通过下面的属性来描述的某个意图:
action(动作): 用来表示意图的动作,如:查看,发邮件,打电话category(类别): 用来表示动作的类别。data(数据): 表示与动作要操作的数据。如:查看指定的联系人type(数据类型): 对data类型的描述。extras(附加信息): 附加信息。如:详细资料,一个文件,某事。component(目标组件): 目标组件。7.3.5 action(动作)属性
动作很大程度上决定了Intent如何构建,特别是数据和附加信息,就像一个方法名决定了参数和返回值一样,所以应该尽可能明确地指定动作,并紧密关联到其他的Intent字段,如Category和Data。
常用动作
最常用的是Action_MAIN(作为初始的Activity启动,没有数据的输入输出)
上面的动作都是Intent对象引用才有实际意义的。
setAction(String action) 用来设置Intent的动作,参数可以为常量
getAction() 方法用来获取Intent动作名称
上面的Action都是系统定义好的,具有一定意义的动作指向的动作。
Intent的Action对象其实就是一个字符串常量,系统的Action对象是系统定义好的字符串常量,我们也可以自己定义自己的Action作为字符串常量。就像上面的例子使用到了自定义的Action字符串对象。
7.3.6 category(类别)属性
Intent的action、category属性都是普通的字符串,其中action表示Intent需要完成的一个抽象”动作”,而category则为action添加额外的类别信息,通常action和category一块使用。
需要指出的是,一个Intent中只能包含一个action属性,但可以包含多个category属性。当程序创建Intent时,该Intent默认启动常量值为andorid.intent.category.DEFAULT的组件。这里的一个Intent中只能包含一个action属性,并不是Activity中xml的设置规范,而是你要跳转到的页面去,你只能设置一个Action的值。
常用的Category:
上面的类别都是Intent对象引用才有实际意义的。
7.3.7 data(数据)属性
Data数据用来向Action属性提供动作的数据。这里的Data不是Intent里面的数据,而是指明动作的具体数据,比如说动作是打电话,那么打给具体的某一个人,就用到了date里面的数据来指定。同样发邮件、或打开具体的某一个网址也是通过Data数据。
Data属性只接受Uri对象,Uri对象是统一资源标识符。对应概念不用太多理解,只需知道里面某些具体值的表现形式就可以了。
Uri其实就是相当于一个网址,如图所示:
网址只是Uri其中一种格式的字符串,要使用它还要把它解析后转化为Uri类型。
为Intent对象添加Data数据,代码:
intent.setData(Uri.parse(“http://www.baidu.com“));
这里的Uri的有两个没显示的属性:port的值是8080,path的值是/index
通过下面三句代码就可以跳转到百度主页面:
Intent intent = new Intent(Intent.ACTION_VIEW);intent.setData(Uri.parse("http://www.baidu.com"));startActivity(intent);7.3.8 type(数据类型)属性
与Data有关的,这个不是Intent的数据类型,是Intent的Action的Data数据的类型。
比如:
{“.mp3”, “audio/x-mpeg”},
{“.mp4”, “video/mp4”},
{“.gif”, “image/gif”},
{“.rmvb”, “audio/x-pn-realaudio”},
这里只是做几个简单的示例介绍,如果是打开gif格式的数据文件,设置type=“image/gif”
7.3.9 extras(附加信息)属性
Extras属性主要用于传递目标组件所需要的额外的数据。这个数据是可以通过Intent来保存的数据和Intent对象来获取数据。
通过putExtras()方法设置。保存数据
通过putExtras()方法设置。获取数据
通常我们使用Intent来直接传递Bundle对象,但也可以传递其他系统内置的一些参数。
如果要传递是是对象,那么对象必须实现序列化。
7.3.10 component(目标组件)属性
这个属性用得比较少,最好不用。如果是显示调用直接指定目标类的class文件名就可以使用了。
7.3.11 Intent的Action属性的部分常量值
ACTION_MAIN:Android Application的入口,每个Android应用必须且只能包含一个此类型的Action声明。ACTION_VIEW:系统根据不同的Data类型,通过已注册的对应Application显示数据。ACTION_EDIT:系统根据不同的Data类型,通过已注册的对应Application编辑示数据。ACTION_DIAL:系统默打开拨号程序,如果Data中设置电话号码,则拨号框中会显示此号码。ACTION_CALL:直接呼叫Data中所带的号码。ACTION_ANSWER:接听来电。ACTION_SEND:由用户指定发送方式进行数据发送操作。ACTION_SENDTO:系统根据不同的Data类型,通过已注册的对应Application进行数据发送操作。ACTION_BOOT_COMPLETED:Android系统在启动完毕后发出带有此Action的广播(Broadcast)。ACTION_TIME_CHANGED:Android系统的时间发生改变后发出带有此Action的广播(Broadcast)。ACTION_PACKAGE_ADDED:Android系统安装了新的App之后发出带有此Action的广播(Broadcast)。ACTION_PACKAGE_CHANGED:Android系统中已存在的App发生改变之后(如更新)发出带有此Action的广播(Broadcast)。ACTION_PACKAGE_REMOVED:Android系统卸载App之后发出带有此Action的广播(Broadcast)。7.3.12 Intent的Category属性的部分常量值
CATEGORY_DEFAULT:Android系统中默认的执行方式,按照普通Activity的执行方式执行。CATEGORY_PREFERENCE:设置该组件为Preference。CATEGORY_LAUNCHER:设置为当前应用程序优先级最高的Activity,通常与ACTION_MAIN配合使用。CATEGORY_BROWSABLE:设置该组件可以使用浏览器启动。CATEGORY_GADGET:设置该组件可以内嵌到另外的Activity中。7.3.13 Intent的Data属性的部分常量值
tel:号码数据格式,后跟电话号码。 mailto:邮件数据格式,后跟邮件收件人地址。smsto:短息数据格式,后跟短信接收号码。content:内容数据格式,后跟需要读取的内容。 file:文件数据格式,后跟文件路径。market:search?q=pname:pkgname:市场数据格式,在Google Market里搜索包名为pkgname的应用。geo:latitude, longitude:经纬数据格式,在地图上显示经纬度所指定的位置。7.3.14 Intent的Extras属性的部分常量值
EXTRA_BCC:存放邮件密送人地址的字符串数组。EXTRA_CC:存放邮件抄送人地址的字符串数组。EXTRA_EMAIL:存放邮件地址的字符串数组。EXTRA_SUBJECT:存放邮件主题字符串。EXTRA_TEXT:存放邮件内容。EXTRA_KEY_EVENT:以KeyEvent对象方式存放触发Intent的按键。EXTRA_PHONE_NUMBER:存放调用ACTION_CALL时的电话号码。7.3.15 Intent的MimeType属性的部分常量值
{“.3gp”, “video/3gpp”},
{“.apk”, “application/vnd.android.package-archive”},
{“.asf”, “video/x-ms-asf”},
{“.avi”, “video/x-msvideo”},
{“.bin”, “application/octet-stream”},
{“.bmp”, “image/bmp”},
{“.c”, “text/plain”},
{“.class”, “application/octet-stream”},
{“.conf”, “text/plain”},
{“.cpp”, “text/plain”},
{“.doc”, “application/msword”},
{“.docx”, “application/vnd.openxmlformats-officedocument.wordprocessingml.document”},
{“.xls”, “application/vnd.ms-excel”},
{“.xlsx”, “application/vnd.openxmlformats-officedocument.spreadsheetml.sheet”},
{“.exe”, “application/octet-stream”},
{“.gif”, “image/gif”},
{“.gtar”, “application/x-gtar”},
{“.gz”, “application/x-gzip”},
{“.h”, “text/plain”},
{“.htm”, “text/html”},
{“.html”, “text/html”},
{“.jar”, “application/Java-archive”},
{“.java”, “text/plain”},
{“.jpeg”, “image/jpeg”},
{“.jpg”, “image/jpeg”},
{“.js”, “application/x-JavaScript”},
{“.log”, “text/plain”},
{“.m3u”, “audio/x-mpegurl”},
{“.m4a”, “audio/mp4a-latm”},
{“.m4b”, “audio/mp4a-latm”},
{“.m4p”, “audio/mp4a-latm”},
{“.m4u”, “video/vnd.mpegurl”},
{“.m4v”, “video/x-m4v”},
{“.mov”, “video/quicktime”},
{“.mp2”, “audio/x-mpeg”},
{“.mp3”, “audio/x-mpeg”},
{“.mp4”, “video/mp4”},
{“.mpc”, “application/vnd.mpohun.certificate”},
{“.mpe”, “video/mpeg”},
{“.mpeg”, “video/mpeg”},
{“.mpg”, “video/mpeg”},
{“.mpg4”, “video/mp4”},
{“.mpga”, “audio/mpeg”},
{“.msg”, “application/vnd.ms-outlook”},
{“.ogg”, “audio/ogg”},
{“.pdf”, “application/pdf”},
{“.png”, “image/png”},
{“.pps”, “application/vnd.ms-powerpoint”},
{“.ppt”, “application/vnd.ms-powerpoint”},
{“.pptx”, “application/vnd.openxmlformats-officedocument.presentationml.presentation”},
{“.prop”, “text/plain”},
{“.rc”, “text/plain”},
{“.rmvb”, “audio/x-pn-realaudio”},
{“.rtf”, “application/rtf”},
{“.sh”, “text/plain”},
{“.tar”, “application/x-tar”},
{“.tgz”, “application/x-compressed”},
{“.txt”, “text/plain”},
{“.wav”, “audio/x-wav”},
{“.wma”, “audio/x-ms-wma”},
{“.wmv”, “audio/x-ms-wmv”},
{“.wps”, “application/vnd.ms-works”},
{“.xml”, “text/plain”},
{“.z”, “application/x-compress”},
{“.zip”, “application/x-zip-compressed”},
7.3部分的内容为转载:CSDN博主「峥嵘life」的原创文章,原文链接:https://blog.csdn.net/wenzhi20102321/article/details/52876648
7.4 Activity之间的跳转
7.4.1 Activity之间的数据传递
Android提供的Intent可以在界面跳转时传递参数。使用Intent传递参数有两种方式,具体如下:
使用Intent的putExtra()方法传递数据putExtra()方法的参数为<key,value>的形式,并且Android系统提供了多个重载的putExtra()方法供不同类型的参数传递
获取参数:首先通过getIntent()方法获取到Intent对象,然后通过Intent对象的getXxxExtra()方法获取到参数使用Bundle类传递数据
此方法是先将参数通过Bundle对象的putXxx()方法保存在Bundle对象中,同样是<key,value>的形式,然后再通过Intent的putExtras()方法保存到Intent对象中
获取参数:首先通过getIntent()方法获取到Intent对象,然后通过Intent对象的getExtras()方法获取到Bundle对象,然后通过Intent对象的getXxx()方法获取到参数如何传递对象(让对象具有被传递的功能)
第一种方法:让对象类实现 Serializable 接口,同样通过以上两种方式传递,在另一个Activity中使用 getSerializableExtra("key")获取到对象,须强转为目标对象,此方法基于JVM虚拟机,不兼容Android虚拟机
第二种方法:让对象类实现 Parcelable 接口,同样通过以上两种方式传递,Android推荐使用,在另一个Activity中使用 getParcelableExtra("key")获取到对象,不用强转为目标对象(使用了泛型),此方法兼容Android虚拟机
7.4.2 Activity之间的数据回传
当我们从MainActivity界面跳转到SecondActivity界面时,在SecondActivity界面进行操作后,当关闭SecondActivity界面时,想要从该界面返回一些数据到MainActivity界面。此时Android系统为我们提供了一些方法用于Activity之间数据的回传。具体如下:
startActivityForResult(intent, REQUEST_CODE)方法:该方法跟startActivity()方法一样,也是用于启动活动的,但这个方法期望在活动销毁的时候能够返回一个结果给上一个活动。
REQUEST_CODE为请求码,用于在之后的回调中判断数据的来源。setResult(RESULT_CODE, intent)方法:
该方法是专门用于向上一个活动返回数据的。
RESULT_CODE为返回码,用于向上一个活动返回处理结果,该结果可用于在之后的回调中判断数据的来源,一般只使用RESULT_OK或RESULT_CANCELED这两个值;onActivityResult()方法:
由于我们是使用startActivityForResult()方法来启动的Activity,在Activity被销毁之后会回调上一个活动的onActivityResult()方法,因此我们需要在MainActivity中重写这个方法来得到返回数据。
注意1:若使用此方法进行Activity之间数据的传递与回传,则必须同时使用以上3个方法,其中第3个方法是一个用于重写的方法
注意2:新手在使用Intent启动其他的Activity时,需要在AndroidManifest.xml清单文件中进行声明,其中android:exported 属性表示是否支持其它应用调用/启动该组件。
activity_main.xml代码:
<?xml version="1.0" encoding="utf-8"?><LinearLayout xmlns:android="http://schemas.android.com/apk/res/android" xmlns:tools="http://schemas.android.com/tools" android:layout_width="match_parent" android:layout_height="match_parent" android:orientation="vertical" tools:context=".MainActivity"> <EditText android:id="@+id/et_name" android:layout_width="match_parent" android:layout_height="40dp" android:hint="姓名"/> <EditText android:id="@+id/et_score" android:layout_width="match_parent" android:layout_height="40dp" android:hint="分数"/> <Button android:id="@+id/btn_submit" android:layout_width="wrap_content" android:layout_height="wrap_content" android:text="提交数据"/> <TextView android:id="@+id/tv_result" android:layout_width="match_parent" android:layout_height="150dp" android:hint="返回的结果"/></LinearLayout>MainActivity.java代码:
public class MainActivity extends AppCompatActivity implements View.OnClickListener { private EditText et_name,et_score; private Button btn_submit; private TextView tv_result; public static final int REQUEST_CODE = 1; @Override protected void onCreate(Bundle savedInstanceState) { super.onCreate(savedInstanceState); setContentView(R.layout.activity_main); et_name = findViewById(R.id.et_name); et_score = findViewById(R.id.et_score); btn_submit = findViewById(R.id.btn_submit); tv_result = findViewById(R.id.tv_result); btn_submit.setOnClickListener(this); } @Override public void onClick(View view) { String name = et_name.getText().toString(); Double score = Double.valueOf(et_score.getText().toString()); Intent intent = new Intent(this, SecondActivity.class); intent.putExtra("name",name); intent.putExtra("score", score); startActivityForResult(intent, REQUEST_CODE); } @Override protected void onActivityResult(int requestCode, int resultCode, @Nullable Intent data) { super.onActivityResult(requestCode, resultCode, data); if (requestCode == REQUEST_CODE) { if (resultCode == SecondActivity.RESULT_CODE) { tv_result.setText("返回的结果为:"+data.getStringExtra("result")); } } }}activity_second.xml代码:
<?xml version="1.0" encoding="utf-8"?><LinearLayout xmlns:android="http://schemas.android.com/apk/res/android" xmlns:tools="http://schemas.android.com/tools" android:layout_width="match_parent" android:layout_height="match_parent" android:orientation="vertical" tools:context=".SecondActivity"> <TextView android:id="@+id/tv_data" android:layout_width="match_parent" android:layout_height="150dp"/> <EditText android:id="@+id/et_result" android:layout_width="match_parent" android:layout_height="40dp" android:hint="返回的数据"/> <Button android:id="@+id/btn_return" android:layout_width="wrap_content" android:layout_height="wrap_content" android:text="返回数据"/></LinearLayout>SecondActivity.java代码:
public class SecondActivity extends AppCompatActivity implements View.OnClickListener { private TextView tv_data; private EditText et_result; private Button btn_return; public static final int RESULT_CODE = 2; @Override protected void onCreate(Bundle savedInstanceState) { super.onCreate(savedInstanceState); setContentView(R.layout.activity_second); tv_data = findViewById(R.id.tv_data); et_result = findViewById(R.id.et_result); btn_return = findViewById(R.id.btn_return); Intent intent = getIntent(); StringBuffer data = new StringBuffer(); data.append("姓名:" + intent.getStringExtra("name")); data.append("\n分数:" + intent.getDoubleExtra("score", 0)); tv_data.setText(data); btn_return.setOnClickListener(this); } @Override public void onClick(View view) { Intent intent = new Intent(this, SecondActivity.class); intent.putExtra("result", et_result.getText().toString()); setResult(RESULT_CODE, intent); finish(); //用于结束一个Activity的生命周期,finish会调用到onDestory()方法。 }}运行效果: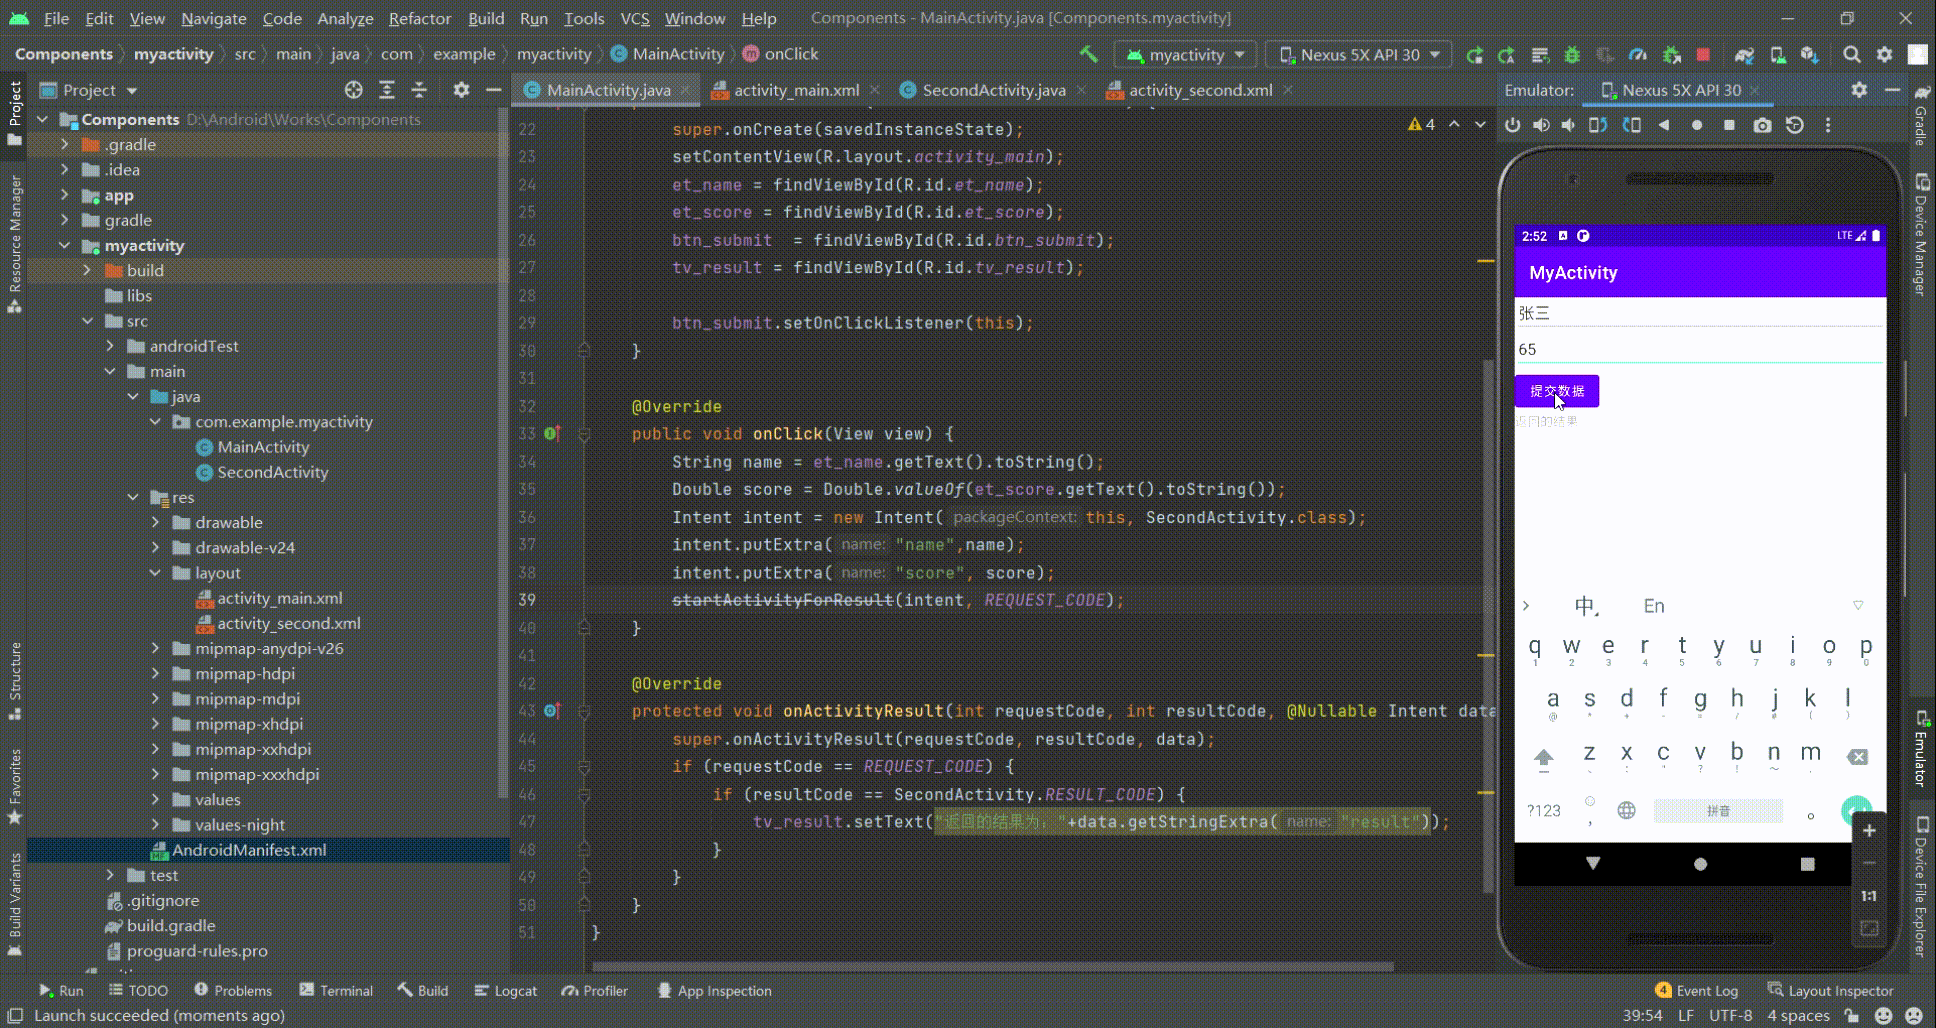
第8章 Service(服务)
8.1 线程的相关概念
8.1.1 相关概念
程序:为了完成特定任务,用某种语言编写的一组指令集合(一组静态代码)进程:进程是系统调度与资源分配(CPU、内存)的基本单位,它是程序执行时的一个实例。操作系统会为每个进程分配一段内存空间!程序的依次动态执行,经历代码的加载,执行, 执行完毕的完整过程!线程:线程是程序执行时的最小单位,是进程的一个执行流,CPU调度和分派的基本单位。每个进程可能有多个线程,线程需要放在一个进程中才能执行,线程由程序负责管理,而进程则由系统进行调度!多线程的理解:并行执行多条指令,将CPU时间片按照调度算法分配给各个 线程,实际上是分时执行的,只是这个切换的时间很短,用户感觉到"同时"而已!8.1.2 线程的生命周期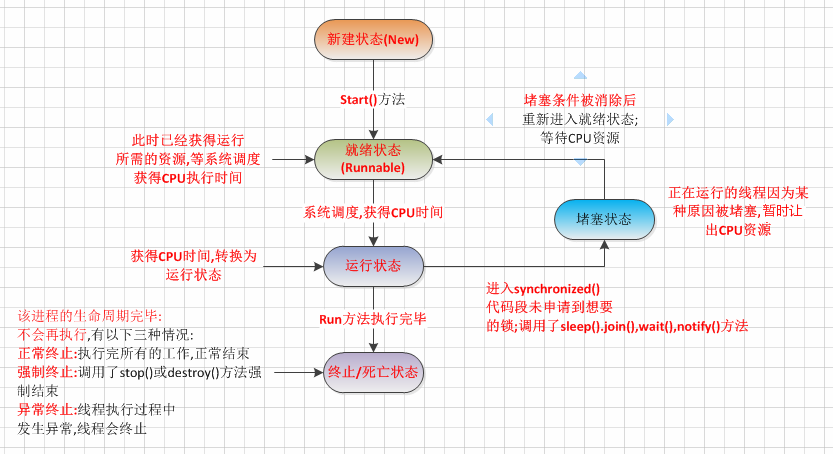
8.1.3 创建线程的三种方式
继承Thread类,并重写run方法实现Callable接口,并重写call()方法实现Callable接口,并重写call()方法详见1:https://www.jianshu.com/p/0977349d20db
详见2:https://blog.csdn.net/chaochao2113/article/details/118861041
8.2 Service与Thread线程的区别
其实他们两者并没有太大的关系,不过有很多朋友经常把这两个混淆了! Thread是线程,程序执行的最小单元,分配CPU的基本单位! 而Service则是Android提供一个允许长时间留驻后台的一个组件,最常见的用法就是做轮询操作!或者想在后台做一些事情,比如后台下载更新、音乐播放等! 记得别把这两个概念混淆!
8.3 Service的生命周期
8.3.1 Service的生命周期图
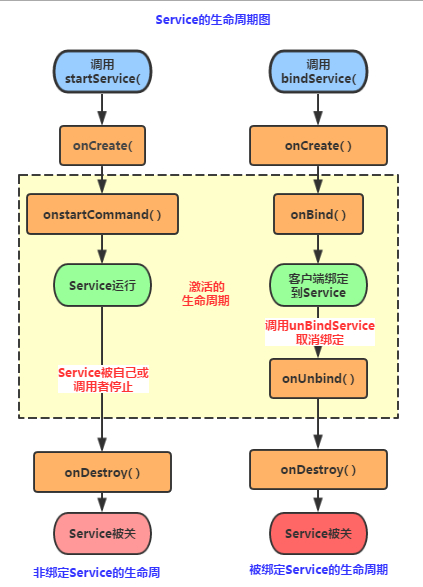
8.3.2 Service的相关方法详解
onCreate():当Service第一次被创建后立即回调该方法,该方法在整个生命周期 中只会调用一次!onDestory():当Service被关闭时会回调该方法,该方法只会回调一次!onStartCommand(intent,flag,startId):早期版本是onStart(intent,startId), 当客户端调用startService(Intent)方法时会回调,可多次调用StartService方法, 但不会再创建新的Service对象,而是继续复用前面产生的Service对象,但会继续回调 onStartCommand()方法!IBinder onOnbind(intent):该方法是Service都必须实现的方法,该方法会返回一个 IBinder对象,app通过该对象与Service组件进行通信!onUnbind(intent):当该Service上绑定的所有客户端都断开时会回调该方法!8.3.3 Service的两种使用方式
StartService启动Service
①首次启动会创建一个Service实例,依次调用onCreate()和onStartCommand()方法,此时Service 进入运行状态,如果再次调用StartService启动Service,将不会再创建新的Service对象, 系统会直接复用前面创建的Service对象,调用它的onStartCommand()方法!
②但这样的Service与它的调用者无必然的联系,就是说当调用者结束了自己的生命周期, 但是只要不调用stopService,那么Service还是会继续运行的!
③无论启动了多少次Service,只需调用一次StopService即可停掉Service
BindService启动Service
①当首次使用bindService绑定一个Service时,系统会实例化一个Service实例,并调用其onCreate()和onBind()方法,然后调用者就可以通过IBinder和Service进行交互了,此后如果再次使用bindService绑定Service,系统不会创建新的Sevice实例,也不会再调用onBind()方法,只会直接把IBinder对象传递给其他后来增加的客户端!
②如果我们解除与服务的绑定,只需调用unbindService(),此时onUnbind和onDestory方法将会被调用!这是一个客户端的情况,假如是多个客户端绑定同一个Service的话,情况如下 当一个客户完成和service之间的互动后,它调用 unbindService() 方法来解除绑定。当所有的客户端都和service解除绑定后,系统会销毁service。(除非service也被startService()方法开启)
③另外,和上面那张情况不同,bindService模式下的Service是与调用者相互关联的,可以理解为 "一条绳子上的蚂蚱",要死一起死,在bindService后,一旦调用者销毁,那么Service也立即终止!
通过BindService调用Service时调用的Context的bindService的解析 bindService(Intent Service,ServiceConnection conn,int flags)
service:通过该intent指定要启动的Service
conn:ServiceConnection对象,用户监听访问者与Service间的连接情况, 连接成功回调该对象中的onServiceConnected(ComponentName,IBinder)方法; 如果Service所在的宿主由于异常终止或者其他原因终止,导致Service与访问者间断开 连接时调用onServiceDisconnected(CompanentName)方法,主动通过unBindService() 方法断开并不会调用上述方法!
flags:指定绑定时是否自动创建Service(如果Service还未创建), 参数可以是0(不自动创建),BIND_AUTO_CREATE(自动创建)
StartService启动Service后bindService绑定
如果Service已经由某个客户端通过StartService()启动,接下来由其他客户端 再调用bindService()绑定到该Service后调用unbindService()解除绑定最后在 调用bindService()绑定到Service的话,此时所触发的生命周期方法如下:
onCreate( )->onStartCommand( )->onBind( )->onUnbind( )->onRebind( )
PS:前提是:onUnbind()方法返回true!!! 这里或许部分读者有疑惑了,调用了unbindService后Service不是应该调用 onDistory()方法么!其实这是因为这个Service是由我们的StartService来启动的 ,所以你调用onUnbind()方法取消绑定,Service也是不会终止的!
得出的结论: 假如我们使用bindService来绑定一个启动的Service,注意是已经启动的Service!!! 系统只是将Service的内部IBinder对象传递给Activity,并不会将Service的生命周期 与Activity绑定,因此调用unBindService( )方法取消绑定时,Service也不会被销毁!
StartService启动与BindService启动的区别:
①启动方式:前者startService、后者bindService;
②和Activity联系:前者Acitivty销毁,service仍然继续运行,后者跟随Acitivity一起销毁;
③方法调用和数据交换:前者不可以,后者可以;
④回调的周期函数:前者是onStartCommand,后者是onBind
⑤结束方式:前者是stopService或者stopSelf,后者是unbindService。
生命周期的不同:
startService方式:调用startService方法->onCreate->onStartCommand->Servcie运行->调用stopService->Service停止->onDestroy->Service销毁;
bindService方式:调用bindServcie方法->onCreate->onBind->绑定Service->调用unbindService方法->解绑Service->onUnBind->onDestroy->Service销毁。
第9章 BroadcastReceiver(广播接收器)
9.1 广播与广播接收器
9.1.1 什么是广播
广播(Broadcast)是 Android 系统中应用程序间通信的手段。
当有特定事件发生时,例如有来电、有短信、电池电量变化等事件发生时,Android 系统都会产生特定的 Intent 对象并且自动进行广播,而针对特定事件注册的 BroadcastReceiver 会接收到这些广播,并获取 Intent 对象中的数据进行处理。
在广播 Intent 对象时可以指定用户权限,以此限制仅有获得了相应权限的 BroadcastReceiver 才能接收并处理对应的广播。
9.1.2 什么是广播接收器
BroadcastReceiver翻译为广播接收者,它是一个系统全局的监听器,用于监听系统全局的Broadcast消息,所以它可以很方便的进行系统组件之间的通信。
BroadcastReceiver虽然是一个监听器,但是它和之前用到的OnXxxListener不同,那些只是程序级别的监听器,运行在指定程序的所在进程中,当程序退出的时候,OnXxxListener监听器也就随之关闭了,但是BroadcastReceiver属于系统级的监听器,它拥有自己的进程,只要存在与之匹配的Broadcast被以Intent的形式发送出来,BroadcastReceiver就会被激活。
虽然同属Android的四大组件,BroadcastReceiver也有自己独立的声明周期,但是和Activity、Service又不同。当在系统注册一个BroadcastReceiver之后,每次系统以一个Intent的形式发布Broadcast的时候,系统都会创建与之对应的BroadcastReceiver广播接收者实例,并自动触发它的onReceive()方法,当onReceive()方法被执行完成之后,BroadcastReceiver的实例就会被销毁。虽然它独自享用一个单独的进程,但也不是没有限制的,如果BroadcastReceiver.onReceive()方法不能在10秒内执行完成,Android系统就会认为该BroadcastReceiver对象无响应,然后弹出ANR(Application No Response)对话框,所以不要在BroadcastReceiver.onReceive()方法内执行一些耗时的操作。
如果需要根据广播内容完成一些耗时的操作,一般考虑通过Intent启动一个Service来完成该操作,而不应该在BroadcastReceiver中开启一个新线程完成耗时的操作,因为BroadcastReceiver本身的生命周期很短,可能出现的情况是子线程还没有结束,BroadcastReceiver就已经退出的情况,而如果BroadcastReceiver所在的进程结束了,该线程就会被标记为一个空线程,根据Android的内存管理策略,在系统内存紧张的时候,会按照优先级,结束优先级低的线程,而空线程无异是优先级最低的,这样就可能导致BroadcastReceiver启动的子线程不能执行完成。
9.2 发送广播的类型
9.2.1 标准广播
它是完全异步的,也就是说,在逻辑上,当一个Broadcast被发出之后,所有的与之匹配的BroadcastReceiver都同时接收到Broadcast。优点是传递效率比较高,但是也有缺点,就是一个BroadcastReceiver不能影响其他响应这条Broadcast的BroadcastReceiver。
sendBroadcast():发送普通广播。9.2.2 有序广播
它是同步执行的,就是说有序广播的接收器将会按照预先声明的优先级(-1000~1000)依次接受Broadcast,优先级越高,越先被执行。因为是顺序执行,所有优先级高的接收器,可以把执行结果传入下一个接收器中,也可以终止Broadcast的传播(通过abortBroadcast()方法),一旦Broadcast的传播被终止,优先级低于它的接收器就不会再接收到这条Broadcast了。
sendOrderedBroadcast():发送有序广播。注:有序广播能被设置了高优先级的广播接收者的 abortBroadcast() 截断。
9.3 如何使用BroadcastReceiver
BroadcastReceiver本质上还是一个监听器,所以使用BroadcastReceiver的方法也是非常简单,只需要继承BroadcastReceiver,在其中重写onReceive(Context context,Intent intent)即可。一旦实现了BroadcastReceiver,并部署到系统中后,就可以在系统的任何位置,通过sendBroadcast、sendOrderedBroadcast方法发送Broadcast给这个BroadcastReceiver。
但是仅仅继承BroadcastReceiver和实现onReceive()方法是不够的,同为Android系统组件,它也必须在Android系统中注册,注册一个BroadcastReceiver有两种方式:
9.3.1 静态注册(不建议使用)
使用清单文件AndroidManifest.xml注册,在<application/>节点中,使用<receiver/>节点注册,并用android:name属性中指定注册的BroadcastReceiver对象,一般还会通过<Intent-filter/>指定<action/>和<category/>,并在<Intent-filter/>节点中通过android:priority属性设置BroadcastReceiver的优先级,在-1000~1000范围内,数值越到优先级越高。
<receiver android:name=".MyBroadcastReceiver" android:exported="false"> <intent-filter> <action android:name="com.example.mybroadcastreceiver.staticReceiver"/> </intent-filter> </receiver>广播接收者接收Android 8.0及以上的静态注册的广播:
intent.addFlags(Intent.FLAG_ACTIVITY_PREVIOUS_IS_TOP);intent.setComponent(new ComponentName("com.example.mybroadcastreceiver","com.example.mybroadcastreceiver.MyBroadcastReceiver"));//第一个参数为广播接收者的包名,第二个参数为广播接收者的类名intent.setPackage("com.example.mybroadcastreceiver");//参数为广播接收者的报名9.3.2 动态注册
就是在Java代码中指定 IntentFilter,然后添加不同的 Action 即可,想监听什么广播就写什么 Action,最后通过registerReceiver(BroadcastReceiver receiver, IntentFilter filter) 方法进行注册,另外动态注册的广播,一定要调用unregisterReceiver() 方法撤销广 播的注册。
MyBroadcastReceiver myBroadcastReceiver = new MyBroadcastReceiver(); IntentFilter intentFilter = new IntentFilter(); intentFilter.addAction("com.example.mybroadcastreceiver.dynamicReceiver");//参数为标识名,用于发送广播时识的别时 registerReceiver(myBroadcastReceiver, intentFilter);9.3.3 广播接收总结
广播接收的特点:①广播接收器接收到相应广播后,会自动回调
onReceive() 方法②一般情况下,
onReceive方法会涉及 与 其他组件之间的交互,如发送Notification、启动Service等③默认情况下,广播接收器运行在
UI 线程,因此,onReceive()方法不能执行耗时操作(10s的时间),否则将导致ANR实现自定义的广播接收:①继承
BroadcastReceiver类,实现自定义的广播接收者,实现onReceive(Context context, Intent intent)方法用于接受广播②注册
BroadcastReceiver,静态注册 / 动态注册③
sendBroadcast(Intent intent); 发送广播④在
onReceive(Context context, Intent intent)中处理逻辑业务; 接收广播 activity_main.xml代码:
<?xml version="1.0" encoding="utf-8"?><androidx.constraintlayout.widget.ConstraintLayout xmlns:android="http://schemas.android.com/apk/res/android" xmlns:app="http://schemas.android.com/apk/res-auto" xmlns:tools="http://schemas.android.com/tools" android:layout_width="match_parent" android:layout_height="match_parent" tools:context=".MainActivity"> <Button android:id="@+id/btn_static" android:layout_width="wrap_content" android:layout_height="wrap_content" android:text="静态注册广播" android:textSize="30sp" app:layout_constraintBottom_toTopOf="@+id/btn_dynamic" app:layout_constraintEnd_toEndOf="parent" app:layout_constraintHorizontal_bias="0.5" app:layout_constraintStart_toStartOf="parent" app:layout_constraintTop_toTopOf="parent" /> <Button android:id="@+id/btn_dynamic" android:layout_width="wrap_content" android:layout_height="wrap_content" android:text="动态注册广播" android:textSize="30sp" app:layout_constraintBottom_toBottomOf="parent" app:layout_constraintEnd_toEndOf="parent" app:layout_constraintHorizontal_bias="0.5" app:layout_constraintStart_toStartOf="parent" app:layout_constraintTop_toBottomOf="@+id/btn_static" /></androidx.constraintlayout.widget.ConstraintLayout>MyBroadcastReceiver.java代码:
public class MyBroadcastReceiver extends BroadcastReceiver { private static final String TAG = "zhumeng"; @Override public void onReceive(Context context, Intent intent) { Log.e(TAG, "接收到广播消息‘"+intent.getStringExtra("msg")+"’"); }}MainActivity.java代码:
public class MainActivity extends AppCompatActivity implements View.OnClickListener { private MyBroadcastReceiver myBroadcastReceiver; @Override protected void onCreate(Bundle savedInstanceState) { super.onCreate(savedInstanceState); setContentView(R.layout.activity_main); Button btn_static = findViewById(R.id.btn_static); Button btn_dynamic = findViewById(R.id.btn_dynamic); btn_static.setOnClickListener(this); btn_dynamic.setOnClickListener(this); initReceiver(); } private void initReceiver() { //动态注册广播接收者 myBroadcastReceiver = new MyBroadcastReceiver(); IntentFilter intentFilter = new IntentFilter(); intentFilter.addAction("com.example.mybroadcastreceiver.dynamicReceiver"); registerReceiver(myBroadcastReceiver, intentFilter); } @Override public void onClick(View view) { Log.e("zhumeng", "单击事件发生"); Intent intent; switch (view.getId()){ case R.id.btn_static: intent = new Intent(); intent.setAction("com.example.mybroadcastreceiver.staticReceiver");// intent.addFlags(Intent.FLAG_ACTIVITY_PREVIOUS_IS_TOP);// intent.setComponent(new ComponentName("com.example.mybroadcastreceiver","com.example.mybroadcastreceiver.MyBroadcastReceiver")); intent.setPackage("com.example.mybroadcastreceiver"); intent.putExtra("msg","静态注册的广播"); sendBroadcast(intent); break; case R.id.btn_dynamic: intent = new Intent(); intent.setAction("com.example.mybroadcastreceiver.dynamicReceiver"); intent.putExtra("msg","动态注册的广播"); sendBroadcast(intent); break; } } @Override protected void onDestroy() { super.onDestroy(); unregisterReceiver(myBroadcastReceiver); }}运行效果图: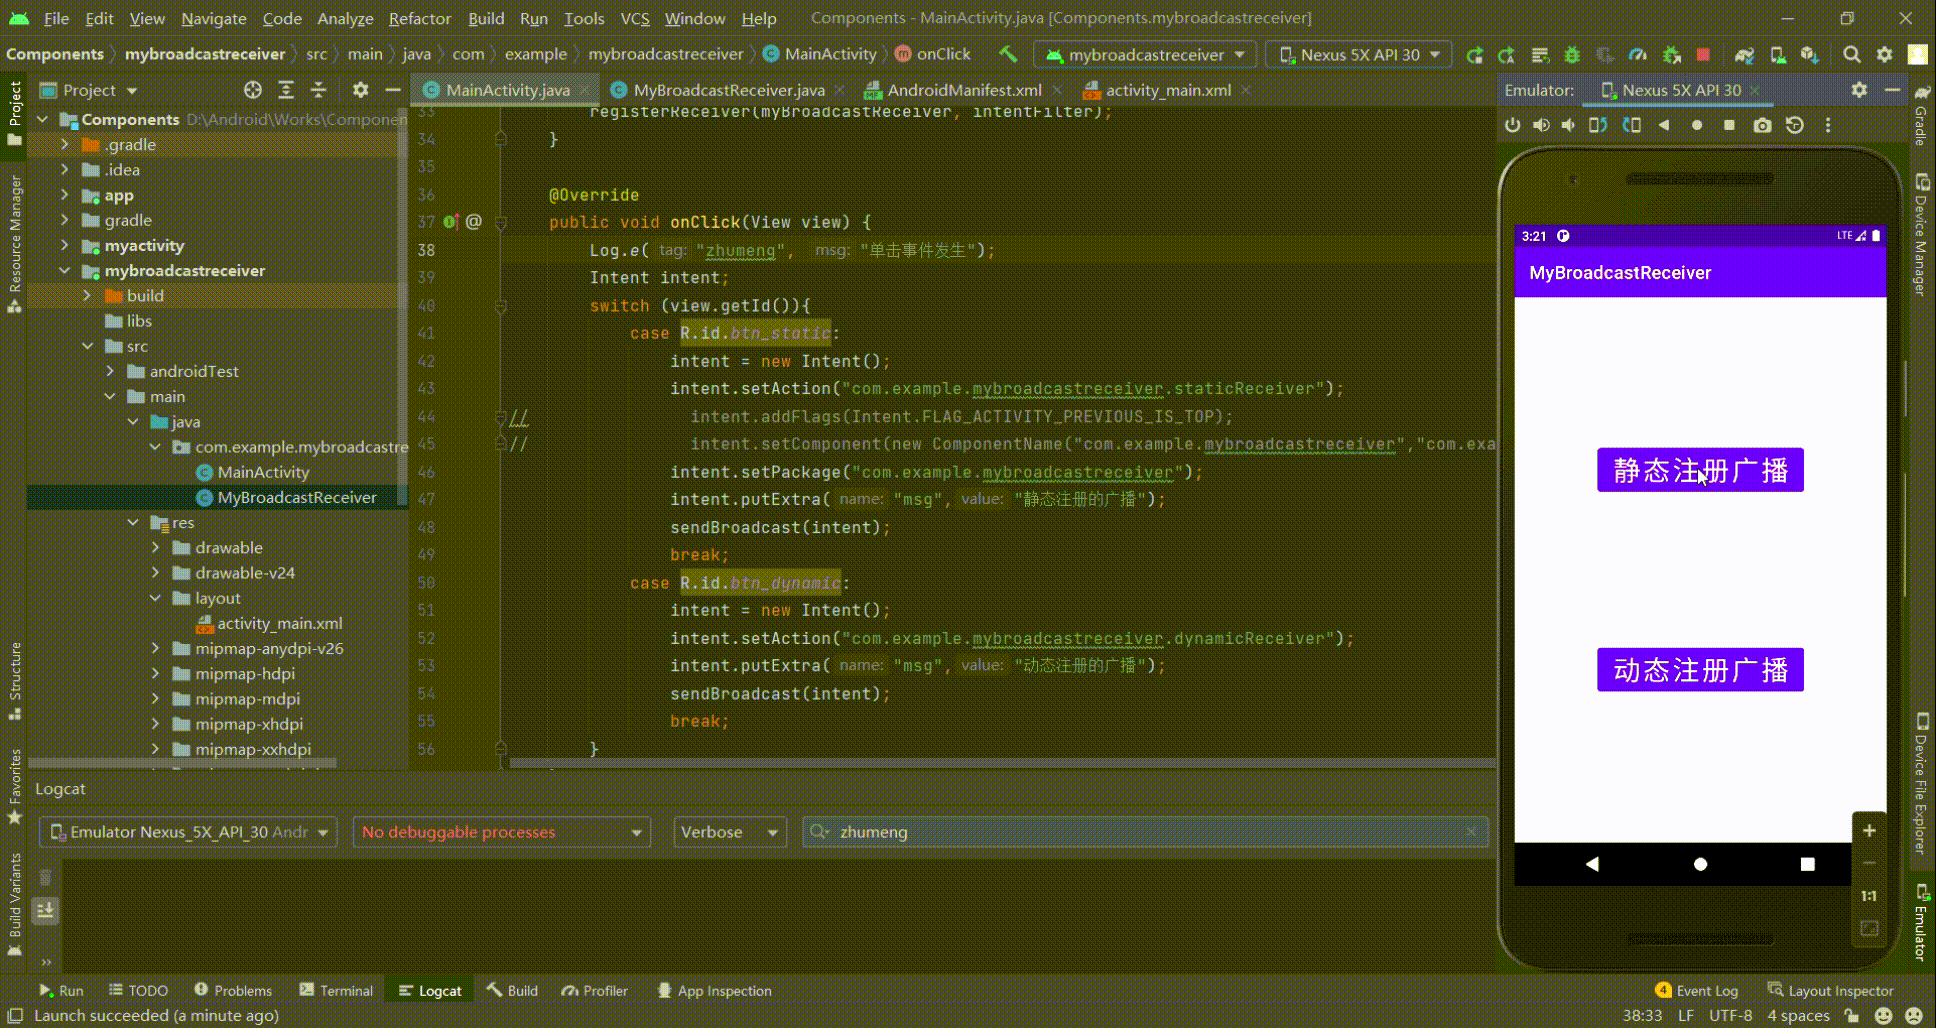
第10章 Fragment(碎片)
10.1 Fragment是什么
10.1.1 Fragment的历史
Fragment是Android3.0后引入的一个新的API,他出现的初衷是为了适应大屏幕的平板电脑, 当然现在他仍然是平板APP UI设计的宠儿。
10.1.2 Fragment是什么
Fragment(碎片)是一种嵌入在Activity中的UI片段,它可以用来描述Activity中的一部分布局。如果Activity界面布局中的控件比较多比较复杂,那么Activity管理起来就很麻烦,我们可以使用Fragment把屏幕划分成几个片段,进行模块化的管理,从而使程序更加合理和充分地利用屏幕的空间。
一个Activity中可以包含多个Fragment,一个Fragment也可以在多个Activity中使用,如果在Activity中有多个相同的业务模块,则可以复用Fragment。
想想,如果一个很大的界面,我们就一个布局,写起界面来会有多麻烦,而且如果组件多的话是管理起来也很麻烦!而使用Fragment我们可以把屏幕划分成几块,然后进行分组,进行一个模块化的管理!从而可以更加方便的在运行过程中动态地更新Activity的用户界面!另外Fragment并不能单独使用,他需要嵌套在Activity中使用,尽管他拥有自己的生命周期,但是还是会受到宿主Activity的生命周期的影响。比如,当Activity暂停时,其中的所有片段也会暂停;当Activity被销毁时,所有片段也会被销毁。 不过,当Activity 正在运行(处于已恢复生命周期状态)时,您可以独立操纵每个片段,如添加或移除它们。 当您执行此类片段事务时,您也可以将其添加到由Activity管理的返回栈,Activity中的每个返回栈条目都是一条已发生片段事务的记录。返回栈让用户可以通过按返回按钮撤消片段事务(后退)。
下面是一个典型的示例演示如何让两个由碎片定义的UI模块,在为平板设计的活动中组合,在为手持设备设计的活动中分离。
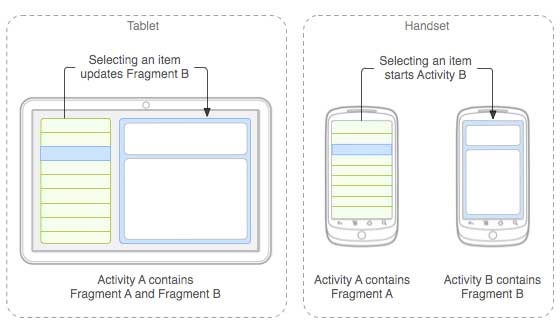
当运行在在平板尺寸的设备上,这个应用程序可以在活动A中嵌入两个碎片。在手机设备屏幕上,由于没有足够的空间,活动A仅包含有文章列表的碎片,当用户点击文章时,启动包含第二个碎片的活动B来阅读文章。
10.2 Fragment的生命周期
10.2.1 Fragment的生命周期简介
Fragment必须是依存与Activity而存在的,因此Activity的生命周期会直接影响到Fragment的生命周期。Fragment状态与Activity类似,也存在如下4种状态:
运行:当前Fmgment位于前台,用户可见,可以获得焦点。暂停:其他Activity位于前台,该Fragment依然可见,只是不能获得焦点。停止:该Fragment不可见,失去焦点。销毁:该Fragment被完全删除,或该Fragment所在的Activity被结束。10.2.2 Fragment的生命周期状态
Fragment的生命周期看起来和Activity的生命周期类似,但是多了一些,因为Fragment的生命周期是和其关联的Activity有关。
(1)onAttach(Context context):在Fragment和Activity关联上的时候调用,且仅调用一次。在该回调中我们可以将context转化为Activity保存下来,从而避免后期频繁调用getAtivity()获取Activity的局面,避免了在某些情况下getAtivity()为空的异常(Activity和Fragment分离的情况下)。同时也可以在该回调中将传入的Arguments提取并解析,在这里强烈推荐通过setArguments给Fragment传参数,因为在应用被系统回收时Fragment不会保存相关属性,具体之后会讲解。
(2)onCreate(Bundle savedInstanceState):在最初创建Fragment的时候会调用,和Activity的onCreate类似。
(3)View onCreateView(LayoutInflater inflater, ViewGroup container, Bundle savedInstanceState):在准备绘制Fragment界面时调用,返回值为Fragment要绘制布局的根视图,当然也可以返回null。注意使用inflater构建View时一定要将attachToRoot指明false,因为Fragment会自动将视图添加到container中,attachToRoot为true会重复添加报错。onCreateView并不是一定会被调用,当添加的是没有界面的Fragment就不会调用,比如调用FragmentTransaction的add(Fragment fragment, String tag)方法。
(4)onActivityCreated(Bundle savedInstanceState):在Activity的onCreated执行完时会调用。
(5)onStart():Fragment对用户可见的时候调用,前提是Activity已经started。
(6)onResume():Fragment和用户之前可交互时会调用,前提是Activity已经resumed。
(7)onPause():Fragment和用户之前不可交互时会调用。
(8)onStop():Fragment不可见时会调用。
(9)onDestroyView():在移除Fragment相关视图层级时调用。
(10)onDestroy():最终清楚Fragment状态时会调用。
(11)onDetach():Fragment和Activity解除关联时调用。
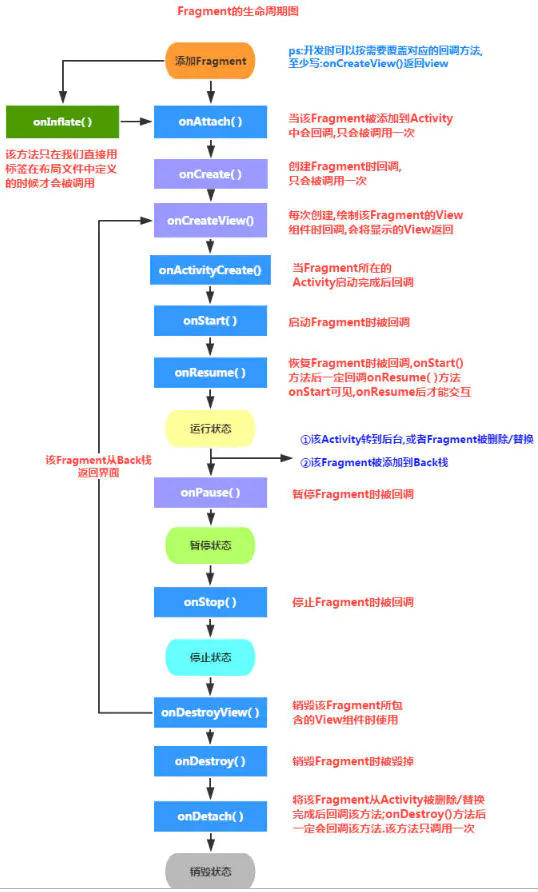
10.2.3 Fragment的生命周期调用
1)创建Fragment
onAttach() —> onCreate() —> onCreateView() —> onActivityCreated() —> onStart() —> onResume()
2)按下Home键回到桌面 / 锁屏
onPause() —> onStop()
3)从桌面回到Fragment / 解锁
onStart() —> onResume()
4)切换到其他Fragment
onPause() —> onStop() —> onDestroyView()
5)切换回本身的Fragment
onCreateView() —> onActivityCreated() —> onStart() —> onResume()
6) 按下Back键退出
onPause() —> onStop() —> onDestroyView() —> onDestroy() —> onDetach()
注意:Fragment必须依赖于Activity,理解为Activity的寄生虫
详见1:Fragment生命周期 - 第壹时间 - 博客园 (cnblogs.com)
详见2:Fragment的生命周期_杭州小白的博客-CSDN博客_fragment生命周期
10.3 Fragment用法
10.3.1 Fragment的静态加载
实现步骤:
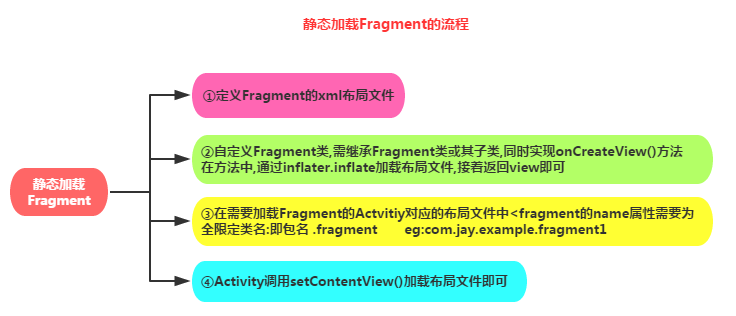
public class BlankFragment1 extends Fragment { @Override public View onCreateView(LayoutInflater inflater, ViewGroup container, Bundle savedInstanceState) { View view = inflater.inflate(R.layout.fragment_blank1, container, false); Button btn = view.findViewById(R.id.btn); TextView tv = view.findViewById(R.id.tv); btn.setOnClickListener(new View.OnClickListener() { @Override public void onClick(View view) { tv.setText("Yes,I am,and you!"); } }); return view; }}<?xml version="1.0" encoding="utf-8"?><LinearLayout xmlns:android="http://schemas.android.com/apk/res/android" xmlns:tools="http://schemas.android.com/tools" android:layout_width="match_parent" android:layout_height="match_parent" tools:context=".BlankFragment1" android:orientation="vertical"> <TextView android:id="@+id/tv" android:layout_width="match_parent" android:layout_height="wrap_content" android:text="@string/hello_blank_fragment" android:textSize="30sp"/> <Button android:id="@+id/btn" android:layout_width="match_parent" android:layout_height="wrap_content" android:text="获取回答" /></LinearLayout><?xml version="1.0" encoding="utf-8"?><LinearLayout xmlns:android="http://schemas.android.com/apk/res/android" xmlns:tools="http://schemas.android.com/tools" android:layout_width="match_parent" android:layout_height="match_parent" tools:context=".MainActivity"> <fragment android:id="@+id/fragment1" android:name="com.example.fragmentbase.BlankFragment1" android:layout_width="match_parent" android:layout_height="wrap_content"/></LinearLayout>运行效果图: 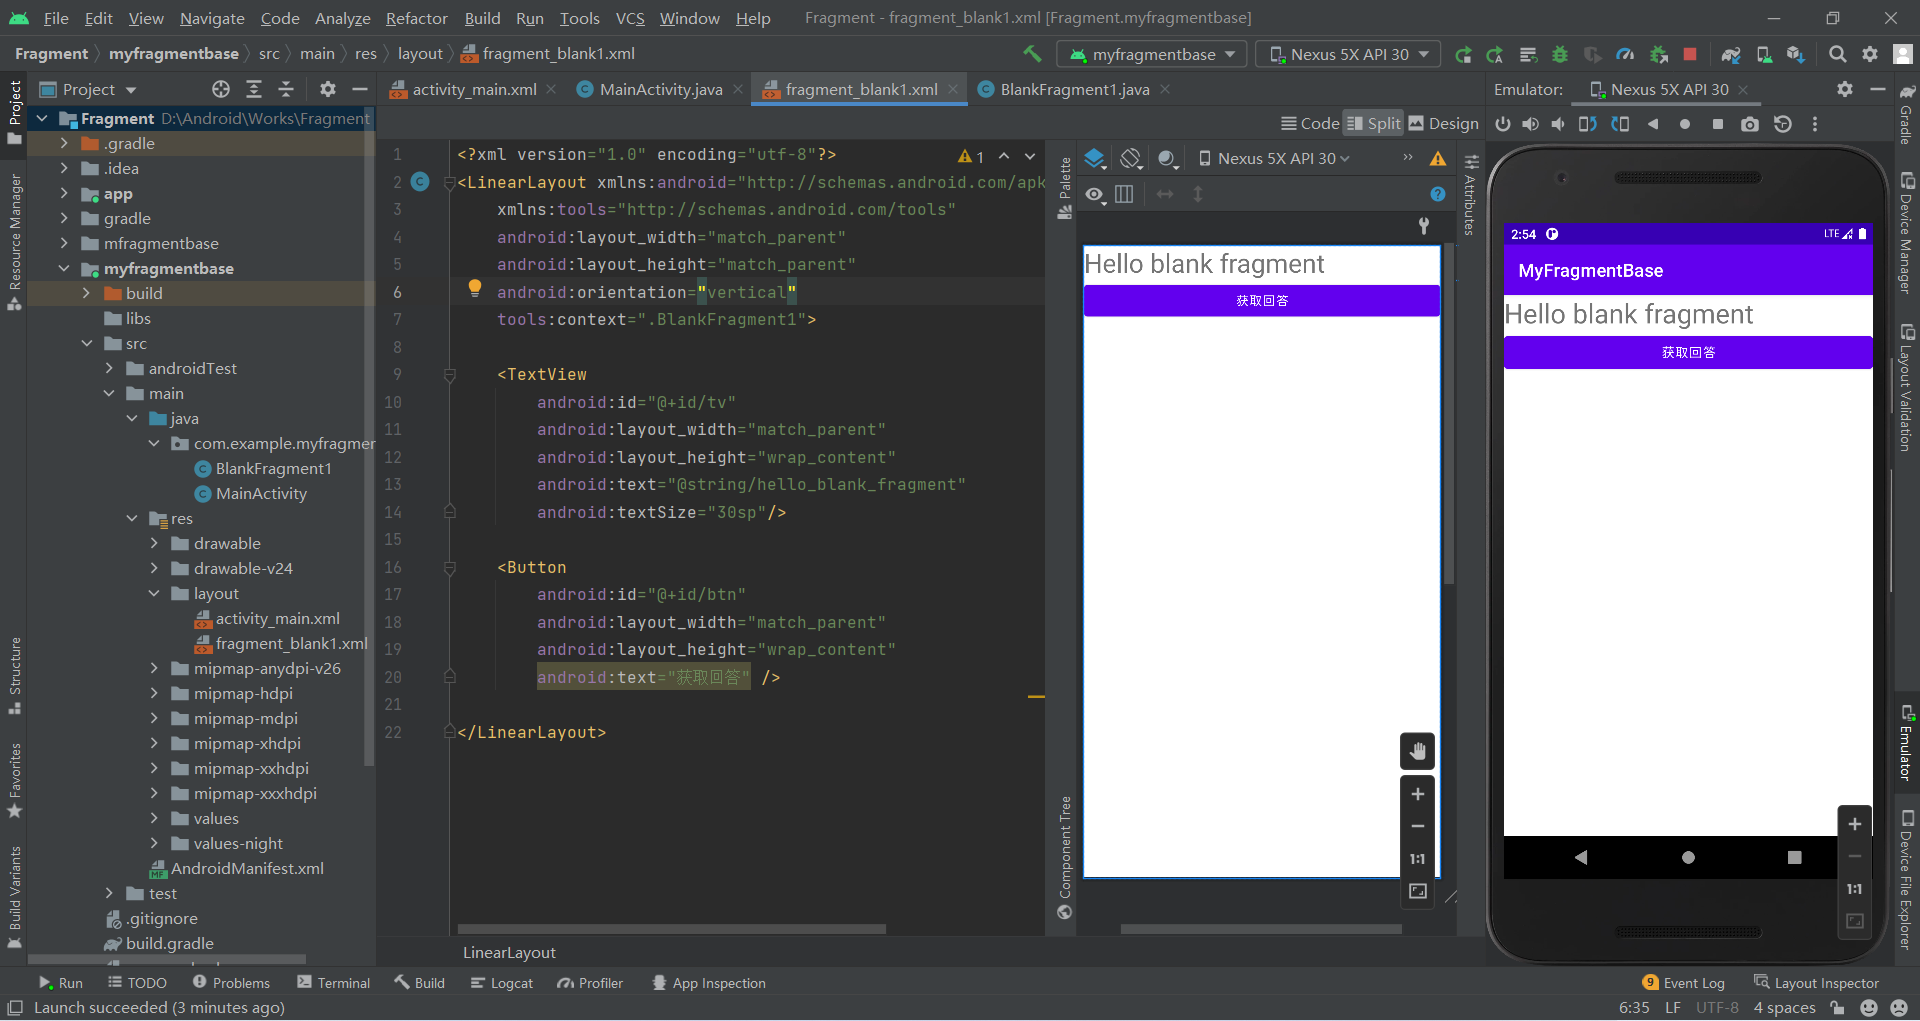
注:若要添加多个Fragment就直接创建多个继承Fragment的类,然后在activity_main.xml中通过name属性引用即可
10.3.2 Fragment的动态加载
实现步骤:
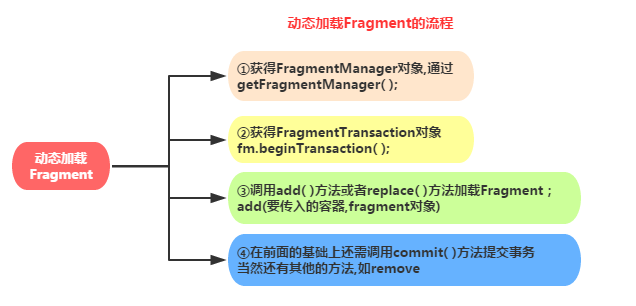
第一个参数:要传入的布局容器
第二个参数:要加载的fragment对象Step 8:在前面的基础上还需调用commit()方法提交事务。当然还有其他的方法如remove()等
注意:若点击back键按照添加过程退出时需要在commit()方法之前执行transation.addToBackStack(null);
MainActivity.java代码:其中BlankFragment1类和ItemFragment1类由AS自动生成
public class MainActivity extends AppCompatActivity implements View.OnClickListener { @Override protected void onCreate(Bundle savedInstanceState) { super.onCreate(savedInstanceState); setContentView(R.layout.activity_main); Button btn1 = findViewById(R.id.btn1); Button btn2 = findViewById(R.id.btn2); btn1.setOnClickListener(this); btn2.setOnClickListener(this); } @Override public void onClick(View view) { switch (view.getId()){ case R.id.btn1: replaceFragment(new BlankFragment1()); break; case R.id.btn2: replaceFragment(new ItemFragment1()); break; } } private void replaceFragment(Fragment fragment) { FragmentManager fragmentManager = getSupportFragmentManager(); FragmentTransaction transaction = fragmentManager.beginTransaction(); transaction.replace(R.id.fragment1, fragment); transaction.addToBackStack(null); transaction.commit(); }}运行效果图: 
10.4 Fragment的通信
10.4.1 Fragment与activity通信——原生Bundle
MainActivity.java代码:
public class MainActivity extends AppCompatActivity implements View.OnClickListener { @Override protected void onCreate(Bundle savedInstanceState) { super.onCreate(savedInstanceState); setContentView(R.layout.activity_main); Button btn1 = findViewById(R.id.btn1); Button btn2 = findViewById(R.id.btn2); btn1.setOnClickListener(this); btn2.setOnClickListener(this); } @Override public void onClick(View view) { switch (view.getId()){ case R.id.btn1: BlankFragment blankFragment = new BlankFragment(); Bundle bunlsle = new Bundle(); bunlsle.putString("name", "张三"); bunlsle.putInt("age", 18); blankFragment.setArguments(bunlsle); replaceFragment(blankFragment); break; case R.id.btn2: replaceFragment(new ItemFragment()); break; } } private void replaceFragment(Fragment fragment) { FragmentManager fragmentManager = getSupportFragmentManager(); FragmentTransaction transaction = fragmentManager.beginTransaction(); transaction.replace(R.id.fragment1, fragment); transaction.addToBackStack(null); transaction.commit(); }}获取参数:在BlankFragment类中任何位置都可以通过Bundle bundle = getArguments()的bundle获取到通过blankFragment.setArguments(bunlsle)传递到该类的参数
运行效果图:
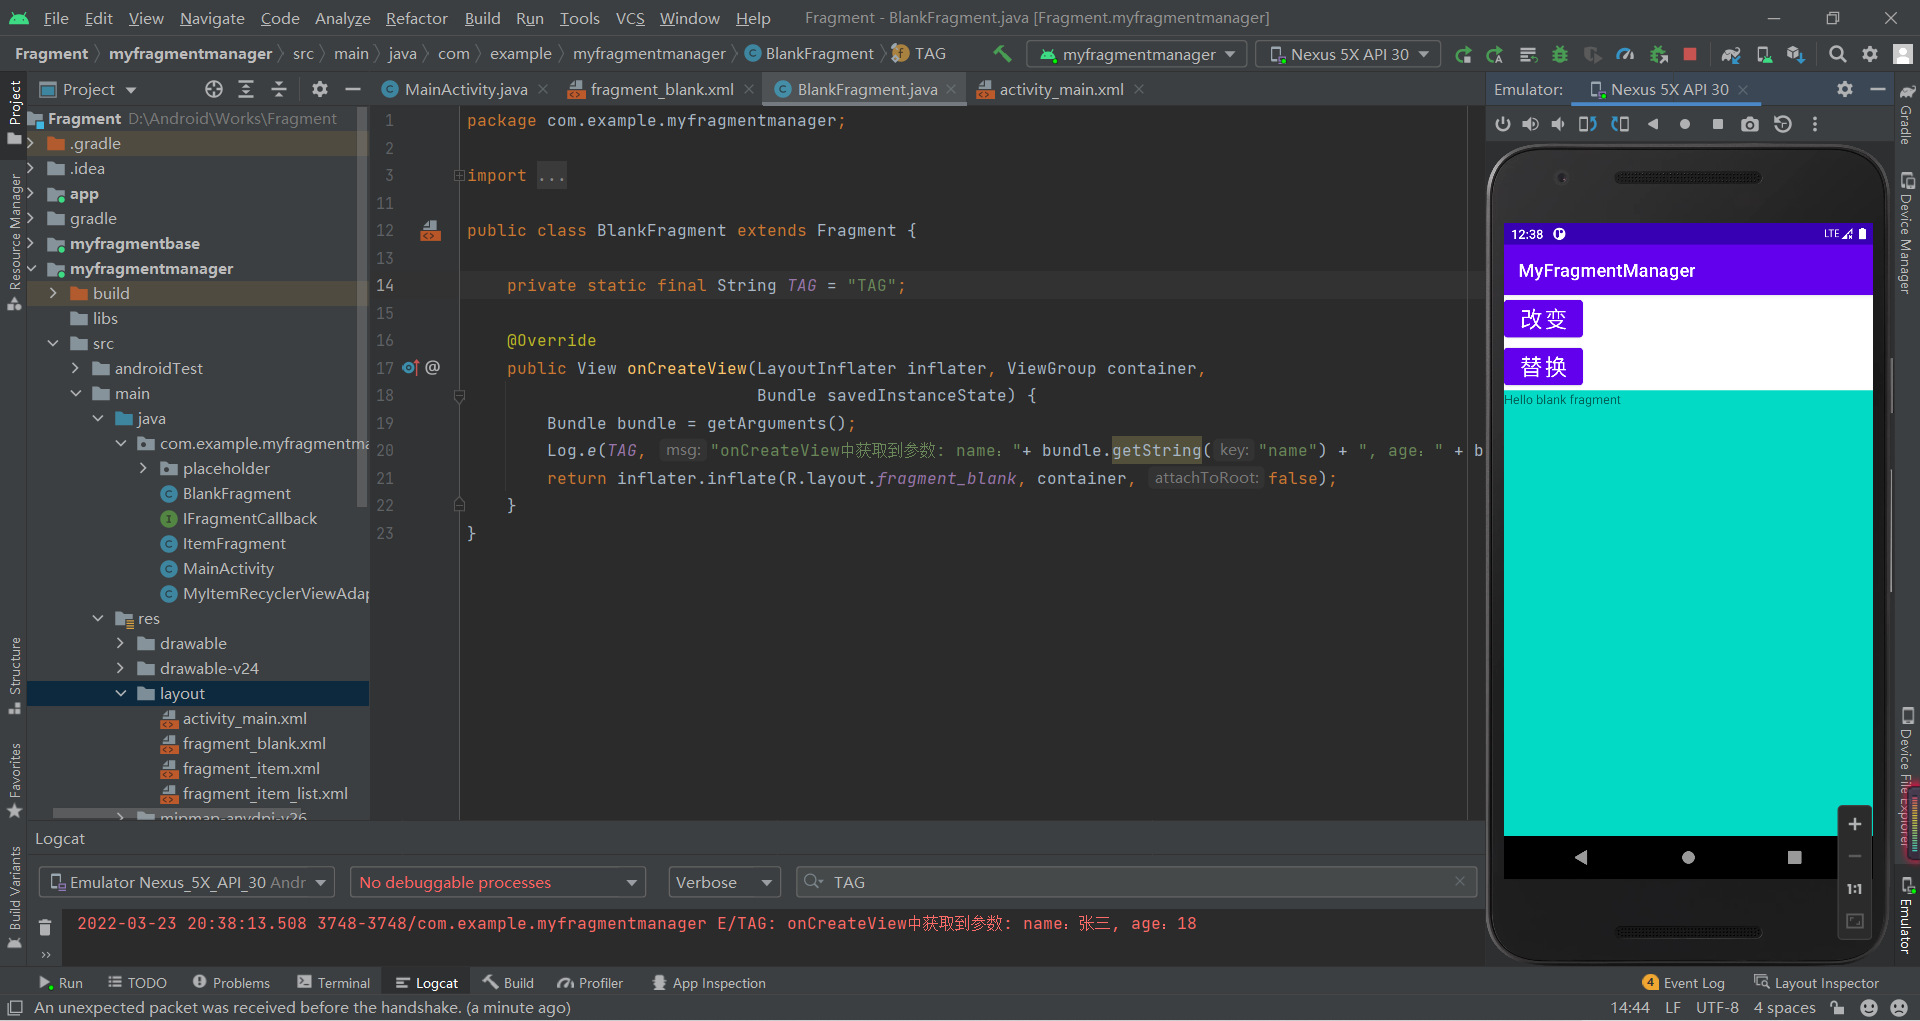
10.4.2 Fragment与activity通信——Java类的接口
实现步骤:
新建用于传递消息的接口IFragmentCallbackpublic interface IFragmentCallback { void sendMsgToActivity(String msg); String getMsgFromActivity(String msg);}public class BlankFragment extends Fragment { private static final String TAG = "TAG"; private IFragmentCallback iFragmentCallback; private View view; public void setiFragmentCallback(IFragmentCallback iFragmentCallback) { this.iFragmentCallback = iFragmentCallback; } @Override public View onCreateView(LayoutInflater inflater, ViewGroup container, Bundle savedInstanceState) { if (view == null) { view = inflater.inflate(R.layout.fragment_blank, container, false); } Button btn3 = view.findViewById(R.id.btn3); Button btn4 = view.findViewById(R.id.btn4); btn3.setOnClickListener(new View.OnClickListener() { @Override public void onClick(View view) { iFragmentCallback.sendMsgToActivity("hello, I'm from Fragment."); } }); btn4.setOnClickListener(new View.OnClickListener() { @Override public void onClick(View view) { String msg = iFragmentCallback.getMsgFromActivity("hello, I'm Fragment."); Toast.makeText(BlankFragment.this.getContext(), msg, Toast.LENGTH_SHORT).show(); } }); return view; }}public class MainActivity extends AppCompatActivity implements View.OnClickListener { @Override protected void onCreate(Bundle savedInstanceState) { super.onCreate(savedInstanceState); setContentView(R.layout.activity_main); Button btn1 = findViewById(R.id.btn1); Button btn2 = findViewById(R.id.btn2); btn1.setOnClickListener(this); btn2.setOnClickListener(this); } @Override public void onClick(View view) { switch (view.getId()){ case R.id.btn1: BlankFragment blankFragment = new BlankFragment(); Bundle bunlsle = new Bundle(); bunlsle.putString("name", "张三"); bunlsle.putInt("age", 18); blankFragment.setArguments(bunlsle); blankFragment.setiFragmentCallback(new IFragmentCallback() { @Override public void sendMsgToActivity(String msg) { Toast.makeText(MainActivity.this, msg, Toast.LENGTH_SHORT).show(); } @Override public String getMsgFromActivity(String msg) { return "I'm from Activity."; } }); replaceFragment(blankFragment); break; case R.id.btn2: replaceFragment(new ItemFragment()); break; } } private void replaceFragment(Fragment fragment) { FragmentManager fragmentManager = getSupportFragmentManager(); FragmentTransaction transaction = fragmentManager.beginTransaction(); transaction.replace(R.id.fragment1, fragment); transaction.addToBackStack(null); transaction.commit(); }}fragment_blank.xml代码:
<?xml version="1.0" encoding="utf-8"?><FrameLayout xmlns:android="http://schemas.android.com/apk/res/android" xmlns:tools="http://schemas.android.com/tools" android:layout_width="match_parent" android:layout_height="match_parent" tools:context=".BlankFragment"> <!-- TODO: Update blank fragment layout --> <TextView android:layout_width="match_parent" android:layout_height="match_parent" android:text="@string/hello_blank_fragment" /> <Button android:id="@+id/btn3" android:layout_width="match_parent" android:layout_height="wrap_content" android:text="发送数据" android:layout_marginTop="50dp"/> <Button android:id="@+id/btn4" android:layout_width="match_parent" android:layout_height="wrap_content" android:text="获取数据" android:layout_marginTop="100dp"/></FrameLayout>运行效果图:
10.5 Fragment与ViewPager2的联合应用
10.5.1 ViewPage2的使用
使用步骤:
添加依赖在build.gradle文件中添加implementation 'androidx.viewpager2:viewpager2:1.0.0'新建item_page.xml并编写其内容
<?xml version="1.0" encoding="utf-8"?><RelativeLayout xmlns:android="http://schemas.android.com/apk/res/android" android:layout_width="match_parent" android:layout_height="match_parent"> <TextView android:layout_width="wrap_content" android:layout_height="wrap_content" android:text="hello" android:layout_centerInParent="true" android:textSize="30sp"/></RelativeLayout><?xml version="1.0" encoding="utf-8"?><LinearLayout xmlns:android="http://schemas.android.com/apk/res/android" xmlns:tools="http://schemas.android.com/tools" android:layout_width="match_parent" android:layout_height="match_parent" tools:context=".MainActivity"> <androidx.viewpager2.widget.ViewPager2 android:id="@+id/vp" android:layout_width="match_parent" android:layout_height="match_parent" /></LinearLayout>public class ViewPagerAdapter extends RecyclerView.Adapter<ViewPagerAdapter.ViewPagerHolder> { private ArrayList<String> data = new ArrayList<>(); public ViewPagerAdapter(ArrayList<String> data) { this.data = data; } @NonNull @Override public ViewPagerHolder onCreateViewHolder(@NonNull ViewGroup parent, int viewType) { ViewPagerHolder viewPagerHolder = new ViewPagerHolder(LayoutInflater.from(parent.getContext()).inflate(R.layout.item_pager, parent, false)); return viewPagerHolder; } @Override public void onBindViewHolder(@NonNull ViewPagerHolder holder, int position) { holder.textView.setText(data.get(position).toString()); } @Override public int getItemCount() { return data.size(); } class ViewPagerHolder extends RecyclerView.ViewHolder{ TextView textView; public ViewPagerHolder(@NonNull View itemView) { super(itemView); textView = itemView.findViewById(R.id.tv); } }}在Java中装填数据和使用ViewPager2
public class MainActivity extends AppCompatActivity { @Override protected void onCreate(Bundle savedInstanceState) { super.onCreate(savedInstanceState); setContentView(R.layout.activity_main); ArrayList<String> data = new ArrayList<>(); for (int i = 0; i < 5; i++) { data.add(new String("你好,我是第"+i+"个Pager")); } ViewPager2 viewPager = findViewById(R.id.vp); ViewPagerAdapter pagerAdapter = new ViewPagerAdapter(data); viewPager.setAdapter(pagerAdapter); }}运行效果图: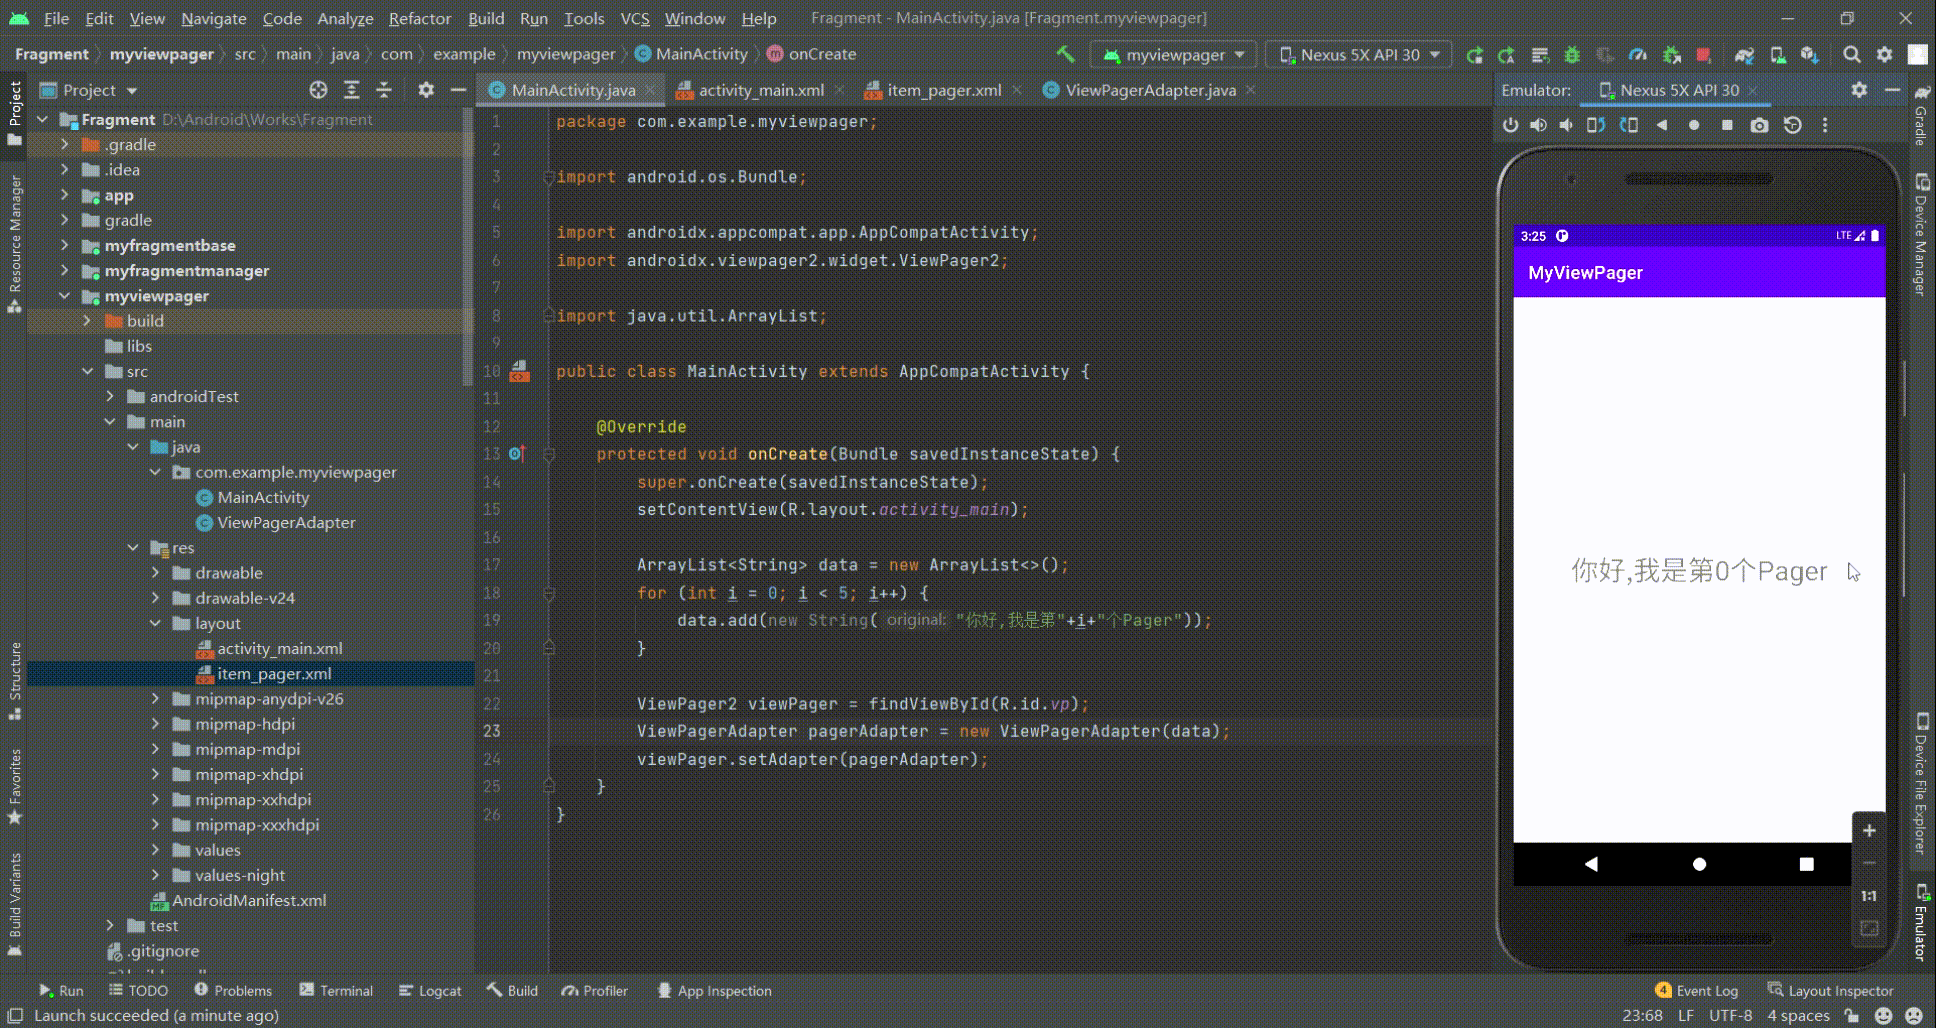
10.5.2 Fragment与ViewPager2实例(WeChat首页)
FragmentPagerAdapter与FragmentStatePagerAdapter介绍
FragmentPagerAdapterFragmentPagerAdapter继承PagerAdapter。使用FragmentPagerAdapter 时,Fragment对象会一直存留在内存中,所以当有大量的显示页时,就不适合用FragmentPagerAdapter了,FragmentPagerAdapter 适用于只有少数的page情况,像选项卡。FragmentStatePagerAdapter
FragmentStateAdapter继承RecyclerView.Adapter。如果page比较多,这个时候你可以考虑使用FragmentStatePagerAdapter ,当使用FragmentStatePagerAdapter 时,如果Fragment不显示,那么Fragment对象会被销毁,(滑过后会保存当前界面,以及下一个界面和上一个界面(如果有),最多保存3个,其他会被销毁掉)但在回调onDestroy()方法之前会回调onSaveInstanceState(Bundle outState)方法来保存Fragment的状态,下次Fragment显示时通过onCreate(Bundle savedInstanceState)把存储的状态值取出来,FragmentStatePagerAdapter 比较适合页面比较多的情况,像一个页面的ListView 。
如上所述,使用FragmentStatePagerAdapter更省内存,但是销毁和新建也是需要时间的。一般情况下,如果你是制作主页面,用3、4个Tab,那么可以考虑使用FragmentPagerAdapter,如果你是用于ViewPager展示数量较多的条目时,那么建议使用FragmentStatePagerAdapter。
WeChat首页的滑动窗口实现:
在activity_main.xml中使用ViewPager2<?xml version="1.0" encoding="utf-8"?><LinearLayout xmlns:android="http://schemas.android.com/apk/res/android" xmlns:tools="http://schemas.android.com/tools" android:layout_width="match_parent" android:layout_height="match_parent" android:orientation="vertical" tools:context=".MainActivity"> <androidx.viewpager2.widget.ViewPager2 android:id="@+id/viewpager" android:layout_width="match_parent" android:layout_height="0dp" android:layout_weight="1"/></LinearLayout><?xml version="1.0" encoding="utf-8"?><FrameLayout xmlns:android="http://schemas.android.com/apk/res/android" xmlns:tools="http://schemas.android.com/tools" android:layout_width="match_parent" android:layout_height="match_parent" tools:context=".BlankFragment"> <TextView android:id="@+id/textView" android:layout_width="match_parent" android:layout_height="match_parent" android:text="@string/hello_blank_fragment" android:textSize="30sp" android:gravity="center"/></FrameLayout>public class BlankFragment extends Fragment { private static final String ARG_PARAM1 = "param1"; private String mParam1; private View fragmentView; public BlankFragment() { // Required empty public constructor } public static BlankFragment newInstance(String param1) { BlankFragment fragment = new BlankFragment(); Bundle args = new Bundle(); args.putString(ARG_PARAM1, param1); fragment.setArguments(args); return fragment; } @Override public void onCreate(Bundle savedInstanceState) { super.onCreate(savedInstanceState); if (getArguments() != null) { mParam1 = getArguments().getString(ARG_PARAM1); } } @Override public View onCreateView(LayoutInflater inflater, ViewGroup container, Bundle savedInstanceState) { if (fragmentView == null) { fragmentView = inflater.inflate(R.layout.fragment_blank, container, false); } TextView textView = fragmentView.findViewById(R.id.textView); textView.setText(mParam1); return fragmentView; }}public class MyFragmentPagerAdapter extends FragmentStateAdapter { ArrayList<Fragment> fragmentList = new ArrayList<>(); public MyFragmentPagerAdapter(@NonNull FragmentManager fragmentManager, @NonNull Lifecycle lifecycle, ArrayList<Fragment> fragmentList) { super(fragmentManager, lifecycle); this.fragmentList = fragmentList; } @NonNull @Override public Fragment createFragment(int position) { return fragmentList.get(position); } @Override public int getItemCount() { return fragmentList.size(); }}public class MainActivity extends AppCompatActivity { @Override protected void onCreate(Bundle savedInstanceState) { super.onCreate(savedInstanceState); setContentView(R.layout.activity_main); ViewPager2 viewPager = findViewById(R.id.viewpager); ArrayList<Fragment> fragmentList = new ArrayList<>(); fragmentList.add(BlankFragment.newInstance("微信聊天")); fragmentList.add(BlankFragment.newInstance("通讯录")); fragmentList.add(BlankFragment.newInstance("发现")); fragmentList.add(BlankFragment.newInstance("我的主页")); MyFragmentPagerAdapter myFragmentPagerAdapter = new MyFragmentPagerAdapter(getSupportFragmentManager(),getLifecycle(),fragmentList); viewPager.setAdapter(myFragmentPagerAdapter); }}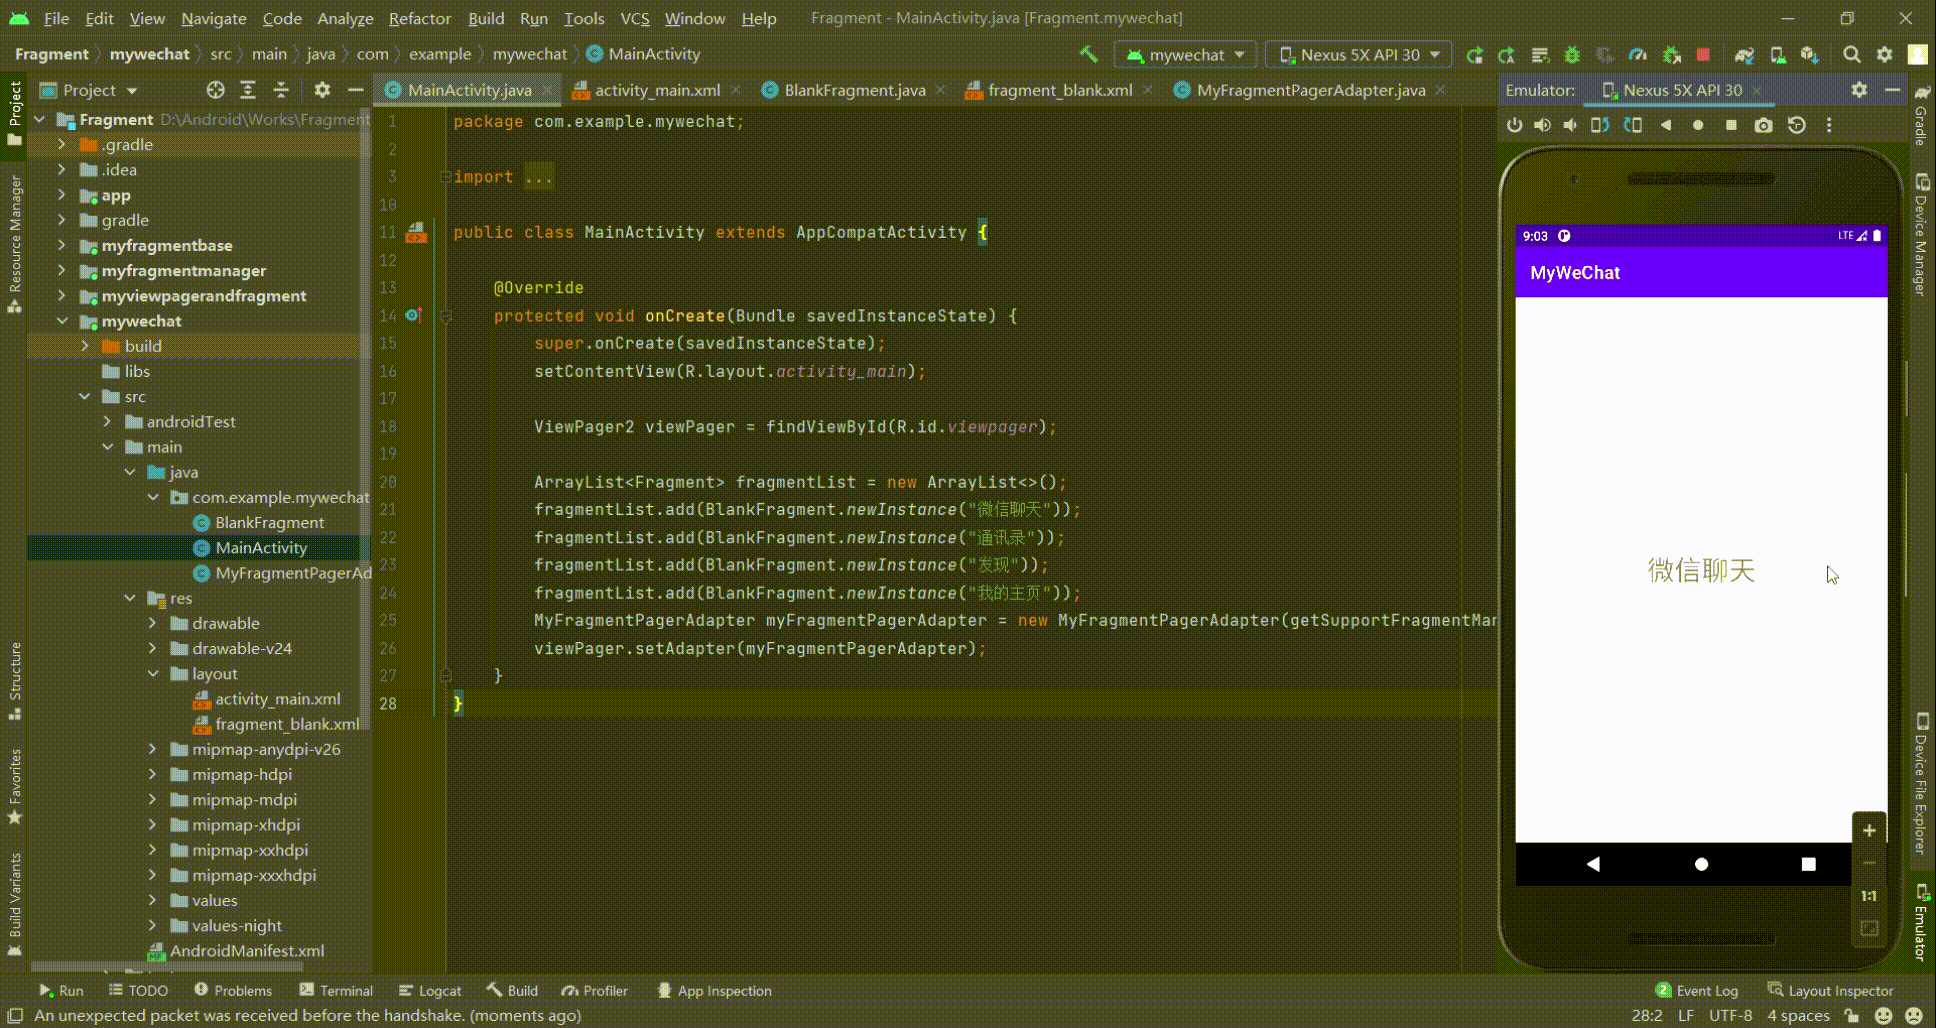
WeChat首页的雏形实现:
准备图片并在src/main/res/drawable/新建资源,资源名为tab_wexin.xml(同理新建4个用于选择的资源并编写)<?xml version="1.0" encoding="utf-8"?><selector xmlns:android="http://schemas.android.com/apk/res/android"> <item android:drawable="@drawable/weixin_pressed" android:state_pressed="true"/> <item android:drawable="@drawable/weinxin_normal"/></selector><?xml version="1.0" encoding="utf-8"?><selector xmlns:android="http://schemas.android.com/apk/res/android"> <item android:color="#09C15F" android:state_selected="true"/> <item android:color="@color/black"/></selector><?xml version="1.0" encoding="utf-8"?><LinearLayout xmlns:android="http://schemas.android.com/apk/res/android" android:orientation="horizontal" android:layout_width="match_parent" android:layout_height="55dp" android:background="@color/gray"> <LinearLayout android:id="@+id/tab_wechat" android:layout_width="0dp" android:layout_height="match_parent" android:layout_weight="1" android:gravity="center" android:orientation="vertical"> <ImageView android:id="@+id/tab_wechat_iv" android:layout_width="32dp" android:layout_height="32dp" android:background="@drawable/tab_wechat"/> <TextView android:id="@+id/tab_wechat_tv" android:layout_width="32dp" android:layout_height="wrap_content" android:text="微信" android:gravity="center" android:textColor="@color/tab_color"/> </LinearLayout> <LinearLayout android:id="@+id/tab_contact" android:layout_width="0dp" android:layout_height="match_parent" android:layout_weight="1" android:gravity="center" android:orientation="vertical"> <ImageView android:id="@+id/tab_contact_iv" android:layout_width="32dp" android:layout_height="32dp" android:background="@drawable/tab_contact"/> <TextView android:id="@+id/tab_contact_tv" android:layout_width="32dp" android:layout_height="wrap_content" android:text="通讯录" android:gravity="center" android:textColor="@color/tab_color"/> </LinearLayout> <LinearLayout android:id="@+id/tab_find" android:layout_width="0dp" android:layout_height="match_parent" android:layout_weight="1" android:gravity="center" android:orientation="vertical"> <ImageView android:id="@+id/tab_find_iv" android:layout_width="32dp" android:layout_height="32dp" android:background="@drawable/tab_find"/> <TextView android:id="@+id/tab_find_tv" android:layout_width="32dp" android:layout_height="wrap_content" android:text="发现" android:gravity="center" android:textColor="@color/tab_color"/> </LinearLayout> <LinearLayout android:id="@+id/tab_profile" android:layout_width="0dp" android:layout_height="match_parent" android:layout_weight="1" android:gravity="center" android:orientation="vertical"> <ImageView android:id="@+id/tab_profile_iv" android:layout_width="32dp" android:layout_height="32dp" android:background="@drawable/tab_profile"/> <TextView android:id="@+id/tab_profile_tv" android:layout_width="32dp" android:layout_height="wrap_content" android:text="我" android:gravity="center" android:textColor="@color/tab_color"/> </LinearLayout></LinearLayout><include layout="@layout/bottom_layout"/>public class MainActivity extends AppCompatActivity implements View.OnClickListener { private ViewPager2 viewPager; private LinearLayout llWechat, llContact, llFind, llProfile; private ImageView ivWechat, ivContact, ivFind, ivProfile, ivCurrent; private TextView tvWechat, tvContact, tvFind, tvProfile, tvCurrent; @Override protected void onCreate(Bundle savedInstanceState) { super.onCreate(savedInstanceState); setContentView(R.layout.activity_main); initFragmentPage(); initTabView(); } private void initTabView() { llWechat = findViewById(R.id.tab_wechat); ivWechat = findViewById(R.id.tab_wechat_iv); tvWechat = findViewById(R.id.tab_wechat_tv); llContact = findViewById(R.id.tab_contact); ivContact = findViewById(R.id.tab_contact_iv); tvContact = findViewById(R.id.tab_contact_tv); llFind = findViewById(R.id.tab_find); ivFind = findViewById(R.id.tab_find_iv); tvFind = findViewById(R.id.tab_find_tv); llProfile = findViewById(R.id.tab_profile); ivProfile = findViewById(R.id.tab_profile_iv); tvProfile = findViewById(R.id.tab_profile_tv); ivWechat.setSelected(true); tvWechat.setSelected(true); ivCurrent = ivWechat; tvCurrent = tvWechat; llWechat.setOnClickListener(this); llContact.setOnClickListener(this); llFind.setOnClickListener(this); llProfile.setOnClickListener(this); } private void initFragmentPage() { viewPager = findViewById(R.id.viewpager); ArrayList<Fragment> fragmentList = new ArrayList<>(); fragmentList.add(BlankFragment.newInstance("微信聊天")); fragmentList.add(BlankFragment.newInstance("通讯录")); fragmentList.add(BlankFragment.newInstance("发现")); fragmentList.add(BlankFragment.newInstance("我的主页")); MyFragmentPagerAdapter myFragmentPagerAdapter = new MyFragmentPagerAdapter(getSupportFragmentManager(),getLifecycle(),fragmentList); viewPager.setAdapter(myFragmentPagerAdapter); viewPager.registerOnPageChangeCallback(new ViewPager2.OnPageChangeCallback() { @Override public void onPageScrolled(int position, float positionOffset, int positionOffsetPixels) { super.onPageScrolled(position, positionOffset, positionOffsetPixels); } @Override public void onPageSelected(int position) { super.onPageSelected(position); switch (position){ case 0: changeTab(ivWechat, tvWechat); break; case 1: changeTab(ivContact, tvContact); break; case 2: changeTab(ivFind, tvFind); break; case 3: changeTab(ivProfile, tvProfile); break; } } @Override public void onPageScrollStateChanged(int state) { super.onPageScrollStateChanged(state); } }); } private void changeTab(ImageView imageView, TextView textView) { ivCurrent.setSelected(false); tvCurrent.setSelected(false); imageView.setSelected(true); textView.setSelected(true); ivCurrent = imageView; tvCurrent = textView; } @Override public void onClick(View view) { switch (view.getId()){ case R.id.tab_wechat: changeTab(ivWechat, tvWechat); viewPager.setCurrentItem(0); break; case R.id.tab_contact: changeTab(ivContact, tvContact); viewPager.setCurrentItem(1); break; case R.id.tab_find: changeTab(ivFind, tvFind); viewPager.setCurrentItem(2); break; case R.id.tab_profile: changeTab(ivProfile, tvProfile); viewPager.setCurrentItem(3); break; } }}运行效果图: 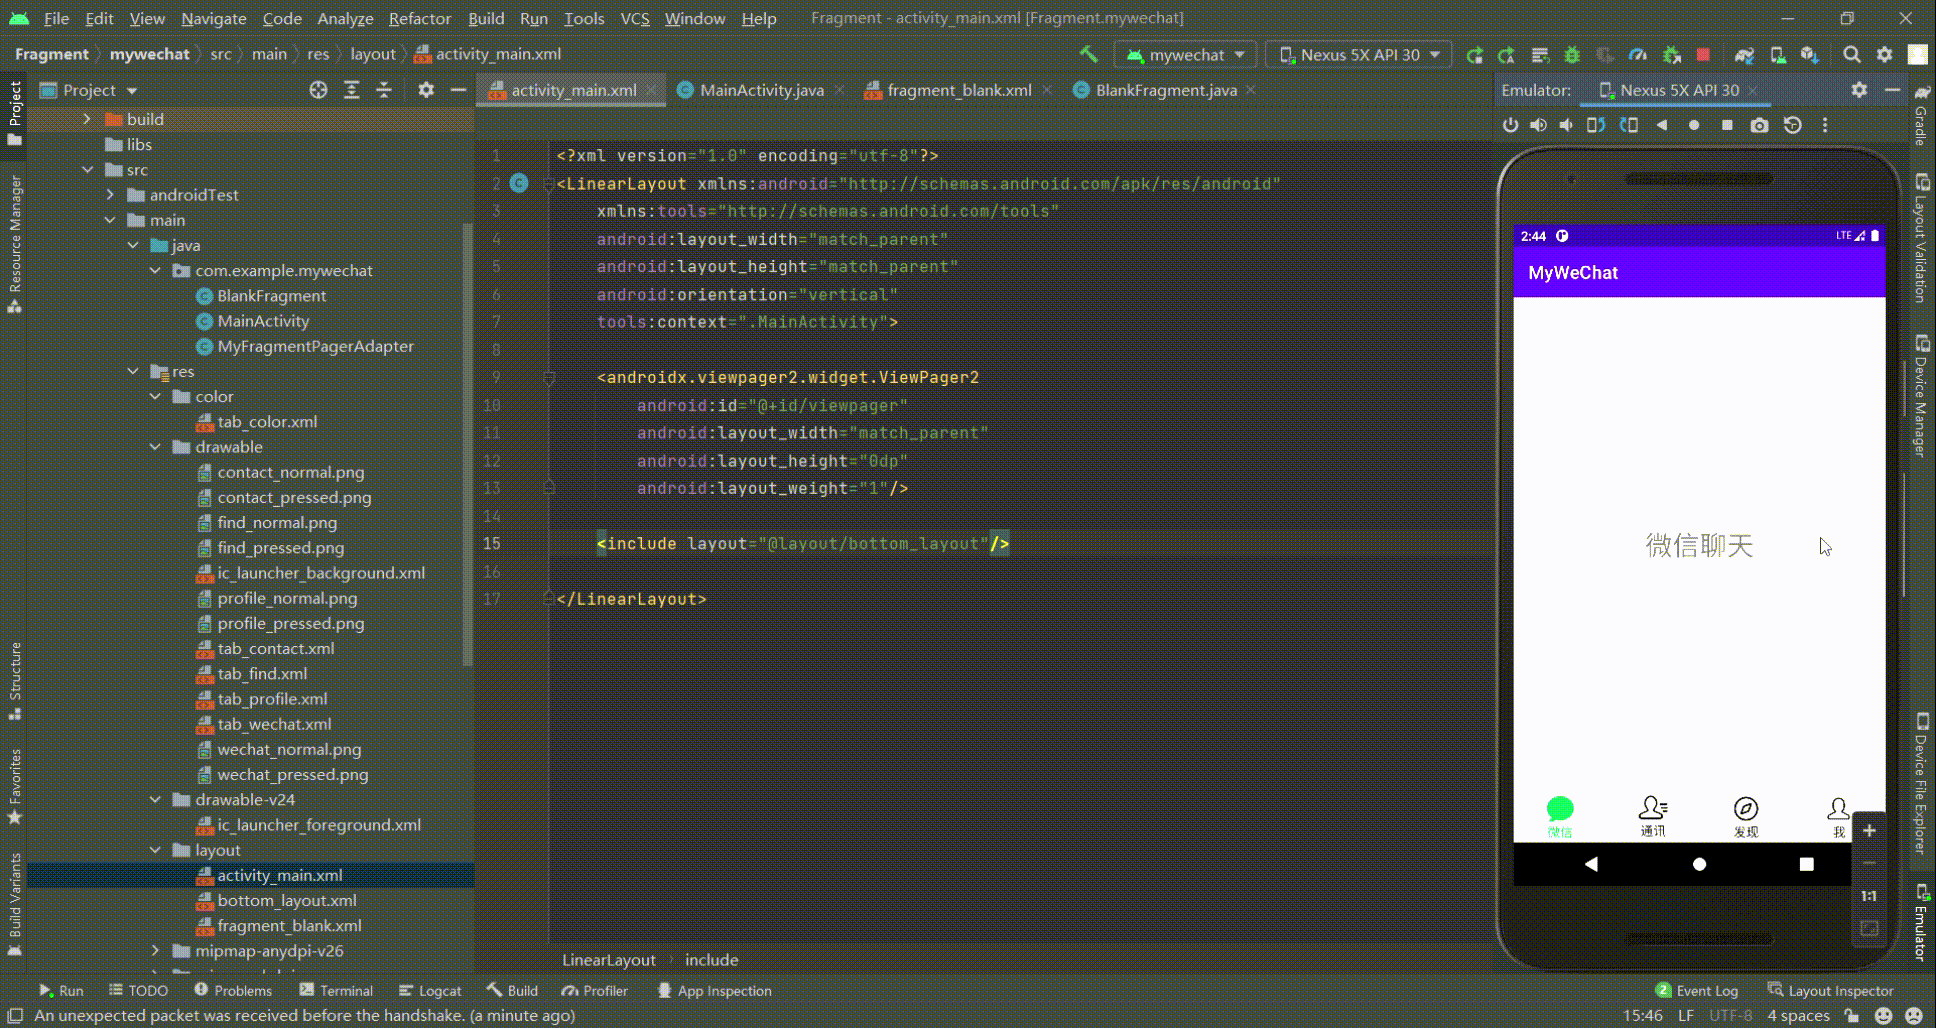
第11章 数据存储
11.1 数据存储的选择
11.1.1 数据存储介绍
SP:保存配置信息或记忆信息(如记住密码)
SQLite:数据库
Room(新):数据库,更简洁
11.1.2 SP特点介绍
SP为SharedPreference(首选项)的缩写
首选项用于存储软件的配置信息:
window .ini
android .xml
自动登录,记住密码,主题记录等等
首选项不能存在太多的信息。特点:当程序运行首选项里面的数据会全部加载进内容(map的格式,key--value)
注意:很小、很简单的数据可以保存到首选项SP里面去
11.2 SP的简单使用
11.2.1 保存数据
保存目录:/data/data/包名/shared_prefs/文件名.xml
@overridepublic SharedPreferences getSharedPreferences(String name,int mode){ return mBase.getSharedpreferences(name, mode);}参数1:SP文件的名字
参数2:SP保存的模式
常规(每次保存都会更新/覆盖):Context.MODE_PRIVATE
追加(每次保存都会追加到后面):Context.MODE_APPEND
11.2.2 获取数据
总代码:
import androidx.appcompat.app.AppCompatActivity;import android.content.Context;import android.content.SharedPreferences;import android.os.Bundle;import android.view.View;import android.widget.Toast;public class MainActivity extends AppCompatActivity { @Override protected void onCreate(Bundle savedInstanceState) { super.onCreate(savedInstanceState); setContentView(R.layout.activity_main); } //保存数据到SP中 public void saveToSP(View view) { SharedPreferences sp = getSharedPreferences("SPName", Context.MODE_PRIVATE); sp.edit().putString("book1","《九阳神功》").apply(); } //获取SP中的数据 public void getSPData(View view) { SharedPreferences sp = getSharedPreferences("SPName", Context.MODE_PRIVATE); String book1 = sp.getString("book1", "数据值不存在"); Toast.makeText(this, book1, Toast.LENGTH_SHORT).show(); }}运行效果:
11.2.3 SP实战(记住密码和自动登录)
注意:由于时间关系,没有考虑程序的健壮性,该项目有Bug,在点击自动登录时需要连勾保存密码,在取消勾选保存密码时需要取消勾选自动登录,该功能只需要实现复选框改变的监听函数即可。
activity_main代码:
<?xml version="1.0" encoding="utf-8"?><LinearLayout xmlns:android="http://schemas.android.com/apk/res/android" xmlns:tools="http://schemas.android.com/tools" android:layout_width="match_parent" android:layout_height="match_parent" android:padding="50dp" android:orientation="vertical" tools:context=".MainActivity"> <LinearLayout android:layout_width="match_parent" android:layout_height="wrap_content" android:orientation="horizontal"> <TextView android:layout_width="wrap_content" android:layout_height="wrap_content" android:text="用户名:" /> <EditText android:id="@+id/et_username" android:layout_width="match_parent" android:layout_height="wrap_content" android:hint="请输入用户名"/> </LinearLayout> <LinearLayout android:layout_width="match_parent" android:layout_height="wrap_content" android:orientation="horizontal"> <TextView android:layout_width="wrap_content" android:layout_height="wrap_content" android:text="密 码:" /> <EditText android:id="@+id/et_password" android:layout_width="match_parent" android:layout_height="wrap_content" android:hint="请输入密码" android:inputType="textPassword"/> </LinearLayout> <LinearLayout android:layout_width="match_parent" android:layout_height="wrap_content" android:orientation="horizontal"> <CheckBox android:id="@+id/cb_rememberPassword" android:layout_width="wrap_content" android:layout_height="wrap_content" android:text="记住密码"/> <CheckBox android:id="@+id/cb_autoLogin" android:layout_width="wrap_content" android:layout_height="wrap_content" android:text="自动登录"/> </LinearLayout> <LinearLayout android:layout_width="match_parent" android:layout_height="wrap_content" android:orientation="horizontal"> <Button android:id="@+id/btn_register" android:layout_width="wrap_content" android:layout_weight="1" android:layout_height="wrap_content" android:text="注册"/> <Button android:id="@+id/btn_login" android:layout_width="wrap_content" android:layout_weight="1" android:layout_height="wrap_content" android:text="登录"/> </LinearLayout></LinearLayout>MainActivity代码:
import androidx.appcompat.app.AppCompatActivity;import android.content.Context;import android.content.SharedPreferences;import android.os.Bundle;import android.text.TextUtils;import android.view.View;import android.widget.Button;import android.widget.CheckBox;import android.widget.EditText;import android.widget.Toast;public class MainActivity extends AppCompatActivity { private SharedPreferences configSP; private EditText et_username, et_password; private CheckBox cb_rememberPassword, cb_autoLogin; private Button btn_register, btn_login; @Override protected void onCreate(Bundle savedInstanceState) { super.onCreate(savedInstanceState); setContentView(R.layout.activity_main); init(); //若是打勾了,则下一次登录是回显数据 boolean rememberPassword = configSP.getBoolean("rememberPassword", false); boolean autoLogin = configSP.getBoolean("autoLogin", false); if (rememberPassword){ et_username.setText(configSP.getString("username", "")); et_password.setText(configSP.getString("password", "")); cb_rememberPassword.setChecked(true); } if (autoLogin){ cb_autoLogin.setChecked(true); Toast.makeText(this, "自动登录成功", Toast.LENGTH_SHORT).show(); } } private void init() { configSP = getSharedPreferences("config", Context.MODE_PRIVATE); et_username = findViewById(R.id.et_username); et_password = findViewById(R.id.et_password); cb_rememberPassword = findViewById(R.id.cb_rememberPassword); cb_autoLogin = findViewById(R.id.cb_autoLogin); btn_register = findViewById(R.id.btn_register); btn_login = findViewById(R.id.btn_login); MyOnClickListener myOnClickListener = new MyOnClickListener(); btn_register.setOnClickListener(myOnClickListener); btn_login.setOnClickListener(myOnClickListener); } public class MyOnClickListener implements View.OnClickListener{ @Override public void onClick(View view) { switch (view.getId()){ case R.id.btn_register: break; case R.id.btn_login: login(view); break; } } } private void login(View view) { String username = et_username.getText().toString().trim(); String password = et_password.getText().toString().trim(); if (TextUtils.isEmpty(username) || TextUtils.isEmpty(password)){ Toast.makeText(this, "用户名或密码不能为空", Toast.LENGTH_SHORT).show(); } else { if (TextUtils.equals("admin", username) && TextUtils.equals("123456", password)){ SharedPreferences.Editor edit = configSP.edit(); //获取到编辑 if (cb_rememberPassword.isChecked()){ //是否需要保存密码 edit.putString("username", username); edit.putString("password", password); edit.putBoolean("rememberPassword", true); edit.apply(); } if (cb_autoLogin.isChecked()){ //是否需要自动登录 edit.putBoolean("autoLogin", true); edit.apply(); }Toast.makeText(this, "登录成功", Toast.LENGTH_SHORT).show(); } else { Toast.makeText(this, "用户名或密码错误", Toast.LENGTH_SHORT).show(); } } }}运行效果图: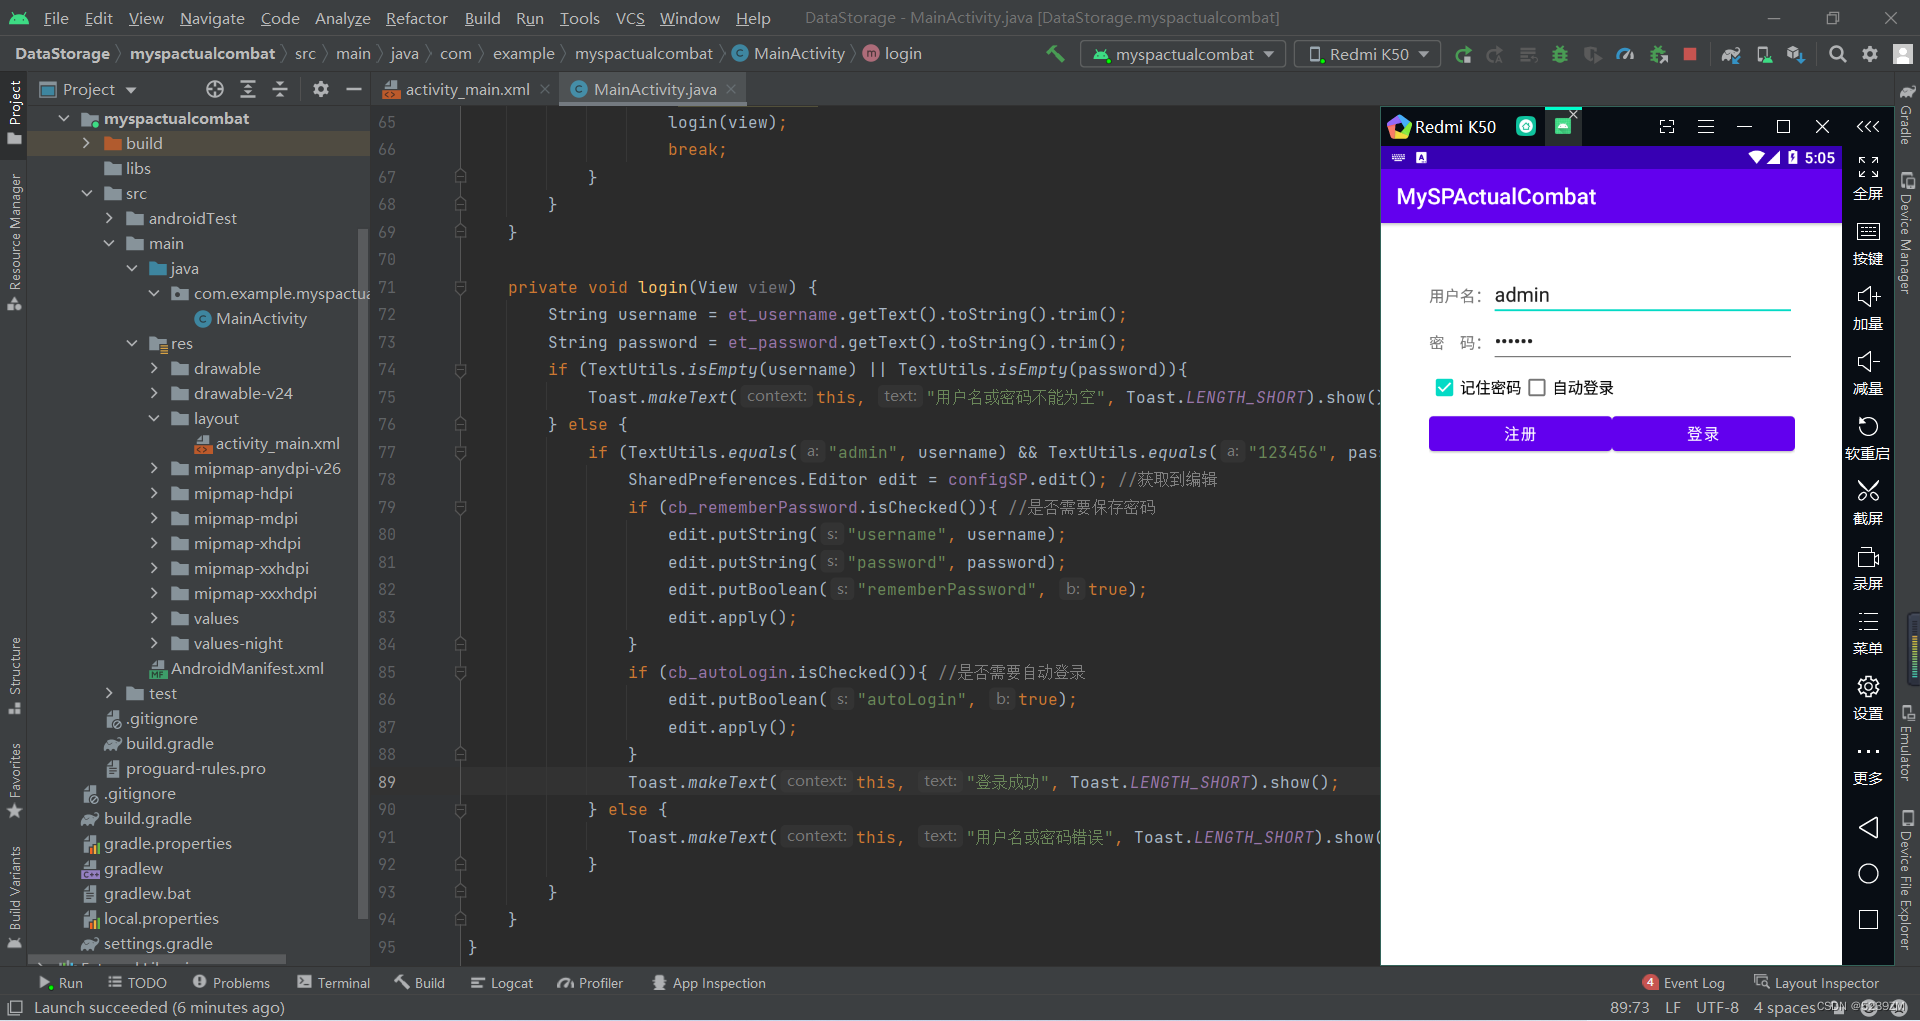
11.3 SQLite的简单使用
11.3.1 SQLite介绍
SQLite为关系型数据库
嵌入式的数据库,体积小功能强大,几十kb,嵌入式设备上:计算器、手表等。
在Android平台上,集成了一个嵌入式关系型数据库——SQLite,SQLite3支持NULL、INTEGER、REAL(浮点数字)、TEXT(字符串文本)和BLOB(二进制对象)数据类型,虽然它支持的类型只有五种,但实际上sqlite3也接受varchar(n)、char(n)、decimal(p,s)等数据类型,只不过在运算或保存时会转成对应的五种数据类型。
SQLite最大的特点是你可以把各种类型的数据保存到字段中,但是主键只能是Integer类型的。Sqlite数据库一般要求主键是_id,当然也可以是id。
Android里面的数据库是由底层的sqilte.c的代码来动态生成的。
11.3.2 SQLite的可视化工具
安装SQLite的可视化工具,将SQLite数据库导出,然后将导出的SQLite数据库拖入可视化工具中即可
SQLiteExpert官网链接:SQLite administration | SQLite Expert
更多SQLite的可视化工具:(4条消息) sqlite 免费的可视化工具_Lucas__liu的博客-CSDN博客_sqlite可视化工具
11.3.3 SQLiteOpenHelper类的方法介绍
| 方法名 | 作用 |
|---|---|
| onCreate() | 创建数据库,一个Helper类只会创建一次表 |
| onUpgrade() | 升级数据库 |
| close() | 关闭所有打开的数据库对象 |
| execSQL() | 执行增删改操作的SQL语句 |
| rawQuery() | 执行查询操作的SQL语句 |
| insert() | 插入数据 |
| delete() | 删除数据 |
| query() | 查询数据 |
| update() | 修改数据 |
| getWritableDatabase() | 创建或打开可写的数据库 |
| getReadableDatabase() | 创建或打开可读的数据 |
11.3.4 SQLite数据库的操作
1、创建SQLite数据库的辅助类(包括创库和创表)
import android.content.Context;import android.database.sqlite.SQLiteDatabase;import android.database.sqlite.SQLiteOpenHelper;import androidx.annotation.Nullable;//MySqliteOpenHelper是工具类 --> 单例模式(1.构造函数私有化 2.对外提供函数)public class MySQLiteOpenHelper extends SQLiteOpenHelper { private static MySQLiteOpenHelper mySQLiteHelper = null; //2.对外提供函数 public static synchronized MySQLiteOpenHelper getInstance(Context context){ if (mySQLiteHelper == null){ mySQLiteHelper = new MySQLiteOpenHelper(context,"user.db",null,1); } return mySQLiteHelper; } //1.构造函数私有化 private MySQLiteOpenHelper(@Nullable Context context, @Nullable String name, @Nullable SQLiteDatabase.CursorFactory factory, int version) { super(context, name, factory, version); } @Override public void onCreate(SQLiteDatabase sqLiteDatabase) { sqLiteDatabase.execSQL("create table persons(_id integer primary key autoincrement, name varchar(20), sex varchar(2), age integer)"); } @Override public void onUpgrade(SQLiteDatabase sqLiteDatabase, int i, int i1) { }}2、创建JavaBean类
public class Person { private String name; private String sex; private Integer age; public Person() { } public Person(String name, String sex, Integer age) { this.name = name; this.sex = sex; this.age = age; } public String getName() { return name; } public void setName(String name) { this.name = name; } public String getSex() { return sex; } public void setSex(String sex) { this.sex = sex; } public Integer getAge() { return age; } public void setAge(Integer age) { this.age = age; } @Override public String toString() { return "Person{" + "name='" + name + '\'' + ", sex='" + sex + '\'' + ", age=" + age + '}'; }}3、编写activity_main.xml代码
4、操作SQLite数据库
import androidx.appcompat.app.AppCompatActivity;import android.content.ContentValues;import android.database.Cursor;import android.database.sqlite.SQLiteDatabase;import android.os.Bundle;import android.util.Log;import android.view.View;import android.widget.Button;import android.widget.Toast;public class MainActivity extends AppCompatActivity implements View.OnClickListener { private MySQLiteOpenHelper myHelper; private String TAG = "MainActivity"; @Override protected void onCreate(Bundle savedInstanceState) { super.onCreate(savedInstanceState); setContentView(R.layout.activity_main); initi(); } private void initi() { myHelper = MySQLiteOpenHelper.getInstance(this); Button btn_insert = findViewById(R.id.btn_insert); Button btn_delete = findViewById(R.id.btn_delete); Button btn_query = findViewById(R.id.btn_query); Button btn_update = findViewById(R.id.btn_update); btn_insert.setOnClickListener(this); btn_delete.setOnClickListener(this); btn_query.setOnClickListener(this); btn_update.setOnClickListener(this); } @Override public void onClick(View view) { switch (view.getId()) { case R.id.btn_insert: Log.i(TAG, "插入数据"); insert("张三", "女", 18); break; case R.id.btn_delete: Log.i(TAG, "删除数据"); delete("李四"); break; case R.id.btn_query: Log.i(TAG, "查询数据"); query(); break; case R.id.btn_update: Log.i(TAG, "更新数据"); update("张三", "李四"); break; } } private void insert(String name, String sex, Integer age) { SQLiteDatabase writableDatabase = myHelper.getWritableDatabase(); ContentValues values = new ContentValues(); values.put("name", name); values.put("sex", sex); values.put("age", age); long insertCount = writableDatabase.insert("persons", null, values); /** * 第一个参数:操作的表名 * 第二个参数:插入的列没有数据匹配时的默认值 * 第三个参数:插入的数据列表 */ if (insertCount > 0){ Toast.makeText(this, "插入成功", Toast.LENGTH_SHORT).show(); } else { Toast.makeText(this, "插入失败", Toast.LENGTH_SHORT).show(); } } private void delete(String name) { SQLiteDatabase writableDatabase = myHelper.getWritableDatabase(); String[] whereArgs = {name}; int deleteCount = writableDatabase.delete("persons", "name=?", whereArgs); /** * 第一个参数:操作的表名 * 第二个参数:条件语句, 如果为null, 就删除所有行 * 第三个参数:条件字符串中"?"占位符的匹配列表 */ if (deleteCount > 0){ Toast.makeText(this, "删除成功", Toast.LENGTH_SHORT).show(); } else { Toast.makeText(this, "删除失败", Toast.LENGTH_SHORT).show(); } writableDatabase.close(); } private void query() { SQLiteDatabase readableDatabase = myHelper.getReadableDatabase(); Cursor cursor = readableDatabase.query("persons", null, null, null, null, null, null); while (cursor.moveToNext()) { String name = cursor.getString(cursor.getColumnIndex("name")); String sex = cursor.getString(cursor.getColumnIndex("sex")); int age = cursor.getInt(cursor.getColumnIndex("age")); Person person = new Person(name, sex, age); Log.i(TAG, person.toString()); } cursor.close(); readableDatabase.close(); } private void update(String name, String name1) { SQLiteDatabase writableDatabase = myHelper.getWritableDatabase(); ContentValues values = new ContentValues(); values.put("name", name1); String[] whereArgs = {name}; int updateCount = writableDatabase.update("persons", values, "name=?", whereArgs); /** * 第一个参数:操作的表名 * 第二个参数:更新的数据列表 * 第三个参数:条件语句, 如果为null, 就更新所有行 * 第四个参数:条件字符串中"?"占位符的匹配列表 */ if (updateCount > 0){ Toast.makeText(this, "更新成功", Toast.LENGTH_SHORT).show(); } else { Toast.makeText(this, "更新失败", Toast.LENGTH_SHORT).show(); } writableDatabase.close(); }}5、运行效果图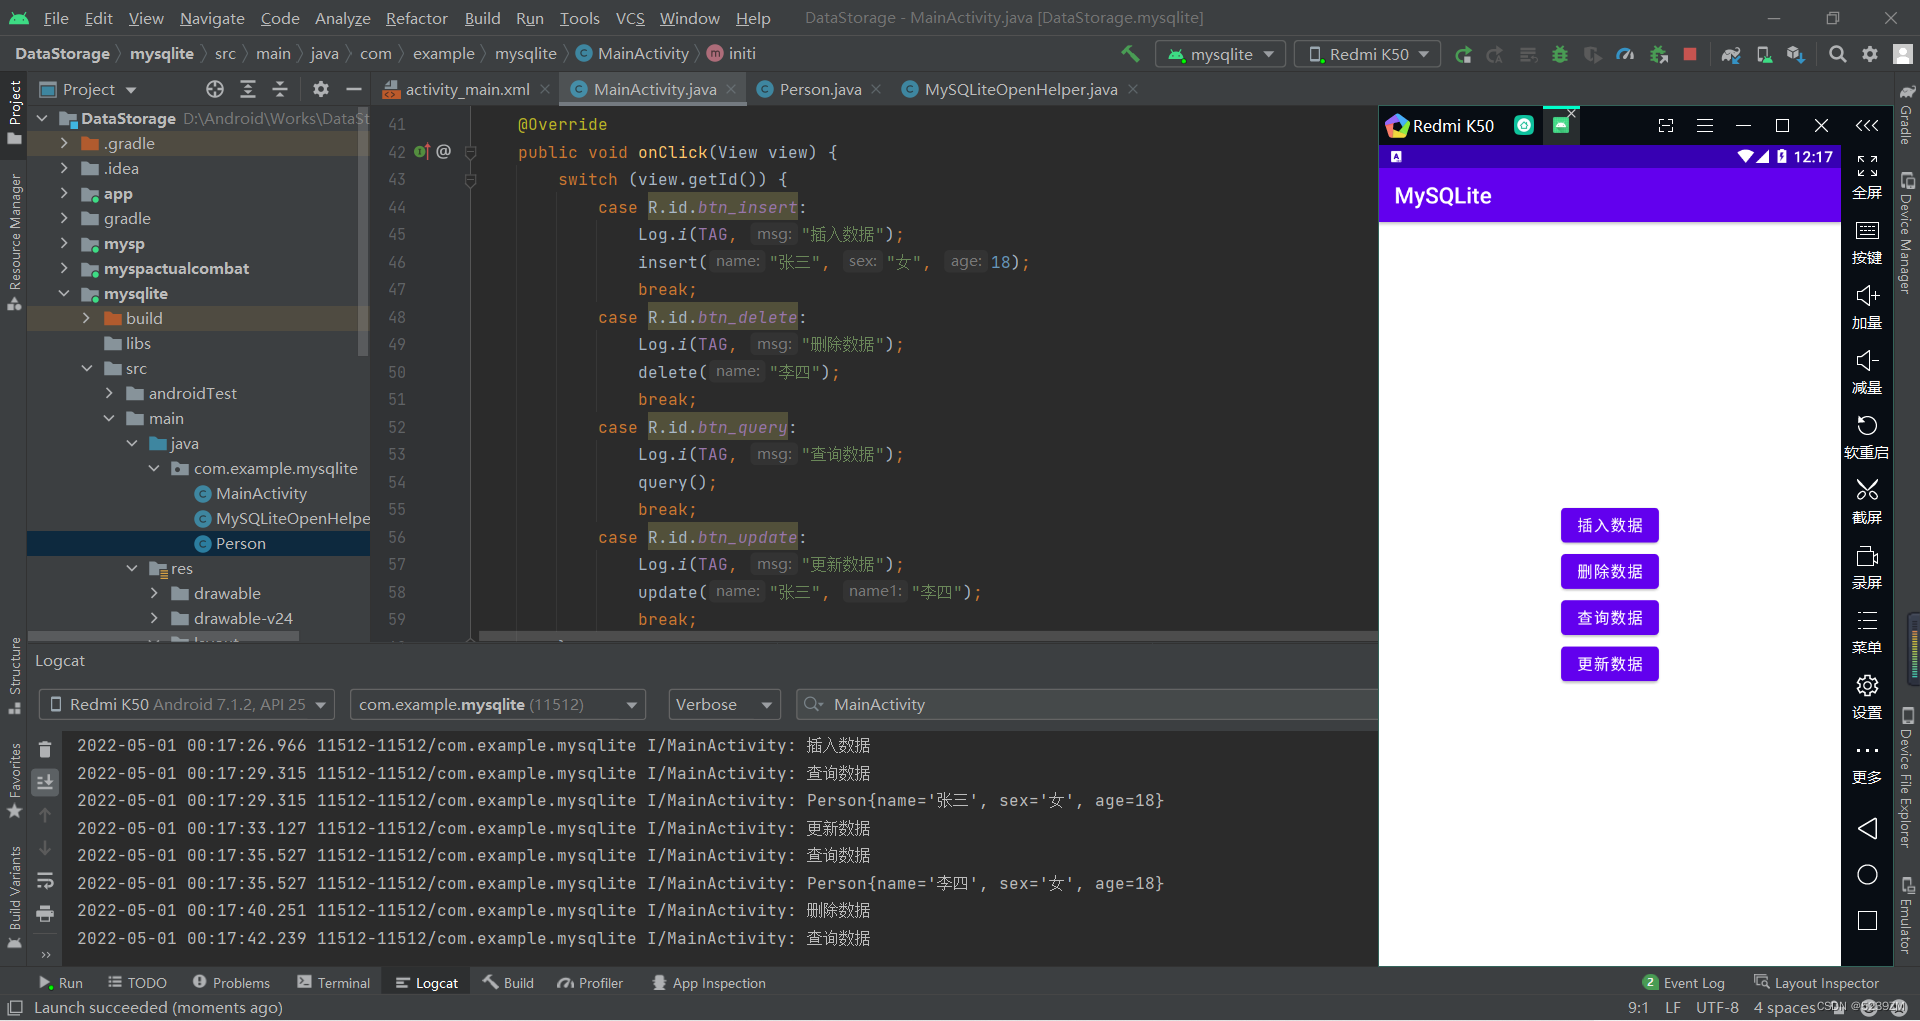
注意:在数据库查询操作的cursor.getString(cursor.getColumnIndex("name"));处报错,但不影响编译(可分为两步写解决报错问题)
操作顺序为插入-->查询-->更新--查询-->删除-->查询
11.4 Room的简单使用
11.4.1 Room的介绍
Room是一个对象关系映射(ORM)库。Room抽象了SQLite的使用,可以在充分利用SQLite的同时访问流畅的数据库。
Room官方文档介绍 https://developer.android.com/training/data-storage/room/
Room由三个重要的组件组成(三角色):Entity、Dao、Database。
Entity:数据库实体,系统根据Entity类创建数据库,里面规定了PrimaryKey,列名、表名等数据库必备设定Dao:Database access object:定义了一些操作数据库的操作,比如说增删改查Database:可以认为是完整的数据库,完整的数据库包括数据库信息和数据库操作,也就是Entity和Dao 11.4.2 Room三角色的实现
注意:Room操作数据库时都是基于主键操作的
1、Student(Entity)
import androidx.room.Entity;import androidx.room.Index;import androidx.room.PrimaryKey;@Entity(indices = {@Index(value = {"studentNumber"}, unique = true)})public class Student { @PrimaryKey(autoGenerate = true) private Integer id; private String studentNumber; private String name; private String classes; public Student(Integer id, String studentNumber, String name, String classes) { this.id = id; this.studentNumber = studentNumber; this.name = name; this.classes = classes; } public Integer getId() { return id; } public void setId(Integer id) { this.id = id; } public String getStudentNumber() { return studentNumber; } public void setStudentNumber(String studentNumber) { this.studentNumber = studentNumber; } public String getName() { return name; } public void setName(String name) { this.name = name; } public String getClasses() { return classes; } public void setClasses(String classes) { this.classes = classes; } @Override public String toString() { return "Student{" + "id=" + id + ", studentNumber='" + studentNumber + '\'' + ", name='" + name + '\'' + ", classes='" + classes + '\'' + '}'; }}2、StudentDao(Dao)
import androidx.room.Dao;import androidx.room.Insert;import androidx.room.Query;import androidx.room.Update;import java.util.List;@Daopublic interface StudentDao { @Insert void insertStudent(Student student); @Insert void insertStudents(List<Student> students); @Query("DELETE FROM student WHERE studentNumber=:studentNumber") int deleteStudent(String studentNumber); @Query("DELETE FROM student") int deleteAllStudent(); @Query("SELECT * FROM Student") List<Student> queryAllStudent(); @Query("SELECT * FROM Student WHERE studentNumber=:studentNumber") Student queryStudentByStudentNumber(String studentNumber); @Query("SELECT * FROM Student WHERE name=:name") List<Student> queryStudentByName(String name); @Update int updateStudent(Student student);}3、StudentDatabase(Database)
import android.content.Context;import androidx.room.Database;import androidx.room.Room;import androidx.room.RoomDatabase;/** * entities:传入所有Entity的class对象; * version:数据库版本号。 * exportSchema:设置是否导出数据库schema,默认为true,需要在build.gradle中设置 */@Database(entities = {Student.class}, version = 1, exportSchema = false)public abstract class StudentDatabase extends RoomDatabase { private static StudentDatabase studentDatabase = null; public static synchronized StudentDatabase getInstance(Context context){ if (studentDatabase == null){ studentDatabase = Room.databaseBuilder(context.getApplicationContext(), StudentDatabase.class, "student") .allowMainThreadQueries() //强制在主线程执行 .build(); } return studentDatabase; } public abstract StudentDao getStudentDao();}11.4.3 使用Room三角色
1、编写activity_main.xml
2、编写ActivityMain.java
import androidx.appcompat.app.AppCompatActivity;import android.content.ContentValues;import android.database.Cursor;import android.database.sqlite.SQLiteDatabase;import android.os.Bundle;import android.util.Log;import android.view.View;import android.widget.Button;import android.widget.Toast;import java.util.List;public class MainActivity extends AppCompatActivity implements View.OnClickListener { private static final String TAG = "MainActivity"; private StudentDao studentDao; @Override protected void onCreate(Bundle savedInstanceState) { super.onCreate(savedInstanceState); setContentView(R.layout.activity_main); init(); } private void init() { studentDao = StudentDatabase.getInstance(this).getStudentDao(); Button btn_insert = findViewById(R.id.btn_insert); Button btn_delete = findViewById(R.id.btn_delete); Button btn_query = findViewById(R.id.btn_query); Button btn_update = findViewById(R.id.btn_update); btn_insert.setOnClickListener(this); btn_delete.setOnClickListener(this); btn_query.setOnClickListener(this); btn_update.setOnClickListener(this); } @Override public void onClick(View view) { switch (view.getId()) { case R.id.btn_insert: Log.i(TAG, "插入数据"); insert("38241319601", "张三", "2019级计算机科学与技术六班"); insert("38241319602", "李si", "2019级计算机科学与技术六班"); insert("38241319603", "王五", "2019级计算机科学与技术六班"); insert("38241319604", "赵六", "2019级计算机科学与技术六班"); break; case R.id.btn_delete: Log.i(TAG, "删除数据"); delete("38241319602"); break; case R.id.btn_query: Log.i(TAG, "查询数据"); queryAll(); break; case R.id.btn_update: Log.i(TAG, "更新数据"); update(2, "李四"); break; } } private void insert(String studentNumber, String name, String classes) { Student student = new Student(null, studentNumber, name, classes); student.setStudentNumber(studentNumber); studentDao.insertStudent(student); } private void delete(String studentNumber) { int deleteCount = studentDao.deleteStudent(studentNumber); if (deleteCount > 0){ Toast.makeText(this, "删除成功", Toast.LENGTH_SHORT).show(); } else { Toast.makeText(this, "删除失败", Toast.LENGTH_SHORT).show(); } } private void queryAll() { List<Student> students = studentDao.queryAllStudent(); for (Student student : students) { Log.i(TAG, student.toString()); } } private void update(Integer id, String name) { Student student = new Student(id, null, name, null); int updateCount = studentDao.updateStudent(student); if (updateCount > 0){ Toast.makeText(this, "更新成功", Toast.LENGTH_SHORT).show(); } else { Toast.makeText(this, "更新失败", Toast.LENGTH_SHORT).show(); } }}6、运行效果
第12章 多媒体应用
Android 多媒体框架支持捕获和编码各种常见的音频和视频格式。
12.1 MediaRecorder概述
用于录制音频和视频的一个类。
12.1.1 状态转换图
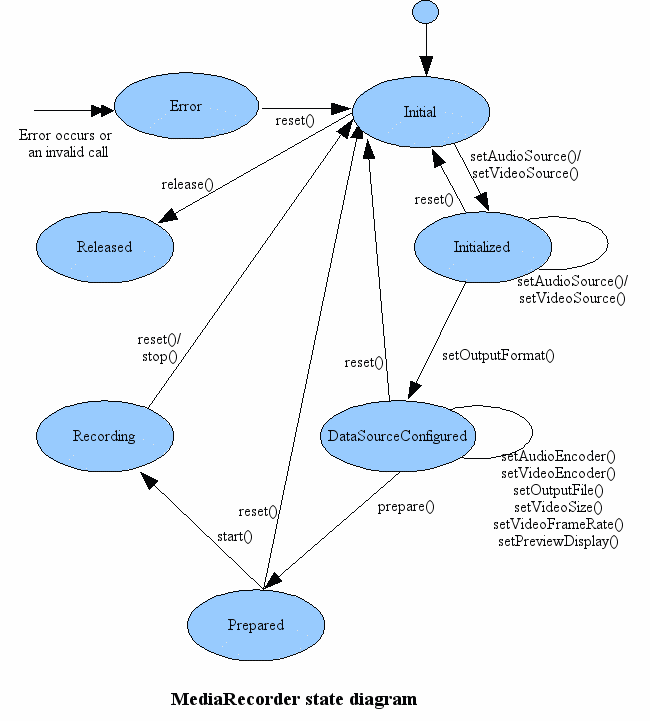
说明:
下面是关于MediaRecorder状态图的各个状态的介绍:
Initial:初始状态,当使用new()方法创建一个MediaRecorder对象或者调用了reset()方法时,该MediaRecorder对象处于Initial状态。在设定视频源或者音频源之后将转换为Initialized状态。另外,在除Released状态外的其它状态通过调用reset()方法都可以使MediaRecorder进入该状态。
Initialized:已初始化状态,可以通过在Initial状态调用setAudioSource()或setVideoSource()方法进入该状态。在这个状态可以通过setOutputFormat()方法设置输出格式,此时MediaRecorder转换为DataSourceConfigured状态。另外,通过reset()方法进入Initial状态。
DataSourceConfigured:数据源配置状态,这期间可以设定编码方式、输出文件、屏幕旋转、预览显示等等。可以在Initialized状态通过setOutputFormat()方法进入该状态。另外,可以通过reset()方法回到Initial状态,或者通过prepare()方法到达Prepared状态。
Prepared:就绪状态,在DataSourceConfigured状态通过prepare()方法进入该状态。在这个状态可以通过start()进入录制状态。另外,可以通过reset()方法回到Initialized状态。
Recording:录制状态,可以在Prepared状态通过调用start()方法进入该状态。另外,它可以通过stop()方法或reset()方法回到Initial状态。
Released:释放状态(官方文档给出的词叫做Idle state 空闲状态),可以通过在Initial状态调用release()方法来进入这个状态,这时将会释放所有和MediaRecorder对象绑定的资源。
Error:错误状态,当错误发生的时候进入这个状态,它可以通过reset()方法进入Initial状态。
提示:使用MediaRecorder录音录像时需要严格遵守状态图说明中的函数调用先后顺序,在不同的状态调用不同的函数,否则会出现异常。
12.1.2 使用MediaRecorder的使用
1、添加权限
<!-- 授予该程序录制声音的权限 --><uses-permission android:name="android.permission.RECORD_AUDIO"/><!-- 授予该程序使用摄像头的权限 --><uses-permission android:name="android.permission.CAMERA"/>2、MainActivity.java(含申请权限)
import android.Manifest;import android.content.Intent;import android.os.Bundle;import android.view.View;import android.widget.Button;import androidx.appcompat.app.AppCompatActivity;import androidx.core.app.ActivityCompat;public class MainActivity extends AppCompatActivity implements View.OnClickListener { @Override protected void onCreate(Bundle savedInstanceState) { super.onCreate(savedInstanceState); setContentView(R.layout.activity_main); init(); } public void init(){ ActivityCompat.requestPermissions(this, new String[]{Manifest.permission.RECORD_AUDIO, Manifest.permission.CAMERA}, 1000); Button btn_record = findViewById(R.id.btn_record); Button btn_playVideo = findViewById(R.id.btn_playVideo); Button btn_playAudio = findViewById(R.id.btn_playAudio); Button btn_playVideoVV = findViewById(R.id.btn_playVideoVV); btn_record.setOnClickListener(this); btn_playVideo.setOnClickListener(this); btn_playAudio.setOnClickListener(this); btn_playVideoVV.setOnClickListener(this); } @Override public void onClick(View view) { switch (view.getId()){ case R.id.btn_record: startActivity(new Intent(this, RecordActivity.class)); break; case R.id.btn_playVideo: startActivity(new Intent(this, VideoActivity.class)); break; case R.id.btn_playVideoVV: startActivity(new Intent(this, VideoViewActivity.class)); break; case R.id.btn_playAudio: startActivity(new Intent(this, RecordActivity.class)); break; } }}3、RecordActivity.java(问题:声音和图像分开播放,未解决)
import android.hardware.Camera;import android.media.MediaRecorder;import android.os.Bundle;import android.text.TextUtils;import android.view.Surface;import android.view.TextureView;import android.view.View;import android.widget.Button;import androidx.appcompat.app.AppCompatActivity;import java.io.File;import java.io.IOException;public class RecordActivity extends AppCompatActivity implements View.OnClickListener {// private SurfaceView surfaceView; private TextureView textureView; private Button btn_opt; @Override protected void onCreate(Bundle savedInstanceState) { super.onCreate(savedInstanceState); setContentView(R.layout.activity_record);// surfaceView = findViewById(R.id.surfaceView); textureView = findViewById(R.id.textureView); btn_opt = findViewById(R.id.btn_opt); btn_opt.setOnClickListener(this); } @Override public void onClick(View view) { CharSequence btn_optText = btn_opt.getText(); MediaRecorder mediaRecorder = null; Camera camera = Camera.open(); if (TextUtils.equals("开始", btn_optText)){ btn_opt.setText("结束"); camera.setDisplayOrientation(90); //竖屏 camera.unlock(); mediaRecorder = new MediaRecorder(); mediaRecorder.setCamera(camera); mediaRecorder.setAudioSource(MediaRecorder.AudioSource.MIC); //设置音频源 麦克风 mediaRecorder.setVideoSource(MediaRecorder.VideoSource.CAMERA); //设置视频源 麦克风 mediaRecorder.setOutputFormat(MediaRecorder.OutputFormat.MPEG_4); //设置视频输出格式 mediaRecorder.setAudioEncoder(MediaRecorder.AudioEncoder.AMR_NB); //设置音频编码格式 mediaRecorder.setVideoEncoder(MediaRecorder.VideoEncoder.MPEG_4_SP); //设置视频格式 mediaRecorder.setOrientationHint(90); //设置文件正向 mediaRecorder.setOutputFile(new File(getExternalFilesDir(""), "a.mp4").getAbsolutePath()); //设置文件输出路径 mediaRecorder.setVideoSize(640, 480); //设置视频显示大小// mediaRecorder.setPreviewDisplay(surfaceView.getHolder().getSurface()); //低版本不行 mediaRecorder.setPreviewDisplay(new Surface(textureView.getSurfaceTexture())); try { mediaRecorder.prepare(); //录制准备 } catch (IOException e) { e.printStackTrace(); } mediaRecorder.start(); //开始录制 } else { btn_opt.setText("开始"); mediaRecorder.stop(); mediaRecorder.release(); //释放mediaRecorder camera.stopPreview(); camera.release(); } }}4、activity_record.xml
<?xml version="1.0" encoding="utf-8"?><androidx.constraintlayout.widget.ConstraintLayout xmlns:android="http://schemas.android.com/apk/res/android" xmlns:app="http://schemas.android.com/apk/res-auto" xmlns:tools="http://schemas.android.com/tools" android:layout_width="match_parent" android:layout_height="match_parent" tools:context=".RecordActivity"> <SurfaceView android:id="@+id/surfaceView" android:layout_width="match_parent" android:layout_height="match_parent"/> <TextureView android:id="@+id/textureView" android:layout_width="match_parent" android:layout_height="match_parent" /> <Button android:id="@+id/btn_opt" android:layout_width="wrap_content" android:layout_height="wrap_content" android:text="开始" app:layout_constraintBottom_toBottomOf="@+id/textureView" app:layout_constraintEnd_toEndOf="parent" app:layout_constraintStart_toStartOf="parent" /></androidx.constraintlayout.widget.ConstraintLayout>12.2 MediaPlayer简介
MediaPlayer类是媒体框架最重要的组成部分之一。此类的对象能够获取、解码以及播放音频和视频,而且只需极少量设置。它支持多种不同的媒体源,例如:
本地资源内部URI,例如您可能从内容解析器那获取的URI·外部网址(流式传输)媒体格式列表:https://developer.android.google.cn/guide/topics/media/media-formats?hl=zh_cn
12.2.1 状态转换图
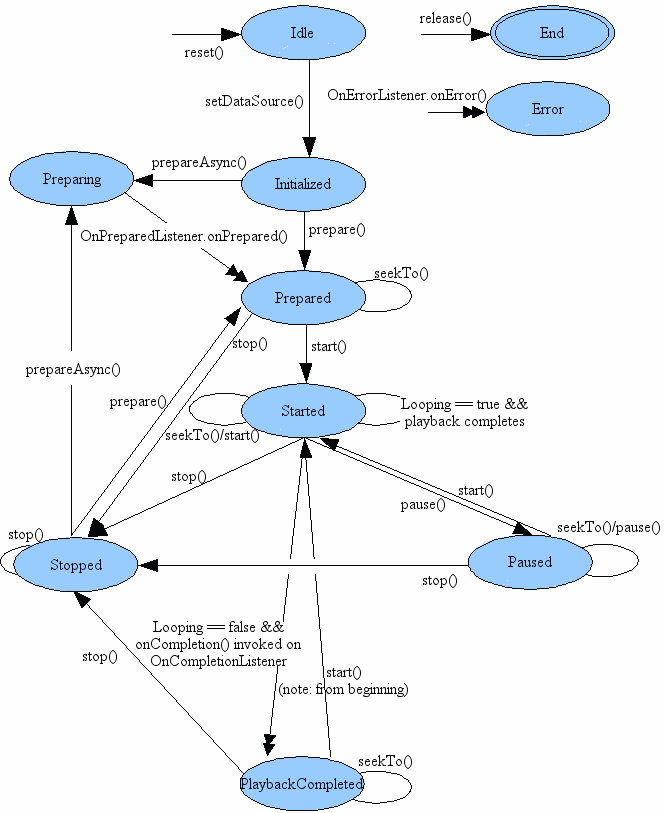
12.2.2 自定义
1、VideoActivity.java
import android.media.MediaPlayer;import android.os.Bundle;import android.text.TextUtils;import android.view.Surface;import android.view.TextureView;import android.view.View;import android.widget.Button;import androidx.appcompat.app.AppCompatActivity;import java.io.File;import java.io.IOException;public class VideoActivity extends AppCompatActivity implements View.OnClickListener, MediaPlayer.OnPreparedListener, MediaPlayer.OnCompletionListener { private TextureView textureView; private Button btn_opt; @Override protected void onCreate(Bundle savedInstanceState) { super.onCreate(savedInstanceState); setContentView(R.layout.activity_video); textureView = findViewById(R.id.textureView); btn_opt = findViewById(R.id.btn_opt); btn_opt.setOnClickListener(this); } @Override public void onClick(View view) { CharSequence btn_optText = btn_opt.getText(); MediaPlayer mediaPlayer = null; if (TextUtils.equals("开始", btn_optText)) { btn_opt.setText("结束"); mediaPlayer = new MediaPlayer(); mediaPlayer.setOnPreparedListener(this); //加载完成监听 mediaPlayer.setOnCompletionListener(this); //播放完成监听 try { mediaPlayer.setDataSource(new File(getExternalFilesDir(""), "a.mp4").getAbsolutePath()); } catch (IOException e) { e.printStackTrace(); } mediaPlayer.setSurface(new Surface(textureView.getSurfaceTexture())); //播放画布 mediaPlayer.prepareAsync(); //异步加载 } else { btn_opt.setText("开始"); mediaPlayer.stop(); mediaPlayer.release(); } } @Override public void onPrepared(MediaPlayer mediaPlayer) { mediaPlayer.start(); //播放 } @Override public void onCompletion(MediaPlayer mediaPlayer) { btn_opt.setText("开始"); mediaPlayer.stop(); mediaPlayer.release(); }}2、activity_video.xml
<?xml version="1.0" encoding="utf-8"?><androidx.constraintlayout.widget.ConstraintLayout xmlns:android="http://schemas.android.com/apk/res/android" xmlns:app="http://schemas.android.com/apk/res-auto" xmlns:tools="http://schemas.android.com/tools" android:layout_width="match_parent" android:layout_height="match_parent" tools:context=".RecordActivity"> <VideoView android:id="@+id/videoView" android:layout_width="match_parent" android:layout_height="match_parent" /></androidx.constraintlayout.widget.ConstraintLayout>12.2.3 Android自带的VideoView
1、VideoViewActivity.java
import android.os.Bundle;import android.util.Log;import android.view.View;import android.widget.MediaController;import android.widget.VideoView;import androidx.appcompat.app.AppCompatActivity;import java.io.File;public class VideoViewActivity extends AppCompatActivity implements View.OnClickListener { @Override protected void onCreate(Bundle savedInstanceState) { super.onCreate(savedInstanceState); setContentView(R.layout.activity_videoview); VideoView videoView = findViewById(R.id.videoView); MediaController mediaController = new MediaController(this); mediaController.setPrevNextListeners(this, this); //上一曲、下一曲 videoView.setMediaController(mediaController); videoView.setVideoPath(new File(getExternalFilesDir(""), "a.mp4").getAbsolutePath()); videoView.start(); } @Override public void onClick(View view) { Log.i("VideoView", "======"); }}2、activity_videoview.xml
<?xml version="1.0" encoding="utf-8"?><androidx.constraintlayout.widget.ConstraintLayout xmlns:android="http://schemas.android.com/apk/res/android" xmlns:app="http://schemas.android.com/apk/res-auto" xmlns:tools="http://schemas.android.com/tools" android:layout_width="match_parent" android:layout_height="match_parent" tools:context=".VideoViewActivity"> <VideoView android:id="@+id/videoView" android:layout_width="match_parent" android:layout_height="match_parent" /></androidx.constraintlayout.widget.ConstraintLayout>12.3 SoundPool音效播放
12.3.1 SoundPool简介
MediaPlayer虽然也能播放音频,但是它有资源占用量较高、延迟时间较长、不支持多个音频同时播放等缺点。这些缺点决定了MediaPlayer在某些场合的使用情况不会很理想,例如在对时间精准度要求相对较高的场景。而SoundPool一般用来播放密集、急促而又短暂的音效,比如:"滴滴一下,马上出发”。
12.3.2 使用SounPool
1、Music.java
public class Music { private String name; private int musicId; public Music() { } public Music(String name, int musicId) { this.name = name; this.musicId = musicId; } public String getName() { return name; } public void setName(String name) { this.name = name; } public int getMusicId() { return musicId; } public void setMusicId(int musicId) { this.musicId = musicId; } @Override public String toString() { return "Music{" + "name='" + name + '\'' + ", musicId=" + musicId + '}'; }}2、创建SoundActivity
activity_sound.xml
<?xml version="1.0" encoding="utf-8"?><androidx.constraintlayout.widget.ConstraintLayout xmlns:android="http://schemas.android.com/apk/res/android" xmlns:tools="http://schemas.android.com/tools" android:layout_width="match_parent" android:layout_height="match_parent" tools:context=".SoundActivity"> <androidx.recyclerview.widget.RecyclerView android:id="@+id/recyclerView" android:layout_width="match_parent" android:layout_height="match_parent" android:background="@color/teal_200"/></androidx.constraintlayout.widget.ConstraintLayout>3、music_item.xml
<?xml version="1.0" encoding="utf-8"?><LinearLayout xmlns:android="http://schemas.android.com/apk/res/android" android:layout_width="match_parent" android:layout_height="wrap_content" android:orientation="vertical" android:background="@color/red"> <TextView android:id="@+id/tv_musicName" android:layout_width="match_parent" android:layout_height="wrap_content" android:textSize="30sp"/> <TextView android:layout_width="match_parent" android:layout_height="1dp" android:background="@color/black"/></LinearLayout>4、MusicAdamter.java
import android.content.Context;import android.view.LayoutInflater;import android.view.View;import android.view.ViewGroup;import android.widget.TextView;import android.widget.Toast;import androidx.annotation.NonNull;import androidx.recyclerview.widget.RecyclerView;import java.util.List;public class MusicAdapter extends RecyclerView.Adapter<MusicAdapter.ViewHolder> { private List<Music> musicList; private Context context; public MusicAdapter(List<Music> musicList, Context context){ this.musicList = musicList; this.context = context; } @NonNull @Override public ViewHolder onCreateViewHolder(@NonNull ViewGroup parent, int viewType) { //用来创建ViewHolder实例,再将加载好的布局传入构造函数,最后返回ViewHolder实例// View view = View.inflate(context, R.layout.music_item, null); View view = LayoutInflater.from(parent.getContext()).inflate(R.layout.music_item, parent, false); //解决宽度不能铺满 view.setOnClickListener(new View.OnClickListener() { @Override public void onClick(View view) { int position = view.getVerticalScrollbarPosition(); Toast.makeText(context, musicList.get(position).getName(), Toast.LENGTH_SHORT).show(); } }); ViewHolder viewHolder = new ViewHolder(view); return viewHolder; } @Override public void onBindViewHolder(@NonNull ViewHolder holder, int position) { holder.textView.setText(musicList.get(position).getName()); holder.itemView.setOnClickListener(new View.OnClickListener() { @Override public void onClick(final View v) { if(onItemClickListener != null) { int pos = holder.getLayoutPosition(); onItemClickListener.onItemClick(holder.itemView, pos); } } }); } @Override public int getItemCount() { return musicList.size(); } public interface OnItemClickListener{ void onItemClick(View view, int position); } private OnItemClickListener onItemClickListener; public void setOnItemClickListener(MusicAdapter.OnItemClickListener listener) { this.onItemClickListener = listener; } public class ViewHolder extends RecyclerView.ViewHolder{ protected TextView textView; public ViewHolder(@NonNull View itemView) { super(itemView); textView = itemView.findViewById(R.id.tv_musicName); } }}5、SoundActivity.java
import android.content.Context;import android.media.AudioManager;import android.media.SoundPool;import android.os.Bundle;import android.view.View;import android.widget.Toast;import androidx.appcompat.app.AppCompatActivity;import androidx.recyclerview.widget.LinearLayoutManager;import androidx.recyclerview.widget.RecyclerView;import java.util.ArrayList;import java.util.List;public class SoundActivity extends AppCompatActivity { private List<Music> musicList = new ArrayList<>(); private SoundPool soundPool; @Override protected void onCreate(Bundle savedInstanceState) { super.onCreate(savedInstanceState); setContentView(R.layout.activity_sound); initMusics(); RecyclerView recyclerView = findViewById(R.id.recyclerView); LinearLayoutManager layoutManager = new LinearLayoutManager(this); layoutManager.setOrientation(LinearLayoutManager.VERTICAL); //设置方向 recyclerView.setLayoutManager(layoutManager); MusicAdapter musicAdapter = new MusicAdapter(musicList, this); musicAdapter.setOnItemClickListener(new MusicAdapter.OnItemClickListener() { @Override public void onItemClick(View view, int position) { Toast.makeText(SoundActivity.this, "点击了"+musicList.get(position).getName(), Toast.LENGTH_SHORT).show(); Music music = musicList.get(position); AudioManager audioManager = (AudioManager) getSystemService(Context.AUDIO_SERVICE); int volumem = audioManager.getStreamMaxVolume(AudioManager.STREAM_MUSIC); int volume = audioManager.getStreamVolume(AudioManager.STREAM_MUSIC); soundPool.play(music.getMusicId(), volumem, volume, 1, 1, 1); } }); recyclerView.setAdapter(musicAdapter); } private void initMusics() { soundPool = new SoundPool.Builder().setMaxStreams(6).build(); for (int i = 0; i < 6; i++) { musicList.add(new Music("a"+(i+1), soundPool.load(this, R.raw.a1+i, 1))); //不建议 }// musicList.add(new Music("a2", soundPool.load(this, R.raw.a2, 1)));// musicList.add(new Music("a3", soundPool.load(this, R.raw.a3, 1)));// musicList.add(new Music("a4", soundPool.load(this, R.raw.a4, 1)));// musicList.add(new Music("a5", soundPool.load(this, R.raw.a5, 1)));// musicList.add(new Music("a6", soundPool.load(this, R.raw.a6, 1))); } @Override protected void onDestroy() { super.onDestroy(); for (Music music : musicList) { soundPool.unload(music.getMusicId()); } soundPool.release(); }音效资源链接:https://pan.baidu.com/s/1yIY5l7xQf0kG7lO_U6A4uQ
提取码:neyt
第13章 项目发布
13.1 项目安全
13.1.1 加固
为什么应用需要加固:防止应用被逆向分析、反编译、二次打包,防止嵌入各类病毒、广告等恶意代码,从源头保护数据安全和开发者利益。
13.1.2 设置多渠道
1、统计各个渠道包的情况,例如哪个渠道的下载量更大,哪个渠道下载的客户活跃度或者粘性更高等信息。
2、针对不同的渠道做一些不同的操作。
目前常用的多渠道打包工具有三种:
11.1.3 生成release apk
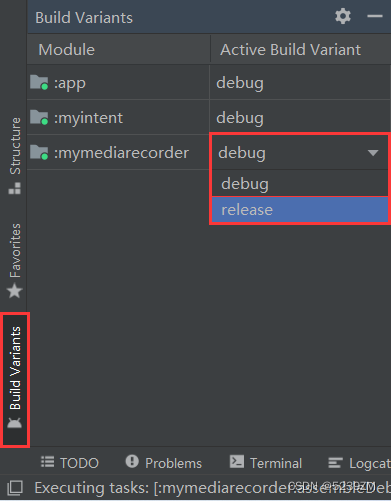
常用:【Build】-->【Generate Signed Bundle / APK...】-->【APK】-->【Next】--> 【Key story path】-->【Next】-->【使用加固工具进行加固】 -->【应用发布】