??????
哈喽!大家好,我是【一心同学】,一位上进心十足的【Java领域博主】!???
✨【一心同学】的写作风格:喜欢用【通俗易懂】的文笔去讲解每一个知识点,而不喜欢用【高大上】的官方陈述。
✨【一心同学】博客的领域是【面向后端技术】的学习,未来会持续更新更多的【后端技术】以及【学习心得】。
✨如果有对【后端技术】感兴趣的【小可爱】,欢迎关注【一心同学】???
❤️❤️❤️感谢各位大可爱小可爱!❤️❤️❤️
目录
前言
一、介绍
二、代码自动生成器搭建
准备工作
2.1 创建一个SpringBoot项目。
2.2 导入依赖
2.3 编写配置文件
2.4 搭建代码自动生成器
2.5 启动运行代码生成器类
2.6 编写自动填充处理器
2.7 乐观锁和逻辑删除配置
2.8 测试
三、Service中的CRUD
3.1 插入操作
3.2 插入或更新操作
3.3 删除操作
3.4 更新操作
3.5 查询操作
3.5.1 单条查询
3.5.2 批量查询操作
3.5.3 查询数量
小结
前言
回想我们之前进行开发的过程,首先我们需要编写与数据库表对应的实体类,接着再进行创建各种层次的包(mapper,service,impl),这个过程是不是感觉特别漫长呢,而现在一款神器登场了,它就是:MpBatis-Plus的代码自动生成器。
一、介绍
代码自动生成器非常好用,我们只需要提供我们数据库的表名,然后就可以让生成器自动帮我们完成各种代码的创建,整个过程非常清爽,可以说是加班人的福利!
现在我们就来讲解怎么搭建这个代码自动生成器!
二、代码自动生成器搭建
准备工作
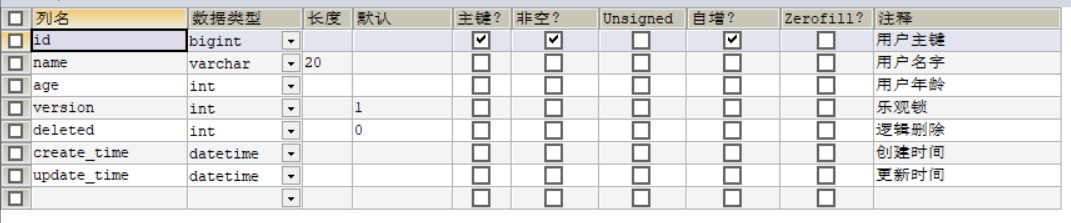
CREATE DATABASE mybatis_plus_db;USE `mybatis_plus_db`;DROP TABLE IF EXISTS `user`;CREATE TABLE `user` ( `id` bigint NOT NULL AUTO_INCREMENT COMMENT '用户主键', `name` varchar(20) DEFAULT NULL COMMENT '用户名字', `age` int DEFAULT NULL COMMENT '用户年龄', `version` int DEFAULT '1' COMMENT '乐观锁', `deleted` int DEFAULT '0' COMMENT '逻辑删除', `create_time` datetime DEFAULT NULL COMMENT '创建时间', `update_time` datetime DEFAULT NULL COMMENT '更新时间', PRIMARY KEY (`id`)) ENGINE=InnoDB AUTO_INCREMENT=1482996505408204804 DEFAULT CHARSET=utf8mb4 COLLATE=utf8mb4_0900_ai_ci;
数据库结构如下:
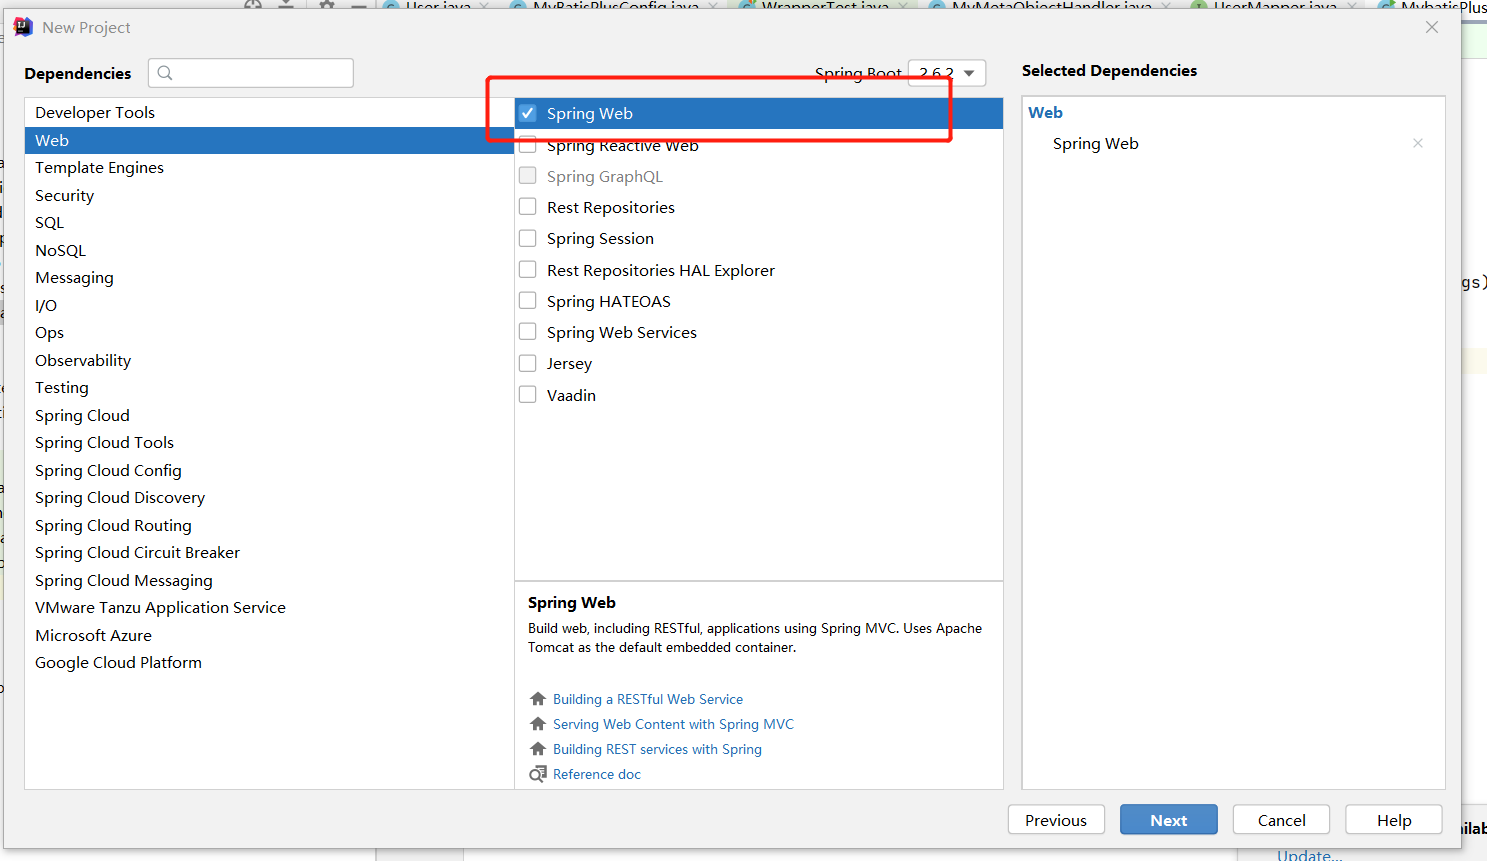
2.1 创建一个SpringBoot项目。
选择web依赖。
2.2 导入依赖
<!-- 数据库驱动 --> <dependency> <groupId>mysql</groupId> <artifactId>mysql-connector-java</artifactId> </dependency> <!-- lombok --> <dependency> <groupId>org.projectlombok</groupId> <artifactId>lombok</artifactId> </dependency> <!-- mybatis-plus --> <dependency> <groupId>com.baomidou</groupId> <artifactId>mybatis-plus-boot-starter</artifactId> <version>3.0.5</version> </dependency> <!-- 代码自动生成器依赖--> <dependency> <groupId>com.baomidou</groupId> <artifactId>mybatis-plus-generator</artifactId> <version>3.0.5</version> </dependency> <dependency> <groupId>org.apache.velocity</groupId> <artifactId>velocity-engine-core</artifactId> <version>2.2</version> </dependency>
2.3 编写配置文件
application.properties:
# mysql 5 驱动不同 com.mysql.jdbc.Driver# mysql 8 驱动不同com.mysql.cj.jdbc.Driver、需要增加时区的配置 serverTimezone=GMT%2B8spring.datasource.username=rootspring.datasource.password=123456spring.datasource.url=jdbc:mysql://localhost:3306/mybatis_plus_db?useUnicode=true&characterEncoding=utf-8&serverTimezone=GMT%2B8spring.datasource.driver-class-name=com.mysql.cj.jdbc.Driver# 配置日志mybatis-plus.configuration.log-impl=org.apache.ibatis.logging.stdout.StdOutImpl# 配置逻辑删除mybatis-plus.global-config.db-config.logic-delete-value=1mybatis-plus.global-config.db-config.logic-not-delete-value=0
2.4 搭建代码自动生成器
package com.yixin;import com.baomidou.mybatisplus.annotation.DbType;import com.baomidou.mybatisplus.annotation.FieldFill;import com.baomidou.mybatisplus.annotation.IdType;import com.baomidou.mybatisplus.core.exceptions.MybatisPlusException;import com.baomidou.mybatisplus.generator.AutoGenerator;import com.baomidou.mybatisplus.generator.config.DataSourceConfig;import com.baomidou.mybatisplus.generator.config.GlobalConfig;import com.baomidou.mybatisplus.generator.config.PackageConfig;import com.baomidou.mybatisplus.generator.config.StrategyConfig;import com.baomidou.mybatisplus.generator.config.po.TableFill;import com.baomidou.mybatisplus.generator.config.rules.DateType;import com.baomidou.mybatisplus.generator.config.rules.NamingStrategy;import org.junit.platform.commons.util.StringUtils;import java.util.ArrayList;import java.util.Scanner;public class CodeGenerator { public static String scanner(String tip) { Scanner scanner = new Scanner(System.in); StringBuilder help = new StringBuilder(); help.append("请输入" + tip + ":"); System.out.println(help.toString()); if (scanner.hasNext()) { String ipt = scanner.next(); if (StringUtils.isNotBlank(ipt)) { return ipt; } } throw new MybatisPlusException("请输入正确的" + tip + "!"); } public static void main(String[] args) { // 代码生成器 AutoGenerator mpg = new AutoGenerator(); // 全局配置 GlobalConfig gc = new GlobalConfig(); String projectPath = System.getProperty("user.dir"); gc.setOutputDir(projectPath + "/src/main/java");//设置代码生成路径 gc.setFileOverride(true);//是否覆盖以前文件 gc.setOpen(false);//是否打开生成目录 gc.setAuthor("yixin");//设置项目作者名称 gc.setIdType(IdType.AUTO);//设置主键策略 gc.setBaseResultMap(true);//生成基本ResultMap gc.setBaseColumnList(true);//生成基本ColumnList gc.setServiceName("%sService");//去掉服务默认前缀 gc.setDateType(DateType.ONLY_DATE);//设置时间类型 mpg.setGlobalConfig(gc); // 数据源配置 DataSourceConfig dsc = new DataSourceConfig(); dsc.setUrl("jdbc:mysql://localhost:3306/mybatis_plus_db?useUnicode=true&characterEncoding=utf-8&serverTimezone=GMT%2B8"); dsc.setDriverName("com.mysql.cj.jdbc.Driver"); dsc.setUsername("root"); dsc.setPassword("123456"); mpg.setDataSource(dsc); // 包配置 PackageConfig pc = new PackageConfig(); pc.setParent("com.yixin"); pc.setMapper("mapper"); pc.setXml("mapper.xml"); pc.setEntity("pojo"); pc.setService("service"); pc.setServiceImpl("service.impl"); pc.setController("controller"); mpg.setPackageInfo(pc); // 策略配置 StrategyConfig sc = new StrategyConfig(); sc.setNaming(NamingStrategy.underline_to_camel); sc.setColumnNaming(NamingStrategy.underline_to_camel); sc.setEntityLombokModel(true);//自动lombok sc.setRestControllerStyle(true); sc.setControllerMappingHyphenStyle(true); sc.setLogicDeleteFieldName("deleted");//设置逻辑删除 //设置自动填充配置 TableFill gmt_create = new TableFill("create_time", FieldFill.INSERT); TableFill gmt_modified = new TableFill("update_time", FieldFill.INSERT_UPDATE); ArrayList<TableFill> tableFills=new ArrayList<>(); tableFills.add(gmt_create); tableFills.add(gmt_modified); sc.setTableFillList(tableFills); //乐观锁 sc.setVersionFieldName("version"); sc.setRestControllerStyle(true);//驼峰命名 // sc.setTablePrefix("tbl_"); 设置表名前缀 sc.setInclude(scanner("表名,多个英文逗号分割").split(",")); mpg.setStrategy(sc); // 生成代码 mpg.execute(); }}
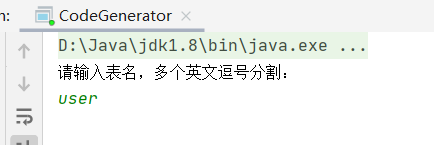
2.5 启动运行代码生成器类
在控制台输入我们的表名:user
接着就完成啦!
看效果:
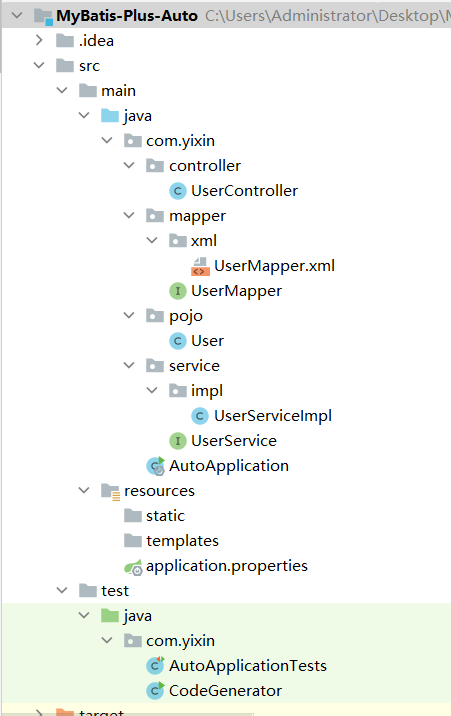
对于java下的所有包都不是我们自己写的,而是代码生成器自动帮我们搭建好了!
2.6 编写自动填充处理器
我们在代码生成器给我们搭建的基础上,只需像之前一样,编写自动填充的处理器类即可。
package com.yixin.handler;import com.baomidou.mybatisplus.core.handlers.MetaObjectHandler;import lombok.extern.slf4j.Slf4j;import org.apache.ibatis.reflection.MetaObject;import org.springframework.stereotype.Component;import java.util.Date;@Slf4j@Component // 一定不要忘记把处理器加到IOC容器中!public class MyMetaObjectHandler implements MetaObjectHandler { // 插入时的填充策略 @Override public void insertFill(MetaObject metaObject) { log.info("start insert fill....."); // setFieldValByName(String fieldName, Object fieldVal, MetaObject metaObject this.setFieldValByName("createTime",new Date(),metaObject); this.setFieldValByName("updateTime",new Date(),metaObject); } // 更新时的填充策略 @Override public void updateFill(MetaObject metaObject) { log.info("start update fill....."); this.setFieldValByName("updateTime",new Date(),metaObject); }}
2.7 乐观锁和逻辑删除配置
package com.yixin.config;import com.baomidou.mybatisplus.core.injector.ISqlInjector;import com.baomidou.mybatisplus.extension.injector.LogicSqlInjector;import com.baomidou.mybatisplus.extension.plugins.OptimisticLockerInterceptor;import org.mybatis.spring.annotation.MapperScan;import org.springframework.context.annotation.Bean;import org.springframework.context.annotation.Configuration;import org.springframework.transaction.annotation.EnableTransactionManagement;// 扫描我们的 mapper 文件夹@MapperScan("com.yixin.mapper")@EnableTransactionManagement@Configuration // 配置类public class MyBatisPlusConfig { // 注册乐观锁插件 @Bean public OptimisticLockerInterceptor optimisticLockerInterceptor() { return new OptimisticLockerInterceptor(); } // 逻辑删除组件! @Bean public ISqlInjector sqlInjector() { return new LogicSqlInjector(); }}
这样就大功告成啦!我们去编写测试类测试一下。
2.8 测试
(1)测试添加数据
package com.yixin;import com.yixin.pojo.User;import com.yixin.service.UserService;import org.junit.jupiter.api.Test;import org.springframework.beans.factory.annotation.Autowired;import org.springframework.boot.test.context.SpringBootTest;@SpringBootTestclass AutoApplicationTests { @Autowired private UserService userService; @Test void test1() { User user=new User(); user.setName("yixin"); user.setAge(18); boolean flag=userService.save(user); System.out.println(flag); }}
输出:
可以发现,成功插入一条数据。

(2)测试controller层获取数据
package com.yixin.controller;import com.yixin.pojo.User;import com.yixin.service.UserService;import org.springframework.beans.factory.annotation.Autowired;import org.springframework.web.bind.annotation.RequestMapping;import org.springframework.web.bind.annotation.ResponseBody;import org.springframework.web.bind.annotation.RestController;import java.util.List;/** * <p> * 前端控制器 * </p> * * @author yixin * @since 2022-01-17 */@RestController@RequestMapping("/user")public class UserController { @Autowired private UserService userService; @ResponseBody @RequestMapping("/all") public List<User> get(){ return userService.list(null); }}
启动主启动类:
package com.yixin;import org.mybatis.spring.annotation.MapperScan;import org.springframework.boot.SpringApplication;import org.springframework.boot.autoconfigure.SpringBootApplication;@SpringBootApplication@MapperScan("com.yixin.mapper")public class AutoApplication { public static void main(String[] args) { SpringApplication.run(AutoApplication.class, args); }}
在浏览器输入:http://localhost:8080/user/all
成功获取到我们的数据了。

三、Service中的CRUD
3.1 插入操作
Save
// 插入一条记录(选择字段,策略插入)boolean save(T entity);// 插入(批量)boolean saveBatch(Collection<T> entityList);
参数说明
| 类型 | 参数名 | 描述 |
|---|---|---|
| T | entity | 实体对象 |
| Collection<T> | entityList | 实体对象集合 |
使用
(1)插入一条数据
@Test void contextLoads() { User user=new User(); user.setName("yixin"); user.setAge(18); boolean flag=userService.save(user); System.out.println(flag); }
(2)批量插入数据
@Test void test3() { List<User> userList=new ArrayList<>(); User user=new User(); user.setName("zhangsan"); user.setAge(26); User user2=new User(); user2.setName("lisi"); user2.setAge(27); userList.add(user); userList.add(user2); boolean flag=userService.saveBatch(userList); System.out.println(flag); }3.2 插入或更新操作
SaveOrUpdate
// TableId 注解存在更新记录,否插入一条记录boolean saveOrUpdate(T entity);// 根据updateWrapper尝试更新,否继续执行saveOrUpdate(T)方法boolean saveOrUpdate(T entity, Wrapper<T> updateWrapper);// 批量修改插入boolean saveOrUpdateBatch(Collection<T> entityList);
参数说明
| 类型 | 参数名 | 描述 |
|---|---|---|
| T | entity | 实体对象 |
| Wrapper<T> | updateWrapper | 实体对象封装操作类 UpdateWrapper |
| Collection<T> | entityList | 实体对象集合 |
使用
需求:插入一条数据,如果这条数据在数据库中存在,那么进行更新操作,如果不存在则进行插入操作。
@Test void test5() { User user=new User(); user.setName("wangwu"); user.setAge(18); boolean flag=userService.saveOrUpdate(user); System.out.println(flag); }3.3 删除操作
Remove
// 根据 entity 条件,删除记录boolean remove(Wrapper<T> queryWrapper);// 根据 ID 删除boolean removeById(Serializable id);// 根据 columnMap 条件,删除记录boolean removeByMap(Map<String, Object> columnMap);// 删除(根据ID 批量删除)boolean removeByIds(Collection<? extends Serializable> idList);
参数说明
| 类型 | 参数名 | 描述 |
|---|---|---|
| Wrapper<T> | queryWrapper | 实体包装类 QueryWrapper |
| Serializable | id | 主键 ID |
| Map<String, Object> | columnMap | 表字段 map 对象 |
| Collection<? extends Serializable> | idList | 主键 ID 列表 |
使用
需求:删除所有名字带“lisi"的用户信息。
@Test void test6() { QueryWrapper<User> wrapper=new QueryWrapper<>(); wrapper.like("name","lisi"); boolean flag=userService.remove(wrapper); System.out.println(flag); }
3.4 更新操作
Update
// 根据 UpdateWrapper 条件,更新记录 需要设置sqlsetboolean update(Wrapper<T> updateWrapper);// 根据 whereWrapper 条件,更新记录boolean update(T updateEntity, Wrapper<T> whereWrapper);// 根据 ID 选择修改boolean updateById(T entity);// 根据ID 批量更新boolean updateBatchById(Collection<T> entityList);
参数说明
| 类型 | 参数名 | 描述 |
|---|---|---|
| Wrapper<T> | updateWrapper | 实体对象封装操作类 UpdateWrapper |
| T | entity | 实体对象 |
| Collection<T> | entityList | 实体对象集合 |
使用
需求:将用户名为”yixin"的用户更改为“一心同学”。
@Test void test7() { QueryWrapper<User> wrapper=new QueryWrapper<>(); wrapper.eq("name","yixin"); User user =userService.getOne(wrapper); user.setName("一心同学"); boolean flag=userService.updateById(user); System.out.println(flag); }
3.5 查询操作
3.5.1 单条查询
Get
// 根据 ID 查询T getById(Serializable id);// 根据 Wrapper,查询一条记录。结果集,如果是多个会抛出异常,随机取一条加上限制条件 wrapper.last("LIMIT 1")T getOne(Wrapper<T> queryWrapper);// 根据 Wrapper,查询一条记录T getOne(Wrapper<T> queryWrapper, boolean throwEx);// 根据 Wrapper,查询一条记录Map<String, Object> getMap(Wrapper<T> queryWrapper);
参数说明
| 类型 | 参数名 | 描述 |
|---|---|---|
| Serializable | id | 主键 ID |
| Wrapper<T> | queryWrapper | 实体对象封装操作类 QueryWrapper |
| boolean | throwEx | 有多个 result 是否抛出异常 |
| T | entity | 实体对象 |
使用
需求:查询名字带“一心”的一名用户,记住,只要一名。
@Test void test8() { QueryWrapper<User> wrapper=new QueryWrapper<>(); wrapper.like("name","一心").last("LiMIT 1"); User user=userService.getOne(wrapper); System.out.println(user); }
3.5.2 批量查询操作
List
// 查询所有List<T> list();// 查询列表List<T> list(Wrapper<T> queryWrapper);// 查询(根据ID 批量查询)Collection<T> listByIds(Collection<? extends Serializable> idList);// 查询(根据 columnMap 条件)Collection<T> listByMap(Map<String, Object> columnMap);// 查询所有列表List<Map<String, Object>> listMaps();// 查询列表List<Map<String, Object>> listMaps(Wrapper<T> queryWrapper);// 查询全部记录List<Object> listObjs();// 根据 Wrapper 条件,查询全部记录List<Object> listObjs(Wrapper<T> queryWrapper);
参数说明
| 类型 | 参数名 | 描述 |
|---|---|---|
| Wrapper<T> | queryWrapper | 实体对象封装操作类 QueryWrapper |
| Collection<? extends Serializable> | idList | 主键 ID 列表 |
| Map<?String, Object> | columnMap | 表字段 map 对象 |
使用
需求:查询所有名字带“一心”的用户信息.
@Test void test9() { QueryWrapper<User> wrapper=new QueryWrapper<>(); wrapper.like("name","一心"); List<User> userList=userService.list(wrapper); System.out.println(userList); }
3.5.3 查询数量
Count
// 查询总记录数int count();// 根据 Wrapper 条件,查询总记录数int count(Wrapper<T> queryWrapper);
参数说明
| 类型 | 参数名 | 描述 |
|---|---|---|
| Wrapper<T> | queryWrapper | 实体对象封装操作类 QueryWrapper |
使用
需求:查询所有年龄为18岁的用户数量。
@Test void test10() { QueryWrapper<User> wrapper=new QueryWrapper<>(); wrapper.eq("age",18); int count=userService.count(wrapper); System.out.println(count); }
小结
以上就是【一心同学】整理的如何【搭建代码自动生成器】以及在【Service层】中的【CRUD操作】,学到这里,相信大家对MyBatis-Plus越来越能感觉到其的【高效率】性了,在我们的开发当中,这确实能帮我们省了不少力气呀!
如果这篇【文章】有帮助到你,希望可以给【一心同学】点个赞?,创作不易,相比官方的陈述,我更喜欢用【通俗易懂】的文笔去讲解每一个知识点,如果有对【后端技术】感兴趣的小可爱,也欢迎关注❤️❤️❤️ 【一心同学】❤️❤️❤️,我将会给你带来巨大的【收获与惊喜】??!