SpringBoot 统一功能处理
前言一、用户登录权限效验1.1 最初的用户登录验证1.2 Spring AOP 用户统一登录验证的问题1.3 Spring 拦截器1.3.1 准备工作1.3.2 自定义拦截器1.3.3 将自定义拦截器加入到系统配置 1.4 拦截器实现原理1.4.1 实现原理源码分析1.4.2 拦截器小结 1.5 扩展:统一访问前缀添加 二、统一异常处理三、统一数据返回格式3.1 为什么需要统一数据返回格式?3.2 统一数据返回格式的实现3.3 @ControllerAdvice 源码分析(了解)
前言
接下来是 Spring Boot 统⼀功能处理模块了,也是 AOP 的实战环节,要实现的课程⽬标有以下 3 个:
统⼀⽤户登录权限验证统⼀数据格式返回统⼀异常处理接下我们⼀个⼀个来看。
一、用户登录权限效验
⽤户登录权限的发展从之前每个⽅法中⾃⼰验证⽤户登录权限,到现在统⼀的⽤户登录验证处理,它是⼀个逐渐完善和逐渐优化的过程。
1.1 最初的用户登录验证
我们先来回顾⼀下最初⽤户登录验证的实现⽅法:
@RestController@RequestMapping("/user")public class UserController { /** * 某⽅法 1 */ @RequestMapping("/m1") public Object method(HttpServletRequest request) { // 有 session 就获取,没有不会创建 HttpSession session = request.getSession(false); if (session != null && session.getAttribute("userinfo") != null) { // 说明已经登录,业务处理 return true; } else { // 未登录 return false; } } /** * 某⽅法 2 */ @RequestMapping("/m2") public Object method2(HttpServletRequest request) { // 有 session 就获取,没有不会创建 HttpSession session = request.getSession(false); if (session != null && session.getAttribute("userinfo") != null) { // 说明已经登录,业务处理 return true; } else { // 未登录 return false; } } // 其他⽅法...}从上述代码可以看出,每个⽅法中都有相同的⽤户登录验证权限,它的缺点是:
每个⽅法中都要单独写⽤户登录验证的⽅法,即使封装成公共⽅法,也⼀样要传参调⽤和在⽅法中进⾏判断。添加控制器越多,调⽤⽤户登录验证的⽅法也越多,这样就增加了后期的修改成本和维护成本。这些⽤户登录验证的⽅法和接下来要实现的业务⼏何没有任何关联,但每个⽅法中都要写⼀遍。所以提供⼀个公共的 AOP ⽅法来进⾏统⼀的⽤户登录权限验证迫在眉睫。
1.2 Spring AOP 用户统一登录验证的问题
说到统⼀的⽤户登录验证,我们想到的第⼀个实现⽅案是 Spring AOP 前置通知或环绕通知来实现,具体实现代码如下:
import org.aspectj.lang.ProceedingJoinPoint;import org.aspectj.lang.annotation.*;import org.springframework.stereotype.Component;@Aspect@Componentpublic class UserAspect { // 定义切点⽅法 controller 包下、⼦孙包下所有类的所有⽅法 @Pointcut("execution(* com.example.demo.controller..*.*(..))") public void pointcut(){ } // 前置⽅法 @Before("pointcut()") public void doBefore(){ } // 环绕⽅法 @Around("pointcut()") public Object doAround(ProceedingJoinPoint joinPoint){ Object obj = null; System.out.println("Around ⽅法开始执⾏"); try { // 执⾏拦截⽅法 obj = joinPoint.proceed(); } catch (Throwable throwable) { throwable.printStackTrace(); } System.out.println("Around ⽅法结束执⾏"); return obj; }}如果要在以上 Spring AOP 的切⾯中实现⽤户登录权限效验的功能,有以下两个问题:
没办法获取到 HttpSession 对象。我们要对⼀部分⽅法进⾏拦截,⽽另⼀部分⽅法不拦截,如注册⽅法和登录⽅法是不拦截的,这样的话排除⽅法的规则很难定义,甚⾄没办法定义。那这样如何解决呢?
1.3 Spring 拦截器
对于以上问题 Spring 中提供了具体的实现拦截器:HandlerInterceptor,拦截器的实现分为以下两个步骤:
创建⾃定义拦截器,实现 HandlerInterceptor 接⼝的 preHandle(执⾏具体⽅法之前的预处理)⽅法。将⾃定义拦截器加⼊ WebMvcConfigurer 的 addInterceptors ⽅法中。具体实现如下。
补充 过滤器:
过滤器是Web容器提供的。触发的时机比拦截器更靠前,Spring 初始化前就执行了,所以并不能处理用户登录权限效验等问题。
1.3.1 准备工作
package com.example.demo.controller;import lombok.extern.slf4j.Slf4j;import org.springframework.util.StringUtils;import org.springframework.web.bind.annotation.RequestMapping;import org.springframework.web.bind.annotation.RestController;import javax.servlet.http.HttpServletRequest;import javax.servlet.http.HttpSession;@RestController@RequestMapping("/user")@Slf4jpublic class UserController { @RequestMapping("/login") public boolean login(HttpServletRequest request, String username, String password) {// // 1.非空判断// if (username != null && username != "" &&// password != null && username != "") {// // 2.验证用户名和密码是否正确// } // 1.非空判断 if (StringUtils.hasLength(username) && StringUtils.hasLength(password)) { // 2.验证用户名和密码是否正确 if ("admin".equals(username) && "admin".equals(password)) { // 登录成功 HttpSession session = request.getSession(); session.setAttribute("userinfo", "admin"); return true; } else { // 用户名或密码输入错误 return false; } } return false; } @RequestMapping("/getinfo") public String getInfo() { log.debug("执行了 getinfo 方法"); return "执行了 getinfo 方法"; } @RequestMapping("/reg") public String reg() { log.debug("执行了 reg 方法"); return "执行了 reg 方法"; }}1.3.2 自定义拦截器
接下来使⽤代码来实现⼀个⽤户登录的权限效验,⾃定义拦截器是⼀个普通类,具体实现代码如下:
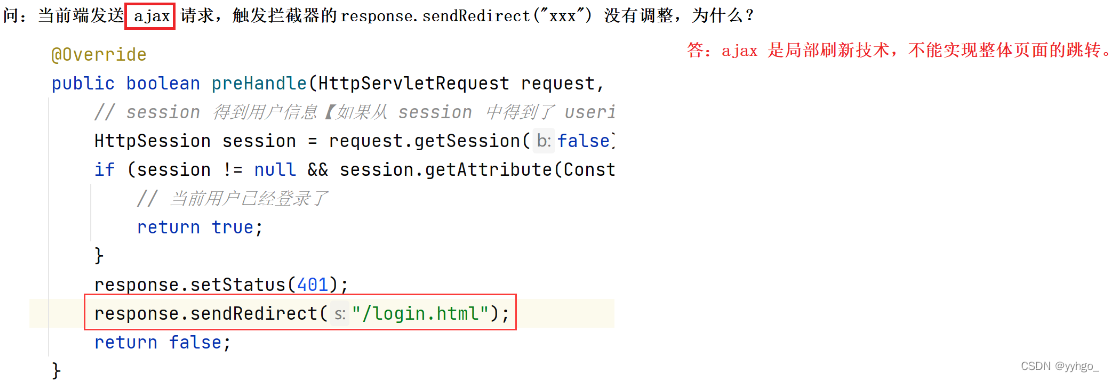
package com.example.demo.config;import lombok.extern.slf4j.Slf4j;import org.springframework.stereotype.Component;import org.springframework.web.servlet.HandlerInterceptor;import javax.servlet.http.HttpServletRequest;import javax.servlet.http.HttpServletResponse;import javax.servlet.http.HttpSession;/** * 登录拦截器 */@Component@Slf4jpublic class LoginInterceptor implements HandlerInterceptor { @Override public boolean preHandle(HttpServletRequest request, HttpServletResponse response, Object handler) throws Exception { // 登录判断业务 HttpSession session = request.getSession(false); if (session != null && session.getAttribute("userinfo") != null) { return true; } log.error("当前用户没有访问权限"); response.setStatus(401); return false; }}返回 boolean 类型。
相当于一层安保:
为 false 则不能继续往下执行;为 true 则可以。
1.3.3 将自定义拦截器加入到系统配置
将上⼀步中的⾃定义拦截器加⼊到系统配置信息中,具体实现代码如下:
package com.example.demo.config;import org.springframework.beans.factory.annotation.Autowired;import org.springframework.context.annotation.Configuration;import org.springframework.web.servlet.config.annotation.InterceptorRegistry;import org.springframework.web.servlet.config.annotation.ResourceHandlerRegistry;import org.springframework.web.servlet.config.annotation.WebMvcConfigurer;@Configuration // 一定不要忘记public class MyConfig implements WebMvcConfigurer { @Autowired private LoginInterceptor loginInterceptor; @Override public void addInterceptors(InterceptorRegistry registry) { registry.addInterceptor(loginInterceptor) .addPathPatterns("/**") // 拦截所有请求 .excludePathPatterns("/user/login") // 排除不拦截的 url// .excludePathPatterns("/**/*.html")// .excludePathPatterns("/**/*.js")// .excludePathPatterns("/**/*.css") .excludePathPatterns("/user/reg"); // 排除不拦截的 url }}或者:
package com.example.demo.common;import org.springframework.beans.factory.annotation.Autowired;import org.springframework.context.annotation.Configuration;import org.springframework.web.servlet.config.annotation.InterceptorRegistration;import org.springframework.web.servlet.config.annotation.InterceptorRegistry;import org.springframework.web.servlet.config.annotation.WebMvcConfigurer;import java.util.ArrayList;import java.util.List;@Configurationpublic class AppConfig implements WebMvcConfigurer { // 不拦截的 url 集合 List<String> excludes = new ArrayList<String>() {{ add("/**/*.html"); add("/js/**"); add("/editor.md/**"); add("/css/**"); add("/img/**"); // 放行 static/img 下的所有文件 add("/user/login"); // 放行登录接口 add("/user/reg"); // 放行注册接口 add("/art/detail"); // 放行文章详情接口 add("/art/list"); // 放行文章分页列表接口 add("/art/totalpage"); // 放行文章分页总页数接口 }}; @Autowired private LoginInterceptor loginInterceptor; @Override public void addInterceptors(InterceptorRegistry registry) { // 配置拦截器 InterceptorRegistration registration = registry.addInterceptor(loginInterceptor); registration.addPathPatterns("/**"); registration.excludePathPatterns(excludes); }}如果不注入对象的话,addInterceptor() 的参数也可以直接 new 一个对象:
@Configuration // 一定不要忘记public class MyConfig implements WebMvcConfigurer { @Override public void addInterceptors(InterceptorRegistry registry) { registry.addInterceptor(new LoginInterceptor()) .addPathPatterns("/**") // 拦截所有请求 .excludePathPatterns("/user/login") // 排除不拦截的 url// .excludePathPatterns("/**/*.html")// .excludePathPatterns("/**/*.js")// .excludePathPatterns("/**/*.css")// .excludePathPatterns("/**/*.jpg")// .excludePathPatterns("/**/login") .excludePathPatterns("/user/reg"); // 排除不拦截的 url }}其中:
addPathPatterns:表示需要拦截的 URL,“**”表示拦截任意⽅法(也就是所有⽅法)。excludePathPatterns:表示需要排除的 URL。说明:以上拦截规则可以拦截此项⽬中的使⽤ URL,包括静态⽂件 (图⽚⽂件、JS 和 CSS 等⽂件)。
1.4 拦截器实现原理
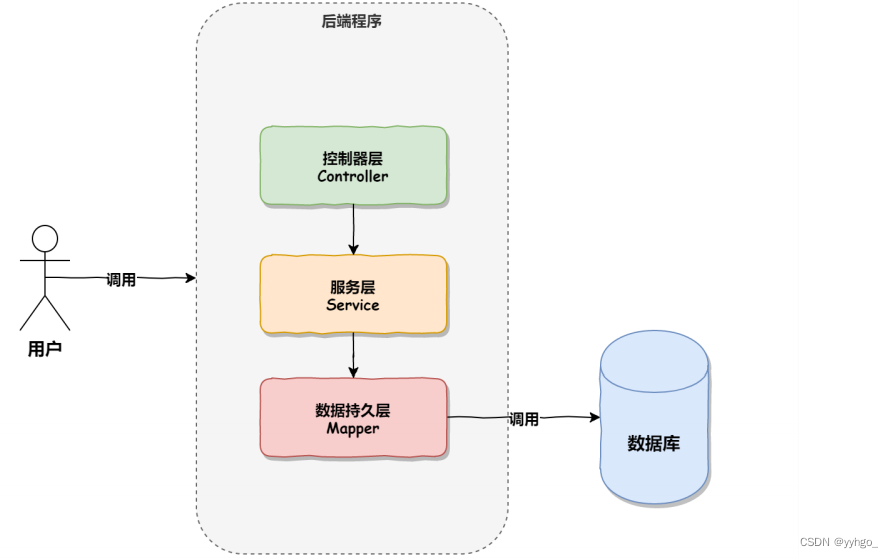
正常情况下的调⽤顺序:
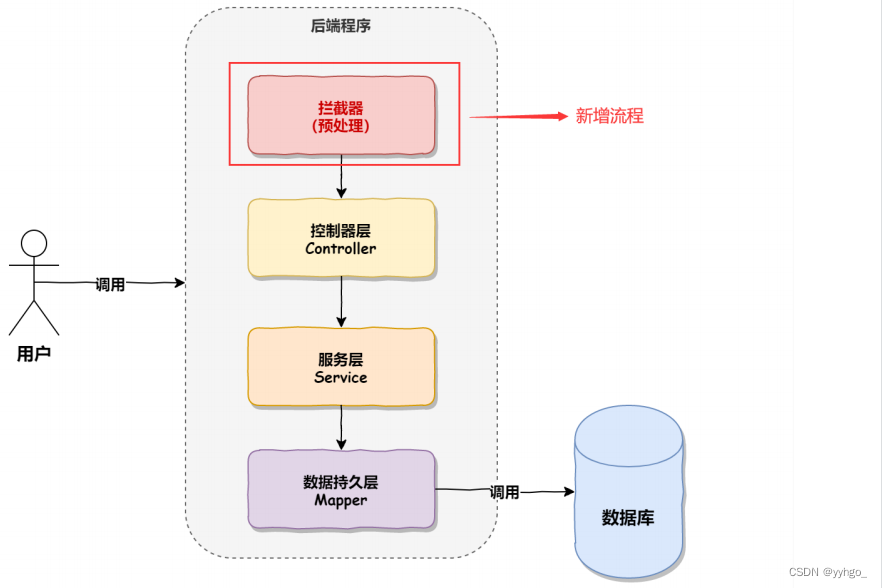
然⽽有了拦截器之后,会在调⽤ Controller 之前进⾏相应的业务处理,执⾏的流程如下图所示:
1.4.1 实现原理源码分析
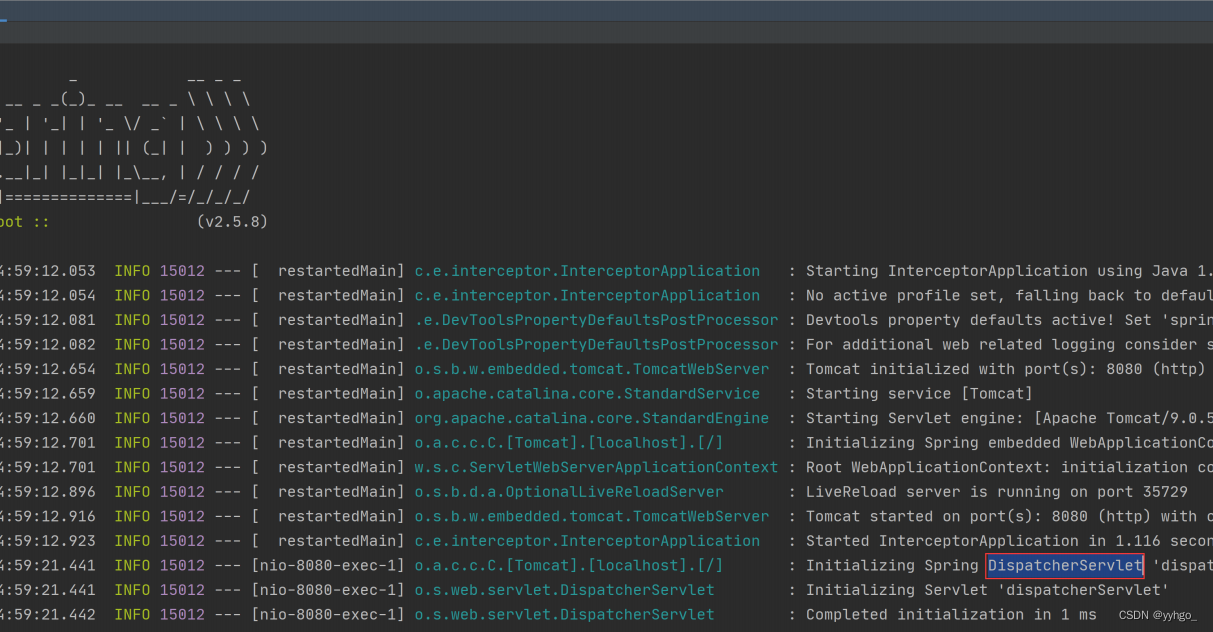
所有的 Controller 执⾏都会通过⼀个调度器 DispatcherServlet 来实现,这⼀点可以从 Spring Boot 控制台的打印信息看出,如下图所示:
⽽所有⽅法都会执⾏ DispatcherServlet 中的 doDispatch 调度⽅法,doDispatch 源码如下:
protected void doDispatch(HttpServletRequest request, HttpServletResponse response) throws Exception { HttpServletRequest processedRequest = request; HandlerExecutionChain mappedHandler = null; boolean multipartRequestParsed = false; WebAsyncManager asyncManager = WebAsyncUtils.getAsyncManager(request); try { try { ModelAndView mv = null; Object dispatchException = null; try { processedRequest = this.checkMultipart(request); multipartRequestParsed = processedRequest != request; mappedHandler = this.getHandler(processedRequest); if (mappedHandler == null) { this.noHandlerFound(processedRequest, response); return; } HandlerAdapter ha = this.getHandlerAdapter(mappedHandler.g etHandler()); String method = request.getMethod(); boolean isGet = HttpMethod.GET.matches(method); if (isGet || HttpMethod.HEAD.matches(method)) { long lastModified = ha.getLastModified(request, mapped Handler.getHandler()); if ((new ServletWebRequest(request, response)).checkNo tModified(lastModified) && isGet) { return; } } // 调⽤预处理【重点】 if (!mappedHandler.applyPreHandle(processedRequest, respon se)) { return; } // 执⾏ Controller 中的业务 mv = ha.handle(processedRequest, response, mappedHandler.g etHandler()); if (asyncManager.isConcurrentHandlingStarted()) { return; } this.applyDefaultViewName(processedRequest, mv); mappedHandler.applyPostHandle(processedRequest, response, mv); } catch (Exception var20) { dispatchException = var20; } catch (Throwable var21) { dispatchException = new NestedServletException("Handler di spatch failed", var21); } this.processDispatchResult(processedRequest, response, mappedH andler, mv, (Exception)dispatchException); } catch (Exception var22) { this.triggerAfterCompletion(processedRequest, response, mapped Handler, var22); } catch (Throwable var23) { this.triggerAfterCompletion(processedRequest, response, mapped Handler, new NestedServletException("Handler processing failed", var23)); } } finally { if (asyncManager.isConcurrentHandlingStarted()) { if (mappedHandler != null) { mappedHandler.applyAfterConcurrentHandlingStarted(processe dRequest, response); } } else if (multipartRequestParsed) { this.cleanupMultipart(processedRequest); } } }从上述源码可以看出在开始执⾏ Controller 之前,会先调⽤ 预处理⽅法 applyPreHandle,⽽
applyPreHandle ⽅法的实现源码如下:
boolean applyPreHandle(HttpServletRequest request, HttpServletResponse response) throws Exception { for(int i = 0; i < this.interceptorList.size(); this.interceptorIndex = i++) { // 获取项⽬中使⽤的拦截器 HandlerInterceptor HandlerInterceptor interceptor = (HandlerInterceptor)this.intercep torList.get(i); if (!interceptor.preHandle(request, response, this.handler)) { this.triggerAfterCompletion(request, response, (Exception)null ); return false; } } return true; }从上述源码可以看出,在 applyPreHandle 中会获取所有的拦截器 HandlerInterceptor 并执⾏拦截器中
的 preHandle ⽅法,这样就会咱们前⾯定义的拦截器对应上了,如下图所示:

此时⽤户登录权限的验证⽅法就会执⾏,这就是拦截器的实现原理。
1.4.2 拦截器小结
通过上⾯的源码分析,我们可以看出,Spring 中的拦截器也是通过动态代理和环绕通知的思想实现的,⼤体的调⽤流程如下: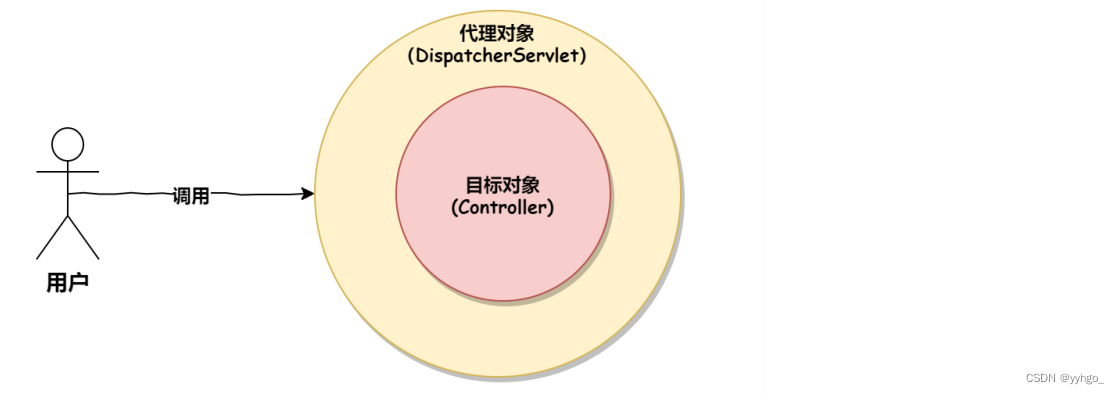
1.5 扩展:统一访问前缀添加
所有请求地址添加 api 前缀:
@Configuration public class AppConfig implements WebMvcConfigurer { // 所有的接⼝添加 api 前缀 @Override public void configurePathMatch(PathMatchConfigurer configurer) { configurer.addPathPrefix("api", c -> true); } }其中第⼆个参数是⼀个表达式,设置为 true 表示启动前缀。
二、统一异常处理
统⼀异常处理使⽤的是 @ControllerAdvice + @ExceptionHandler 来实现的,@ControllerAdvice 表示控制器通知类,@ExceptionHandler 是异常处理器,两个结合表示当出现异常的时候执⾏某个通知,也就是执⾏某个⽅法事件,具体实现代码如下:
package com.example.demo.config;import org.springframework.web.bind.annotation.ControllerAdvice;import org.springframework.web.bind.annotation.ExceptionHandler;import org.springframework.web.bind.annotation.ResponseBody;import java.util.HashMap;/** * 统一处理异常 */@ControllerAdvicepublic class ErrorAdive { @ExceptionHandler(Exception.class) @ResponseBody public HashMap<String, Object> exceptionAdvie(Exception e) { HashMap<String, Object> result = new HashMap<>(); result.put("code", "-1"); result.put("msg", e.getMessage()); return result; } @ExceptionHandler(ArithmeticException.class) @ResponseBody public HashMap<String, Object> arithmeticAdvie(ArithmeticException e) { HashMap<String, Object> result = new HashMap<>(); result.put("code", "-2"); result.put("msg", e.getMessage()); return result; }}方法名和返回值可以⾃定义,重要的是 @ControllerAdvice 和 @ExceptionHandler 注解。
以上⽅法表示,如果出现了异常就返回给前端⼀个 HashMap 的对象,其中包含的字段如代码中定义的那样。
我们可以针对不同的异常,返回不同的结果,⽐以下代码所示:
import org.springframework.web.bind.annotation.ControllerAdvice;import org.springframework.web.bind.annotation.ExceptionHandler;import org.springframework.web.bind.annotation.ResponseBody;import java.util.HashMap;@ControllerAdvice@ResponseBodypublic class ExceptionAdvice { @ExceptionHandler(Exception.class) public Object exceptionAdvice(Exception e) { HashMap<String, Object> result = new HashMap<>(); result.put("success", -1); result.put("message", "总的异常信息:" + e.getMessage()); result.put("data", null); return result; } @ExceptionHandler(NullPointerException.class) public Object nullPointerexceptionAdvice(NullPointerException e) { HashMap<String, Object> result = new HashMap<>(); result.put("success", -1); result.put("message", "空指针异常:" + e.getMessage()); result.put("data", null); return result; }}当有多个异常通知时,匹配顺序为当前类及其子类向上依次匹配,案例演示:
在 UserController 中设置⼀个空指针异常,实现代码如下:
@RestController @RequestMapping("/u") public class UserController { @RequestMapping("/index") public String index() { Object obj = null; int i = obj.hashCode(); return "Hello,User Index."; } }以上程序的执⾏结果如下:

此时若出现异常就不会报错了,代码会继续执行,但是会把自定义的异常信息返回给前端!
统一完数据返回格式后:
package com.example.demo.common;import org.springframework.web.bind.annotation.ControllerAdvice;import org.springframework.web.bind.annotation.ExceptionHandler;import org.springframework.web.bind.annotation.ResponseBody;/** * 异常类的统一处理 */@ControllerAdvice@ResponseBodypublic class ExceptionAdvice { @ExceptionHandler(Exception.class) public Object exceptionAdvice(Exception e) { return AjaxResult.fail(-1, e.getMessage()); } }统一异常处理不用配置路径,是拦截整个项目中的所有异常。
三、统一数据返回格式
3.1 为什么需要统一数据返回格式?
统⼀数据返回格式的优点有很多,比如以下几个:
⽅便前端程序员更好的接收和解析后端数据接⼝返回的数据。降低前端程序员和后端程序员的沟通成本,按照某个格式实现就⾏了,因为所有接⼝都是这样返回的。有利于项⽬统⼀数据的维护和修改。有利于后端技术部⻔的统⼀规范的标准制定,不会出现稀奇古怪的返回内容。3.2 统一数据返回格式的实现
统⼀的数据返回格式可以使用 @ControllerAdvice + ResponseBodyAdvice接口 的方式实现,具体实现代码如下:
import org.springframework.core.MethodParameter;import org.springframework.http.MediaType;import org.springframework.http.server.ServerHttpRequest;import org.springframework.http.server.ServerHttpResponse;import org.springframework.web.bind.annotation.ControllerAdvice;import org.springframework.web.servlet.mvc.method.annotation.ResponseBodyAdvice;import java.util.HashMap;/** * 统一返回数据的处理 */@ControllerAdvicepublic class ResponseAdvice implements ResponseBodyAdvice { /** * 内容是否需要重写(通过此⽅法可以选择性部分控制器和⽅法进⾏重写) * 返回 true 表示重写 */ @Override public boolean supports(MethodParameter returnType, Class converterType) { return true; } /** * ⽅法返回之前调⽤此⽅法 */ @Override public Object beforeBodyWrite(Object body, MethodParameter returnType, MediaType selectedContentType, Class selectedConverterType, ServerHttpR equest request, ServerHttpResponse response) { // 构造统⼀返回对象 HashMap<String, Object> result = new HashMap<>(); result.put("state", 1); result.put("msg", ""); result.put("data", body); return result; }}统一处理后,此时所有返回的都是 json 格式的数据了。
若方法的返回类型为 String,统一数据返回格式封装后,返回会报错!?
转换器的问题,解决方案: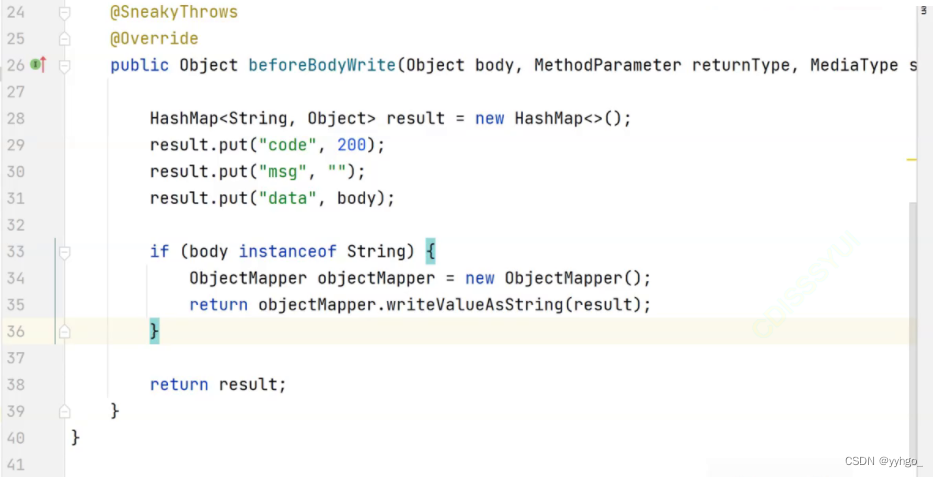
实际开发中这种统一数据返回格式的方式并不常用。因为它会将所有返回都再次进行封装,过于霸道了 ~
而通常我们会写一个统一封装的类,让程序猿在返回时统一返回这个类 (软性约束),例如:
package com.example.demo.common;import java.util.HashMap;/** * 自定义的统一返回对象 */public class AjaxResult { /** * 业务执行成功时进行返回的方法 * * @param data * @return */ public static HashMap<String, Object> success(Object data) { HashMap<String, Object> result = new HashMap<>(); result.put("code", 200); result.put("msg", ""); result.put("data", data); return result; } /** * 业务执行成功时进行返回的方法 * * @param data * @return */ public static HashMap<String, Object> success(String msg, Object data) { HashMap<String, Object> result = new HashMap<>(); result.put("code", 200); result.put("msg", msg); result.put("data", data); return result; } /** * 业务执行失败返回的数据格式 * * @param code * @param msg * @return */ public static HashMap<String, Object> fail(int code, String msg) { HashMap<String, Object> result = new HashMap<>(); result.put("code", code); result.put("msg", msg); result.put("data", ""); return result; } /** * 业务执行失败返回的数据格式 * * @param code * @param msg * @return */ public static HashMap<String, Object> fail(int code, String msg, Object data) { HashMap<String, Object> result = new HashMap<>(); result.put("code", code); result.put("msg", msg); result.put("data", data); return result; }}同时搭配统一数据返回格式:
package com.example.demo.common;import com.fasterxml.jackson.databind.ObjectMapper;import lombok.SneakyThrows;import org.springframework.core.MethodParameter;import org.springframework.http.MediaType;import org.springframework.http.server.ServerHttpRequest;import org.springframework.http.server.ServerHttpResponse;import org.springframework.web.bind.annotation.ControllerAdvice;import org.springframework.web.servlet.mvc.method.annotation.ResponseBodyAdvice;import java.util.HashMap;/** * 统一数据返回封装 */@ControllerAdvicepublic class ResponseAdvice implements ResponseBodyAdvice { @Override public boolean supports(MethodParameter returnType, Class converterType) { return true; } @SneakyThrows @Override public Object beforeBodyWrite(Object body, MethodParameter returnType, MediaType selectedContentType, Class selectedConverterType, ServerHttpRequest request, ServerHttpResponse response) { if (body instanceof HashMap) { // 本身已经是封装好的对象 return body; } if (body instanceof String) { // 返回类型是 String(特殊) ObjectMapper objectMapper = new ObjectMapper(); return objectMapper.writeValueAsString(AjaxResult.success(body)); } return AjaxResult.success(body); }}3.3 @ControllerAdvice 源码分析(了解)
通过对 @ControllerAdvice 源码的分析我们可以知道上⾯统⼀异常和统⼀数据返回的执⾏流程,我们先从 @ControllerAdvice 的源码看起,点击 @ControllerAdvice 实现源码如下:
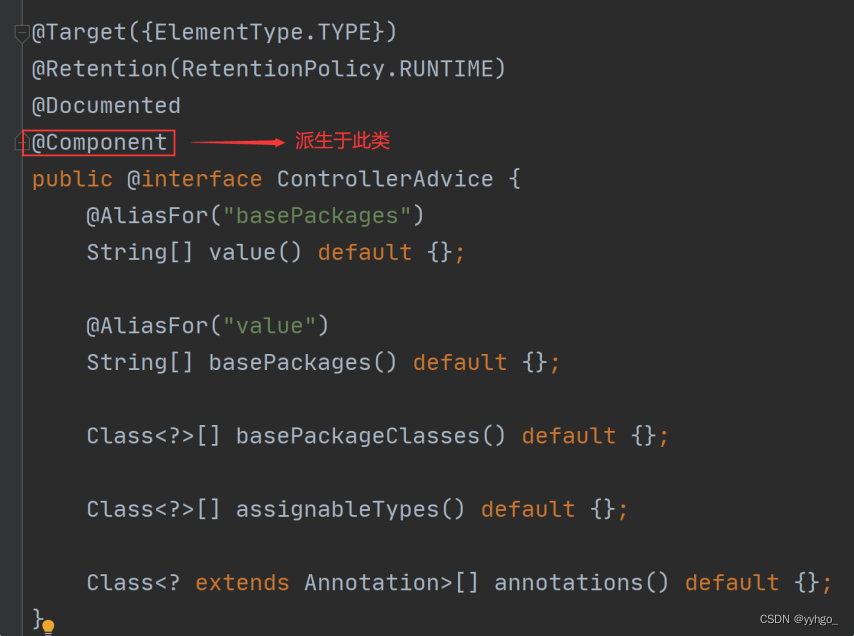
从上述源码可以看出 @ControllerAdvice 派⽣于 @Component 组件,⽽所有组件初始化都会调用 InitializingBean 接⼝。
所以接下来我们来看 InitializingBean 有哪些实现类?在查询的过程中我们发现了,其中 Spring MVC中的实现⼦类是 RequestMappingHandlerAdapter,它⾥⾯有⼀个⽅法 afterPropertiesSet() ⽅法,表示所有的参数设置完成之后执⾏的⽅法,如下图所示:
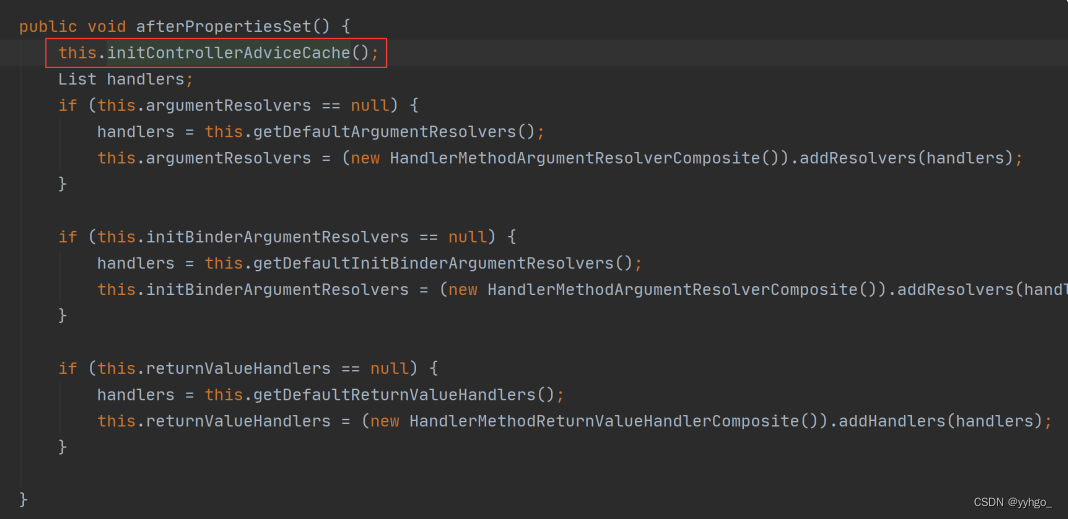
⽽这个⽅法中有⼀个 initControllerAdviceCache ⽅法,查询此⽅法的源码如下:
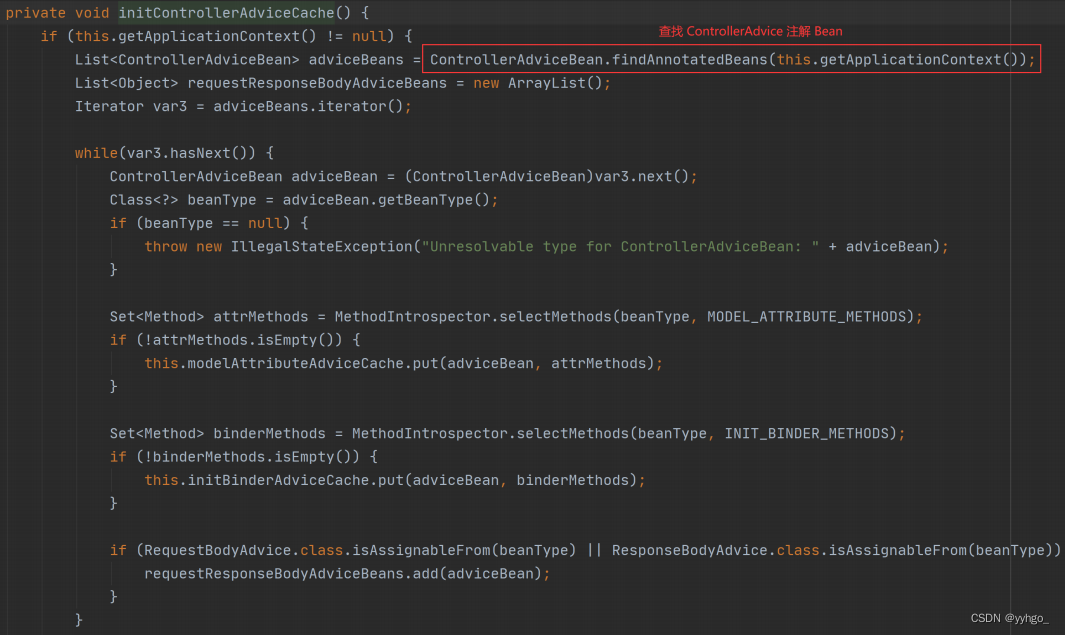
我们发现这个⽅法在执⾏是会查找使⽤所有的 @ControllerAdvice 类,这些类会被容器中,但发⽣某个事件时,调⽤相应的 Advice ⽅法,⽐如返回数据前调⽤统⼀数据封装,⽐如发⽣异常是调⽤异常的 Advice ⽅法实现。