?? 目录
一、整合Spring Security1.1 Security 概述1.2 引入Security与jwt1.3 重新定义redis序列化规则1.4 用户认证1.5 生成验证码1.6 验证码认证过滤器
一、整合Spring Security
1.1 Security 概述
关于spring security,前面文章已经总结过两次( 第一次 ??????? 第二次 )这个框架比shiro确实复杂一点,同时功能也更加强大,首先来看一下security的原理,这里我引用一张来自 江南一点雨大佬画的一张原理图
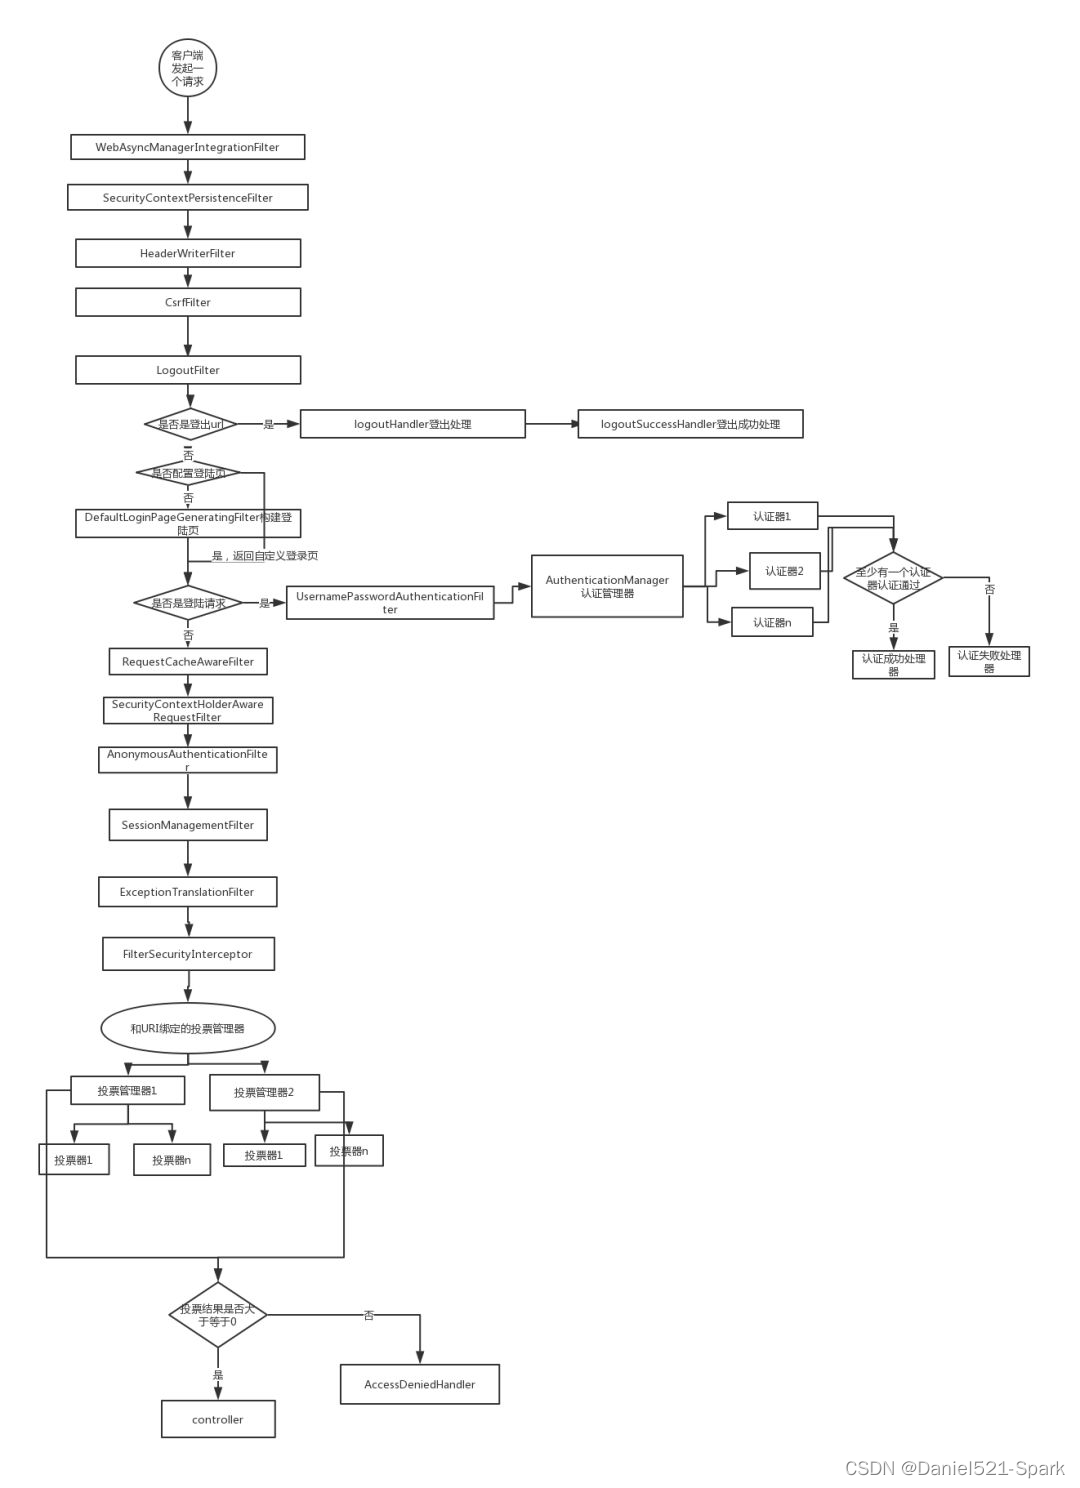
上面这张图一定要好好看,特别详细,毕竟security是责任链的设计模式,是一堆过滤器链的组合,如果对于这个流程都不清楚,那么就很难理解security。那么针对我们现在的这个系统,我们可以自己设计一个security的认证方案,结合江南一点雨大佬的博客,我们得到这样一套流程:
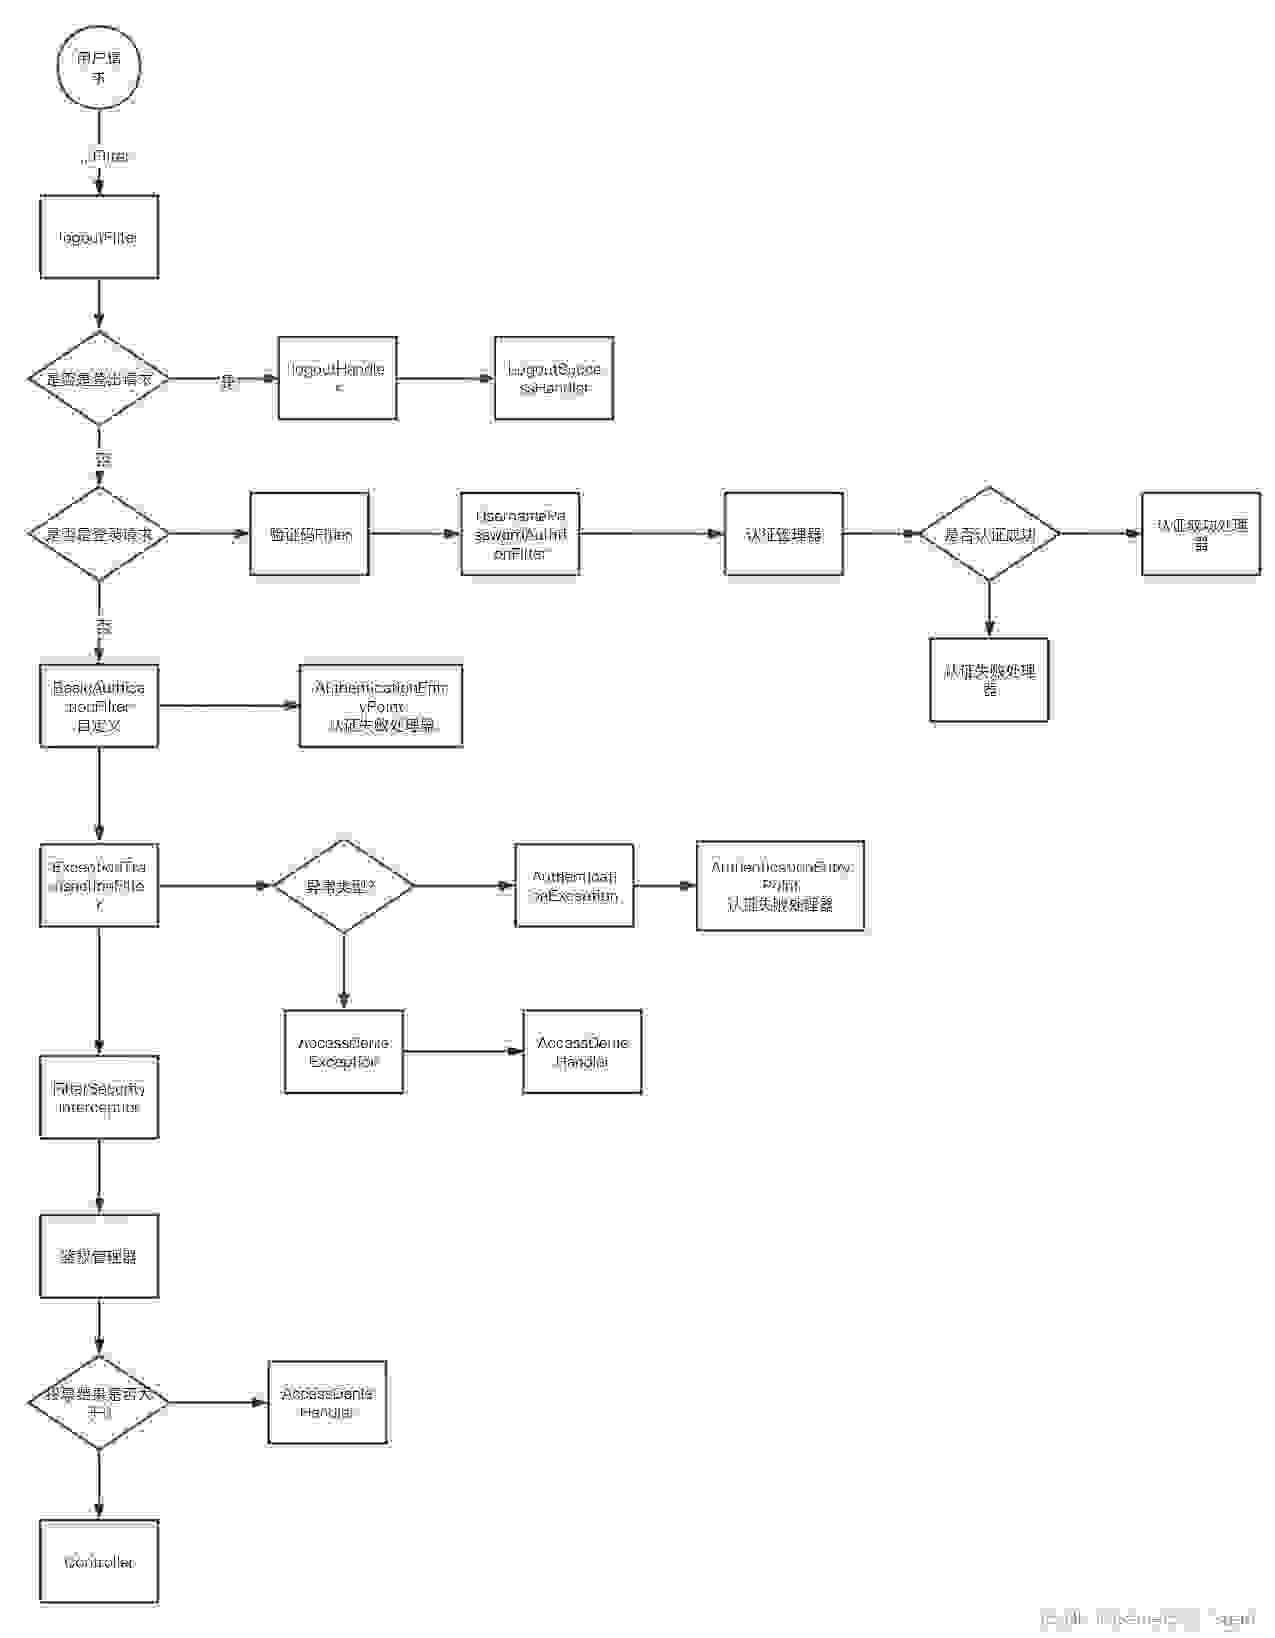
高清图片地址
流程说明:
客户端发起一个请求,进入 Security 过滤器链。当到 LogoutFilter 的时候判断是否是登出路径,如果是登出路径则到 logoutHandler ,如果登出成功则到 logoutSuccessHandler 登出成功处理。如果不是登出路径则直接进入下一个过滤器。当到 UsernamePasswordAuthenticationFilter 的时候判断是否为登录路径,如果是,则进入该过滤器进行登录操作,如果登录失败则到 AuthenticationFailureHandler ,登录失败处理器处理,如果登录成功则到 AuthenticationSuccessHandler 登录成功处理器处理,如果不是登录请求则不进入该过滤器。进入认证BasicAuthenticationFilter进行用户认证,成功的话会把认证了的结果写入到SecurityContextHolder中SecurityContext的属性authentication上面。如果认证失败就会交给AuthenticationEntryPoint认证失败处理类,或者抛出异常被后续ExceptionTranslationFilter过滤器处理异常,如果是AuthenticationException就交给AuthenticationEntryPoint处理,如果是AccessDeniedException异常则交给AccessDeniedHandler处理。当到 FilterSecurityInterceptor 的时候会拿到 uri ,根据 uri 去找对应的鉴权管理器,鉴权管理器做鉴权工作,鉴权成功则到 Controller 层,否则到 AccessDeniedHandler 鉴权失败处理器处理。Spring Security 实战干货:必须掌握的一些 内置 Filter
ok,上面我们说的流程中涉及到几个组件,有些是我们需要根据实际情况来重写的。因为我们是使用json数据进行前后端数据交互,并且我们返回结果也是特定封装的。我们先再总结一下我们需要了解的几个组件:
LogoutFilter - 登出过滤器logoutSuccessHandler - 登出成功之后的操作类UsernamePasswordAuthenticationFilter - from提交用户名密码登录认证过滤器AuthenticationFailureHandler - 登录失败操作类AuthenticationSuccessHandler - 登录成功操作类BasicAuthenticationFilter - Basic身份认证过滤器SecurityContextHolder - 安全上下文静态工具类AuthenticationEntryPoint - 认证失败入口ExceptionTranslationFilter - 异常处理过滤器AccessDeniedHandler - 权限不足操作类FilterSecurityInterceptor - 权限判断拦截器、出口 有了上面的组件,那么认证与授权两个问题我们就已经接近啦,我们现在需要做的就是去重写我们的一些关键类。
1.2 引入Security与jwt
首先我们导入security包,因为我们前后端交互用户凭证用的是JWT,所以我们也导入jwt的相关包,然后因为验证码的存储需要用到redis,所以引入redis。最后为了一些工具类,我们引入hutool。
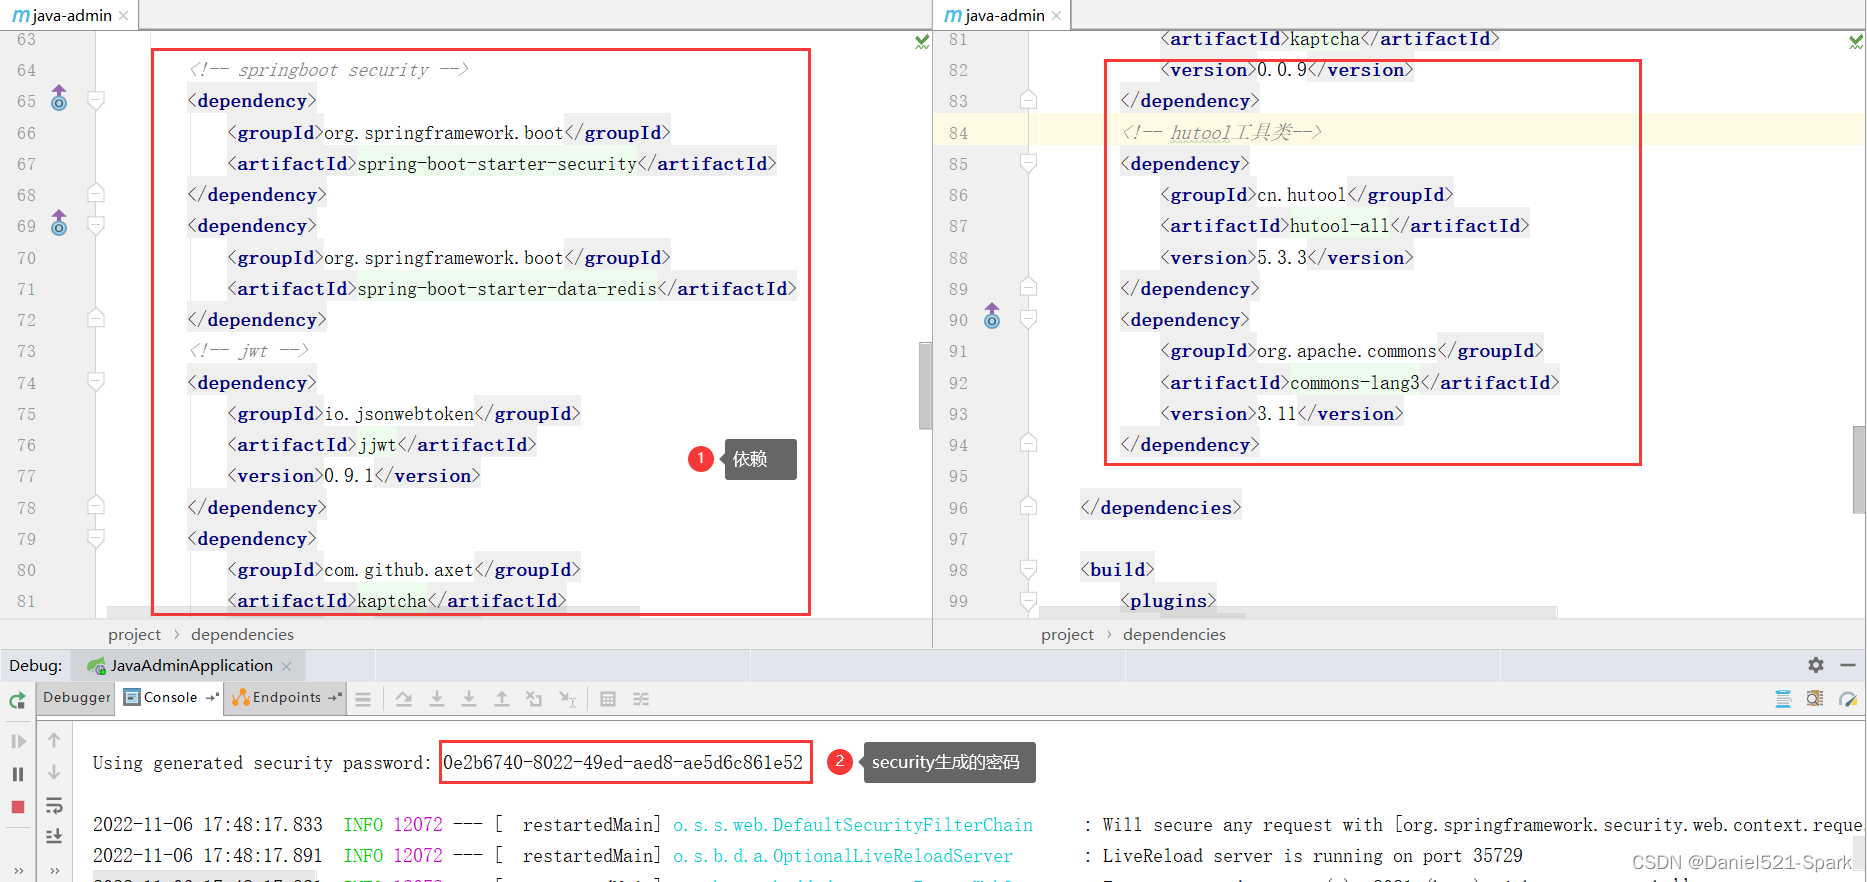
pom.xml
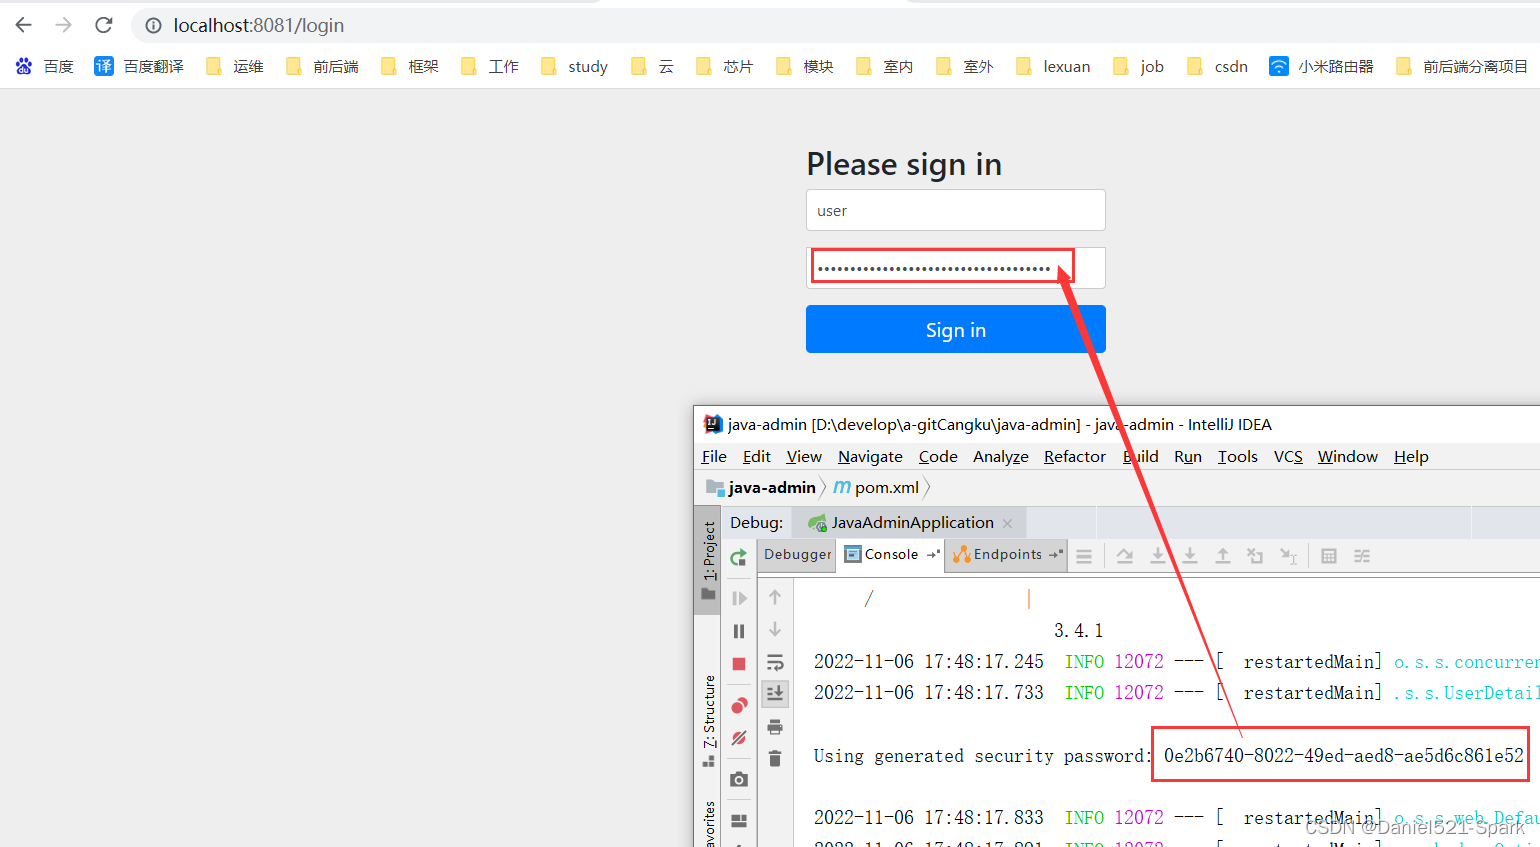
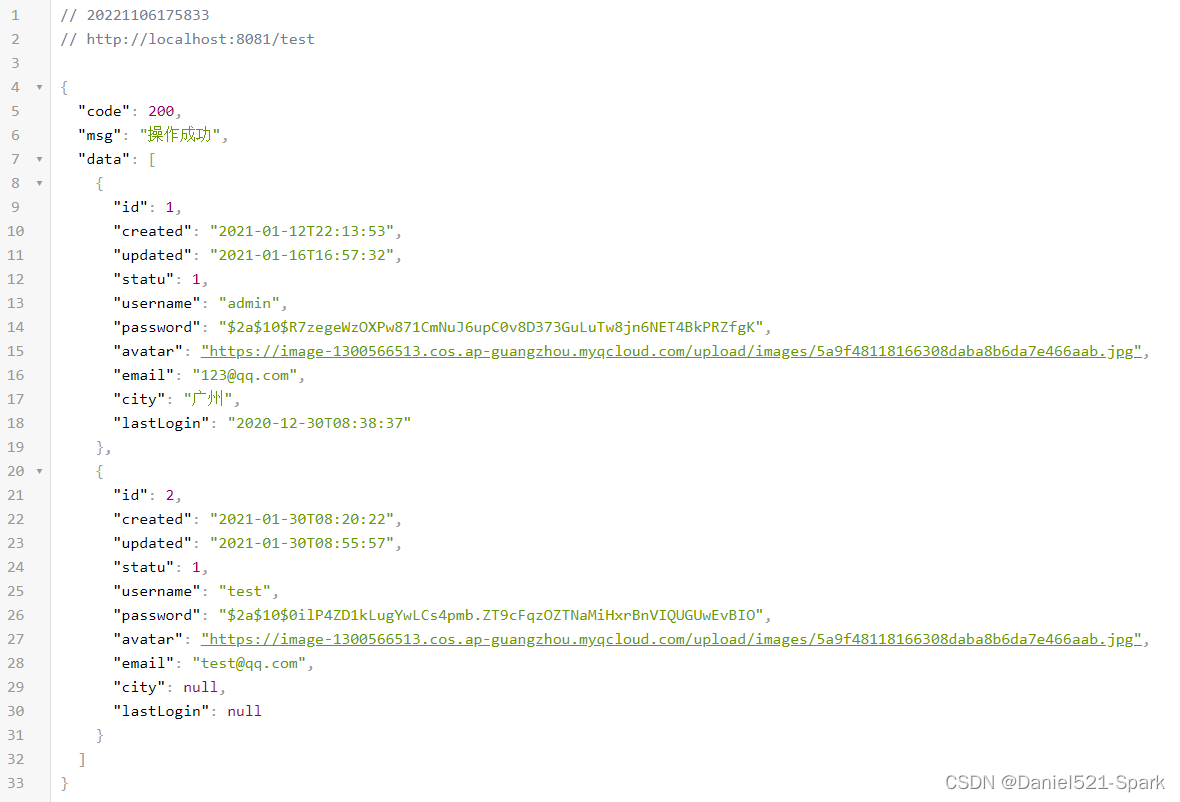
<!-- springboot security --><dependency> <groupId>org.springframework.boot</groupId> <artifactId>spring-boot-starter-security</artifactId></dependency><dependency> <groupId>org.springframework.boot</groupId> <artifactId>spring-boot-starter-data-redis</artifactId></dependency><!-- jwt --><dependency> <groupId>io.jsonwebtoken</groupId> <artifactId>jjwt</artifactId> <version>0.9.1</version></dependency><dependency> <groupId>com.github.axet</groupId> <artifactId>kaptcha</artifactId> <version>0.0.9</version></dependency><!-- hutool工具类--><dependency> <groupId>cn.hutool</groupId> <artifactId>hutool-all</artifactId> <version>5.3.3</version></dependency><dependency> <groupId>org.apache.commons</groupId> <artifactId>commons-lang3</artifactId> <version>3.11</version></dependency>启动redis,然后我们再启动项目,这时候我们再去访问http://localhost:8081/test,会发现系统会先判断到你未登录跳转到http://localhost:8081/login,因为security内置了登录页,用户名为user,密码在启动项目的时候打印在了控制台。登录完成之后我们才可以正常访问接口。
因为每次启动密码都会改变,所以我们通过配置文件来配置一下默认的用户名和密码:
application.yml
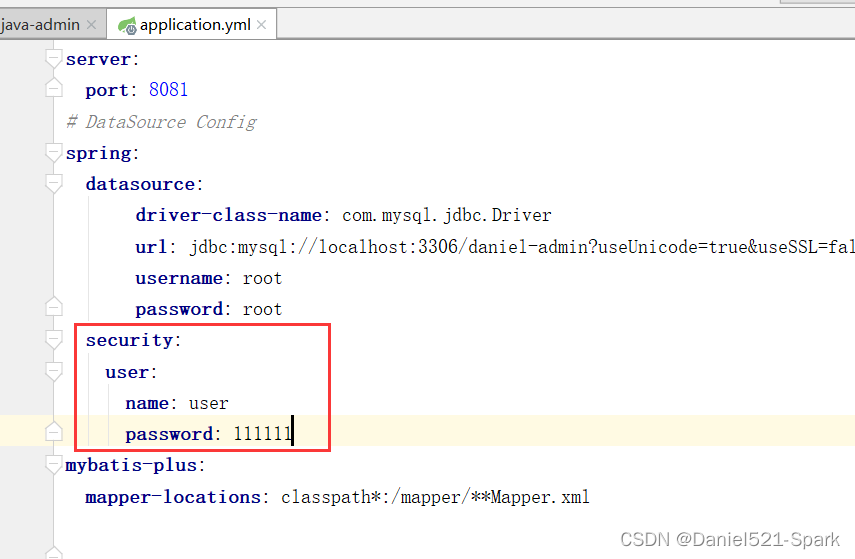
server: port: 8081# DataSource Configspring: datasource: driver-class-name: com.mysql.jdbc.Driver url: jdbc:mysql://localhost:3306/daniel-admin?useUnicode=true&useSSL=false&characterEncoding=utf8&serverTimezone=Asia/Shanghai username: root password: root security: user: name: user password: 111111mybatis-plus: mapper-locations: classpath*:/mapper/**Mapper.xml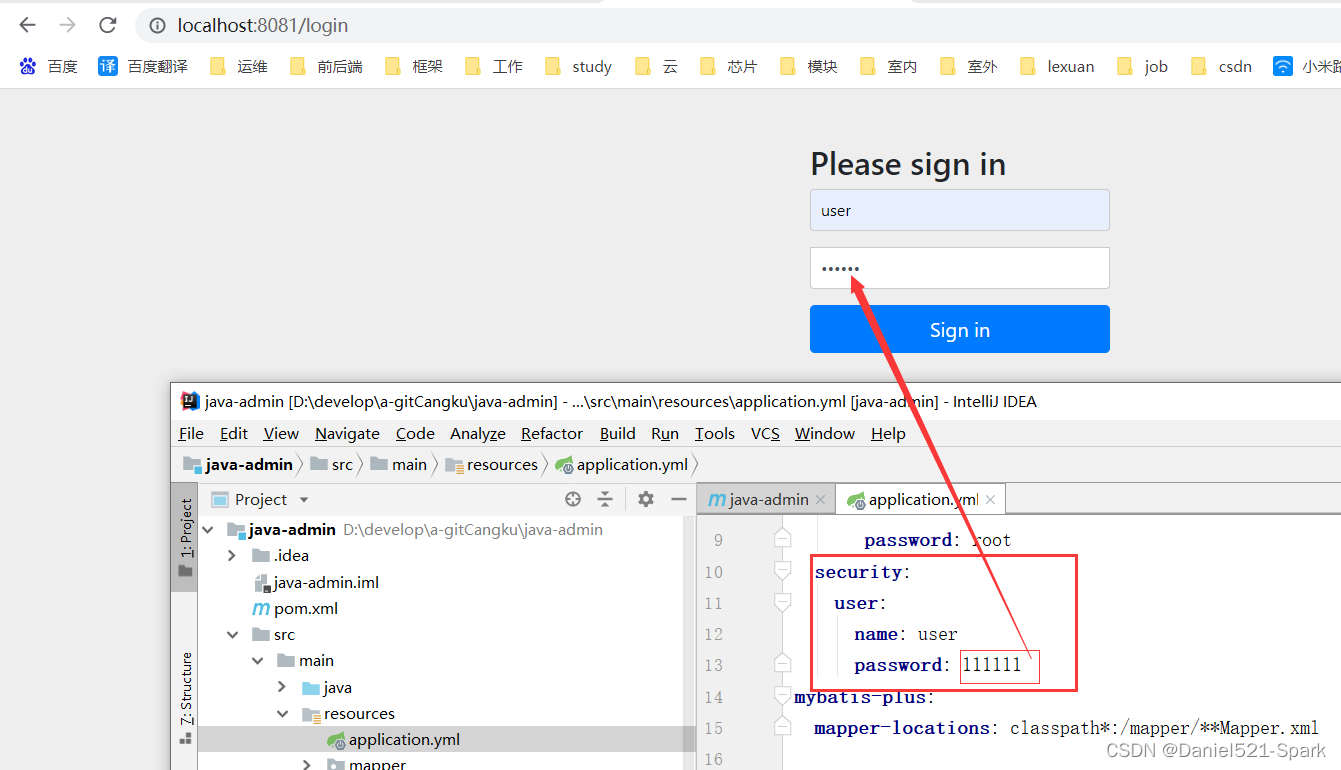
登录成功才会到达下面页面
1.3 重新定义redis序列化规则
创建 com.zql.config.RedisConfig
RedisConfig.java
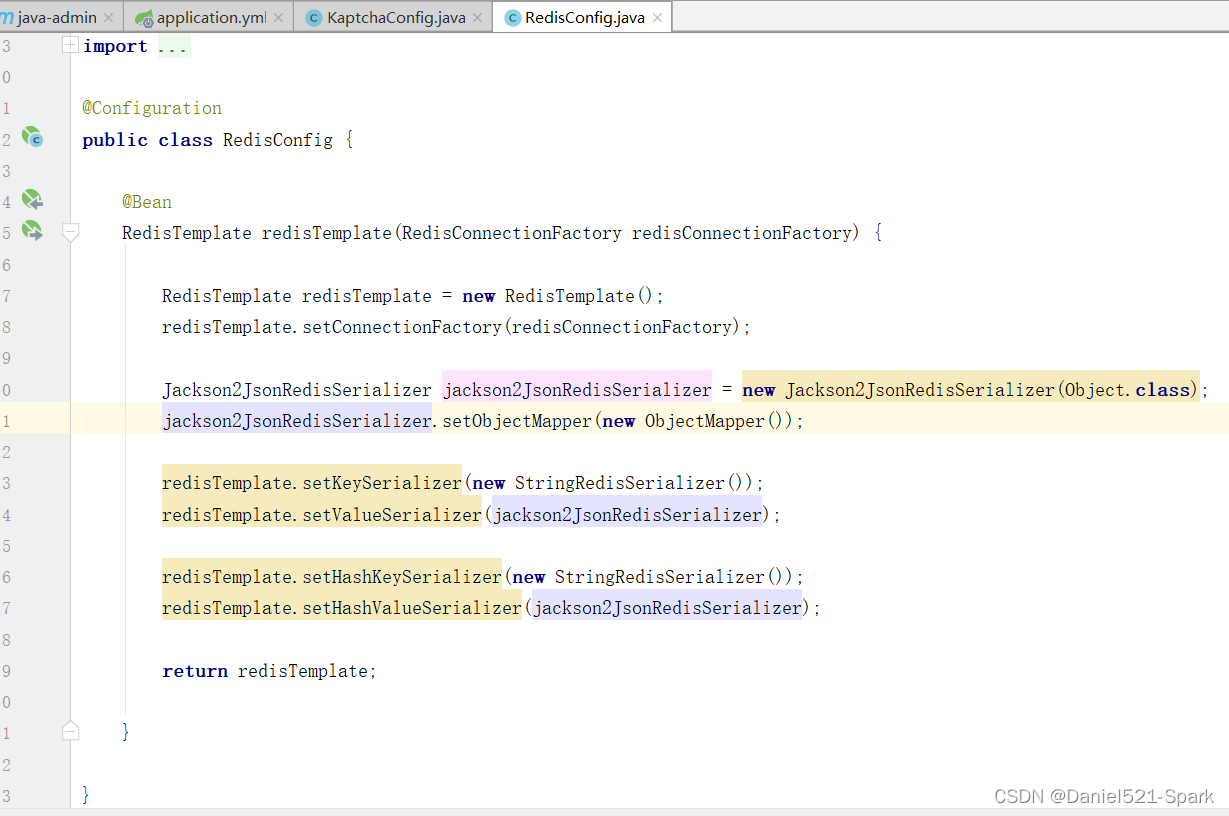
package com.zql.config;import com.fasterxml.jackson.databind.ObjectMapper;import org.springframework.context.annotation.Bean;import org.springframework.context.annotation.Configuration;import org.springframework.data.redis.connection.RedisConnectionFactory;import org.springframework.data.redis.core.RedisTemplate;import org.springframework.data.redis.serializer.Jackson2JsonRedisSerializer;import org.springframework.data.redis.serializer.StringRedisSerializer;@Configurationpublic class RedisConfig {@BeanRedisTemplate redisTemplate(RedisConnectionFactory redisConnectionFactory) {RedisTemplate redisTemplate = new RedisTemplate();redisTemplate.setConnectionFactory(redisConnectionFactory);Jackson2JsonRedisSerializer jackson2JsonRedisSerializer = new Jackson2JsonRedisSerializer(Object.class);jackson2JsonRedisSerializer.setObjectMapper(new ObjectMapper());redisTemplate.setKeySerializer(new StringRedisSerializer());redisTemplate.setValueSerializer(jackson2JsonRedisSerializer);redisTemplate.setHashKeySerializer(new StringRedisSerializer());redisTemplate.setHashValueSerializer(jackson2JsonRedisSerializer);return redisTemplate;}}1.4 用户认证
先来解决用户认证问题,分为首次登陆,和二次认证。
首次登录认证:用户名、密码和验证码完成登录二次token认证:请求头携带Jwt进行身份认证使用用户名密码来登录的,然后我们还想添加图片验证码,那么security给我们提供的UsernamePasswordAuthenticationFilter能使用吗?
首先security的所有过滤器都是没有图片验证码这回事的,看起来不适用了。其实这里我们可以灵活点,如果你依然想沿用自带的UsernamePasswordAuthenticationFilter,那么我们就在这过滤器之前添加一个图片验证码过滤器。当然了我们也可以通过自定义过滤器继承UsernamePasswordAuthenticationFilter,然后自己把验证码验证逻辑和认证逻辑写在一起,这也是一种解决方式。
我们这次解决方式是在UsernamePasswordAuthenticationFilter之前自定义一个图片过滤器CaptchaFilter,提前校验验证码是否正确,这样我们就可以使用UsernamePasswordAuthenticationFilter了,然后登录正常或失败我们都可以通过对应的Handler来返回我们特定格式的封装结果数据。
1.5 生成验证码
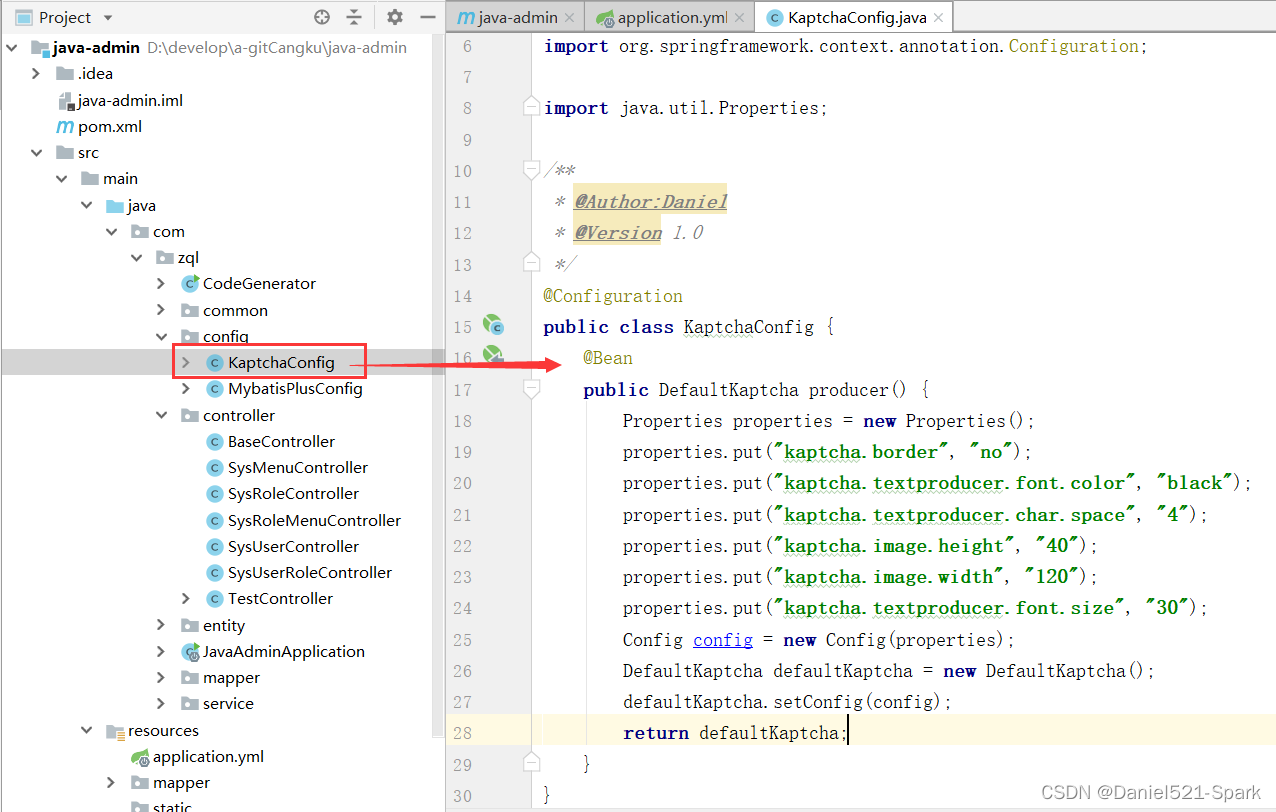
首先先生成验证码,之前已经引用了google的验证码生成器,我们先来配置一下图片验证码的生成规则:com.zql.config.KaptchaConfig
KaptchaConfig.java
package com.zql.config;import com.google.code.kaptcha.impl.DefaultKaptcha;import com.google.code.kaptcha.util.Config;import org.springframework.context.annotation.Bean;import org.springframework.context.annotation.Configuration;import java.util.Properties;/** * @Author:Daniel * @Version 1.0 */@Configurationpublic class KaptchaConfig { @Bean public DefaultKaptcha producer() { Properties properties = new Properties(); //验证码生成属性 properties.put("kaptcha.border", "no"); properties.put("kaptcha.textproducer.font.color", "black"); properties.put("kaptcha.textproducer.char.space", "4"); properties.put("kaptcha.image.height", "40"); properties.put("kaptcha.image.width", "120"); properties.put("kaptcha.textproducer.font.size", "30"); Config config = new Config(properties); //点击Config 可以看到上面参数的设置 DefaultKaptcha defaultKaptcha = new DefaultKaptcha(); defaultKaptcha.setConfig(config); return defaultKaptcha; }} 上面我定义了图片验证码的长宽字体颜色等,自己可以调整哈。
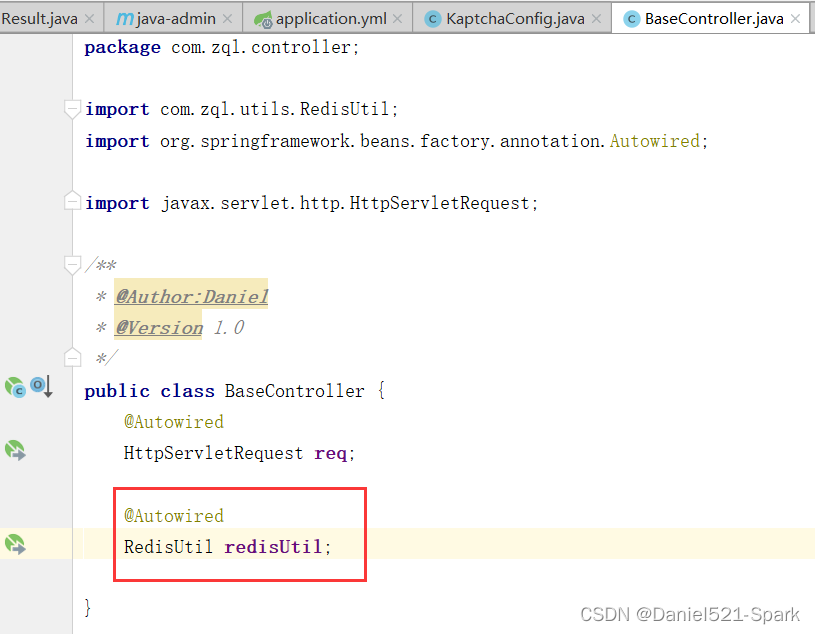
然后我们通过控制器提供生成验证码的方法:(1) 因为验证码需要存储,所以添加了RedisUtil工具类,首先导入 Redis工具类 创建 com.zql .utils.RedisUtil 导入下面代码:
RedisUtil.java
package com.zql.utils;import org.springframework.beans.factory.annotation.Autowired;import org.springframework.data.redis.core.RedisTemplate;import org.springframework.data.redis.core.ZSetOperations;import org.springframework.stereotype.Component;import org.springframework.util.CollectionUtils;import java.util.Collection;import java.util.List;import java.util.Map;import java.util.Set;import java.util.concurrent.TimeUnit;@Componentpublic class RedisUtil { @Autowired private RedisTemplate redisTemplate; /** * 指定缓存失效时间 * * @param key 键 * @param time 时间(秒) * @return */ public boolean expire(String key, long time) { try { if (time > 0) { redisTemplate.expire(key, time, TimeUnit.SECONDS); } return true; } catch (Exception e) { e.printStackTrace(); return false; } } /** * 根据key 获取过期时间 * * @param key 键 不能为null * @return 时间(秒) 返回0代表为永久有效 */ public long getExpire(String key) { return redisTemplate.getExpire(key, TimeUnit.SECONDS); } /** * 判断key是否存在 * * @param key 键 * @return true 存在 false不存在 */ public boolean hasKey(String key) { try { return redisTemplate.hasKey(key); } catch (Exception e) { e.printStackTrace(); return false; } } /** * 删除缓存 * * @param key 可以传一个值 或多个 */ @SuppressWarnings("unchecked") public void del(String... key) { if (key != null && key.length > 0) { if (key.length == 1) { redisTemplate.delete(key[0]); } else { redisTemplate.delete(CollectionUtils.arrayToList(key)); } } } //============================String============================= /** * 普通缓存获取 * * @param key 键 * @return 值 */ public Object get(String key) { return key == null ? null : redisTemplate.opsForValue().get(key); } /** * 普通缓存放入 * * @param key 键 * @param value 值 * @return true成功 false失败 */ public boolean set(String key, Object value) { try { redisTemplate.opsForValue().set(key, value); return true; } catch (Exception e) { e.printStackTrace(); return false; } } /** * 普通缓存放入并设置时间 * * @param key 键 * @param value 值 * @param time 时间(秒) time要大于0 如果time小于等于0 将设置无限期 * @return true成功 false 失败 */ public boolean set(String key, Object value, long time) { try { if (time > 0) { redisTemplate.opsForValue().set(key, value, time, TimeUnit.SECONDS); } else { set(key, value); } return true; } catch (Exception e) { e.printStackTrace(); return false; } } /** * 递增 * * @param key 键 * @param delta 要增加几(大于0) * @return */ public long incr(String key, long delta) { if (delta < 0) { throw new RuntimeException("递增因子必须大于0"); } return redisTemplate.opsForValue().increment(key, delta); } /** * 递减 * * @param key 键 * @param delta 要减少几(小于0) * @return */ public long decr(String key, long delta) { if (delta < 0) { throw new RuntimeException("递减因子必须大于0"); } return redisTemplate.opsForValue().increment(key, -delta); } //================================Map================================= /** * HashGet * * @param key 键 不能为null * @param item 项 不能为null * @return 值 */ public Object hget(String key, String item) { return redisTemplate.opsForHash().get(key, item); } /** * 获取hashKey对应的所有键值 * * @param key 键 * @return 对应的多个键值 */ public Map<Object, Object> hmget(String key) { return redisTemplate.opsForHash().entries(key); } /** * HashSet * * @param key 键 * @param map 对应多个键值 * @return true 成功 false 失败 */ public boolean hmset(String key, Map<String, Object> map) { try { redisTemplate.opsForHash().putAll(key, map); return true; } catch (Exception e) { e.printStackTrace(); return false; } } /** * HashSet 并设置时间 * * @param key 键 * @param map 对应多个键值 * @param time 时间(秒) * @return true成功 false失败 */ public boolean hmset(String key, Map<String, Object> map, long time) { try { redisTemplate.opsForHash().putAll(key, map); if (time > 0) { expire(key, time); } return true; } catch (Exception e) { e.printStackTrace(); return false; } } /** * 向一张hash表中放入数据,如果不存在将创建 * * @param key 键 * @param item 项 * @param value 值 * @return true 成功 false失败 */ public boolean hset(String key, String item, Object value) { try { redisTemplate.opsForHash().put(key, item, value); return true; } catch (Exception e) { e.printStackTrace(); return false; } } /** * 向一张hash表中放入数据,如果不存在将创建 * * @param key 键 * @param item 项 * @param value 值 * @param time 时间(秒) 注意:如果已存在的hash表有时间,这里将会替换原有的时间 * @return true 成功 false失败 */ public boolean hset(String key, String item, Object value, long time) { try { redisTemplate.opsForHash().put(key, item, value); if (time > 0) { expire(key, time); } return true; } catch (Exception e) { e.printStackTrace(); return false; } } /** * 删除hash表中的值 * * @param key 键 不能为null * @param item 项 可以使多个 不能为null */ public void hdel(String key, Object... item) { redisTemplate.opsForHash().delete(key, item); } /** * 判断hash表中是否有该项的值 * * @param key 键 不能为null * @param item 项 不能为null * @return true 存在 false不存在 */ public boolean hHasKey(String key, String item) { return redisTemplate.opsForHash().hasKey(key, item); } /** * hash递增 如果不存在,就会创建一个 并把新增后的值返回 * * @param key 键 * @param item 项 * @param by 要增加几(大于0) * @return */ public double hincr(String key, String item, double by) { return redisTemplate.opsForHash().increment(key, item, by); } /** * hash递减 * * @param key 键 * @param item 项 * @param by 要减少记(小于0) * @return */ public double hdecr(String key, String item, double by) { return redisTemplate.opsForHash().increment(key, item, -by); } //============================set============================= /** * 根据key获取Set中的所有值 * * @param key 键 * @return */ public Set<Object> sGet(String key) { try { return redisTemplate.opsForSet().members(key); } catch (Exception e) { e.printStackTrace(); return null; } } /** * 根据value从一个set中查询,是否存在 * * @param key 键 * @param value 值 * @return true 存在 false不存在 */ public boolean sHasKey(String key, Object value) { try { return redisTemplate.opsForSet().isMember(key, value); } catch (Exception e) { e.printStackTrace(); return false; } } /** * 将数据放入set缓存 * * @param key 键 * @param values 值 可以是多个 * @return 成功个数 */ public long sSet(String key, Object... values) { try { return redisTemplate.opsForSet().add(key, values); } catch (Exception e) { e.printStackTrace(); return 0; } } /** * 将set数据放入缓存 * * @param key 键 * @param time 时间(秒) * @param values 值 可以是多个 * @return 成功个数 */ public long sSetAndTime(String key, long time, Object... values) { try { Long count = redisTemplate.opsForSet().add(key, values); if (time > 0) expire(key, time); return count; } catch (Exception e) { e.printStackTrace(); return 0; } } /** * 获取set缓存的长度 * * @param key 键 * @return */ public long sGetSetSize(String key) { try { return redisTemplate.opsForSet().size(key); } catch (Exception e) { e.printStackTrace(); return 0; } } /** * 移除值为value的 * * @param key 键 * @param values 值 可以是多个 * @return 移除的个数 */ public long setRemove(String key, Object... values) { try { Long count = redisTemplate.opsForSet().remove(key, values); return count; } catch (Exception e) { e.printStackTrace(); return 0; } } //===============================list================================= /** * 获取list缓存的内容 * * @param key 键 * @param start 开始 * @param end 结束 0 到 -1代表所有值 * @return */ public List<Object> lGet(String key, long start, long end) { try { return redisTemplate.opsForList().range(key, start, end); } catch (Exception e) { e.printStackTrace(); return null; } } /** * 获取list缓存的长度 * * @param key 键 * @return */ public long lGetListSize(String key) { try { return redisTemplate.opsForList().size(key); } catch (Exception e) { e.printStackTrace(); return 0; } } /** * 通过索引 获取list中的值 * * @param key 键 * @param index 索引 index>=0时, 0 表头,1 第二个元素,依次类推;index<0时,-1,表尾,-2倒数第二个元素,依次类推 * @return */ public Object lGetIndex(String key, long index) { try { return redisTemplate.opsForList().index(key, index); } catch (Exception e) { e.printStackTrace(); return null; } } /** * 将list放入缓存 * * @param key 键 * @param value 值 * @return */ public boolean lSet(String key, Object value) { try { redisTemplate.opsForList().rightPush(key, value); return true; } catch (Exception e) { e.printStackTrace(); return false; } } /** * 将list放入缓存 * * @param key 键 * @param value 值 * @param time 时间(秒) * @return */ public boolean lSet(String key, Object value, long time) { try { redisTemplate.opsForList().rightPush(key, value); if (time > 0) expire(key, time); return true; } catch (Exception e) { e.printStackTrace(); return false; } } /** * 将list放入缓存 * * @param key 键 * @param value 值 * @return */ public boolean lSet(String key, List<Object> value) { try { redisTemplate.opsForList().rightPushAll(key, value); return true; } catch (Exception e) { e.printStackTrace(); return false; } } /** * 将list放入缓存 * * @param key 键 * @param value 值 * @param time 时间(秒) * @return */ public boolean lSet(String key, List<Object> value, long time) { try { redisTemplate.opsForList().rightPushAll(key, value); if (time > 0) expire(key, time); return true; } catch (Exception e) { e.printStackTrace(); return false; } } /** * 根据索引修改list中的某条数据 * * @param key 键 * @param index 索引 * @param value 值 * @return */ public boolean lUpdateIndex(String key, long index, Object value) { try { redisTemplate.opsForList().set(key, index, value); return true; } catch (Exception e) { e.printStackTrace(); return false; } } /** * 移除N个值为value * * @param key 键 * @param count 移除多少个 * @param value 值 * @return 移除的个数 */ public long lRemove(String key, long count, Object value) { try { Long remove = redisTemplate.opsForList().remove(key, count, value); return remove; } catch (Exception e) { e.printStackTrace(); return 0; } } //================有序集合 sort set=================== /** * 有序set添加元素 * * @param key * @param value * @param score * @return */ public boolean zSet(String key, Object value, double score) { return redisTemplate.opsForZSet().add(key, value, score); } public long batchZSet(String key, Set<ZSetOperations.TypedTuple> typles) { return redisTemplate.opsForZSet().add(key, typles); } public void zIncrementScore(String key, Object value, long delta) { redisTemplate.opsForZSet().incrementScore(key, value, delta); } public void zUnionAndStore(String key, Collection otherKeys, String destKey) { redisTemplate.opsForZSet().unionAndStore(key, otherKeys, destKey); } /** * 获取zset数量 * @param key * @param value * @return */ public long getZsetScore(String key, Object value) { Double score = redisTemplate.opsForZSet().score(key, value); if(score==null){ return 0; }else{ return score.longValue(); } } /** * 获取有序集 key 中成员 member 的排名 。 * 其中有序集成员按 score 值递减 (从大到小) 排序。 * @param key * @param start * @param end * @return */ public Set<ZSetOperations.TypedTuple> getZSetRank(String key, long start, long end) { return redisTemplate.opsForZSet().reverseRangeWithScores(key, start, end); }}(2) 引入 RedisUtils
(3) 为了下面生成的验证码,我们还需要创建一个类 (导入即可) com.zql.common.lang.Const
Const.java
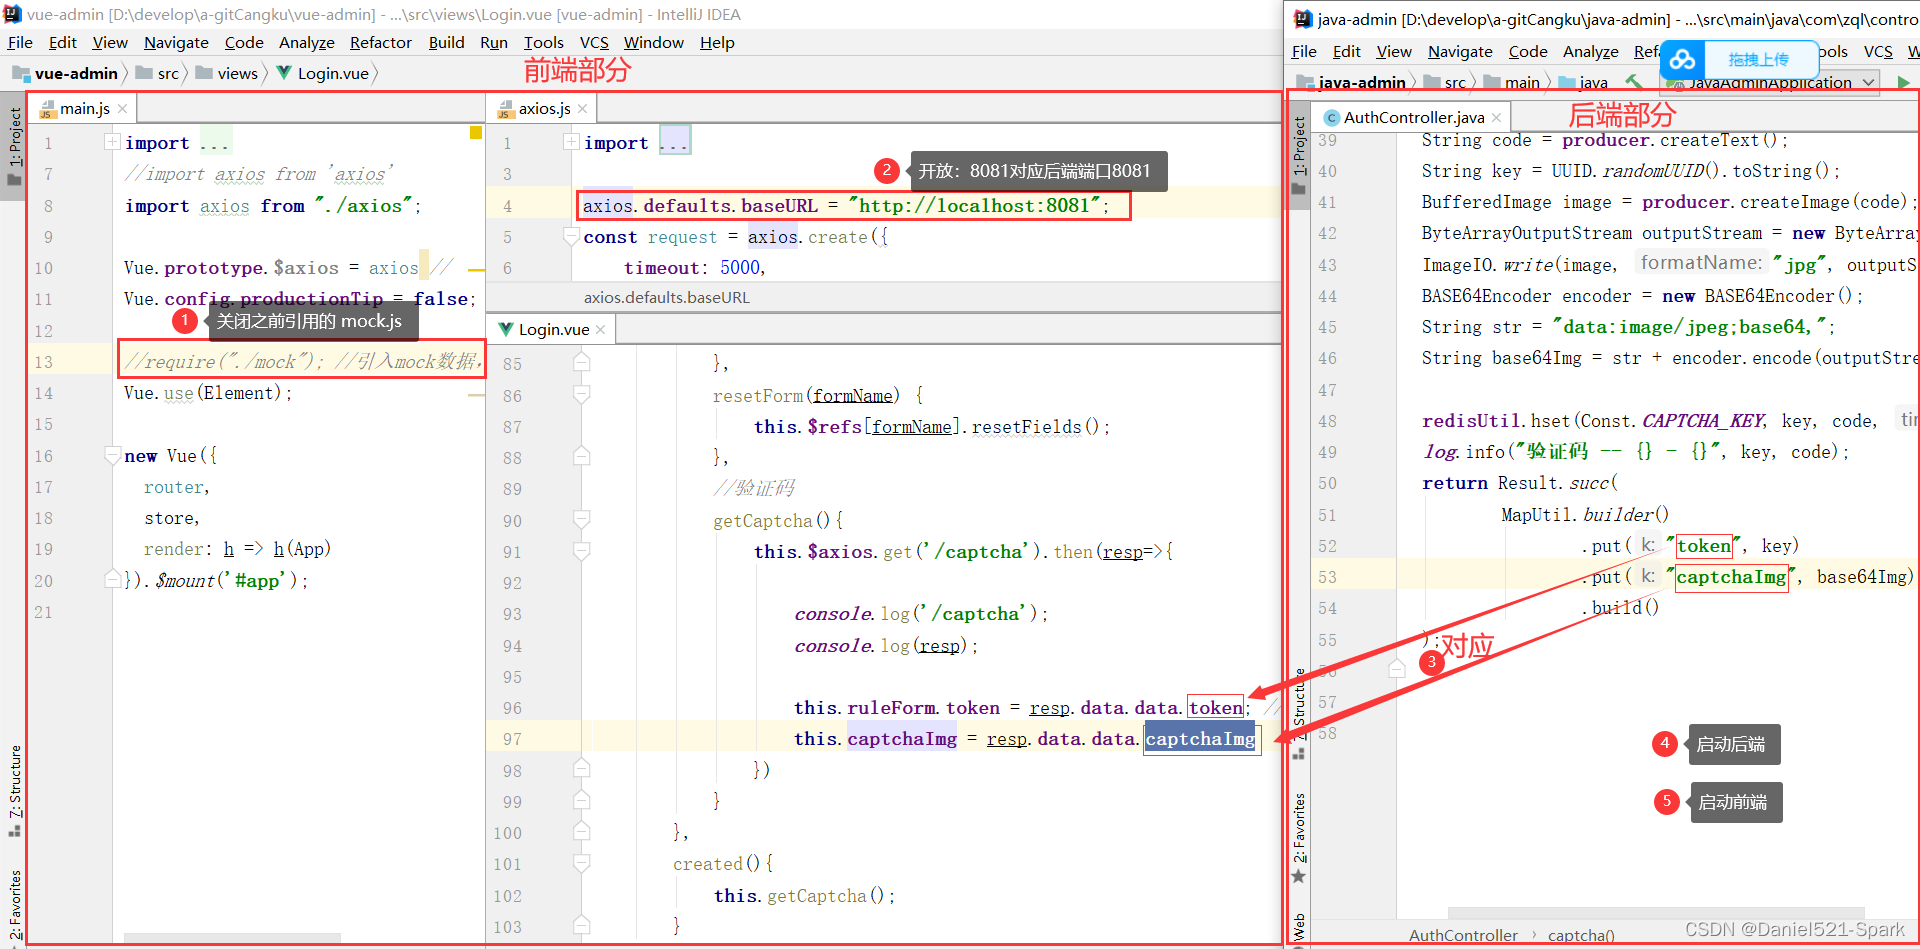
package com.zql.common.lang;public class Const {public final static String CAPTCHA_KEY = "captcha";public final static Integer STATUS_ON = 0;public final static Integer STATUS_OFF = 1;public static final String DEFULT_PASSWORD = "888888";public static final String DEFULT_AVATAR = "https://image-1300566513.cos.ap-guangzhou.myqcloud.com/upload/images/5a9f48118166308daba8b6da7e466aab.jpg";}(4) 最后创建 com.zql.controller.AuthController生成验证码的方法
AuthController.java
package com.zql.controller;import cn.hutool.core.lang.UUID;import cn.hutool.core.map.MapUtil;import com.google.code.kaptcha.Producer;import com.zql.common.lang.Const;import com.zql.common.lang.Result;import lombok.extern.slf4j.Slf4j;import org.springframework.beans.factory.annotation.Autowired;import org.springframework.web.bind.annotation.GetMapping;import org.springframework.web.bind.annotation.RestController;import sun.misc.BASE64Encoder;import javax.imageio.ImageIO;import javax.servlet.http.HttpServletRequest;import javax.servlet.http.HttpServletResponse;import java.awt.image.BufferedImage;import java.io.ByteArrayOutputStream;import java.io.IOException;/** * @Author:Daniel * @Version 1.0 */@Slf4j@RestControllerpublic class AuthController extends BaseController { @Autowired private Producer producer; /** * 图片验证码 */ @GetMapping("/captcha") public Result captcha(HttpServletRequest request, HttpServletResponse response) throws IOException { String code = producer.createText(); String key = UUID.randomUUID().toString(); BufferedImage image = producer.createImage(code); ByteArrayOutputStream outputStream = new ByteArrayOutputStream(); ImageIO.write(image, "jpg", outputStream); BASE64Encoder encoder = new BASE64Encoder(); String str = "data:image/jpeg;base64,"; String base64Img = str + encoder.encode(outputStream.toByteArray());// 存储到redis中 redisUtil.hset(Const.CAPTCHA_KEY, key, code, 120); log.info("验证码 -- {} - {}", key, code); return Result.succ( MapUtil.builder() .put("token", key) .put("base64Img", base64Img) .build() ); }}然后因为图片验证码的方式,所以我们进行了encode,把图片进行了base64编码,这样前端就可以显示图片了。
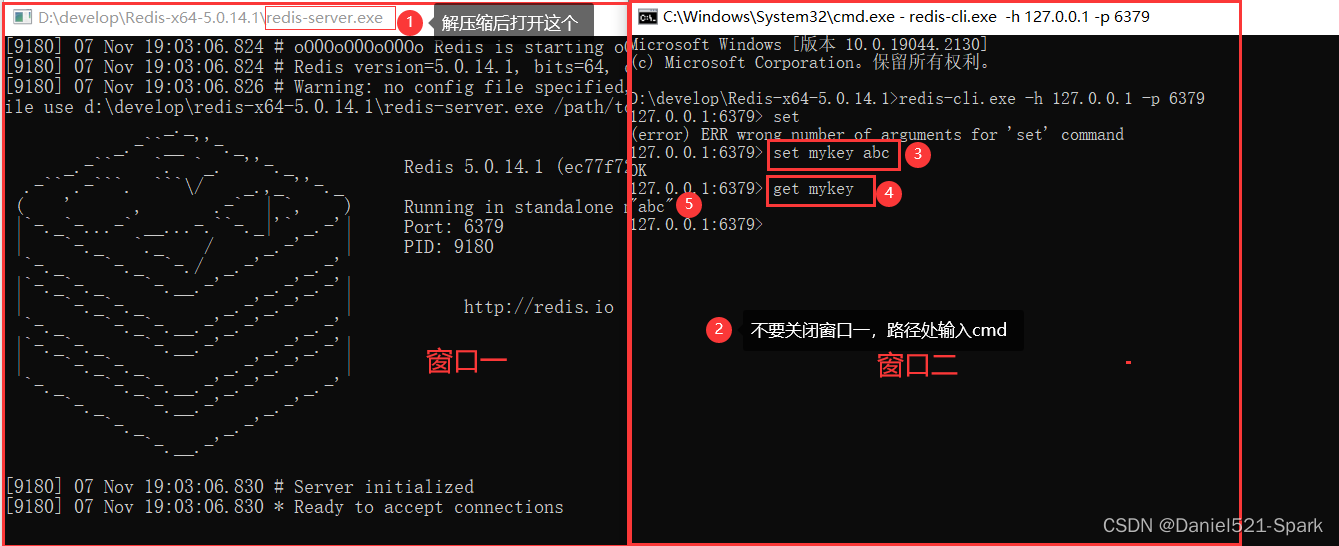
(5)启动redis
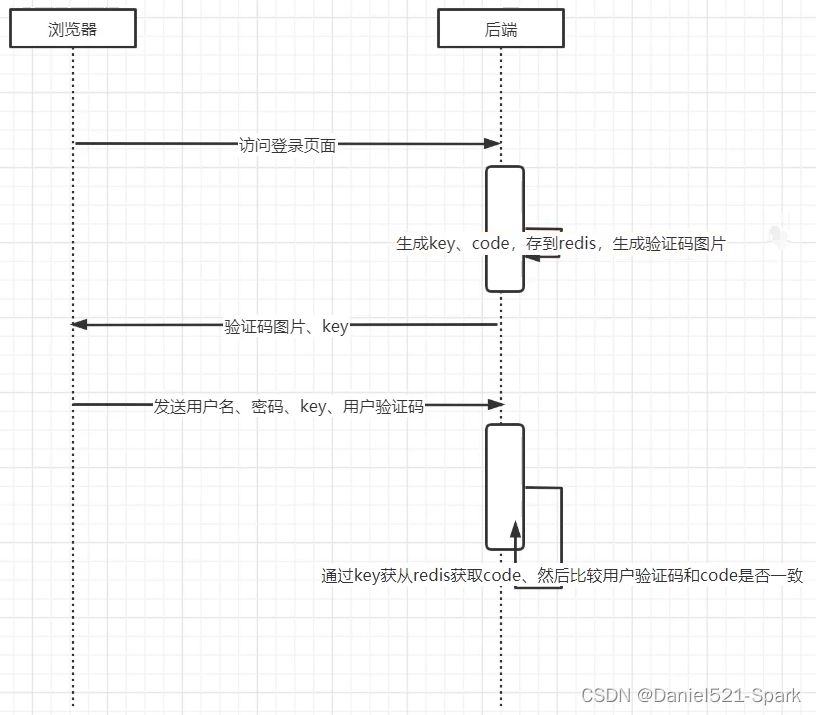
因为前后端分离,我们禁用了session,所以我们把验证码放在了redis中,使用一个随机字符串作为key,并传送到前端,前端再把随机字符串和用户输入的验证码提交上来,这样我们就可以通过随机字符串获取到保存的验证码和用户的验证码进行比较是否正确了,redis安装如下????
菜鸟教程 ✨ redis安装参考
redis下载
菜鸟教程中下载
本地资源中下载
而前端的处理,我们之前是使用了mockjs进行随机生成数据的,现在后端有接口之后,我们只需要在main.js中去掉mockjs的引入即可,这样前端就可以访问后端的接口而不被mock拦截了。
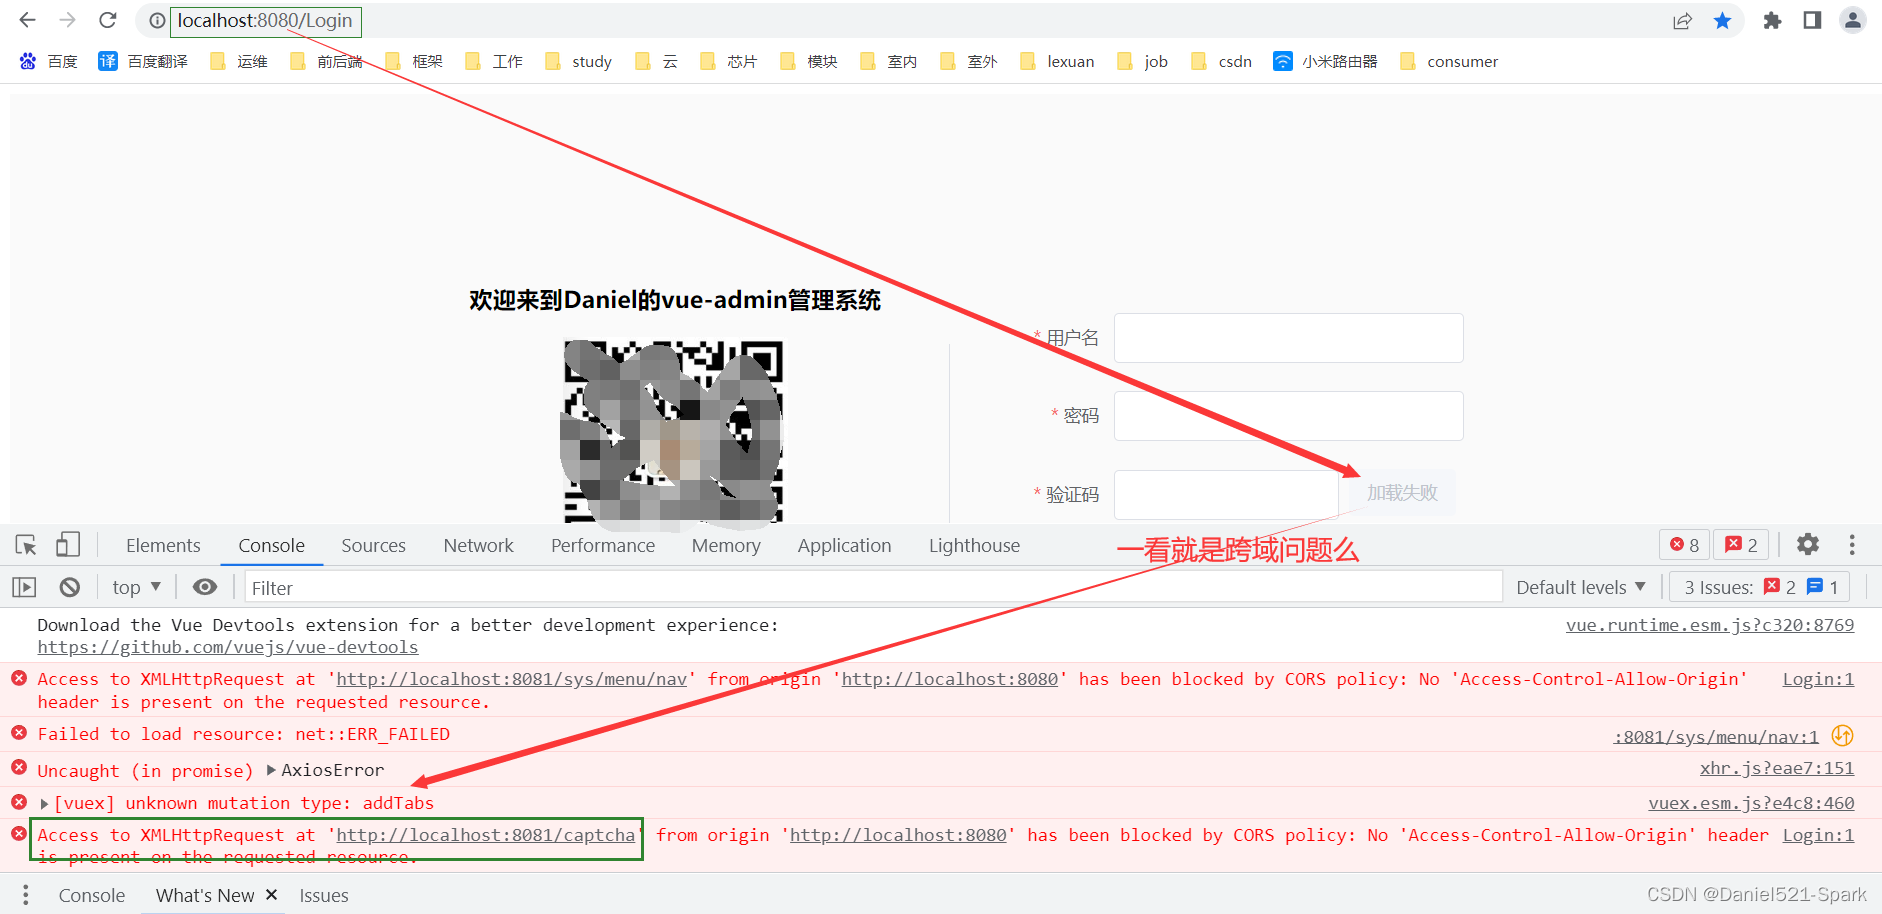
(6)修改如下而后 启动前后端 浏览器访问
结果没有出现验证码,报如下错误(跨域):
com.zql.config.CrosConfig
CrosConfig.java
package com.zql.config;/** * @Author:Daniel * @Version 1.0 */import org.springframework.context.annotation.Bean;import org.springframework.context.annotation.Configuration;import org.springframework.web.cors.CorsConfiguration;import org.springframework.web.cors.UrlBasedCorsConfigurationSource;import org.springframework.web.filter.CorsFilter;import org.springframework.web.servlet.config.annotation.CorsRegistry;import org.springframework.web.servlet.config.annotation.WebMvcConfigurer;/** * @Author:Daniel * @Version 1.0 */@Configurationpublic class CrosConfig implements WebMvcConfigurer { private CorsConfiguration buildConfig() { CorsConfiguration corsConfiguration = new CorsConfiguration(); corsConfiguration.addAllowedOrigin("*"); corsConfiguration.addAllowedHeader("*"); corsConfiguration.addAllowedMethod("*"); corsConfiguration.addExposedHeader("Authorization"); return corsConfiguration; } @Bean public CorsFilter corsFilter() { UrlBasedCorsConfigurationSource source = new UrlBasedCorsConfigurationSource(); source.registerCorsConfiguration("/**", buildConfig()); return new CorsFilter(source); } @Override public void addCorsMappings(CorsRegistry registry) { registry.addMapping("/**") .allowedOrigins("*")// .allowCredentials(true) .allowedMethods("GET", "POST", "DELETE", "PUT") .maxAge(3600); }}再次配置 SecurityConfig
com.zql.config.SecurityConfig
SecurityConfig.java
package com.zql.config;import org.springframework.context.annotation.Configuration;import org.springframework.security.config.annotation.method.configuration.EnableGlobalMethodSecurity;import org.springframework.security.config.annotation.web.builders.HttpSecurity;import org.springframework.security.config.annotation.web.configuration.EnableWebSecurity;import org.springframework.security.config.annotation.web.configuration.WebSecurityConfigurerAdapter;import org.springframework.security.config.http.SessionCreationPolicy;@Configuration@EnableWebSecurity@EnableGlobalMethodSecurity(prePostEnabled = true)public class SecurityConfig extends WebSecurityConfigurerAdapter {private static final String[] URL_WHITELIST = {"/login","/logout","/captcha","/favicon.ico",};protected void configure(HttpSecurity http) throws Exception {http.cors().and().csrf().disable()// 登录配置.formLogin()//.successHandler(loginSuccessHandler)//.failureHandler(loginFailureHandler)// 禁用session.and().sessionManagement().sessionCreationPolicy(SessionCreationPolicy.STATELESS)// 配置拦截规则.and().authorizeRequests().antMatchers(URL_WHITELIST).permitAll().anyRequest().authenticated()// 异常处理器// 配置自定义的过滤器;}}启动测试:http://localhost:8080/Login

1.6 验证码认证过滤器
修改前端: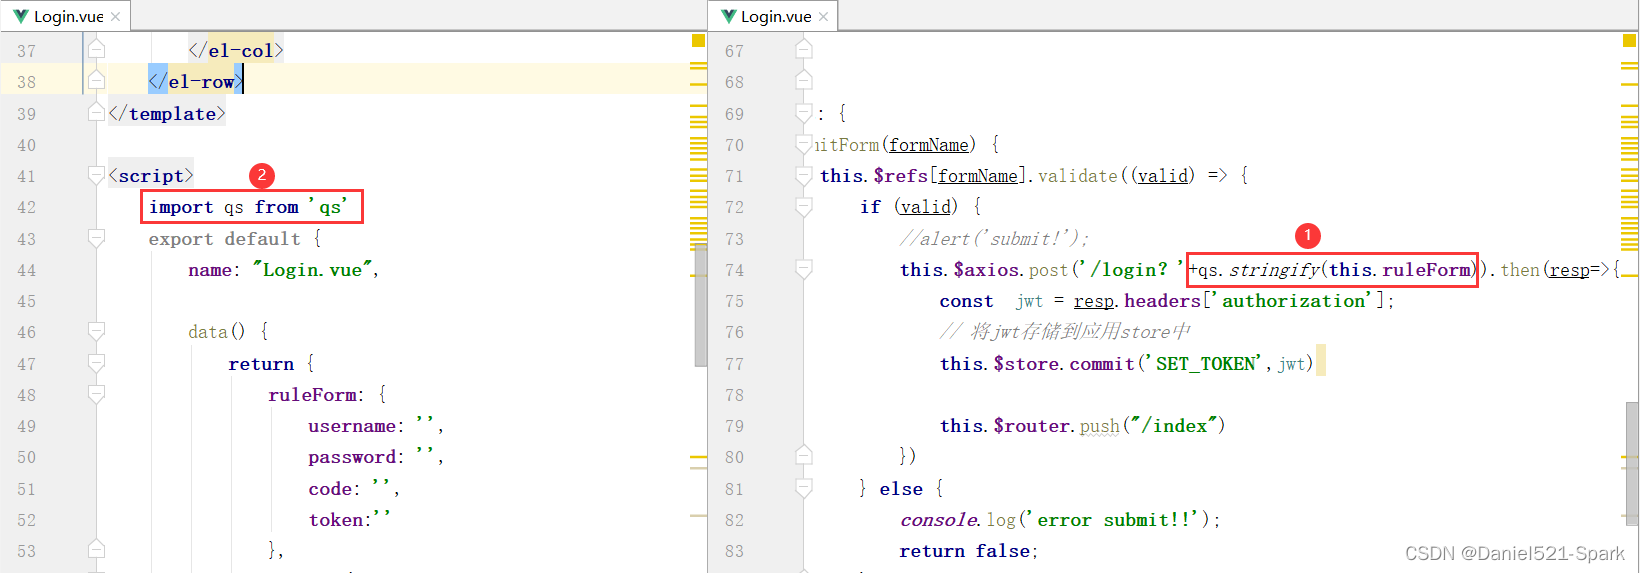
图片验证码进行认证验证码是否正确。
com.zql.security.CaptchaFilter
CaptchaFilter.java
package com.zql.security;import com.baomidou.mybatisplus.core.toolkit.StringUtils;import com.zql.common.exception.CaptchaException;import com.zql.common.lang.Const;import com.zql.utils.RedisUtil;import com.zql.utils.RedisUtil;import org.springframework.beans.factory.annotation.Autowired;import org.springframework.stereotype.Component;import org.springframework.web.filter.OncePerRequestFilter;import javax.servlet.FilterChain;import javax.servlet.ServletException;import javax.servlet.http.HttpServletRequest;import javax.servlet.http.HttpServletResponse;import java.io.IOException;@Componentpublic class CaptchaFilter extends OncePerRequestFilter {@AutowiredRedisUtil redisUtil;@AutowiredLoginFailureHandler loginFailureHandler;@Overrideprotected void doFilterInternal(HttpServletRequest httpServletRequest, HttpServletResponse httpServletResponse, FilterChain filterChain) throws ServletException, IOException {String url = httpServletRequest.getRequestURI();if ("/login".equals(url) && httpServletRequest.getMethod().equals("POST")) {try{// 校验验证码validate(httpServletRequest);} catch (CaptchaException e) {// 交给认证失败处理器loginFailureHandler.onAuthenticationFailure(httpServletRequest, httpServletResponse, e);}}filterChain.doFilter(httpServletRequest, httpServletResponse);}// 校验验证码逻辑private void validate(HttpServletRequest httpServletRequest) {String code = httpServletRequest.getParameter("code");String key = httpServletRequest.getParameter("token");if (StringUtils.isBlank(code) || StringUtils.isBlank(key)) {throw new CaptchaException("验证码错误");}if (!code.equals(redisUtil.hget(Const.CAPTCHA_KEY, key))) {throw new CaptchaException("验证码错误");}// 一次性使用redisUtil.hdel(Const.CAPTCHA_KEY, key);}}上面代码中,因为验证码需要存储,所以添加了RedisUtil工具类,这个工具类代码上面已做完。
然后验证码出错的时候我们返回异常信息,这是一个认证异常,所以我们自定了一个CaptchaException
com.zql.common.exception.CaptchaException
package com.zql.common.exception;import org.springframework.security.core.AuthenticationException;/** * @Author:Daniel * @Version 1.0 */public class CaptchaException extends AuthenticationException { public CaptchaException(String msg) { super(msg); }}然后认证失败的话,之前提过,登录失败的时候交给AuthenticationFailureHandler,所以我自定义了LoginFailureHandler
com.zql.security.LoginFailureHandler
package com.zql.security;import cn.hutool.json.JSONUtil;import com.zql.common.lang.Result;import org.springframework.security.core.AuthenticationException;import org.springframework.security.web.authentication.AuthenticationFailureHandler;import org.springframework.stereotype.Component;import javax.servlet.ServletException;import javax.servlet.ServletOutputStream;import javax.servlet.http.HttpServletRequest;import javax.servlet.http.HttpServletResponse;import java.io.IOException;@Componentpublic class LoginFailureHandler implements AuthenticationFailureHandler {@Overridepublic void onAuthenticationFailure(HttpServletRequest request, HttpServletResponse response, AuthenticationException exception) throws IOException, ServletException {response.setContentType("application/json;charset=UTF-8");ServletOutputStream outputStream = response.getOutputStream();Result result = Result.fail("用户名或密码错误");outputStream.write(JSONUtil.toJsonStr(result).getBytes("UTF-8"));outputStream.flush();outputStream.close();}}其实主要就是获取异常的消息,然后封装到Result,最后转成json返回给前端而已哈。
然后我们配置了 SecurityConfig
com.zql.config.SecurityConfig
SecurityConfig.java
package com.zql.config;import com.zql.security.*;import org.springframework.beans.factory.annotation.Autowired;import org.springframework.context.annotation.Bean;import org.springframework.context.annotation.Configuration;import org.springframework.security.config.annotation.method.configuration.EnableGlobalMethodSecurity;import org.springframework.security.config.annotation.web.builders.HttpSecurity;import org.springframework.security.config.annotation.web.configuration.EnableWebSecurity;import org.springframework.security.config.annotation.web.configuration.WebSecurityConfigurerAdapter;import org.springframework.security.config.http.SessionCreationPolicy;import org.springframework.security.crypto.bcrypt.BCryptPasswordEncoder;import org.springframework.security.web.authentication.UsernamePasswordAuthenticationFilter;@Configuration@EnableWebSecurity@EnableGlobalMethodSecurity(prePostEnabled = true)public class SecurityConfig extends WebSecurityConfigurerAdapter {@AutowiredLoginFailureHandler loginFailureHandler;@AutowiredCaptchaFilter captchaFilter;@BeanBCryptPasswordEncoder bCryptPasswordEncoder() {return new BCryptPasswordEncoder();}private static final String[] URL_WHITELIST = {"/login","/logout","/captcha","/favicon.ico",};protected void configure(HttpSecurity http) throws Exception {http.cors().and().csrf().disable()// 登录配置.formLogin().failureHandler(loginFailureHandler).and().logout()// 禁用session.and().sessionManagement().sessionCreationPolicy(SessionCreationPolicy.STATELESS)// 配置拦截规则.and().authorizeRequests().antMatchers(URL_WHITELIST).permitAll().anyRequest().authenticated()// 异常处理器.and().exceptionHandling()// 配置自定义的过滤器.and().addFilterBefore(captchaFilter, UsernamePasswordAuthenticationFilter.class);}}首先formLogin我们定义了表单登录提交的方式以及定义了登录失败的处理器,后面我们还要定义登录成功的处理器的。然后authorizeRequests我们除了白名单的链接之外其他请求都会被拦截。再然后就是禁用session,最后是设定验证码过滤器在登录过滤器之前。
然后我们尝试登录,因为之前我们已经设置了用户名密码为user/111111,所以我们提交表单的时候再带上我们的token和验证码。
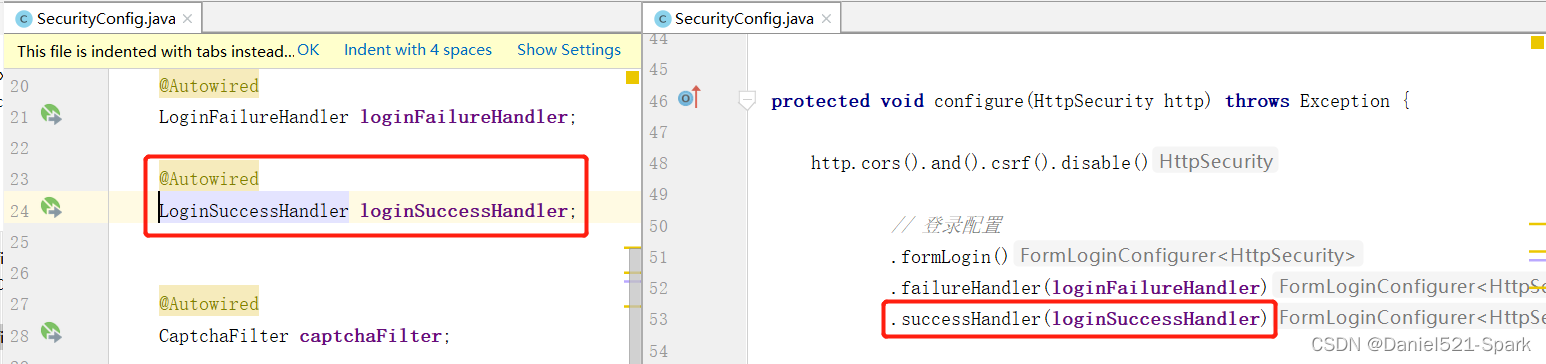
这时候我们就可以去提交表单了吗,其实还不可以,为啥?因为就算我们登录成功,security默认跳转到/链接,但是又会因为没有权限访问/,所有又会教你去登录,所以我们必须取消原先默认的登录成功之后的操作,根据我们之前分析的流程,登录成功之后会走AuthenticationSuccessHandler,因此在登录之前,我们先去自定义这个登录成功操作类:
com.zql.security.LoginSuccessHandler
LoginSuccessHandler.java
package com.zql.security;import cn.hutool.json.JSONUtil;import com.zql.common.lang.Result;import org.springframework.beans.factory.annotation.Autowired;import org.springframework.security.core.Authentication;import org.springframework.security.web.authentication.AuthenticationSuccessHandler;import org.springframework.stereotype.Component;import javax.servlet.ServletException;import javax.servlet.ServletOutputStream;import javax.servlet.http.HttpServletRequest;import javax.servlet.http.HttpServletResponse;import java.io.IOException;@Componentpublic class LoginSuccessHandler implements AuthenticationSuccessHandler {@Overridepublic void onAuthenticationSuccess(HttpServletRequest request, HttpServletResponse response, Authentication authentication) throws IOException, ServletException {response.setContentType("application/json;charset=UTF-8");ServletOutputStream outputStream = response.getOutputStream();// 生成jwt,并放置到请求头中Result result = Result.succ("?????");outputStream.write(JSONUtil.toJsonStr(result).getBytes("UTF-8"));outputStream.flush();outputStream.close();}}登录成功之后我们利用用户名生成jwt,jwtUtils这个工具类代码????,然后把jwt作为请求头返回回去,名称就叫Authorization哈。我们需要在配置文件中配置一些jwt的一些密钥信息:
com.zql.utils.jwtUtils
jwtUtils.java
package com.zql.utils;import io.jsonwebtoken.*;import lombok.Data;import org.springframework.boot.context.properties.ConfigurationProperties;import org.springframework.stereotype.Component;import java.util.Date;@Data@Component@ConfigurationProperties(prefix = "zql.jwt")public class JwtUtils {private long expire;private String secret;private String header;// 生成jwtpublic String generateToken(String username) {Date nowDate = new Date();Date expireDate = new Date(nowDate.getTime() + 1000 * expire);return Jwts.builder().setHeaderParam("typ", "JWT").setSubject(username).setIssuedAt(nowDate).setExpiration(expireDate)// 7天過期.signWith(SignatureAlgorithm.HS512, secret).compact();}// 解析jwtpublic Claims getClaimByToken(String jwt) {try {return Jwts.parser().setSigningKey(secret).parseClaimsJws(jwt).getBody();} catch (Exception e) {return null;}}// jwt是否过期public boolean isTokenExpired(Claims claims) {return claims.getExpiration().before(new Date());}}application.yml
zql: jwt: # 加密秘钥 secret: f4e2e52034348f86b67cde581c0f9eb5 # token有效时长,7天,单位秒 expire: 604800 header: Authorization然后我们再security配置中添加上登录成功之后的操作类:
com.zql.config.SecurityConfig
SecurityConfig.java
然后我们去postman的进行我们的登录测试:
后续会更新……