第一步:在pom.xml加入mybatis的jar包和数据库连接方面的jar包
<?xml version="1.0" encoding="UTF-8"?>
<project xmlns="http://maven.apache.org/POM/4.0.0" xmlns:xsi="http://www.w3.org/2001/XMLSchema-instance"
         xsi:schemaLocation="http://maven.apache.org/POM/4.0.0 https://maven.apache.org/xsd/maven-4.0.0.xsd">
    <modelVersion>4.0.0</modelVersion>
    <parent>
        <groupId>org.springframework.boot</groupId>
        <artifactId>spring-boot-starter-parent</artifactId>
        <version>2.5.5</version>
        <relativePath/> <!-- lookup parent from repository -->
    </parent>
    <groupId>com.pp</groupId>
    <artifactId>thyleaf</artifactId>
    <version>0.0.1-SNAPSHOT</version>
    <name>thyleaf</name>
    <description>Demo project for Spring Boot</description>
    <properties>
        <java.version>1.8</java.version>
    </properties>
    <dependencies>
        <dependency>
            <groupId>org.springframework.boot</groupId>
            <artifactId>spring-boot-starter-thymeleaf</artifactId>
        </dependency>
        <dependency>
            <groupId>org.springframework.boot</groupId>
            <artifactId>spring-boot-starter-web</artifactId>
        </dependency>

        <dependency>
            <groupId>org.springframework.boot</groupId>
            <artifactId>spring-boot-starter-test</artifactId>
            <scope>test</scope>
        </dependency>

        <!--mysql驱动包-->
        <dependency>
            <groupId>mysql</groupId>
            <artifactId>mysql-connector-java</artifactId>
        </dependency>
        <!--连接池的包-->
        <dependency>
            <groupId>com.alibaba</groupId>
            <artifactId>druid</artifactId>
            <version>1.1.9</version>
        </dependency>
        <!--mybatis需要的jar包-->
        <dependency>
            <groupId>org.mybatis.spring.boot</groupId>
            <artifactId>mybatis-spring-boot-starter</artifactId>
            <version>1.3.2</version>
        </dependency>
    </dependencies>

    <build>
        <plugins>
            <plugin>
                <groupId>org.springframework.boot</groupId>
                <artifactId>spring-boot-maven-plugin</artifactId>
            </plugin>
        </plugins>
    </build>

</project>
第二步:在application.properties配置数据库相关的内容和mybaties相关的内容
#配置端口号
server.port=8080

#配置thymeleaf
spring.thymeleaf.cache=false
spring.thymeleaf.suffix=.html
spring.thymeleaf.prefix=classpath:/templates/
spring.thymeleaf.encoding=UTF-8
spring.thymeleaf.mode=HTML

#配置数据库
spring.datasource.name=springboottest
spring.datesource.type=com.alibaba.druid.pool.DruidDataSource
spring.datasource.driver-class-name=com.mysql.jdbc.Driver
spring.datasource.url=jdbc:mysql://localhost:3306/springboottest?serverTimezone=UTC
spring.datasource.username=root
spring.datasource.password=admin
#配置mybatis相关的东西
mybatis.mapper-locations=classpath:mapper/*.xml
mybatis.type-aliases-package=com.pp.thyleaf.bean
- mybatis配置中需要mybatis.mapper-locations指向XXX.xml文件指向,mybatis.type-aliases-package指向我们的实体类。
- 数据库的配置,spring.datasource.name为数据库的名字,spring.datesource.type连接类型这里连接druid连接池。后面几个参数就是我们在前面操作数据库的驱动,连接,用户民,密码的配置。
第三步:在resource下创建mapper文件夹
第四步:在com.pp.thleaf下创建bean包,然后创建Student类
package com.pp.thyleaf.bean;

import java.util.Date;

public class Student {
    private String name;
    private Integer age;
    private Date birthday;

    @Override
    public String toString() {
        return "Student{" +
                "name='" + name + '\'' +
                ", age=" + age +
                ", birthday=" + birthday +
                '}';
    }

    public String getName() {
        return name;
    }

    public void setName(String name) {
        this.name = name;
    }

    public Integer getAge() {
        return age;
    }

    public void setAge(Integer age) {
        this.age = age;
    }

    public Date getBirthday() {
        return birthday;
    }

    public void setBirthday(Date birthday) {
        this.birthday = birthday;
    }
}
- 实体类中创建了student的 姓名性别和生日。
第五步:在com.pp.thleaf下创建dao层,然后创建StudentDao类
package com.pp.thyleaf.dao;

import com.pp.thyleaf.bean.Student;

import java.util.List;

public interface StudentDao {
    List<Student> getlist();
}
我们在dao层的StudentDao接口类定义了,一个 获取所有用户的方法getlist()。
第六步:再resource/mapper下,创建StudentMapper.xml文件
<?xml version="1.0" encoding="UTF-8" ?>
<!DOCTYPE mapper PUBLIC "-//mybatis.org//DTD Mapper 3.0//EN" "http://mybatis.org/dtd/mybatis-3-mapper.dtd" >
<mapper namespace="com.pp.thyleaf.dao.StudentDao" >
    <select id="getlist" resultType="com.pp.thyleaf.bean.Student">
        select * from student
    </select>
</mapper>
- mapper标签的namespace填写com.pp.thyleaf.dao.StudentDao,这里将持久层的方法,映射到mapper中,
<select>中的id填写Student的 方法名getlist;- resultType填写,Student的返回参数
- 里面的内容是select * from student即从数据库中查询student表所有信息。
第七步:在主控制文件ThyleafApplication类中,使用注解@MapperScan(“com.pp.thyleaf.dao”)
package com.pp.thyleaf;

import org.mybatis.spring.annotation.MapperScan;
import org.springframework.boot.SpringApplication;
import org.springframework.boot.autoconfigure.SpringBootApplication;

@SpringBootApplication
@MapperScan("com.pp.thyleaf.dao")
public class ThyleafApplication {

    public static void main(String[] args) {
        SpringApplication.run(ThyleafApplication.class, args);
    }

}
使用@MapperScan(“com.pp.thyleaf.dao”)扫描我们的dao层,是能够管理到该层下的类和方法。
第八步:在com.pp.thyleaf包下的ThController中写入以下代码
package com.pp.thyleaf.controller;

import com.pp.thyleaf.bean.Student;
import com.pp.thyleaf.dao.StudentDao;
import org.springframework.beans.factory.annotation.Autowired;
import org.springframework.stereotype.Controller;
import org.springframework.ui.ModelMap;
import org.springframework.web.bind.annotation.RequestMapping;

import java.util.Date;
import java.util.List;

@Controller
public class ThController {
    @Autowired
    private StudentDao dao;

    @RequestMapping("/th")
    public String test(ModelMap map){
        Student student = new Student();
        student.setAge(11);
        student.setName("zhangsan");
        student.setBirthday(new Date());
        map.addAttribute("student",student);

        List<Student> getlist = dao.getlist();
        map.addAttribute("studentlist",getlist);
        return "test";
    }

    /**
     *
     * @param student
     * 后端提交过来的数据就是student,所以参数就定义为Student
     * @return
     */
    @RequestMapping("/postform")
    public String postform(Student student){
        System.out.println(student.toString());
        return "redirect:/th";
    }
}
- 这里重点关注注解@RequestMapping("/th")的方法。
- 使用注解@Autowired对全部变量private StudentDao dao注解,这样调用的时候就不需要new。
- 在方法里面我们新建了一个Student对象,然后给该对象赋值,最后利用map.addAttribute(“student”,student)将该对象保存起来。
- 后面使用前面定义的全局变量dao,调用dao.getlist()查询student所有的数据,返回了一个数组对象getlist,在使用map.addAttribute(“studentlist”,getlist)然后将getlist添加起来。studenglist算是它的别名。
- 使用return "test"将页面返回到test.html
第九步:在resource/templates下写test.html
<!DOCTYPE html>
<html lang="en" xmlns:th="http://www.w3.org/1999/xhtml">
<head>
    <meta charset="UTF-8">
    <title>Title</title>
</head>
<body>

<h1>讲解一:thymeleaf</h1><br>
<table>
    <tr>
        <td>姓名</td>
        <td>年龄</td>
        <td>生日</td>
    </tr>
    <tr>
        <td th:text="${student.name}"></td>
        <td th:text="${student.age}"></td>
        <!--这里是一个日期,需要对它进行处理。-->
        <!--th:text="${#dates.format(user.date, 'yyyy-MM-dd')}"-->
        <td th:text="${#dates.format(student.birthday,'yyyy-MM-dd')}"></td>
    </tr>
</table>

<!--
请求规定路径的写法:th:action="@{/postform}" 即定义后台控制器路径,类似<form>标签的action属性。
请求的实体类:th:object="${student}",student就是前台获取的student然后传送到这个页面,即用于表单数据对象绑定,将表单绑定到后台controller的一个JavaBean参数。常与th:field一起使用进行表单数据绑定。
提交方法:method="post"
转换后的方法:th:method="post"(意思的表单提交的方法method="post"转换成这里的方法)
-->
<h1>讲解二:thymeleaf</h1><br>
<form th:action="@{/postform}" th:object="${student}" method="post" th:method="post">
    <!--
    th:field:常用于表单字段绑定。通常与th:object一起使用。 属性绑定、集合绑定。
    th:field="*{name}"将后端发送过来的student对象的name作为值输出到输入框
    th:field="*{age}":同上
    -->
    <input type="text" th:field="*{name}">
    <input typr="text" th:field="*{age}">
    <input type="submit" value="提交">
</form>

<h1>讲解三:springboot-mybatis整合</h1><br>
<table>
    <tr>
        <td>姓名</td>
        <td>年龄</td>
        <td>生日</td>
    </tr>
    <tr th:each="stu : ${studentlist}">
        <td th:text="${stu.name}"></td>
        <td th:text="${stu.age}"></td>
        <!--<td th:text="${stu.birthday}"></td>-->
        <td th:text="${#dates.format(stu.birthday,'yyyy-MM-dd')}"></td>
    </tr>
</table>
</body>
</html>
- 上面已经用一级标题对它进行了划分
- 讲解一:thymeleaf在SpringBoot学习11之thymeleaf有详细讲解
- 讲解二:thymeleaf在SpringBoot学习12之thymeleaf2有详细讲解
- 讲解三:springboot-mybatis整合在这里进行分析
1.<tr th:each="stu : ${studentlist}">定义stu遍历循环studentlist,然后在后面依次输出,这里的studentlist就是后台map.addAttribute(“studentlist”,getlist)将getlist的变量传送到studentlist。
2.<td th:text="${stu.name}"></td>的使用就是遍历stu的name。
3.<td th:text="${stu.age}"></td>的使用就是遍历stu的age。
4.<td th:text="${#dates.format(stu.birthday,'yyyy-MM-dd')}">对返回的stu.birthday进行格式化输出。
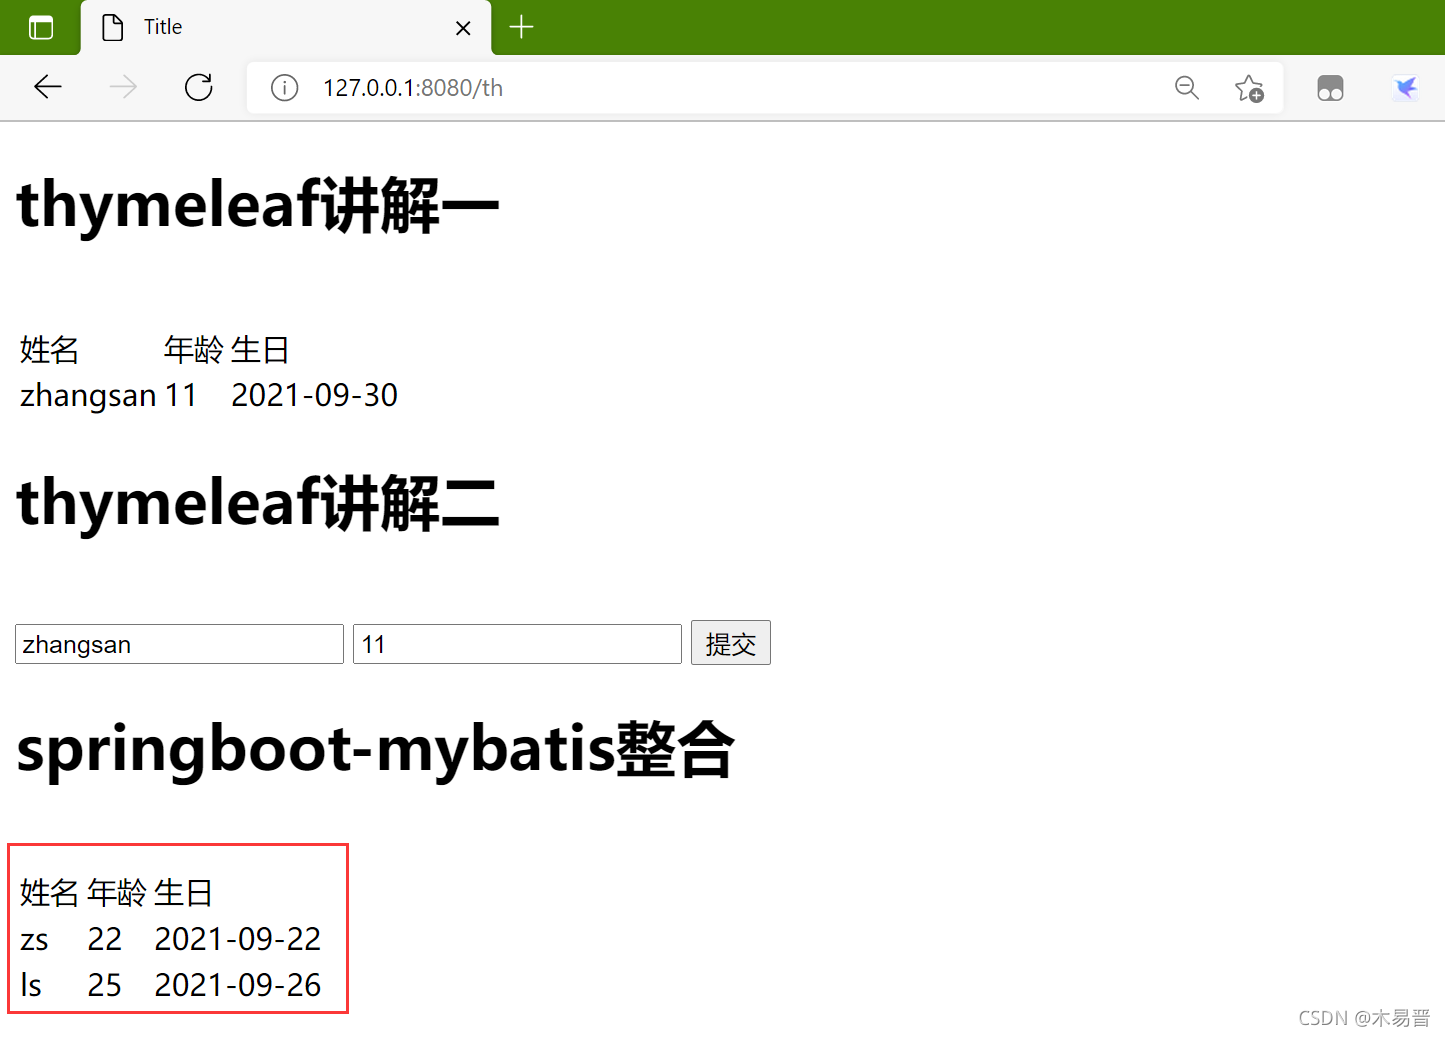
第十步:点击运行按钮,然后在浏览器中输入127.0.0.1:8080/th查看结果

第十步:在数据库中查看数据

项目结构图如下

源码地址:https://gitee.com/yangforever/project-learning/tree/master/demo/SpringBoot/thyleaf