目录
前言
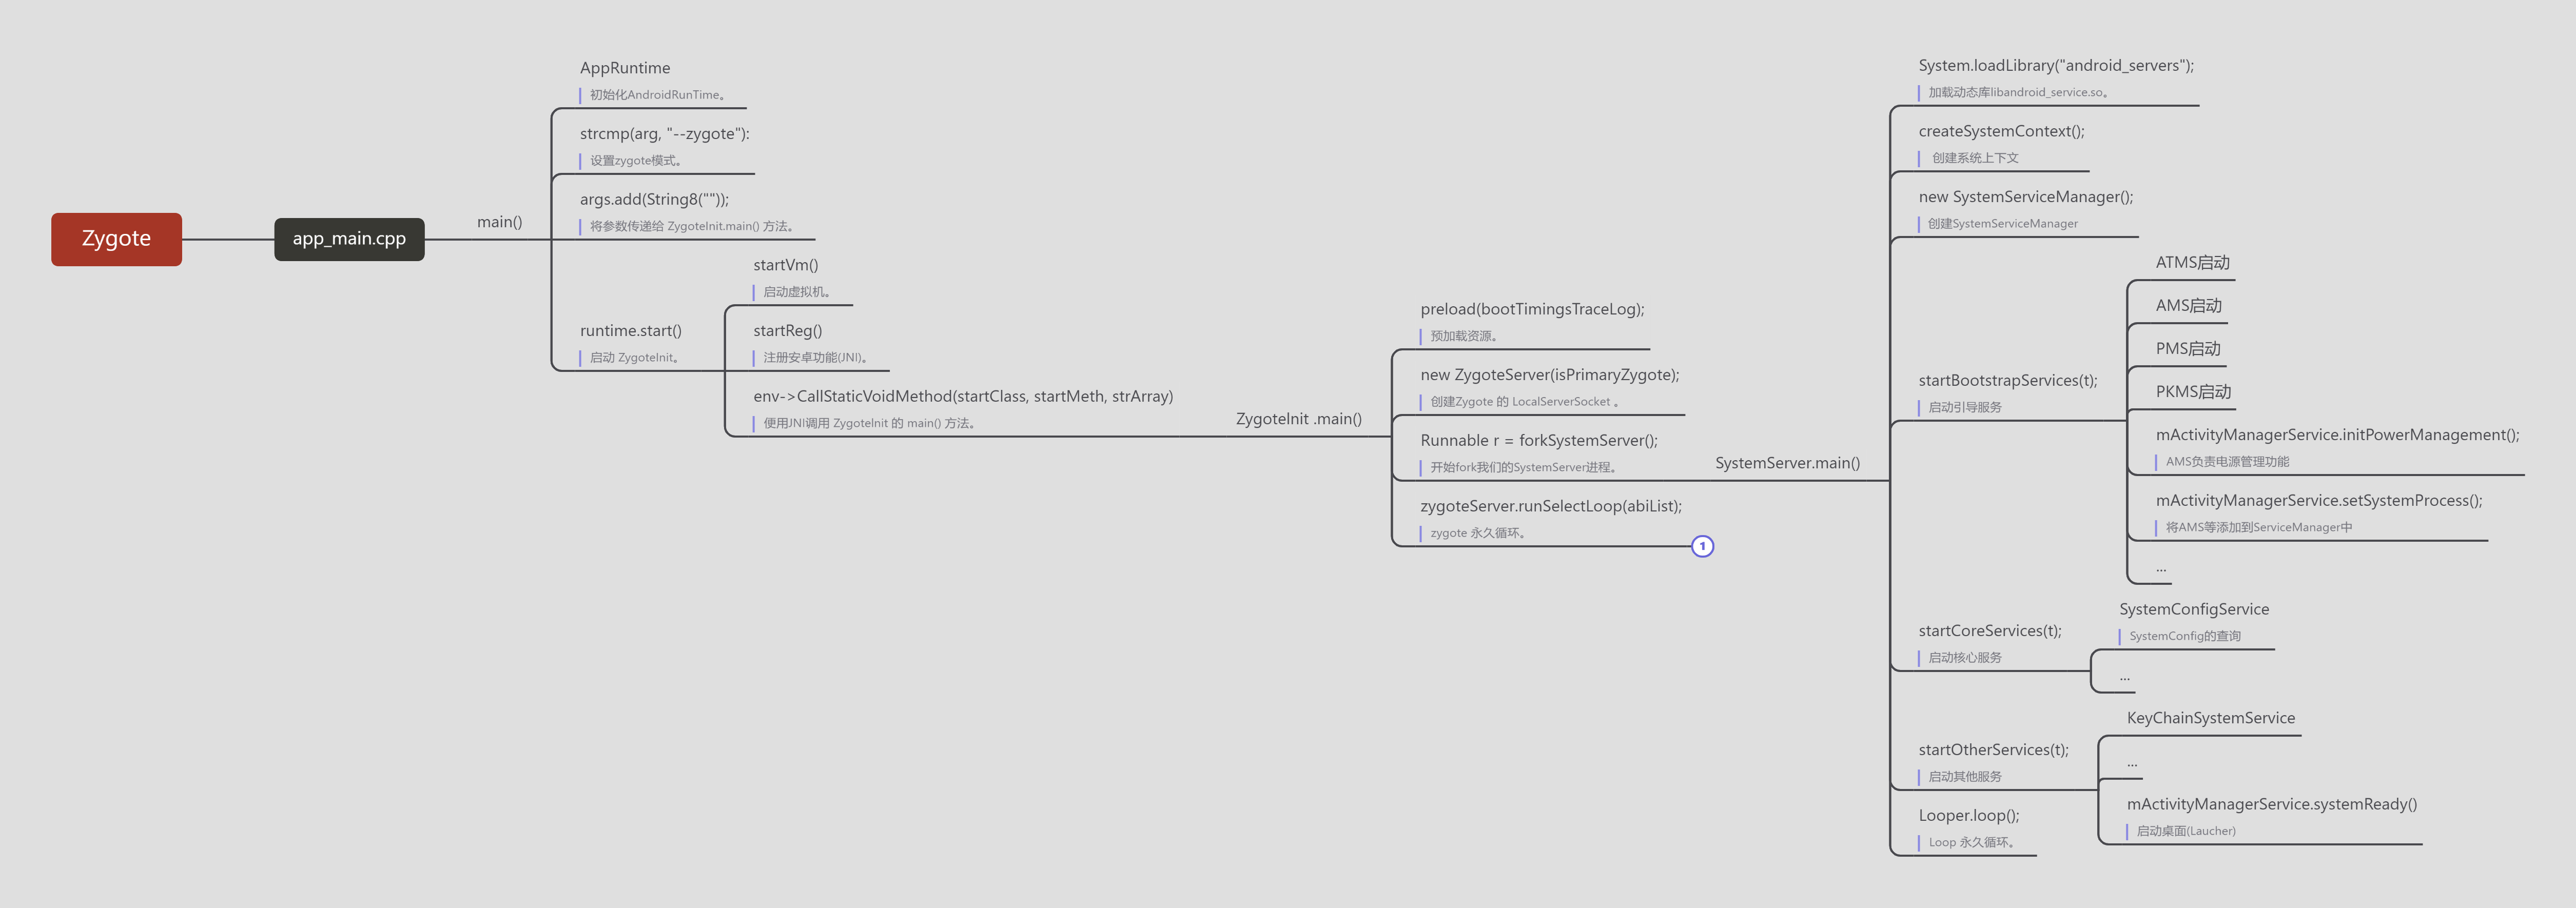
Android 启动过程
1、Zygote是什么
1.1 app_main.cpp
1.1.1 main()
1.2 AndroidRuntime.cpp
1.2.1 start()
1.3 ZygoteInit.java
1.3.1 main()
1.3.2 forkSystemServer()
2、SystemServer
2.1 SystemServer.java
2.1.1 main()
2.1.2 run()
2.1.3 createSystemContext()
2.1.4 startBootstrapServices()
2.1.5 startCoreServices()
2.1.6 startOtherServices()
3、Launcher是什么
3.1 LauncherActivity.java
小结
相关推荐
❤️Android Runtime (ART) 和 Dalvik❤️
❤️Android 从源码解读 Apk 的安装过程 ❤️
❤️Android Apk 的打包过程 ❤️ 只需两幅图
前言
作为多年的 Android 开发,写了不少应用,但是一个App到底是怎么启动起来的?你要说桌面点一下就启动了,那也对。但是它的启动过程呢?带着这样的疑问,咱们来一步步学习。
Android 启动过程
一般在任何平台上,都会逐步加载和执行以下组件:
-
Boot loader
-
U-boot (optional)
-
Kernel
-
Android
Android进程有以下顺序:
-
Init
-
Zygote
-
System Server
-
Service Manager
-
Other Daemons and processes
-
Applications
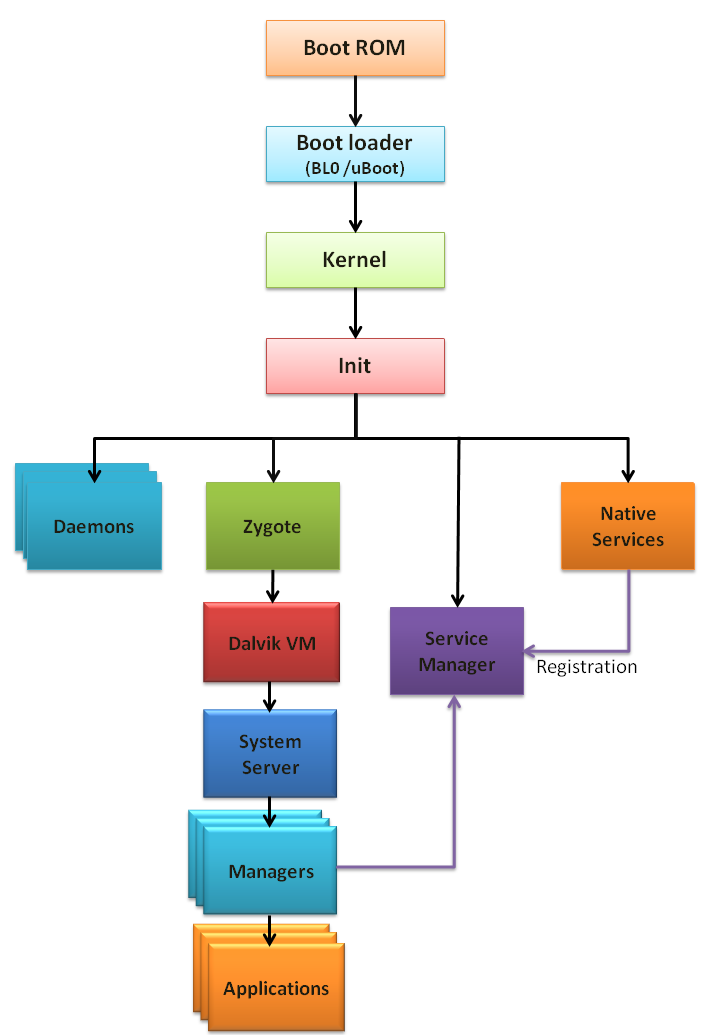
具体情况如下图,这两幅图结合起来比较有意思:
-
Boot ROM:当电源按下时,引导芯片代码会从预定义的地方(固化在ROM)开始执行,加载引导程序BootLoader到RAM,然后执行。(这一步由"芯片厂商"负责设计和实现)
-
Boot loader:Bootloader开始执行,首先负责完成硬件的初始化,引导操作系统启动。(这一步由"设备厂商"负责设计和实现)
-
Kernel:Linux 内核是 Android 的核心,负责进程创建、进程间通信、设备驱动程序、文件系统管理等。 Android 在主流内核上应用自定义补丁来支持 Android 运行所需的某些功能,如唤醒锁等。内核可以作为未压缩图像或压缩图像加载。在加载时,它挂载根文件系统(通常作为内核命令行参数传递)并启动用户空间中的第一个应用程序。(这一步则是Android内核开发过程中需要涉及的地方)
-
Android:Android系统以及各大Linux的发行版,他们的Linux内核部分启动过程都是差不多的,他们之间最大的区别就在于init程序的不同,因为init程序决定了系统在启动过程中,究竟会启动哪些守护进程和服务,以及呈现出怎样的一个用户UI界面。
因此,init程序是分析Android启动过程中最核心的程序。
-
init 和 init.rc:启动内核时执行的第一个用户空间应用程序是位于根文件夹中的 init 可执行文件。该进程解析称为"init.rc"脚本的启动脚本。这是用一种专为 android 设计的语言编写的,用于启动所有必要的进程、守护程序和服务,以便 android 正常运行。它提供了各种类型的执行时间,例如 early-init、on-boot、on-post-fs 等。(用户空间的鼻祖)
-
Demons and Services:init 进程创建了各种守护进程和进程,如 rild、vold、mediaserver、adb 等,每个进程负责自己的功能。这些进程的描述不在本文的范围内。相反,我们将更多地讨论"Zygote"进程。
-
Service Manager:Service Manager进程 管理系统中运行的所有Service。创建的每个服务都会在此进程中注册自己,并且此信息供其他进程/应用程序将来参考。
-
Zygote:Zygote 是启动时创建的第一个 init 进程之一。术语"合子"是基于生物学"形成的初始细胞分裂产生后代"。类似地,"zygote in android"初始化 Dalivik VM(ART) 和 fork 以创建多个实例来支持每个 android 进程。它有助于在 VM 实例之间使用共享代码,从而减少内存占用和加载时间,非常适合嵌入式系统。Zygote 除了在服务器套接字上安装侦听器外,还预加载了稍后在 Android 应用程序中使用的类和资源。完成后,系统服务器启动。
-
System Server:SystemServer 进程启动 Android 中可用的所有服务。
本文咱们重点从 init 开始到应用启动。
1、Zygote是什么
在Android系统里面,zygote是一个进程的名字。Android是基于Linux System的,当你的手机开机的时候,Linux的内核加载完成之后就会启动一个叫"init"的进程。在Linux System里面,所有的进程都是由init进程fork出来的,我们的zygote进程也不例外。
Zygote是一个虚拟机进程,同时也是一个虚拟机实例的孵化器,每当系统要求执行一个Android应用程序,Zygote就会fork(分裂)出一个子进程来执行该应用程序。
1.1 app_main.cpp
frameworks/base/cmds/app_process/app_main.cpp
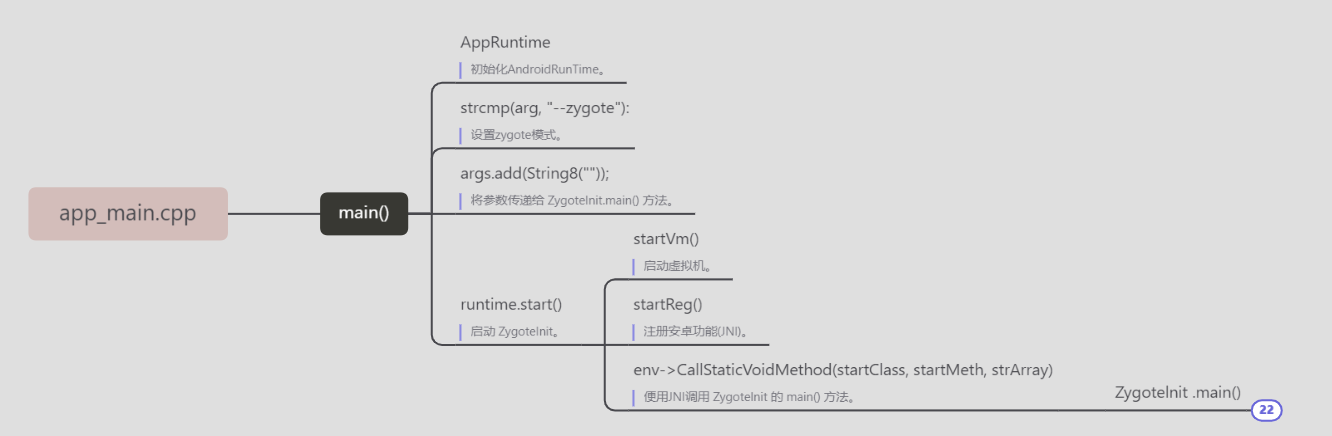
在Zygote启动后就会执行 app_main.cpp。不管是C/c++/java,他们的入口就是 main(),就跟看到 Activity 咱们直接找 onCreate() 方法一样。
1.1.1 main()
int main(int argc, char* const argv[])
{
    ...
    //注释1:初始化AppRuntime(AndroidRunTime)
    AppRuntime runtime(argv[0], computeArgBlockSize(argc, argv));
    ...
    // Parse runtime arguments.  Stop at first unrecognized option.
    bool zygote = false;
    bool startSystemServer = false;
    bool application = false;
    String8 niceName;
    String8 className;

    ++i;  // Skip unused "parent dir" argument.
    while (i < argc) {
        const char* arg = argv[i++];
        //注释2:设置zygote模式
        if (strcmp(arg, "--zygote") == 0) {
            zygote = true;
            niceName = ZYGOTE_NICE_NAME;
        }
        ...
    }
    Vector<String8> args;
    if (!className.isEmpty()) {
        ...
    } else {
        // 我们处于 zygote 模式。
        maybeCreateDalvikCache();

        // 注释3:在 zygote 模式下,将参数传递给 ZygoteInit.main() 方法。
        if (startSystemServer) {
            args.add(String8("start-system-server"));
        }

        //PROP_VALUE_MAX = 92;
        char prop[PROP_VALUE_MAX];
        ...
        String8 abiFlag("--abi-list=");
        abiFlag.append(prop);
        args.add(abiFlag);

        for (; i < argc; ++i) {
            args.add(String8(argv[i]));
        }
    }
    if (zygote) {
        //注释4:调用 AndroidRuntime.start() 方法
        runtime.start("com.android.internal.os.ZygoteInit", args, zygote);
    } else if (className) {
        ...
    } else {
        ...
    }
}
注释1:初始化 AppRuntime ,其实就是 AndroidRuntime(ART)。
注释2:设置zygote模式
注释3:将参数传递给 ZygoteInit.main() 方法。
注释4:启动 ZygoteInit 。这里的 ZygoteInit 就是 zygote 进程的启动类。这个下面讲到。咱们先看看AndroidRuntime 的 start() 方法。
1.2 AndroidRuntime.cpp
frameworks/base/core/jni/AndroidRuntime.cpp
Android 虚拟机
1.2.1 start()
/*
 * Start the Android runtime.  This involves starting the virtual machine and calling the "static void main(String[] args)" method in the class named by "className".
 *
 * Passes the main function two arguments, the class name and the specified
 * options string.
 */
void AndroidRuntime::start(const char* className, const Vector<String8>& options, bool zygote)
{
    ...
    JniInvocation jni_invocation;
    jni_invocation.Init(NULL);
    JNIEnv* env;
    //注释1:启动虚拟机
    if (startVm(&mJavaVM, &env, zygote, primary_zygote) != 0) {
        return;
    }
    onVmCreated(env);

    //注释2:注册安卓功能(JNI)
    if (startReg(env) < 0) {
        ALOGE("Unable to register all android natives\n");
        return;
    }
    ...
    strArray = env->NewObjectArray(options.size() + 1, stringClass, NULL);
    ...
    /*
     * 启动虚拟机。 该线程成为VM的主线程,直到VM退出才会返回。
     */
    char* slashClassName = toSlashClassName(className != NULL ? className : "");
    jclass startClass = env->FindClass(slashClassName);
    if (startClass == NULL) {
        ...
    } else {
        ...
        jmethodID startMeth = env->GetStaticMethodID(startClass, "main",
            "([Ljava/lang/String;)V");
        if (startMeth == NULL) {
            ...
        } else {
            //注释3
            env->CallStaticVoidMethod(startClass, startMeth, strArray);

#if 0
            if (env->ExceptionCheck())
                threadExitUncaughtException(env);
#endif
        }
    }
    ...
}
注释1:启动VM(虚拟机)
注释2:注册安卓功能(JNI)
注释3:便用JNI调用 Zygotelnit 的 main() 方法。这里的 Zygotelnit 是class文件,也就是说从这里开始就进入java领域喽。
JNI:连接 native(C/C++) 层 和 java 层的桥梁。
1.3 ZygoteInit.java
frameworks/base/core/java/com/android/internal/os/ZygoteInit.java
/**
 * zygote 进程的启动类。
 */
public class ZygoteInit {
    ...
}
这是 Zygote 进程的入口点。 它创建 Zygote 服务,加载资源,并处理与准备分叉到应用程序的过程相关的其他任务。
1.3.1 main()
@UnsupportedAppUsage
public static void main(String[] argv) {
ZygoteServer zygoteServer = null;
try {
...
boolean startSystemServer = false;
//argv:用于指定 Zygote 配置的命令行参数。
...
if (!enableLazyPreload) {
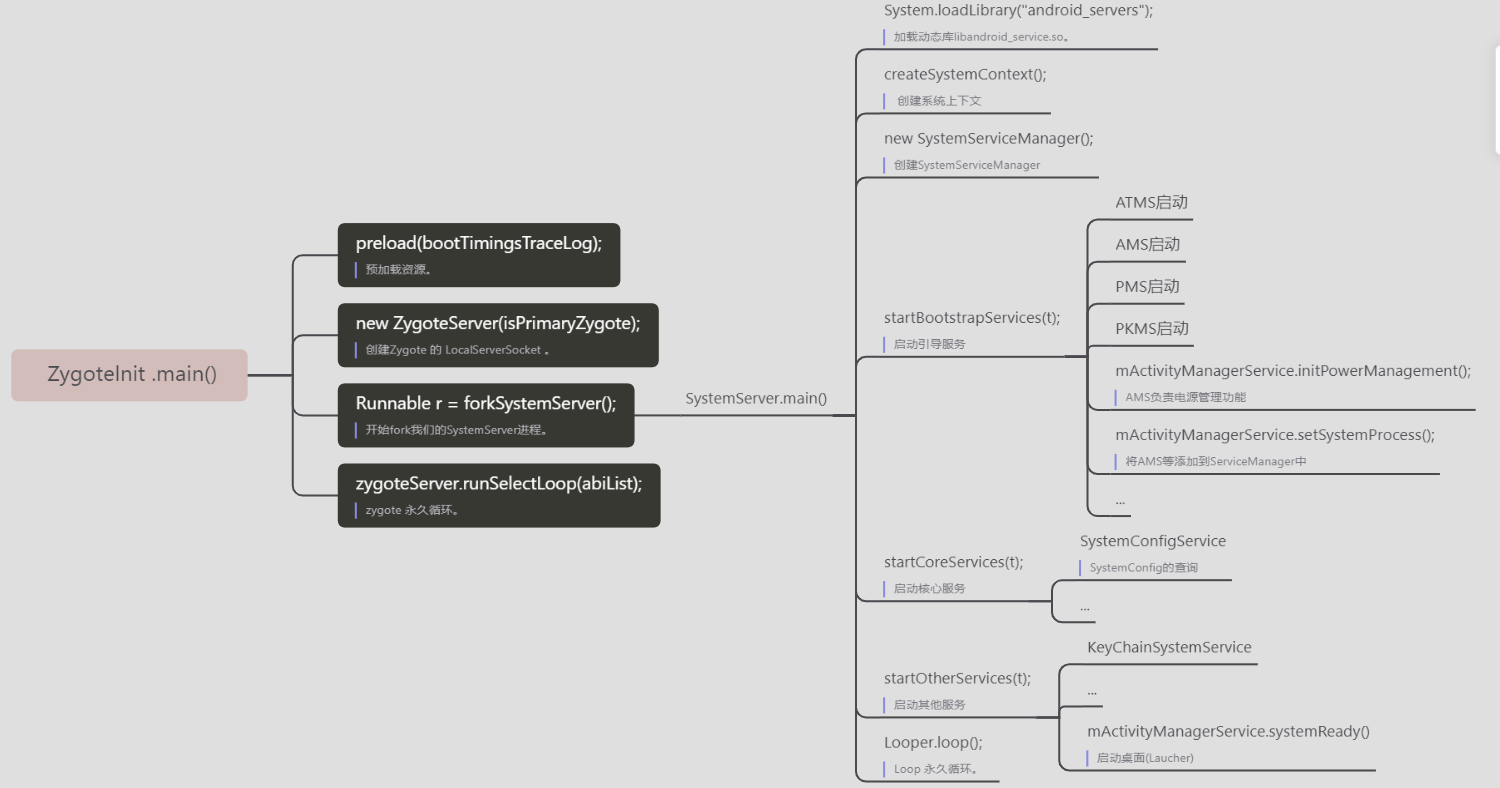
//注释1:预加载资源。
preload(bootTimingsTraceLog);
EventLog.writeEvent(LOG_BOOT_PROGRESS_PRELOAD_END,
SystemClock.uptimeMillis());
bootTimingsTraceLog.traceEnd(); // ZygotePreload
}
...
//注释2:创建Zygote 的 LocalServerSocket 。
zygoteServer = new ZygoteServer(isPrimaryZygote);
if (startSystemServer) {
//注释3:开始fork我们的SystemServer进程。
Runnable r = forkSystemServer(abiList, zygoteSocketName, zygoteServer);
...
}
...
// 注释4:zygote 永久循环。
caller = zygoteServer.runSelectLoop(abiList);
} catch (Throwable ex) {
...
} finally {
if (zygoteServer != null) {
zygoteServer.closeServerSocket();
}
}
...
}
注释1:预加载资源。
注释2:创建Zygote 的 LocalServerSocket 。
注释3:开始fork我们的SystemServer进程。
注释4:zygote 永久循环。
这里咱们看看 forkSystemServer() ;
1.3.2 forkSystemServer()
    /**
     * Prepare the arguments and forks for the system server process.
     *
     * @return A {@code Runnable} that provides an entrypoint into system_server code in the child
     * process; {@code null} in the parent.
     */
    private static Runnable forkSystemServer(String abiList, String socketName,
            ZygoteServer zygoteServer) {
        ...
        //命令行来启动SystemServer
        //ZygoteInit.main(String argv[])里面的argv 跟这个类似
        String[] args = {
                "--setuid=1000",
                "--setgid=1000",
                "--setgroups=1001,1002,1003,1004,1005,1006,1007,1008,1009,1010,1018,1021,1023,"
                        + "1024,1032,1065,3001,3002,3003,3006,3007,3009,3010,3011",
                "--capabilities=" + capabilities + "," + capabilities,
                "--nice-name=system_server",
                "--runtime-args",
                "--target-sdk-version=" + VMRuntime.SDK_VERSION_CUR_DEVELOPMENT,
                "com.android.server.SystemServer",
        };
        //处理与 zygote spawner 相关的 args 的参数解析。
        ZygoteArguments parsedArgs;
        int pid;
        try {
            ZygoteCommandBuffer commandBuffer = new ZygoteCommandBuffer(args);
            try {
                parsedArgs = ZygoteArguments.getInstance(commandBuffer);
            } catch (EOFException e) {
                throw new AssertionError("Unexpected argument error for forking system server", e);
            }
            commandBuffer.close();
            ...

            //请求 fork 系统服务器进程
            /* Request to fork the system server process */
            pid = Zygote.forkSystemServer(
                    parsedArgs.mUid, parsedArgs.mGid,
                    parsedArgs.mGids,
                    parsedArgs.mRuntimeFlags,
                    null,
                    parsedArgs.mPermittedCapabilities,
                    parsedArgs.mEffectiveCapabilities);
        } catch (IllegalArgumentException ex) {
            throw new RuntimeException(ex);
        }

        /* For child process */
        if (pid == 0) {
            if (hasSecondZygote(abiList)) {
                waitForSecondaryZygote(socketName);
            }

            zygoteServer.closeServerSocket();
            return handleSystemServerProcess(parsedArgs);
        }

        return null;
    }
这里启动了一个 system server 。下面咱们就看看他。
2、SystemServer
system server 也就是 SystemServer。SystemServer也是一个进程,包括ActivityTaskManagerService、ActivityManagerService、PackageManagerService、WindowManagerService等92种服务。
Android Framework里面两大非常重要的进程:
-
SystemServer进程。
-
Zygote进程。
2.1 SystemServer.java
frameworks/base/services/java/com/android/server/SystemServer.java
public final class SystemServer {
    ...
}
2.1.1 main()
    /**
     * The main entry point from zygote.
     */
    public static void main(String[] args) {
        new SystemServer().run();
    }
    public SystemServer() {
        // Check for factory test mode.
        mFactoryTestMode = FactoryTest.getMode();
        ...
    }
下面 咱们看看 run () 里面都用什么?
2.1.2 run()
    private void run() {
        try {
            ...
            // 注释1:加载动态库libandroid_service.so。
            System.loadLibrary("android_servers");

            // 注释2:创建系统上下文。
            createSystemContext();

            // 调用每个进程的主线模块初始化。
            ActivityThread.initializeMainlineModules();

            // 注释3:创建 SystemServiceManager。
            mSystemServiceManager = new SystemServiceManager(mSystemContext);
            mSystemServiceManager.setStartInfo(mRuntimeRestart,
                    mRuntimeStartElapsedTime, mRuntimeStartUptime);
            LocalServices.addService(SystemServiceManager.class, mSystemServiceManager);
            // 为可并行化的 init 任务准备线程池
            SystemServerInitThreadPool.start();
            ...
        } finally {

        }
        // 注释4:Start services。
        try {
            //下面咱们看看这个三个方法启动什么服务
            startBootstrapServices(t);
            startCoreServices(t);
            startOtherServices(t);
        } catch (Throwable ex) {
            ...
        } finally {
            t.traceEnd(); // StartServices
        }

        ...
        // 注释5:Loop 永久循环。
        Looper.loop();
        throw new RuntimeException("Main thread loop unexpectedly exited");
    }
注释1:加载动态库libandroid_service.so。
注释2:创建系统上下文。
注释3:创建 SystemServiceManager。
注释4:启动服务(startBootstrapServices、startCoreServices、startOtherServices)
注释5:Loop 永久循环。
2.1.3 createSystemContext()
    private void createSystemContext() {
        ActivityThread activityThread = ActivityThread.systemMain();
        mSystemContext = activityThread.getSystemContext();
        mSystemContext.setTheme(DEFAULT_SYSTEM_THEME);

        final Context systemUiContext = activityThread.getSystemUiContext();
        systemUiContext.setTheme(DEFAULT_SYSTEM_THEME);
    }
初始化系统上下文对象mSystemContext,并设置默认的主题,mSystemContext实际上是一个Context(ContextImpl)对象。
调用ActivityThread.systemMain()的时候,会调用ActivityThread.attach(true),而在attach()里面,则创建了Application对象,并调用了Application.onCreate()。
2.1.4 startBootstrapServices()
    /**
     * 启动系统引导服务,因为这些服务之间有复杂的相互依赖关系,所以都放在了这个方法里面。
     */
    private void startBootstrapServices(@NonNull TimingsTraceAndSlog t) {
        ...
        final String TAG_SYSTEM_CONFIG = "ReadingSystemConfig";
        SystemServerInitThreadPool.submit(SystemConfig::getInstance, TAG_SYSTEM_CONFIG);

        // PlatformCompat Service 由 ActivityManagerService, PackageManagerService 和 其他服务做使用
        PlatformCompat platformCompat = new PlatformCompat(mSystemContext);
        ServiceManager.addService(Context.PLATFORM_COMPAT_SERVICE, platformCompat);
        ServiceManager.addService(Context.PLATFORM_COMPAT_NATIVE_SERVICE,
                new PlatformCompatNative(platformCompat));
        AppCompatCallbacks.install(new long[0]);

        mSystemServiceManager.startService(FileIntegrityService.class);
        Installer installer = mSystemServiceManager.startService(Installer.class);
        mSystemServiceManager.startService(DeviceIdentifiersPolicyService.class);
        mSystemServiceManager.startService(UriGrantsManagerService.Lifecycle.class);
        startMemtrackProxyService();

        // StartActivityManager
        ActivityTaskManagerService atm = mSystemServiceManager.startService(
                ActivityTaskManagerService.Lifecycle.class).getService();
        //初始化 ActivityManagerService
        mActivityManagerService = ActivityManagerService.Lifecycle.startService(
                mSystemServiceManager, atm);
        mActivityManagerService.setSystemServiceManager(mSystemServiceManager);
        mActivityManagerService.setInstaller(installer);
        mWindowManagerGlobalLock = atm.getGlobalLock();

        mDataLoaderManagerService = mSystemServiceManager.startService(
                DataLoaderManagerService.class);

        mIncrementalServiceHandle = startIncrementalService();
        t.traceEnd();

        //初始化PowerManagerService(电源服务),需要提前启动,因为其他服务需要它。
        mPowerManagerService = mSystemServiceManager.startService(PowerManagerService.class);
        mSystemServiceManager.startService(ThermalManagerService.class);

        // 电源管理已经开启,ActivityManagerService负责电源管理功能
        mActivityManagerService.initPowerManagement();

        mSystemServiceManager.startService(RecoverySystemService.Lifecycle.class);
        ...

        mSystemServiceManager.startService(LightsService.class);

        // Package manager isn't started yet; need to use SysProp not hardware feature
        if (SystemProperties.getBoolean("config.enable_sidekick_graphics", false)) {
            mSystemServiceManager.startService(WEAR_SIDEKICK_SERVICE_CLASS);
        }

        // 初始化DisplayManagerService(显示管理器)
        mDisplayManagerService = mSystemServiceManager.startService(DisplayManagerService.class);

        mSystemServiceManager.startBootPhase(t, SystemService.PHASE_WAIT_FOR_DEFAULT_DISPLAY);

        // Start the package manager.
        try {
            mPackageManagerService = PackageManagerService.main(mSystemContext, installer,
                    mFactoryTestMode != FactoryTest.FACTORY_TEST_OFF, mOnlyCore);
        } finally {

        }

        // 现在PackageManagerService已经启动,注册 dex 加载报告器来捕获系统服务加载的任何 dex 文件。
        // 这些 dex 文件将由 BackgroundDexOptService 优化。
        SystemServerDexLoadReporter.configureSystemServerDexReporter(mPackageManagerService);

        mFirstBoot = mPackageManagerService.isFirstBoot();
        mPackageManager = mSystemContext.getPackageManager();
        ...
        //将AMS等添加到ServiceManager中
        mActivityManagerService.setSystemProcess();
        if (!mOnlyCore) {
            boolean disableOtaDexopt = SystemProperties.getBoolean("config.disable_otadexopt",
                    false);
            if (!disableOtaDexopt) {
                try {
                    OtaDexoptService.main(mSystemContext, mPackageManagerService);
                } catch (Throwable e) {

                } finally {
                }
            }
        }

        ...
        mSensorServiceStart = SystemServerInitThreadPool.submit(() -> {
            TimingsTraceAndSlog traceLog = TimingsTraceAndSlog.newAsyncLog();
            startSensorService();
        }, START_SENSOR_SERVICE);

        // startBootstrapServices
    }
改动比较大的地方:
-
ActivityTaskManagerService(ATMS):负责管理除Activity和进程,包括生命周期和状态切换。
-
ActivityManagerService(AMS):AMN的子类,负责管理三大组件(除Activity)和进程,包括生命周期和状态切换。AMS因为要和ui交互,所以极其复杂,涉及window。
ActivityTaskManagerService:把 Activity 相关的内容从 ActivityManagerService 剥离出来而产生的。
PowerManagerService(PMS):电源管理服务。
PackageManagerService(PKMS):包管理服务,不叫PMS是为了和电源管理服务区分开。
2.1.5 startCoreServices()
    /**
     * 启动核心服务。
     */
    private void startCoreServices(@NonNull TimingsTraceAndSlog t) {
        // Service for system config
        mSystemServiceManager.startService(SystemConfigService.class);
        // Tracks the battery level.  Requires LightService.
        mSystemServiceManager.startService(BatteryService.class);
        ...
        mSystemServiceManager.startService(LooperStatsService.Lifecycle.class);

        mSystemServiceManager.startService(ROLLBACK_MANAGER_SERVICE_CLASS);

        mSystemServiceManager.startService(NativeTombstoneManagerService.class);

        mSystemServiceManager.startService(BugreportManagerService.class);

        mSystemServiceManager.startService(GpuService.class);

        // startCoreServices
    }
2.1.6 startOtherServices()
    /**
     * 启动其他服务。
     */
    private void startOtherServices(@NonNull TimingsTraceAndSlog t) {

        final Context context = mSystemContext;
        VibratorService vibrator = null;
        DynamicSystemService dynamicSystem = null;
        IStorageManager storageManager = null;
        NetworkManagementService networkManagement = null;
        IpSecService ipSecService = null;
        VpnManagerService vpnManager = null;
        VcnManagementService vcnManagement = null;
        NetworkStatsService networkStats = null;
        NetworkPolicyManagerService networkPolicy = null;
        NsdService serviceDiscovery = null;
        WindowManagerService wm = null;
        SerialService serial = null;
        NetworkTimeUpdateService networkTimeUpdater = null;
        InputManagerService inputManager = null;
        TelephonyRegistry telephonyRegistry = null;
        ConsumerIrService consumerIr = null;
        MmsServiceBroker mmsService = null;
        HardwarePropertiesManagerService hardwarePropertiesService = null;
        PacProxyService pacProxyService = null;
        ...
        // 现在便可以开始启动三方APP应用(如Launcher启动桌面)
        mActivityManagerService.systemReady(() -> {
        ...
         }, t);
        // startOtherServices
    }
经过上面这些步骤,我们调用调用createSystemContext()创建系统上下文的时候,也已经完成了mSystemContext和ActivityThread的创建。
ATMS、AMS、WMS、PKMS等对象已经创建好了,并且完成了成员变量初始化。
注意:这是系统进程开启时的流程,在这之后,会开启系统的 Launcher程序,完成系统界面的加载与显示。
在Android的框架设计中,服务器端指的就是所有App共用的系统服务,比如我们这里提到的ATMS、AMS、WMS、PKMS等等,这些基础的系统服务是被所有的App公用的。
3、Launcher是什么
在Android系统中,应用程序是由Launcher启动起来的,其实,Launcher本身也是一个应用程序,其它的应用程序安装后,就会Launcher的界面上出现一个相应的图标,点击这个图标时,Launcher就会对应的应用程序启动起来。
当然也可以在 其他应用 启动应用。但是本质上都是调用startActivity()。
3.1 LauncherActivity.java
frameworks/base/core/java/android/app/LauncherActivity.java
/**
 * Displays a list of all activities which can be performed
 * for a given intent. Launches when clicked.
 *
 * @deprecated Applications can implement this UI themselves using
 *   {@link androidx.recyclerview.widget.RecyclerView} and
 *   {@link android.content.pm.PackageManager#queryIntentActivities(Intent, int)}
 */
@Deprecated
public abstract class LauncherActivity extends ListActivity {
    ...
    @Override
    protected void onListItemClick(ListView l, View v, int position, long id) {
        Intent intent = intentForPosition(position);
        startActivity(intent);
    }
}
小结
附送整图一张
关于 startActivity() 有了解的可以直接看看。本篇内容太多我自己看着都闹心。没看过的关注走一波,详细内容会在下一篇: ❤️ Android startActivity源码分析 ❤️中讲解。
相关推荐
❤️Android Runtime (ART) 和 Dalvik❤️
❤️Android 从源码解读 Apk 的安装过程 ❤️
❤️Android Apk 的打包过程 ❤️ 只需两幅图