OLED 显示模块
如果还没有看过I2C 协议的,请移步先看下面这篇文章
I2C协议
好的,现在我们进入正题
1. 向 OLED 寄存器地址写入一个 byte 的数据
- 开启 I2C
- 发送 OLED 设备地址 + 读写控制 (w - 0, r - 1)
- #define OLED_I2C_WR 0 采用宏定义方式
#define OLED_I2C_RD 1
- #define OLED_I2C_WR 0 采用宏定义方式
- 一般 OLED 地址为 0x78,不行就尝试下 0x7A
- 传入参数 addr,为寄存器参数,根据 OLED 手册,0x00 - 写入命令寄存器,0x40 - 写入数据寄存器
- 每一次发送数据,I2C 都需要作出正确的应答,0 为正确应答,查看该函数具体实现请移步到I2C协议
- 如果 OLED 设备未正确应答,使用 goto 无条件转移语句,将 I2C 协议停止掉。谨慎使用 goto 语句
void I2C_WriteByte(uint8_t addr,uint8_t data){

	i2c_Start();			//开启 协议
	//0x78 转化为 2进制 0111 1110 再或上一个 0 | 1 的值,表示地址最后一位为读写控制指令
	i2c_SendByte(OLED_ADDRESS|OLED_I2C_WR);		//发送地址 和 读写控制指令

	if (i2c_WaitAck() != 0)
	{
		goto cmd_fail;
	}

	i2c_SendByte(addr);				//发送对应寄存器,判断为0x00发送命令,还是0x40发送数据
	if (i2c_WaitAck() != 0)
	{
		goto cmd_fail;
	}

	i2c_SendByte(data);				//对应寄存器为 0x00,该data为命令,对应寄存器为0x40,该data为数据
	if (i2c_WaitAck() != 0)
	{
		goto cmd_fail;
	}
	i2c_Stop();						//最后 停止协议

cmd_fail:
	i2c_Stop();

}
2. 写入命令函数和写入数据函数
- 由于我们基本上只使用 写入命令 ,和写入数据两个寄存器地址,所以重新封装下函数,使其简单方便
void WriteCmd(unsigned char I2C_Command)
{
	I2C_WriteByte(0x00, I2C_Command);
}
void WriteDat(unsigned char I2C_Data)
{
	I2C_WriteByte(0x40, I2C_Data);
}
3. OLED 初始化
这边代码直接使用网上的,如果非要自己编写,请查看 OLED 模块使用手册,某宝一般都会提供,可能为 全英文文档,没错,博主看不懂!
void OLED_Init(void)
{
	delay_ms(1000);		// 1s,一定要延时,防止错误

	WriteCmd(0xAE); //display off
	WriteCmd(0x20);	//Set Memory Addressing Mode
	WriteCmd(0x10);	//00,Horizontal Addressing Mode;01,Vertical Addressing Mode;10,Page Addressing Mode (RESET);11,Invalid
	WriteCmd(0xb0);	//Set Page Start Address for Page Addressing Mode,0-7
	WriteCmd(0xc8);	//Set COM Output Scan Direction
	WriteCmd(0x00); //---set low column address
	WriteCmd(0x10); //---set high column address
	WriteCmd(0x40); //--set start line address
	WriteCmd(0x81); //--set contrast control register
	WriteCmd(0xff); //亮度调节 0x00~0xff
	WriteCmd(0xa1); //--set segment re-map 0 to 127
	WriteCmd(0xa6); //--set normal display
	WriteCmd(0xa8); //--set multiplex ratio(1 to 64)
	WriteCmd(0x3F); //
	WriteCmd(0xa4); //0xa4,Output follows RAM content;0xa5,Output ignores RAM content
	WriteCmd(0xd3); //-set display offset
	WriteCmd(0x00); //-not offset
	WriteCmd(0xd5); //--set display clock divide ratio/oscillator frequency
	WriteCmd(0xf0); //--set divide ratio
	WriteCmd(0xd9); //--set pre-charge period
	WriteCmd(0x22); //
	WriteCmd(0xda); //--set com pins hardware configuration
	WriteCmd(0x12);
	WriteCmd(0xdb); //--set vcomh
	WriteCmd(0x20); //0x20,0.77xVcc
	WriteCmd(0x8d); //--set DC-DC enable
	WriteCmd(0x14); //
	WriteCmd(0xaf); //--turn on oled panel
}
4. 设置 OLED 光标起点
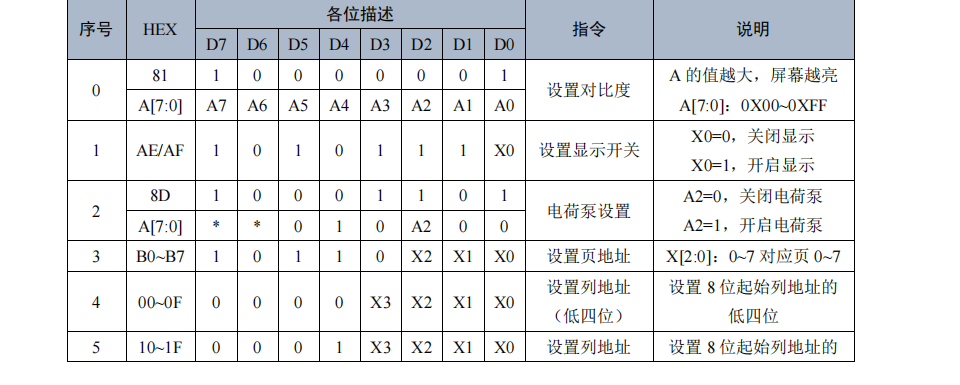
- 参数解释:
- x ,坐标轴中的 水平 坐标,大小为 0 - 127
- y,坐标轴中的 垂直 坐标,大小为 0 - 7
void OLED_SetPos(unsigned char x, unsigned char y)
{
	WriteCmd(0xb0+y);				//设置页坐标
	WriteCmd(((x&0xf0)>>4)|0x10);   //设置 列 高四位地址
	WriteCmd((x&0x0f)|0x01);		//设置 列 低四位地址
}
5. 全屏填充函数
函数作用:填充每一页,实现全亮,全灭的操作
void OLED_Fill(unsigned char fill_Data)
{
	unsigned char m,n;
	for(m=0;m<8;m++)
	{
		WriteCmd(0xb0+m);	//page0-page7
		WriteCmd(0x00);		//第四位起始地址
		WriteCmd(0x10);		//高四位起始地址
		for(n=0;n<128;n++)	//每页水平坐标为 0 - 127
			{
				WriteDat(fill_Data); //写入数据 0x00 为全灭,0xff为全亮
			}
	}
}
6. 显示英文,数字字符
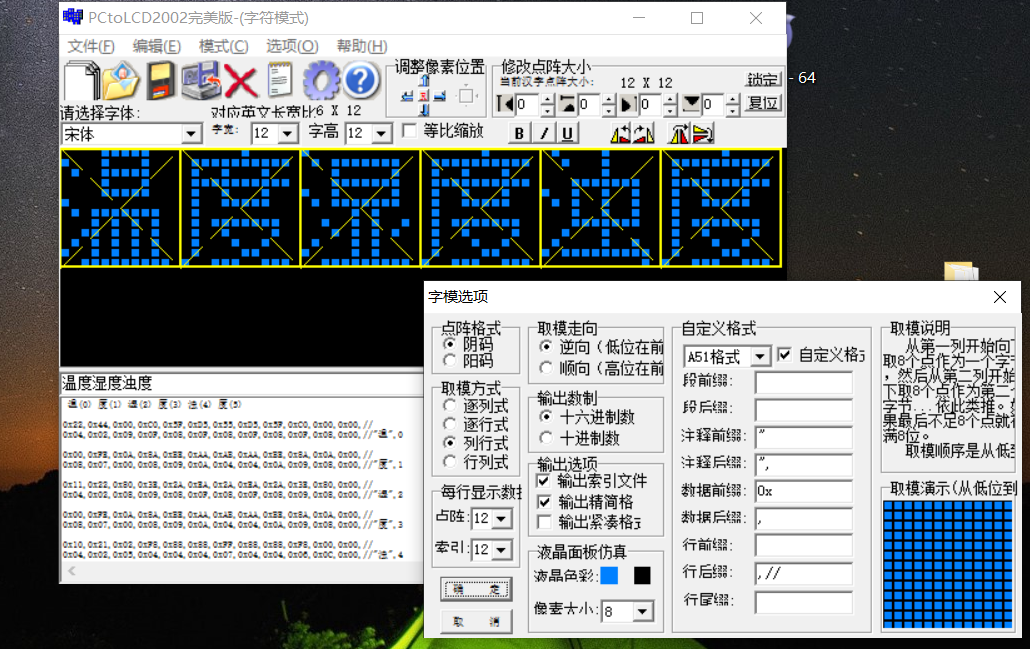
-
采用 字符库软件生成 16 进制数,放入数组中
-
判断是采用 6*8 数组还是 8*16 数组
-
空格的 ascll 码为 32 ,需要减去,这样才能得到正确的数字,字母,符号等
-
如果为 6*8 的 ascll 码,每个 x 就为 6,所以判断一下 如果同一行后面不能准确显示,就换行,再显示该字符
-
设置字符起点,写入对应数据,数据为字符软件生成的字符。
-
case2 表示 8*16 的字符,一行 16 位 16进制数代表某一个英文字符,8*16 代表列数为 8 个,也就是每一行应该输出 8 个 16进制数,总共输出两行,先使用 ascall 码找到英文字符对应的所在位置,再设置 起点坐标,由于一次绘制 8 个 16进制数,所以 x+=8; j++ 表示开始下一个字符
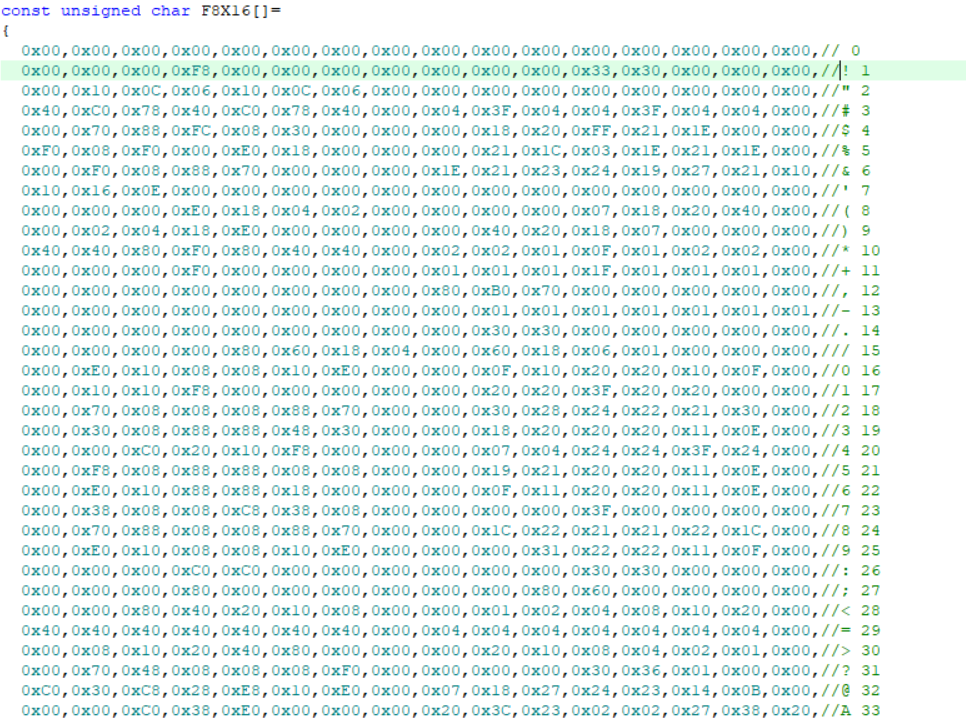
就是类似于
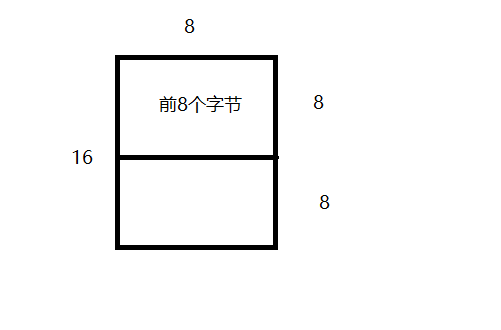
void OLED_ShowStr(unsigned char x, unsigned char y, unsigned char ch[], unsigned char TextSize)
{
	unsigned char c = 0,i = 0,j = 0;
	switch(TextSize)
	{
		case 1:
		{
			while(ch[j] != '\0')
			{
				c = ch[j] - 32;
				if(x > 126)
				{
					x = 0;
					y++;
				}
				OLED_SetPos(x,y);
				for(i=0;i<6;i++)
					WriteDat(F6x8[c][i]);
				x += 6;
				j++;
			}
		}break;
		case 2:
		{
			while(ch[j] != '\0')
			{
				c = ch[j] - 32;
				if(x > 120)
				{
					x = 0;
					y++;
				}
				OLED_SetPos(x,y);
				for(i=0;i<8;i++)
					WriteDat(F8X16[c*16+i]);
				OLED_SetPos(x,y+1);
				for(i=0;i<8;i++)
					WriteDat(F8X16[c*16+i+8]);
				x += 8;
				j++;
			}
		}break;
	}
}
7. 显示中文字符
-
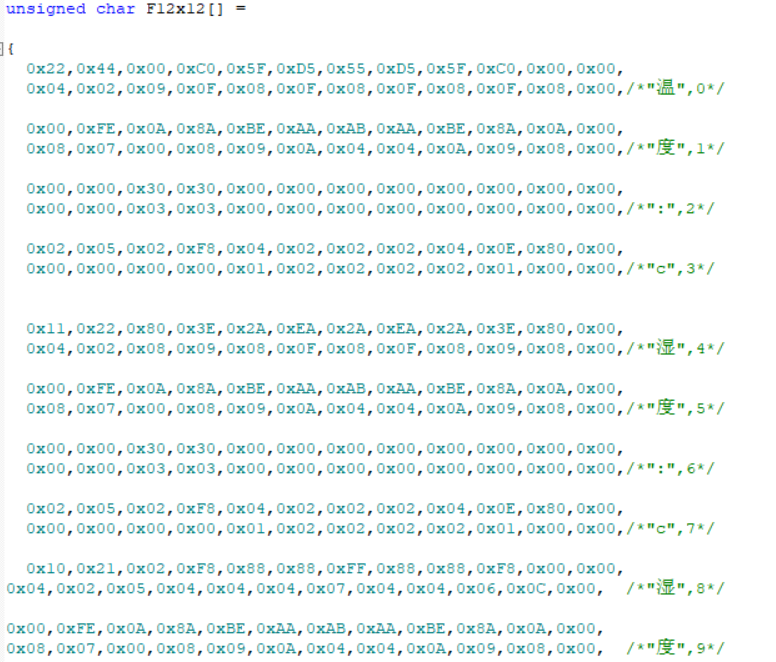
与上面 字符串 case 2 中显示相同
-
这边的字符串数组为 12*12 ,一个汉字为 1个 2*12点阵,所以 addr 为 24*N
void OLED_ShowCN8(unsigned char x, unsigned char y, unsigned char N)
{
	unsigned char wm=0;
	unsigned int  adder=24*N;
	OLED_SetPos(x , y);
	for(wm = 0;wm < 12;wm++)
	{
		WriteDat(F12x12[adder]);
		adder += 1;
	}
	OLED_SetPos(x,y + 1);
	for(wm = 0;wm < 12;wm++)
	{
		WriteDat(F12x12[adder]);
		adder += 1;
	}
}
最后
第一次尝试编写博客,若是有什么建议,欢迎批评指出。
后续会逐步分块更新,并会在最后一篇文章上传源代码。
若是该文章对你有作用或是觉得文章写得还行,帮忙点点赞,三连!
