开学了系列前面讲了element元素定位以及elements元素组定位,有不少的小伙伴问我,这个元素定位不到,那个元素定位不到,该怎么办。今天讲到的可以帮你解决一部分问题,剩下的就需要靠个人检查一下,你自己真的学会元素定位了吗?
你是否认为JS元素定位就跟前面所讲的element以及elements元素定位一样。在这儿就可以告诉各位,用法上确实有些类似,但是用途上就有很明显的差别。我们直接看正文吧!
目录
Windows对象:
获取窗口尺寸
获取内部宽高属性
获取外部宽高属性
操作窗口
Location对象
location属性
location方法
HTML DOM节点
元素定位
更改元素属性值
控制滚动条
JS全名:JavaScript,是WEB网页组成的三部分之一。JavaScript 代码放在位于<script>标签与<script>标签之间。先看一段JS代码认识一下JS:
 <!DOCTYPE html>
<html>
<body>
<h1>我的第一个 Web 页面</h1>
<p>我的第一个段落。</p>
<button onclick="myFunction()">点我</button>
<script>
function myFunction() {
    document.write(Date());
}
</script>
</body>
</html>
它通常会嵌在HTML中,以<script></script>的形式存在,有时候你看到的并非文中这样的,而是类似于链接的形式存在,那是因为吧JS代码写在的外面,通过链接形式引入,原则上是一样的,显得美观一些。如下:

这里运行的话就很简单了,直接复制到txt文档,保存后重命名将后缀改为.html即可,双击直接打开就可以看到效果了。
看完JS代码,我们先了解一下浏览器对象模型BOM,方便后面更好的学习,BOM全名Browser Object Mode,允许JS与浏览器交互。本章主要介绍BOM模型里面的Windows对象以及location对象。
Windows对象:
1. 获取浏览器窗口的尺寸
2. 操作其他窗口方法:如打开新窗口,关闭窗口等
3. 操作当前窗口,如:获取当前页面的地址,重新加载一个新页面,刷新当前页面
获取窗口尺寸
获取内部宽高属性
innerHeight,innerWidth 单位:px(像素)
内部宽高:是指除去菜单栏、工具栏、边框等占位元素后,用于显示网页的净宽高
• window.innerHeight - 浏览器窗口的内高度(以像素计)
• window.innerWidth - 浏览器窗口的内宽度(以像素计)
获取外部宽高属性
outerHeight,outerWidth 单位:px(像素)
• window.outerHeight 浏览器窗口的外部高度(以像素计)
• window.outerWidth 浏览器窗口的外部宽度(以像素计)
from selenium import webdriver

# 获取内宽,内高
fox = webdriver.Firefox()
fox.get('https://baidu.com')
js_ih = 'return window.innerHeight'
js_iw = 'return window.innerWidth'
i = fox.execute_script(js_ih)
o = fox.execute_script(js_iw)
#也可以写成
# i = fox.execute_script(js_ih,js_iw)
# print(i)
print(f"内高是:{i},内宽是:{o}")
# 外宽,外高
js_oh = 'return window.outerHeight'
js_ow = 'return window.outerWidth'
j = fox.execute_script(js_oh)
s = fox.execute_script(js_ow)
print(f"外高是:{j},外宽是:{s}")
fox.quit()
看到这是不是诧异,JS代码写在python中还有有点复杂程度的或者说是有点麻烦的。如果你想获取宽高,你必须要加return不然是没有返回值的,并且没个JS语句你想执行的话都必须fox.execute_script()带上这么一个执行语句,不然写了跟没写一个样。引号内的代码都需要靠纯手写,所以考验键盘能力的时候到了。
操作窗口
1. window.open(url) - 打开新窗口,并打开指定的url
2. window.close() - 关闭当前窗口
3. selenium执行js语句 -fox.execute_script(js)
from selenium import webdriver

fox = webdriver.Firefox()
fox.implicitly_wait(5)
fox.get('https://baidu.com')
# 打开新窗口
js = "window.open('https://www.csdn.net/')"
fox.execute_script(js)
# 关闭新窗口
js_c = 'window.close()'
fox.execute_script(js_c)
fox.quit()
Location对象
location属性
1. window.location.href 返回当前页面的 href (URL)
2. window.location.hostname 返回 web 主机的域名
3. window.location.pathname 返回当前页面的路径或文件名
4. window.location.protocol 返回使用的 web 协议(http: 或 https:)
这里的主机域名可能获取不到,还有就是协议。这里只做了解即可。
from selenium import webdriver

fox = webdriver.Firefox()
# 获取地址
fox.get('https://baidu.com')
js_href = "return location.href"
js_host = "return location.hostname"
js_path = "return location.pathname"
js_port = "return location.protocol"
i = fox.execute_script(js_href, js_host, js_path, js_port)
print(i)
fox.quit()
location方法
1. location.assign(url) 加载新页面
2. location.reload() 重新加载当前页面,刷新
3. location.replace(url) 用输入的url替换当前的url
值得注意的是:
assign与replace的区别:
1. location.assign(url) : 加载 URL 指定的新的 HTML 文档。就相当于一个链接,跳转到指定的url,当前页 面会转为新页面内容,可以点击后退返回上一个页面。
2. location.replace(url) : 通过加载 URL 指定的文档来替换当前文档,这个方法是替换当前窗口页面,前 后两个页面共用一个窗口,所以是没有后退返回上一页的
这些都是小练手,记得自己上手,提示:不需要得到值的就不需要添加return了,可以直接使用,举例:
from selenium import webdriver

fox = webdriver.Firefox()
fox.implicitly_wait(5)
# 获取地址
fox.get('https://baidu.com')
js = "return location.href"
i = fox.execute_script(js)
print(i)
# 打开一个新的窗口
fox.execute_script("location.assign('https://baidu.com')")
HTML DOM节点
HTML DOM (Document Object Model) 中 , 每一个元素都是节点。
Document 对象是 Window 对象的一部分,可通过 window.document 属性对其进行访问。
元素定位
这里才是重点,JS元素定位其实说的就是Document元素定位。
查找元素,最常用的查找是根据ID和Tag Name ,注意:除id,css选择器以外是元素组定位
1. document.getElementById(id属性值) --》唯一的
2. document.getElementsByClassName(class属性值) --》可以定位一组元素
• document.getElementsByClassName(class属性值)[索引值] 对一组元素中的单个元素的获取
3. document.getElementsByName(name属性值)
4. document.getElementsByTagName(标签名)
5. document.querySelector(css选择器) --》对于没有id/name/classname属性,可以使用这个定位元 素
这里与普通的元素定位没有什么太大的区别,元素组定位索引取值,元素定位。还有就是value与send_keys区别。
from selenium import webdriver

fox = webdriver.Firefox()
fox.implicitly_wait(5)
fox.get('https://baidu.com')
js_input = "document.getElementById('kw').value='python'"
fox.execute_script(js_input)
jx_click = "document.getElementById('su').click()"
fox.execute_script(jx_click)
fox.quit()
from selenium import webdriver
fox = webdriver.Firefox()
fox.implicitly_wait(5)
fox.get('https://baidu.com')
js_input = "document.getElementsByClassName('mnav')[0].click()"
fox.execute_script(js_input)
sleep(2)
fox.quit()这里看到区别了吧,JS中元素定位方式类似,写法还是有一定的区别的。我个人举得还是挺繁琐的。其他的元素定写法与上述类似,这里就不做全部的代码展示了。自行练习!
更改元素属性值
看到这是不是很意外,还能更改元素属性值,JS的特点这里也有份,网页中有部分的属性是隐藏的,有些属性只读不可写让我们具体看看。
1. document.getElementById('kw').autocomplete= 'off' --常用元素属性修改;百度
2. document.getElementById('vip').style.visibility= 'visible' --设置元素的隐藏属性,是否显示;
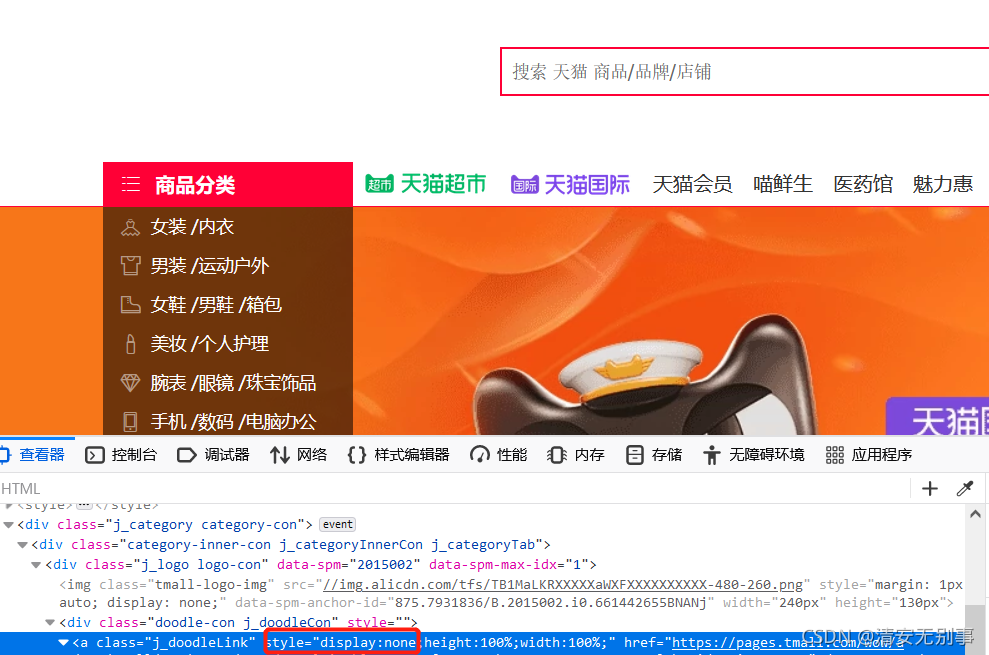
隐藏的元素:利用javascript更改元素属性值,让元素可见
例如:visibility:hidden(隐藏),visible(显示)
display : none(隐藏),block(显示)

看这个例子,我们可以通过更改属性值直接隐藏掉这个烦人的东西。
from time import sleep
from selenium import webdriver

fox = webdriver.Firefox()
fox.implicitly_wait(5)
fox.get('https://www.tmall.com/')
js = "document.querySelector('.j_doodleLink').style.display='none'"
fox.execute_script(js)
sleep(3)
fox.quit()
还可以更改很多东西,比如text值,定位元素后.text=' '想要修改的值,具体的用法很多很多,对于测试而言,这部分其实也差不多,但是你想技多不压身就去研究研究。
控制滚动条
控制滚动条有什么好处,如果页面没有完全显示,element如果是在下拉之后才能显示出来,只能先滚动到该元素才能进 行click,否则是不能click。
对于纵向滚动条,我们要获取滚动条的高度;
对于横向滚动条则需要获取他的宽度
1. document.body.scrollHeight 获取对象的滚动高度
2. document.body.scrollWidth 获取对象的滚动宽度
滑动滚动条:
window.scrollTo(x,y) 方法可把内容滚动到指定的坐标。
滑动到页面底部:
1. 左下角:window.scrollTo(0,document.body.scrollHeight)
2. 右下角:
window.scrollTo(document.body.scrollWidth,document.body.scrollHeight)
3. 指定位置:window.scrollTo(0,数值)
4. 滑动到指定元素:ele.srollIntoView() true:与元素顶部对其,false:与元素底部对其 document.querySelector('').scrollIntoView()
document.querySelector('').scrollIntoView(false)
这里直接拿淘宝的例子来跑,先下拉到指定举例,再下拉到最底部:
from selenium import webdriver
from time import sleep

fox = webdriver.Firefox()
fox.get('https://www.taobao.com/')
fox.maximize_window()

# 获取高度
js_height = "return document.body.scrollHeight"
height = fox.execute_script(js_height)
print(height)
# 获取宽度
js_width = "return document.body.scrollWidth"
width = fox.execute_script(js_width)
print(width)
# 下滑1000px
js_left = "window.scrollTo(0,1000)"
fox.execute_script(js_left)
sleep(2)
# 下滑最底部
jx_left_down = "window.scrollTo(0,document.body.scrollHeight)"
fox.execute_script(jx_left_down)
# 下滑到指定元素
# jx_left_zd = "document.querySelector('ul.list > a:nth-child(3) > div:nth-child(1) > div:nth-child(2)').scrollIntoView(false)"
# fox.execute_script(jx_left_zd)
上述是浏览器滚动条。接下来给到各位一个界面元素滚动条。自己写了一个JS,便于练习,源码给到各位:
<!DOCTYPE html>
<html>
	<head>
		<meta charset="utf-8">
		<title></title>
		<style type="text/css">
			*{
				margin: 0;
				padding: 0;
			}
			.news{
				width: 600px;
				height: 240px;
				border: 1px solid #333;
				line-height: 160%;
				margin: 50px auto;
				position: relative;
				padding-right: 30px;
				overflow: hidden;
			}
			.news .content{
				position: relative;
				padding: 20px;
			}
			.news .content p{
				margin-bottom: 20px;
			}
			.news .bar{
				width: 20px;
				height: 240px;
				background-color: #eee;
				position: absolute;
				right:10px;
				top: 0;
			}
			.news .bar b{
				position: absolute;
				width: 20px;
				height: 104px;
				top: 0;
				left: 0;
				border-radius: 6px;
				box-shadow: 1px 1px 1px black;

			}
			@-webkit-keyframes faguang{
				0%{
					box-shadow: 0px 0px 0px red;
				}

				100%{
					box-shadow: 0px 0px 20px red;
				}
			}
			@-moz-keyframes faguang{
				0%{
					box-shadow: 0px 0px 0px red;
				}

				100%{
					box-shadow: 0px 0px 20px red;
				}
			}
		</style>
	</head>
	<body>
		<div class="news" id="news">
			<div class="bar">
				<b id="barb"></b>
			</div>
			<div class="content" id="contentBox">
				<p>人们常说,犹豫一万次,不如实践一次。一个人越犹豫不决,就越容易患得患失.</p>
				<p>	西雨斜风作小寒,淡烟疏柳媚晴滩.</p>
				<p>入淮清洛渐漫漫,雪沫乳花浮午盏。</p>
				<p>蓼茸蒿笋试春盘,人间有味是清欢</p>
				<p>个人微信号qing_an_an</p>
			</div>
		</div>
		<script type="text/javascript">
			var barb = document.getElementById("barb");
			var contentBox = document.getElementById("contentBox");
			var news = document.getElementById("news");

			var newsJingTop = getAllY(news);
			var contentBoxHeight = parseInt(contentBox.clientHeight);
			var rate = 240 / contentBoxHeight;
			if(rate > 1) {
				box.style.display = "none";
			}
			var barbheight = 240 * rate;
			barb.style.height = barbheight + "px";

			//公共信号量,不管是滑块,都在操作它们两个数值
			var contentBoxTop = 0;
			var barbTop = 0;
			//滑块的拖曳
			//在滑块中按下的时候
			barb.onmousedown = function(event) {
				var dy = event.offsetY;
				//注册移动事件
				document.onmousemove = function(event) {
					var y = event.pageY - newsJingTop - dy;
					//验收
					if(y < 0) {
						y = 0;
					}else if(y>240 - barbheight) {
						y = 240 - barbheight;
					}
					//滑块的移动
					//改变信号量
					barbTop = y;
					contentBoxTop = -y / rate;

					barb.style.top = barbTop + "px";
					//内容的移动
					contentBox.style.top = contentBoxTop + "px";
					return false;
				}
				return false;
			}

			document.onmouseup = function() {
				document.onmousemove = null;
			}

			//滚轮事件
			news.onmousewheel = mousewheelhandler;
			news.addEventListener("DOMMouseScroll",mousewheelhandler,true);
			function mousewheelhandler(event) {
				event = event|| window.event;
				if(event.preventDefault) {
					event.preventDefault();
				}else {
					event.returnValue = true;
				}


				if(event.wheelDelta) {
					var direction = event.wheelDelta>0?1:-1;
				}else{
					var direction = event.detail>0?-1:1;
				}
				contentBoxTop += direction * 20;
				if(contentBoxTop > 0) {
					contentBoxTop = 0;
				}else if(contentBoxTop < 240 - contentBoxHeight) {
					contentBoxTop = 240 - contentBoxHeight;
				}
				barbTop = -contentBoxTop * rate;
				contentBox.style.top = contentBoxTop + "px";
				barb.style.top = barbTop + "px";
			}
			function getAllY(o) {
				var allY = o.offsetTop;
				while(o == o.offsetParent) {
					allY += o.offsetTop + Number(getComputedStyle(o)["border-top-width"]);
				}
				return allY;
			}
		</script>
	</body>
</html>
先定位到元素
1. ele.scrollHeight # 获取滚动条高度
2. ele.scrollWidth # 获取横向滚动条宽度
这里提供思路,就是,定位到元素通过鼠标事件去拖拽即可,页面内的元素都可这样使用。
大家对于获取高度宽度可以在控制台操作。也就是浏览器F12。
