一、访问控制
基于用户名、密码的验证访问
服务端配置
vim /usr/local/nginx/conf/nginx.conf
在想验证的location下面添加,以根区域为例
location / {
		root html;
		index index.html index.htm;
		#添加下面两行
		auth_basic "welcome you here";
		auth_basic_user_file /usr/local/nginx/html/a.psd;
	}

创建认证文件,htpasswd是安装包httpd-tools拥有的命令
cd /usr/local/nginx
htpasswd -c /usr/local/nginx/html/a.psd 访问用户名

允许个别、拒绝所有
vim /usr/local/nginx/conf/nginx.conf
在location下添加如下规则
allow 172.16.1.1;	#允许访问
deny 172.16.1.0/24;		#拒绝1.0网段
重启服务
 /usr/local/nginx/sbin/nginx -t
 pkill -HUP nginx
客户端访问测试
172.16.1.1

172.16.1.10

二、虚拟主机(基于域名)
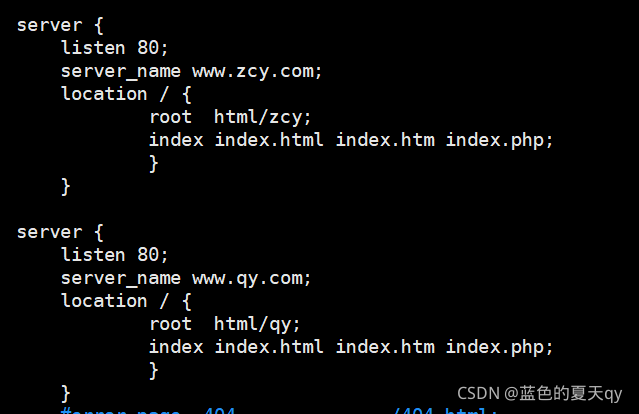
在主配置文件中,添加不同的server区域
vim /usr/local/nginx/conf/nginx.conf
	server {
		listen 80;
		server_name www.zcy.com;
		location / {
			root  html/zcy;
			index index.html index.htm index.php;
		}
	}

	server {
		listen 80;
		server_name www.qy.com;
		location / {
			root  html/qy;
			index index.html index.htm index.php;
		}
	}

新建站点和访问界面、并赋予nginx权限
cd /usr/local/nginx/html
mkdir zcy
mkdir qy
echo "zcyzcyzcy~~~~~~~~~~" > zcy/index.html
echo "qyqyqy~~~~~~~~~~~~~" > qy/index.html
重启服务
/usr/local/nginx/sbin/nginx -t
pkill -HUP nginx
客户端测试


三、域名跳转(www.zcy.com–>www.qy.com)
基于上面的虚拟主机实验
vim /usr/local/nginx/conf/nginx.conf
在www.zcy.com的location下修改添加跳转
rewrite .* http://www.new.com permanent;

重启服务
 /usr/local/nginx/sbin/nginx -t
 pkill -HUP nginx
客户端测试

四、实现https加密
在三的基础上继续实验
实现对www.qy.com的https访问
生成证书
 cd /usr/local/nginx/conf
 openssl genrsa -out cert.key 1024
 建立服务器私钥,生成RSA密钥
 openssl req -new -key cert.key -out cert.csr
 openssl x509 -req -days 365 -sha256 -in cert.csr -signkey cert.key -out cert.pem
修改主配置文件,修改server端口为443、添加验证配置
vim /usr/local/nginx/conf/nginx.conf
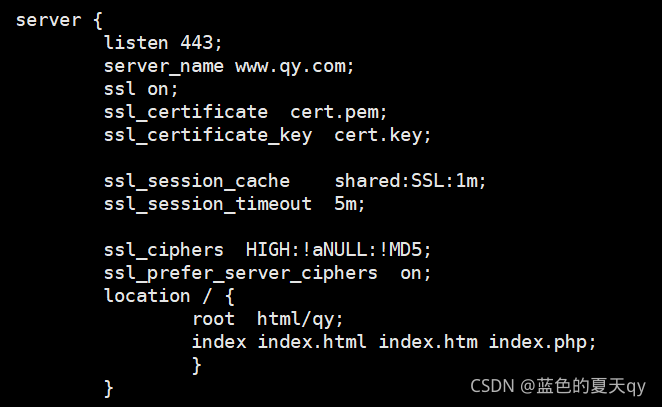
对www.qy.com添加ssl加密验证
listen 443;
		server_name www.qy.com;

		ssl on;
		ssl_certificate  cert.pem;
		ssl_certificate_key  cert.key;

		ssl_session_cache    shared:SSL:1m;
        ssl_session_timeout  5m;

        ssl_ciphers  HIGH:!aNULL:!MD5;
        ssl_prefer_server_ciphers  on;

重启服务
/usr/local/nginx/sbin/nginx -t
pkill -HUP nginx
客户端测试


五、端口跳转(80 -> 443)
在四的基础上继续实验
实现访问www.qy.com自动跳转到https://www.qy.com
修改主配置文件 添加如下内容
vim /usr/local/nginx/conf/nginx.conf
	server {
        listen       80;
        server_name  www.qy.com;
        location / {
                rewrite .* https://www.qy.com permanent;
        }
   }

重启服务
/usr/local/nginx/sbin/nginx -t
pkill -HUP nginx
客户端测试


六、扩展:http2
在五的基础上继续实验
安装时有–with-http_v2_module参数
修改主配置文件
vim /usr/local/nginx/conf/nginx.conf
	server{
		#listen的值加上ssl、http2
		listen 443 ssl http2;
		server_name www.qy.com;

		ssl on;
		ssl_certificate  cert.pem;
		ssl_certificate_key  cert.key;

		ssl_session_timeout 5m;

		ssl_ciphers HIGH:!RC4:!MD5:!aNULL:!eNULL:!NULL:!DH:!EDH:!EXP:+MEDIUM; 			ssl_prefer_server_ciphers on;

		location / {
            root  html/qy;
            index index.html index.htm index.php;
		}
	}

重启测试
/usr/local/nginx/sbin/nginx -t
pkill -HUP nginx

七、反向代理
在虚拟主机的基础上实验
主配置文件对应的location下面添加代理网站proxy_pass
vim /usr/local/nginx/conf/nginx.conf
	server{
		....    #其他配置
		location / {
			#此处填写真实服务器的IP地址,代理其他主机
			#也可填本机其他域名,实现跳转
			proxy_pass http://172.16.1.20:80;
		}
	}

重启服务
 /usr/local/nginx/sbin/nginx -t
 pkill -HUP nginx
后台真实服务器
yum -y install httpd
echo welcome to 172.16.1.20 >/var/www/html/index.html
systemctl start httpd
测试机
访问nginx所在机器的IP或域名,出现Apache里的界面内容

八、负载均衡
在七的基础上实验
主配置文件对应的location下面添加代理网站proxy_pass
vim /usr/local/nginx/conf/nginx.conf
	#此标签在server标签前添加
	upstream zcy {
       #权重越大,访问它的次数就越多
		server 172.16.1.20:80 weight=1;
		server 172.16.1.30:80 weight=1;
	}

	server {
		listen 80;
		server_name www.zcy.com;
		location / {
			proxy_pass http://zcy;
			proxy_set_header Host $host;
		}
	}

重启服务
 /usr/local/nginx/sbin/nginx -t
 pkill -HUP nginx
配置被代理的真实服务器
172.16.1.20
yum -y install httpd
echo welcome to 172.16.1.20 >/var/www/html/index.html
systemctl start httpd
172.168.1.30
yum -y install httpd
echo welcome to 172.16.1.30 >/var/www/html/index.html
systemctl start httpd
客户端测试
多次请求www.zcy.com,可以看到得到的数据一次来自172.16.1.20、一次来自172.16.1.30

