Web的认证和授权,是老生常谈的问题,常见的几种认证授权模式:
1.cookies+session:
用户在浏览器中登录成功后,服务器生成sessionId并返回给浏览器,同时服务端存储session,浏览器将sessionId保存至cookies,下次发起请求时带上,服务器将通过传入的sessionId获取对应的session信息,并通过session来确认用户登录信息;
2.token:令牌
这是我们在写移动端app时最常见的认证方式,即用户登录成功后,服务端根据一定规则生成token串返回给移动端,同时服务端将该token与该用户对应存储,移动端保存该token并在以后的接口请求都会带上;
token也有多种实现方式,比如token+sign方式,或者Oauth2(refresh_token+access_token)方式等;
3.JWT:Java Web Token
严格来说,这是一种设计思想,前两种都是将用户认证信息存储在服务端,缺点就是占用资源,共享,跨域等方面的问题,而JWT则是向token存储在前端,服务器不做任何存储,只做验证;具体可以查看JWT官网说明:https://jwt.io/introduction,或者百度,会有很多专业的讲解,我这里只讲一下大致流程:
用户登录后,服务器根据jwt规则,将用户信息结合自定义密钥(此密钥只有服务器知道,不可泄漏)通过加密算法,生成token字符串(xxxxx.xxxxx.xxxxx),例:
eyJhbGciOiJIUzI1NiJ9
.eyJzdWIiOiI2NjY2NjYiLCJjcmVhdGVkIjoiU2VwIDE2LCAyMDIxIDE6MzM6MDggUE0iLCJleHAiOjE2MzIzNzUxODh9
.bVODaWOwweOXEF_Pi4fgHqU1FT4kdWXKtxLmhaqCdY4
即Header.Payload.Signature,返回给前端,前端保存该token,并在以后的请求中带上:
Authorization: Bearer xxxxx.xxxxx.xxxxx
服务器接收到请求后,通过密钥将token中的用户及创建时间信息解析出来,以此来验证token的有效期以及请求的合法性;
JWT是目前最流行的跨域认证解决方案,但缺点也尤其明显:
1.因为服务端不存储token,就无法控制token的有效性,若token被劫持,服务器就算知道也只能默默流泪毫无作为,直到token过期;
2.无法做到单客户端登录,也就是说多设备可以同时登录,无法完成互踢操作,除非服务器记录用户登录信息,但这又违背了JWT方案中服务器不保存任何信息的设计思想,所以如果要实现这种需求,就只能依靠外力,比如IM,依靠IM服务器的互踢功能来达到整个应用的互踢功能;
总结:至于实际开发中到底选择哪种认证方式,还要结合实际需求来做判断!
GitHub:https://github.com/baiyuliang/SpringBootJwt
好了,下面贴出本博客所实现的SpringBoot+Security+Jwt+MybatisPlus的案例截图:
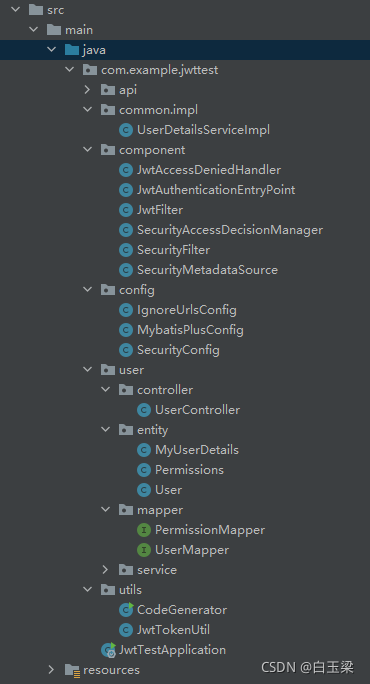
项目结构:
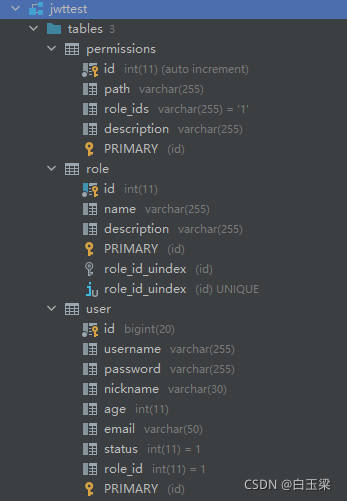
数据库:
Sql:
create table jwttest.permissions
(
    id          int auto_increment
        primary key,
    path        varchar(255)             null,
    role_ids    varchar(255) default '1' null,
    description varchar(255)             null
);

create table jwttest.role
(
    id          int          not null,
    name        varchar(255) null,
    description varchar(255) null,
    constraint role_id_uindex
        unique (id)
);

alter table jwttest.role
    add primary key (id);

create table jwttest.user
(
    id       bigint        not null comment '主键ID'
        primary key,
    username varchar(255)  null,
    password varchar(255)  null,
    nickname varchar(30)   null comment '姓名',
    age      int           null comment '年龄',
    email    varchar(50)   null comment '邮箱',
    status   int default 1 null,
    role_id  int default 1 null
);
请求示例(测试JWT):

请求示例(测试权限):

首先引入相关依赖:
mysql、mybatis-plus、mybatis-plus-generator、lombok、p6spy、security、jwt、hutool
        <!--mysql数据库-->
        <dependency>
            <groupId>mysql</groupId>
            <artifactId>mysql-connector-java</artifactId>
            <scope>runtime</scope>
        </dependency>
        <!--mybatis-plus-->
        <dependency>
            <groupId>com.baomidou</groupId>
            <artifactId>mybatis-plus-boot-starter</artifactId>
            <version>3.4.3.3</version>
        </dependency>
        <!--lombok-->
        <dependency>
            <groupId>org.projectlombok</groupId>
            <artifactId>lombok</artifactId>
        </dependency>
        <!--mybatis-plus-generator-->
        <dependency>
            <groupId>com.baomidou</groupId>
            <artifactId>mybatis-plus-generator</artifactId>
            <version>3.5.0</version>
        </dependency>
        <dependency>
            <groupId>org.apache.velocity</groupId>
            <artifactId>velocity-engine-core</artifactId>
            <version>2.3</version>
        </dependency>
        <!--sql打印-->
        <dependency>
            <groupId>p6spy</groupId>
            <artifactId>p6spy</artifactId>
            <version>3.9.1</version>
        </dependency>

        <dependency>
            <groupId>org.springframework.boot</groupId>
            <artifactId>spring-boot-starter-security</artifactId>
        </dependency>

        <dependency>
            <groupId>io.jsonwebtoken</groupId>
            <artifactId>jjwt-api</artifactId>
            <version>0.11.2</version>
        </dependency>

        <dependency>
            <groupId>io.jsonwebtoken</groupId>
            <artifactId>jjwt-impl</artifactId>
            <version>0.11.2</version>
        </dependency>
        <dependency>
            <groupId>io.jsonwebtoken</groupId>
            <artifactId>jjwt-gson</artifactId>
            <version>0.11.2</version>
        </dependency>

        <dependency>
            <groupId>cn.hutool</groupId>
            <artifactId>hutool-all</artifactId>
            <version>4.5.15</version>
        </dependency>
application.yml:
spring:
  application:
    name: jwttest
  datasource:
    username: root
    password: root
    #    url: jdbc:mysql://localhost:3306/jwttest?useUnicode=true&characterEncoding=utf-8&useSSL=false&serverTimezone=Hongkong
    #    driver-class-name: com.mysql.cj.jdbc.Driver
    driver-class-name: com.p6spy.engine.spy.P6SpyDriver #sql语句打印
    url: jdbc:p6spy:mysql://localhost:3306/jwttest?useUnicode=true&characterEncoding=utf-8&useSSL=false&serverTimezone=Hongkong

jwt:
  tokenType: 'Bearer '  #JWT负载开头
  tokenHeader: Authorization #JWT存储的请求头
  secret: cuAihCz53DZRjZwbsGcZJ2Ai6At+T142uphtJMsk7iQ= #JWT加解密密钥
  expiration: 604800 #JWT的超期限时间(60*60*24*7)

secure:
  ignored:
    urls: #路径白名单
      - /user/testNoJwt
使用P6SpyDriver 代替mysqlDriver,查询数据库时直接打印sql语句:

配置jwt的密钥和过期时间,以及白名单路径!
MybatisPlus使用相关可参考官方文档,非常简单,可通过项目中的CodeGenerator自动生成!
下面贴了部分关键类代码,不想看的话可以直接跳过看下面讲解的具体认证流程步骤!
Jwt工具类 JwtTokenUtil:
public class JwtTokenUtil {
    private static final Logger LOGGER = LoggerFactory.getLogger(JwtTokenUtil.class);
    private static final String CLAIM_KEY_USERNAME = "sub";
    private static final String CLAIM_KEY_CREATED = "created";
    @Value("${jwt.secret}")
    private String secret;
    @Value("${jwt.expiration}")
    private Long expiration;
    @Value("${jwt.tokenType}")
    private String tokenType;


    /**
     * 根据负责生成JWT的token
     */
    private String generateToken(Map<String, Object> claims) {
        return Jwts.builder()
                .setClaims(claims)
                .setExpiration(generateExpirationDate())
                .signWith(Keys.hmacShaKeyFor(Decoders.BASE64.decode(secret)))
                .compact();
    }

    /**
     * 从token中获取JWT中的负载
     */
    private Claims getClaimsFromToken(String token) {
        Claims claims = null;
        try {
            claims = Jwts.parserBuilder()
                    .setSigningKey(Keys.hmacShaKeyFor(Decoders.BASE64.decode(secret)))
                    .build()
                    .parseClaimsJws(token)
                    .getBody();
        } catch (Exception e) {
            LOGGER.info("JWT格式验证失败:{}", token);
        }
        return claims;
    }

    /**
     * 生成token的过期时间
     */
    private Date generateExpirationDate() {
        return new Date(System.currentTimeMillis() + expiration * 1000);
    }

    /**
     * 从token中获取登录用户名
     */
    public String getUserNameFromToken(String token) {
        String username;
        try {
            Claims claims = getClaimsFromToken(token);
            username = claims.getSubject();
        } catch (Exception e) {
            username = null;
        }
        return username;
    }

    /**
     * 验证token是否还有效
     *
     * @param token       客户端传入的token
     * @param userDetails 从数据库中查询出来的用户信息
     */
    public boolean validateToken(String token, UserDetails userDetails) {
        String username = getUserNameFromToken(token);
        return username.equals(userDetails.getUsername()) && !isTokenExpired(token);
    }

    /**
     * 判断token是否已经失效
     */
    private boolean isTokenExpired(String token) {
        Date expiredDate = getExpiredDateFromToken(token);
        return expiredDate.before(new Date());
    }

    /**
     * 从token中获取过期时间
     */
    private Date getExpiredDateFromToken(String token) {
        Claims claims = getClaimsFromToken(token);
        return claims.getExpiration();
    }

    /**
     * 根据用户信息生成token
     */
    public String generateToken(UserDetails userDetails) {
        Map<String, Object> claims = new HashMap<>();
        claims.put(CLAIM_KEY_USERNAME, userDetails.getUsername());
        claims.put(CLAIM_KEY_CREATED, new Date());
        return generateToken(claims);
    }

    /**
     * 当原来的token没过期时是可以刷新的
     *
     * @param oldToken 带tokenHead的token
     */
    public String refreshHeadToken(String oldToken) {
        if (StrUtil.isEmpty(oldToken)) {
            return null;
        }
        String token = oldToken.substring(tokenType.length());
        if (StrUtil.isEmpty(token)) {
            return null;
        }
        //token校验不通过
        Claims claims = getClaimsFromToken(token);
        if (claims == null) {
            return null;
        }
        //如果token已经过期,不支持刷新
        if (isTokenExpired(token)) {
            return null;
        }
        //如果token在30分钟之内刚刷新过,返回原token
        if (tokenRefreshJustBefore(token, 30 * 60)) {
            return token;
        } else {
            claims.put(CLAIM_KEY_CREATED, new Date());
            return generateToken(claims);
        }
    }

    /**
     * 判断token在指定时间内是否刚刚刷新过
     *
     * @param token 原token
     * @param time  指定时间(秒)
     */
    private boolean tokenRefreshJustBefore(String token, int time) {
        Claims claims = getClaimsFromToken(token);
        Date created = claims.get(CLAIM_KEY_CREATED, Date.class);
        Date refreshDate = new Date();
        //刷新时间在创建时间的指定时间内
        if (refreshDate.after(created) && refreshDate.before(DateUtil.offsetSecond(created, time))) {
            return true;
        }
        return false;
    }
}
配置SecurityConfig:
@Configuration
@EnableWebSecurity
@EnableGlobalMethodSecurity(prePostEnabled = true)
public class SecurityConfig extends WebSecurityConfigurerAdapter {

    @Override
    protected void configure(HttpSecurity httpSecurity) throws Exception {
        ExpressionUrlAuthorizationConfigurer<HttpSecurity>.ExpressionInterceptUrlRegistry registry = httpSecurity.authorizeRequests();
        //不需要保护的资源路径允许访问
        for (String url : ignoreUrlsConfig().getUrls()) {
            System.out.println("白名单:" + url);
            registry.antMatchers(url).permitAll();
        }
        //允许跨域请求的OPTIONS请求
        registry.antMatchers(HttpMethod.OPTIONS).permitAll();
        // 任何请求需要身份认证
        registry.and()
                .authorizeRequests()
                .anyRequest()
                .authenticated()
                // 关闭跨站请求防护及不使用session
                .and()
                .csrf()
                .disable()
                .sessionManagement()
                .sessionCreationPolicy(SessionCreationPolicy.STATELESS)
                // 自定义权限拒绝处理类
                .and()
                .exceptionHandling()
                .accessDeniedHandler(restfulAccessDeniedHandler())//授权
                .authenticationEntryPoint(restAuthenticationEntryPoint())//认证
                // 自定义权限拦截器JWT过滤器
                .and()
                .addFilterBefore(jwtAuthenticationTokenFilter(), UsernamePasswordAuthenticationFilter.class);
        //动态权限校验过滤器
        registry.and().addFilterBefore(securityFilter(), FilterSecurityInterceptor.class);
    }

    /**
     * 白名单
     *
     * @return
     */
    @Bean
    public IgnoreUrlsConfig ignoreUrlsConfig() {
        return new IgnoreUrlsConfig();
    }

    /**
     * 自定义无权限返回结果
     *
     * @return
     */
    @Bean
    public JwtAccessDeniedHandler restfulAccessDeniedHandler() {
        return new JwtAccessDeniedHandler();
    }

    /**
     * 自定义未登录或登录过期返回结果
     *
     * @return
     */
    @Bean
    public JwtAuthenticationEntryPoint restAuthenticationEntryPoint() {
        return new JwtAuthenticationEntryPoint();
    }

    /**
     * JWT登录授权过滤器(对请求进行授权验证过滤)
     *
     * @return
     */
    @Bean
    public JwtFilter jwtAuthenticationTokenFilter() {
        return new JwtFilter();
    }

    /**
     * Jwt生成的工具类
     *
     * @return
     */
    @Bean
    public JwtTokenUtil jwtTokenUtil() {
        return new JwtTokenUtil();
    }

    @Override
    protected void configure(AuthenticationManagerBuilder auth) throws Exception {
        auth.userDetailsService(userDetailsService()).passwordEncoder(passwordEncoder());
    }

    @Bean
    public PasswordEncoder passwordEncoder() {
        return new BCryptPasswordEncoder();
    }

    @Bean
    public SecurityFilter securityFilter() {
        return new SecurityFilter();
    }

    @Bean
    public SecurityAccessDecisionManager securityAccessDecisionManager() {
        return new SecurityAccessDecisionManager();
    }

    @Bean
    public SecurityMetadataSource securityMetadataSource() {
        return new SecurityMetadataSource();
    }

}
配置JwtFilter:
public class JwtFilter extends OncePerRequestFilter {
    @Resource
    private UserDetailsService userDetailsService;
    @Resource
    private JwtTokenUtil jwtTokenUtil;
    @Resource
    IgnoreUrlsConfig ignoreUrlsConfig;

    @Value("${jwt.tokenHeader}")
    private String tokenHeader;
    @Value("${jwt.tokenType}")
    private String tokenType;
    @Value("${server.servlet.context-path}")
    private String contextPath;

    @Override
    protected void doFilterInternal(HttpServletRequest request, HttpServletResponse response, FilterChain chain) throws ServletException, IOException, AccessDeniedException {
        String requestURI = request.getRequestURI();
        System.out.println("JwtFilter:" + requestURI);
        //如果requestURI在白名单中直接放行
        PathMatcher pathMatcher = new AntPathMatcher();
        for (String url : ignoreUrlsConfig.getUrls()) {
            if (pathMatcher.match(contextPath + url, requestURI)) {
                System.out.println("白名单通过..." + requestURI);
                chain.doFilter(request, response);
                return;
            }
        }
        //验证用户名和token
        String authHeader = request.getHeader(tokenHeader);
        if (authHeader != null && authHeader.startsWith(tokenType)) {
            String authToken = authHeader.substring(tokenType.length());// The part after "Bearer "
            String username = jwtTokenUtil.getUserNameFromToken(authToken);
            System.out.println("用户" + username + "发起请求...");
            if (username != null && SecurityContextHolder.getContext().getAuthentication() == null) {
                UserDetails userDetails = userDetailsService.loadUserByUsername(username);
                if (jwtTokenUtil.validateToken(authToken, userDetails)) {
                    System.out.println("Jwt请求验证通过...");
                    UsernamePasswordAuthenticationToken authentication = new UsernamePasswordAuthenticationToken(userDetails, null, userDetails.getAuthorities());
                    authentication.setDetails(new WebAuthenticationDetailsSource().buildDetails(request));
                    SecurityContextHolder.getContext().setAuthentication(authentication);
                    chain.doFilter(request, response);
                    return;
                }
            }
        }

        //未通过验证,直接返回错误
        response.setCharacterEncoding("UTF-8");
        response.setContentType("application/json");
        response.getWriter().println(JSONUtil.parse(CommonResult.unauthorized("token验证失败")));
        response.getWriter().flush();
    }
}
配置SecurityFilter:
public class SecurityFilter extends AbstractSecurityInterceptor implements Filter {

    @Resource
    private SecurityMetadataSource securityMetadataSource;
    @Resource
    private IgnoreUrlsConfig ignoreUrlsConfig;
    @Value("${server.servlet.context-path}")
    private String contextPath;

    @Resource
    public void setAccessDecisionManager(SecurityAccessDecisionManager securityAccessDecisionManager) {
        super.setAccessDecisionManager(securityAccessDecisionManager);
    }

    @Override
    public void init(FilterConfig filterConfig) {

    }

    @Override
    public void doFilter(ServletRequest servletRequest, ServletResponse servletResponse, FilterChain filterChain) throws IOException, ServletException {
        HttpServletRequest request = (HttpServletRequest) servletRequest;
        FilterInvocation fi = new FilterInvocation(servletRequest, servletResponse, filterChain);

        //仿照OncePerRequestFilter,解决Filter执行两次的问题
        //执行两次原因:SecurityConfig中,@Bean和addFilter相当于向容器注入了两次
        //解决办法:1是去掉@Bean,但Filter中若有引用注入容器的其它资源,则会报错
        //        2就是request中保存一个Attribute来判断该请求是否已执行过
        String alreadyFilteredAttributeName = getAlreadyFilteredAttributeName();
        boolean hasAlreadyFilteredAttribute = request.getAttribute(alreadyFilteredAttributeName) != null;
        if (hasAlreadyFilteredAttribute) {
            fi.getChain().doFilter(fi.getRequest(), fi.getResponse());
            return;
        }
        request.setAttribute(alreadyFilteredAttributeName, Boolean.TRUE);

        System.out.println("SecurityFilter:" + request.getRequestURI());

        //OPTIONS请求直接放行
        if (request.getMethod().equals(HttpMethod.OPTIONS.toString())) {
            fi.getChain().doFilter(fi.getRequest(), fi.getResponse());
            return;
        }
        //白名单请求直接放行
        PathMatcher pathMatcher = new AntPathMatcher();
        for (String path : ignoreUrlsConfig.getUrls()) {
            if (pathMatcher.match(contextPath + path, request.getRequestURI())) {
                System.out.println("白名单通过..." + request.getRequestURI());
                fi.getChain().doFilter(fi.getRequest(), fi.getResponse());
                return;
            }
        }
        //此处会调用AccessDecisionManager中的decide方法进行鉴权操作
        InterceptorStatusToken token = super.beforeInvocation(fi);
        try {
            fi.getChain().doFilter(fi.getRequest(), fi.getResponse());
        } finally {
            super.afterInvocation(token, null);
        }
    }

    @Override
    public void destroy() {
        securityMetadataSource.clearDataSource();
    }

    @Override
    public Class<?> getSecureObjectClass() {
        return FilterInvocation.class;
    }

    @Override
    public SecurityMetadataSource obtainSecurityMetadataSource() {
        return securityMetadataSource;
    }


    protected String getAlreadyFilteredAttributeName() {
        return this.getClass().getName() + ".FILTERED";
    }
}
刚开始配置SecurityFilter出现了一个问题,就是每发起一次请求,filter都会执行两次,这是因为在配置SecurityConfig 时,将SecurityFilter通过@Bean添加进了容器,security本身又执行了addFilter,相当于SecurityFilter被添加了两次,因此我仿照了OncePerRequestFilter做了重复执行拦截判断!
UserController:
@RestController
@RequestMapping("/user")
public class UserController {

    @Resource
    IUserService userService;

    @PostMapping("/login")
    public CommonResult login(String username, String password) {
        String token = userService.login(username, password);
        if (token == null) {
            return CommonResult.validateFailed("用户名或密码错误");
        }
        if (token.equals("-1")) {
            return CommonResult.validateFailed("账号被禁用");
        }
        Map<String, String> tokenMap = new HashMap<>();
        tokenMap.put("token", token);
        return CommonResult.success(tokenMap);
    }

    @PostMapping("/register")
    public CommonResult register(String username, String password) {
        User user = new User();
        user.setUsername(username);
        user.setPassword(password);
        int result = userService.register(user);
        if (result == -1) {
            return CommonResult.failed("该账号已注册");
        }
        return CommonResult.success("注册成功");
    }

    @GetMapping("/testJwt")
    public CommonResult testJwt() {
        return CommonResult.success("有Token测试成功");
    }

    @GetMapping("/testNoJwt")
    public CommonResult testNoJwt() {
        return CommonResult.success("无Token测试成功");
    }

    @GetMapping("/testPerm")
    public CommonResult testPerm() {
        return CommonResult.success("权限测试成功");
    }
}
这里只贴了关键代码,详情可以参考源码:https://github.com/baiyuliang/SpringBootJwt
现在我们来捋一下全部的认证授权流程:
1.Test中调用注册接口 /user/register:
    @Test
    void testReg() {
        String username = "666666";
        String password = "123456";
        System.out.println(userController.register(username, password).getMessage());
    }
默认用户状态status为1可用(0禁用),用户权限1普通用户
2.调用登录接口 /user/login:
    @Test
    void testLogin() {
        String username = "666666";
        String password = "123456";
        System.out.println(JSONUtil.toJsonStr(userController.login(username, password)));
    }
登录这里需要注意的是,我们要实现一个org.springframework.security.core.userdetails中的UserDetailsService接口:
public class UserDetailsServiceImpl implements UserDetailsService {

    @Resource
    UserMapper userMapper;
    @Resource
    PermissionMapper permissionMapper;

    @Override
    public UserDetails loadUserByUsername(String username) throws UsernameNotFoundException {
        QueryWrapper<User> queryWrapper = new QueryWrapper<>();
        queryWrapper.eq("username", username);
        User user = userMapper.selectOne(queryWrapper);
        //如果用户被禁用,则不再查询权限表
        if (user != null) {
            return new MyUserDetails(user, user.getStatus() == 1 ? getResourceList(user.getRoleId()) : new ArrayList<>());
        }
        return null;
    }

    /**
     * 获取该用户角色拥有的权限(可访问的url)
     *
     * @return
     */
    public List<Permissions> getResourceList(int roleId) {
        QueryWrapper<Permissions> queryWrapper = new QueryWrapper<>();
        queryWrapper.last("where find_in_set('" + roleId + "',role_ids)");
        return permissionMapper.selectList(queryWrapper);
    }

}
MyUserDetails继承自security中的UserDetails,loadUserByUsername方法即通过用户名从user表中查询到该用户信息,然后再通过用户角色roleId从permissions表中查询该角色可以访问的路径列表(此处做了判断,如果用户status==0则返回空列表);
然后,通过passwordEncoder比对用户传入的password与从数据库获取的用户的password比对,成功则调用jwtTokenUtil.generateToken(userDetails)生成token并返回,否则返回失败信息。
3.拿到token后,保存,开始模拟请求,可以用postman,也可以用IDEA自带HTTPClient:
GET http://localhost:8080/jwttest/user/testJwt
Accept: application/json
token: eyJhbGciOiJIUzI1NiJ9.eyJzdWIiOiI2NjY2NjYiLCJjcmVhdGVkIjoiU2VwIDE2LCAyMDIxIDE6MzM6MDggUE0iLCJleHAiOjE2MzIzNzUxODh9.bVODaWOwweOXEF_Pi4fgHqU1FT4kdWXKtxLmhaqCdY4
执行测试前,我们不要忘了我们配置的白名单路径:user/testNoJwt,所以我们可以先试验一下访问白名单:
JwtFilter:/jwttest/user/testNoJwt
白名单通过.../jwttest/user/testNoJwt
当我们发送请求时,首先进入JwtFilter的doFilterInternal方法:
   //如果requestURI在白名单中直接放行
     PathMatcher pathMatcher = new AntPathMatcher();
     for (String url : ignoreUrlsConfig.getUrls()) {
         if (pathMatcher.match(contextPath + url, requestURI)) {
             System.out.println("白名单通过..." + requestURI);
             chain.doFilter(request, response);
             return;
         }
     }
这里 如果判断访问路径是白名单路径则直接放行,不需要验证token;
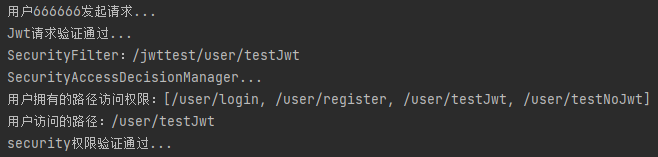
再次执行需要验证token的user/testJwt:
因为不在白名单中,所以会进入到下面的方法中验证token:
   String authHeader = request.getHeader(tokenHeader);
   if (authHeader != null && authHeader.startsWith(tokenType)) {
       String authToken = authHeader.substring(tokenType.length());// The part after "Bearer "
       String username = jwtTokenUtil.getUserNameFromToken(authToken);
       System.out.println("用户" + username + "发起请求...");
       if (username != null && SecurityContextHolder.getContext().getAuthentication() == null) {
           UserDetails userDetails = userDetailsService.loadUserByUsername(username);
           if (userDetails != null && jwtTokenUtil.validateToken(authToken, userDetails)) {
               System.out.println("Jwt请求验证通过...");
               UsernamePasswordAuthenticationToken authentication = new UsernamePasswordAuthenticationToken(userDetails, null, userDetails.getAuthorities());
               authentication.setDetails(new WebAuthenticationDetailsSource().buildDetails(request));
               SecurityContextHolder.getContext().setAuthentication(authentication);
               chain.doFilter(request, response);
               return;
           }
       }
   }
若未传token或传错,则返回:
{
    "code": 401,
    "message": "token验证失败"
}
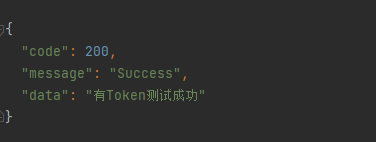
正确,则返回:
{
    "code": 200,
    "message": "Success",
    "data": "有Token测试成功"
}
该步骤首先会验证请求头是否是:Authorization: Bearer,然后通过截取获得传来的token,并调用jwtTokenUtil.getUserNameFromToken方法从token中解析出用户名username,然后调用userDetailsService.loadUserByUsername(username)获得userDetails,这里包含有用户名、密码、该用户权限下多能访问的路径列表,通过jwtTokenUtil.validateToken来验证传来的token中的用户信息与数据库中的用户信息是否一致来判断token的有效性,通过验证后,则将认证信息设置进Security并进入SecurityFilter验证环节!
这里需要说明的是,JwtFilter仅相当于认证环节,就是仅用来确认token的有效性,以及用户是否合法,当认证通过后,还需要授权,也就是判断该用户是否具有访问该路径的权限,这就是SecurityFilter的作用!
SecurityFilter中我们发现重写了obtainSecurityMetadataSource()方法,并返回了我们自己定义的securityMetadataSource对象,它是干什么的?
实际上,SecurityMetadataSource实现了FilterInvocationSecurityMetadataSource,它的作用主要是获取用户访问的路径在系统中的配置信息:
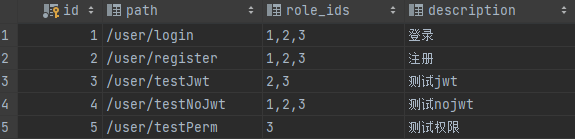
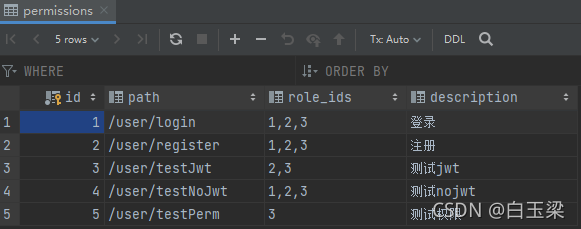
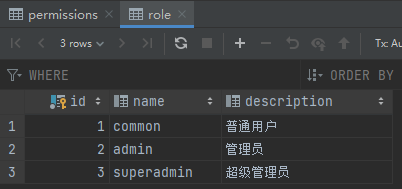
此时我们访问的是user/testJwt,该路径在数据库中已经配置,访问所需权限(角色)是2,3即只有管理员和超级管理员可以访问,所以SecurityMetadataSource的作用就是将查询出来的配置信息返回,并与用户所拥有路径访问权限进行比对(项目中是直接比对路径),以此来确定用户是否具有该路径的访问权限,当然这里也可能获取到的是空的,因为系统本身并没有配置该路径,数据库中也不存在,这种情况就跟白名单一样,认为是安全路径,可以随意访问!
在SecurityFilter中仍然有白名单判断,这是应为在jwtFilter中放行后会进入到SecurityFilter,如果这里没有白名单判断,则就会进入授权验证环节,这是不应该的!如果不在白名单中就会进入下一步,
super.beforeInvocation(fi)
该步骤将进入到真正的验证环节AccessDecisionManager中去:
    @Override
    public void decide(Authentication authentication, Object object, Collection<ConfigAttribute> configAttributes) throws AccessDeniedException, InsufficientAuthenticationException {
        // 当接口未被配置资源时直接放行
        if (CollUtil.isEmpty(configAttributes)) return;
        if (CollUtil.isEmpty(authentication.getAuthorities())) throw new AccessDeniedException("该账号没有任何权限");
        System.out.println("用户拥有的路径访问权限:" + authentication.getAuthorities().toString());
        for (ConfigAttribute configAttribute : configAttributes) {
            //将访问所需资源或用户拥有资源进行比对
            String needAuthority = configAttribute.getAttribute();
            System.out.println("用户访问的路径:" + needAuthority);
            for (GrantedAuthority grantedAuthority : authentication.getAuthorities()) {
                if (needAuthority.trim().equals(grantedAuthority.getAuthority())) {
                    System.out.println("security权限验证通过...");
                    return;
                }
            }
        }
        System.out.println("security权限验证失败...");
        throw new AccessDeniedException("权限验证失败");
    }
authentication:就是jwt中认证通过后,赋予的用户所具有的路径访问权限:
if (user != null) {
   return new MyUserDetails(user, user.getStatus() == 1 ? getResourceList(user.getRoleId()) : new ArrayList<>());
}

public List<Permissions> getResourceList(int roleId) {
    QueryWrapper<Permissions> queryWrapper = new QueryWrapper<>();
    queryWrapper.last("where find_in_set('" + roleId + "',role_ids)");
    return permissionMapper.selectList(queryWrapper);
}
它被放进了security中的Authentication,通过authentication.getAuthorities()就可以获得!
configAttributes:就是上面说的SecurityMetadataSource中获取的当前访问路径在系统中的配置信息,如配置的有,其实返回的就是该路径本身!
然后将当前访问路径需要的权限,与用户自身拥有的权限比对,用户具有的权限包含有该访问路径,则通过授权验证,否则不通过,返回没有相关权限!
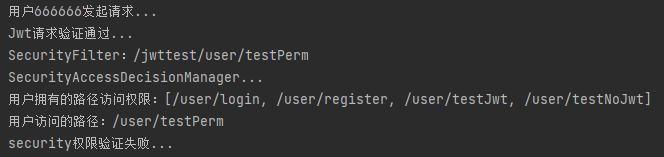
这里我们可以通过修改用户角色,来测试不同访问路径验证:
当前我的用户角色是2,我将访问/user/testPerm(该路径所需角色权限是3):
GET http://localhost:8080/jwttest/user/testPerm
Accept: application/json
Authorization: Bearer eyJhbGciOiJIUzI1NiJ9.eyJzdWIiOiI2NjY2NjYiLCJjcmVhdGVkIjoiU2VwIDE2LCAyMDIxIDE6MzM6MDggUE0iLCJleHAiOjE2MzIzNzUxODh9.bVODaWOwweOXEF_Pi4fgHqU1FT4kdWXKtxLmhaqCdY4
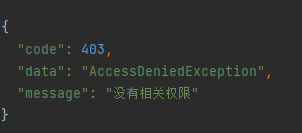
结果:
{
  "code": 403,
  "message": "权限验证失败"
}
Security+JWT的认证和授权流程大致就是这样,具体可以下载源码进行测试,另有疏漏或者讲解不正确的地方,还望大家不吝赐教~
GitHub:https://github.com/baiyuliang/SpringBootJwt