文章目录
- 一、快速运行
- 二、运行效果
- 三、硬件说明
- 四、RMT简介
- 五、例程说明
- 六、优化与效果
- 七、相关函数说明
- 7.1 rmt 相关
- 7.2 led strip 相关
- 八、参考
一、快速运行
- 示例项目中,选择
peripherals—>rmt—>led_strip menuconfig配置ESP32C3-Specific—>Rec 0- 芯片选择
ESP32-C3(Built-in USB JTAG) - 快速运行
ESP-IDF Build, Flash and Monitor(左下角)
二、运行效果
ESP32-C3入门教程 基础篇⑧——WS2812 全彩RGB LED灯带2
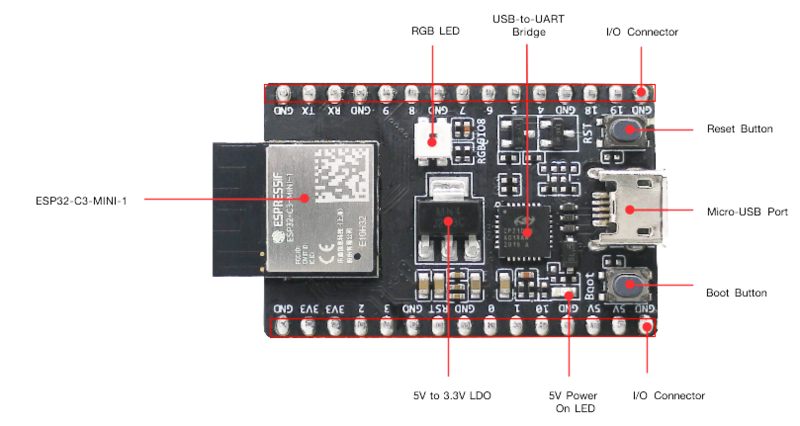
三、硬件说明
从硬件原理图中可以看出来
RGB LED是通过GPIO8来控制- 而
RGB LED是SK68XXMINI-HS - 大部分人对
SK68XXMINI不熟悉,但是对WS2812熟悉 - 查一下资料就晓得,
SK68XXMINI和WS2812其实是一个东西,控制原理是一样的 - SK68XXMINI资料
- WS2812资料,WS2812资料2


四、RMT简介
RMT 是 Remote Control 的简称。由于RMT模块的灵活性,驱动器还可用于生成或接收许多其他类型的信号。
WS2812是一个数字RGB LED,其定义的协议数据格式与RMT外围设备中的协议数据格式兼容。
- RMT发送

- RMT接收

五、例程说明
- RMT配置
rmt_configrmt_mode = RMT_MODE_TX输出模式channel通道号gpio_numGPIO口- 其他
- RMT驱动安装
rmt_driver_installchannel通道号rx_buf_size = 0接收缓存大小intr_alloc_flags = 0
- led_strip配置
LED_STRIP_DEFAULT_CONFIGmax_leds最大LED个数dev设备手柄,即RMT通道号的地址
- led_strip实例化
led_strip_new_rmt_ws2812led_strip_config_tled_strip配置参数
- led_strip实例化后有多个方法
esp_err_t (*set_pixel)(led_strip_t *strip, uint32_t index, uint32_t red, uint32_t green, uint32_t blue);为特定像素设置RGBesp_err_t (*refresh)(led_strip_t *strip, uint32_t timeout_ms);刷新LEDs颜色esp_err_t (*clear)(led_strip_t *strip, uint32_t timeout_ms);关闭所有LEDsesp_err_t (*del)(led_strip_t *strip);释放LEDs所有资源
- while循环
- hue从0到360的阶梯递增
- hue转rgb
strip->set_pixel(strip, j, red, green, blue)设置RGB进去到第j个LEDstrip->refresh(strip, 100)刷新LED的颜色- 延时
strip->clear(strip, 50);关闭所有LEDs- 延时
- 循环……
void app_main(void)
{
    uint32_t red = 0;
    uint32_t green = 0;
    uint32_t blue = 0;
    uint16_t hue = 0;
    uint16_t start_rgb = 0;

    rmt_config_t config = RMT_DEFAULT_CONFIG_TX(CONFIG_EXAMPLE_RMT_TX_GPIO, RMT_TX_CHANNEL);
    // set counter clock to 40MHz
    config.clk_div = 2;

    ESP_ERROR_CHECK(rmt_config(&config));
    ESP_ERROR_CHECK(rmt_driver_install(config.channel, 0, 0));

    // install ws2812 driver
    led_strip_config_t strip_config = LED_STRIP_DEFAULT_CONFIG(CONFIG_EXAMPLE_STRIP_LED_NUMBER, (led_strip_dev_t)config.channel);
    led_strip_t *strip = led_strip_new_rmt_ws2812(&strip_config);
    if (!strip) {
        ESP_LOGE(TAG, "install WS2812 driver failed");
    }
    // Clear LED strip (turn off all LEDs)
    ESP_ERROR_CHECK(strip->clear(strip, 100));
    // Show simple rainbow chasing pattern
    ESP_LOGI(TAG, "LED Rainbow Chase Start");
    while (true) {
        for (int i = 0; i < 3; i++) {
            for (int j = i; j < CONFIG_EXAMPLE_STRIP_LED_NUMBER; j += 3) {
                // Build RGB values
                hue = j * 360 / CONFIG_EXAMPLE_STRIP_LED_NUMBER + start_rgb;
                led_strip_hsv2rgb(hue, 100, 100, &red, &green, &blue);
                // Write RGB values to strip driver
                ESP_ERROR_CHECK(strip->set_pixel(strip, j, red, green, blue));
            }
            // Flush RGB values to LEDs
            ESP_ERROR_CHECK(strip->refresh(strip, 100));
            vTaskDelay(pdMS_TO_TICKS(EXAMPLE_CHASE_SPEED_MS));
            strip->clear(strip, 50);
            vTaskDelay(pdMS_TO_TICKS(EXAMPLE_CHASE_SPEED_MS));
        }
        start_rgb += 60;
    }
}
六、优化与效果
我感觉这个效果在我这个开发板上面效果不咋地,所以我做了如下优化
- 首先,RMT TX的GPIO在开发板上面是GPIO8,所以,
#define EXAMPLE_RMT_TX_GPIO 8 - 其次,RGB LED我就一个,所以,
#define EXAMPLE_STRIP_LED_NUMBER 1 - 最后,hue递增,再转rgb的方式,太骚了,不适合我。我直接红绿蓝RGB三种颜色每秒流转即可
改动后效果如下:
ESP32-C3入门教程 基础篇⑧——WS2812 全彩RGB LED灯带3
改动代码如下:
#include "sdkconfig.h"
#include "freertos/FreeRTOS.h"
#include "freertos/task.h"
#include "esp_log.h"
#include "driver/rmt.h"
#include "led_strip.h"

static const char *TAG = "example";

#define RMT_TX_CHANNEL RMT_CHANNEL_0

#define EXAMPLE_CHASE_SPEED_MS (1000)

#define EXAMPLE_RMT_TX_GPIO 8

#define EXAMPLE_STRIP_LED_NUMBER 1

void app_main(void)
{
    rmt_config_t config = RMT_DEFAULT_CONFIG_TX(EXAMPLE_RMT_TX_GPIO, RMT_TX_CHANNEL);
    // set counter clock to 40MHz
    config.clk_div = 2;

    ESP_ERROR_CHECK(rmt_config(&config));
    ESP_ERROR_CHECK(rmt_driver_install(config.channel, 0, 0));

    // install ws2812 driver
    led_strip_config_t strip_config = LED_STRIP_DEFAULT_CONFIG(EXAMPLE_STRIP_LED_NUMBER, (led_strip_dev_t)config.channel);
    led_strip_t *strip = led_strip_new_rmt_ws2812(&strip_config);
    if (!strip) {
        ESP_LOGE(TAG, "install WS2812 driver failed");
    }
    // Clear LED strip (turn off all LEDs)
    ESP_ERROR_CHECK(strip->clear(strip, 100));
    // Show simple rainbow chasing pattern
    ESP_LOGI(TAG, "LED Rainbow Chase Start");
    while (true) {
        strip->set_pixel(strip, 0, 255, 0, 0);
        strip->refresh(strip, 50);
        vTaskDelay(pdMS_TO_TICKS(EXAMPLE_CHASE_SPEED_MS));

        strip->set_pixel(strip, 0, 0, 255, 0);
        strip->refresh(strip, 50);
        vTaskDelay(pdMS_TO_TICKS(EXAMPLE_CHASE_SPEED_MS));


        strip->set_pixel(strip, 0, 0, 0, 255);
        strip->refresh(strip, 50);
        vTaskDelay(pdMS_TO_TICKS(EXAMPLE_CHASE_SPEED_MS));
    }
}
七、相关函数说明
7.1 rmt 相关
\esp-idf\components\driver\include\driver\rmt.h
/**
* @brief Data struct of RMT configure parameters
*/
typedef struct {
    rmt_mode_t rmt_mode;   /*!< RMT mode: transmitter or receiver */
    rmt_channel_t channel; /*!< RMT channel */
    gpio_num_t gpio_num;   /*!< RMT GPIO number */
    uint8_t clk_div;       /*!< RMT channel counter divider */
    uint8_t mem_block_num; /*!< RMT memory block number */
    uint32_t flags;        /*!< RMT channel extra configurations, OR'd with RMT_CHANNEL_FLAGS_[*] */
    union {
        rmt_tx_config_t tx_config; /*!< RMT TX parameter */
        rmt_rx_config_t rx_config; /*!< RMT RX parameter */
    };
} rmt_config_t;

/**
 * @brief Default configuration for Tx channel
 *
 */
#define RMT_DEFAULT_CONFIG_TX(gpio, channel_id)      \
    {                                                \
        .rmt_mode = RMT_MODE_TX,                     \
        .channel = channel_id,                       \
        .gpio_num = gpio,                            \
        .clk_div = 80,                               \
        .mem_block_num = 1,                          \
        .flags = 0,                                  \
        .tx_config = {                               \
            .carrier_freq_hz = 38000,                \
            .carrier_level = RMT_CARRIER_LEVEL_HIGH, \
            .idle_level = RMT_IDLE_LEVEL_LOW,        \
            .carrier_duty_percent = 33,              \
            .carrier_en = false,                     \
            .loop_en = false,                        \
            .idle_output_en = true,                  \
        }                                            \
    }
components\driver\rmt.c
esp_err_t rmt_config(const rmt_config_t *rmt_param)

esp_err_t rmt_driver_install(rmt_channel_t channel, size_t rx_buf_size, int intr_alloc_flags)
7.2 led strip 相关
\components\led_strip\include\led_strip.h
/**
* @brief LED Strip Configuration Type
*
*/
typedef struct {
    uint32_t max_leds;   /*!< Maximum LEDs in a single strip */
    led_strip_dev_t dev; /*!< LED strip device (e.g. RMT channel, PWM channel, etc) */
} led_strip_config_t;

/**
* @brief Declare of LED Strip Type
*
*/
struct led_strip_s {
    /**
    * @brief Set RGB for a specific pixel
    *
    * @param strip: LED strip
    * @param index: index of pixel to set
    * @param red: red part of color
    * @param green: green part of color
    * @param blue: blue part of color
    *
    * @return
    *      - ESP_OK: Set RGB for a specific pixel successfully
    *      - ESP_ERR_INVALID_ARG: Set RGB for a specific pixel failed because of invalid parameters
    *      - ESP_FAIL: Set RGB for a specific pixel failed because other error occurred
    */
    esp_err_t (*set_pixel)(led_strip_t *strip, uint32_t index, uint32_t red, uint32_t green, uint32_t blue);

    /**
    * @brief Refresh memory colors to LEDs
    *
    * @param strip: LED strip
    * @param timeout_ms: timeout value for refreshing task
    *
    * @return
    *      - ESP_OK: Refresh successfully
    *      - ESP_ERR_TIMEOUT: Refresh failed because of timeout
    *      - ESP_FAIL: Refresh failed because some other error occurred
    *
    * @note:
    *      After updating the LED colors in the memory, a following invocation of this API is needed to flush colors to strip.
    */
    esp_err_t (*refresh)(led_strip_t *strip, uint32_t timeout_ms);

    /**
    * @brief Clear LED strip (turn off all LEDs)
    *
    * @param strip: LED strip
    * @param timeout_ms: timeout value for clearing task
    *
    * @return
    *      - ESP_OK: Clear LEDs successfully
    *      - ESP_ERR_TIMEOUT: Clear LEDs failed because of timeout
    *      - ESP_FAIL: Clear LEDs failed because some other error occurred
    */
    esp_err_t (*clear)(led_strip_t *strip, uint32_t timeout_ms);

    /**
    * @brief Free LED strip resources
    *
    * @param strip: LED strip
    *
    * @return
    *      - ESP_OK: Free resources successfully
    *      - ESP_FAIL: Free resources failed because error occurred
    */
    esp_err_t (*del)(led_strip_t *strip);
};
八、参考
Remote Control (RMT) - ESP32-C2 - —— ESP-IDF编程指南
觉得好,就一键三连呗(点赞+收藏+关注)