上一章提到了Redis(二)Redis持久化 其目的是出现故障重启时的数据恢复,这一章要提到Redis主从与哨兵架构。文中所用图片来自copy
文章目录
- 前言
- Redis主从架构
- 如何在同一台机器搭建主从架构
- Redis主从工作原理
- 数据部分复制
- Jedis使用
- Redis的管道(Pipeline)
- Redis Lua脚本
- Redis哨兵高可用架构
- 搭建
- 假设master挂了
- Jedis使用通过哨兵获取信息连接
- 哨兵的Spring Boot整合Redis连接
- Redis客户端命令对应的RedisTemplate中的方法列表:
前言
本章主要是和大家一起探索一下redis主从架构的搭建,这里有的参数暂不解释,更多的是搭建应用。
Redis主从架构
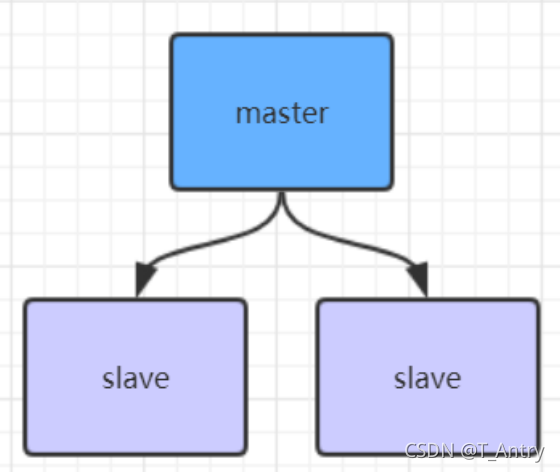
主(master)和 从(slave)部署在不同的服务器上,当主节点服务器写入数据时会同步到从节点的服务器上,一般主节点负责写入数据,从节点负责读取数据。
优点
-
读写分离,提高效率
-
数据热备份,提供多个副本

缺点 -
主节点故障,集群则无法进行工作,可用性比较低,从节点升主节点需要人工手动干预
-
单点容易造成性能低下
-
主节点的存储能力受到限制
-
主节点的写受到限制(只有一个主节点)- 全量同步可能会造成毫秒或者秒级的卡顿现象
如何在同一台机器搭建主从架构
- copy一份redis.conf文件
- 修改port
port 6380
- 配置主从复制
replicaof 192.168.0.60 6379 # 从本机6379的redis实例复制数据,Redis 5.0之前使用slaveof
修改完,启动新的实例只要指定这个新的配置文件即可
[root@localhost redis-5.0.13]# src/redis-server config/redis-6380.conf
43394:C 14 Sep 2021 00:04:29.506 # oO0OoO0OoO0Oo Redis is starting oO0OoO0OoO0Oo
43394:C 14 Sep 2021 00:04:29.506 # Redis version=5.0.13, bits=64, commit=00000000, modified=0, pid=43394, just started
43394:C 14 Sep 2021 00:04:29.506 # Configuration loaded
启动完,可以查到多了个6380的实例
[root@localhost redis-5.0.13]# ps -ef | grep redis
root      40955      1  0 Sep13 ?        00:00:08 src/redis-server *:6379
root      43395      1  0 00:04 ?        00:00:00 src/redis-server *:6380
root      43400  42366  0 00:04 pts/0    00:00:00 grep --color=auto redis
Redis主从工作原理
为master配置一个slave,不管这个slave是否第一次连接上Master,它都会发送一个PSYNC命令给master请求复制数据。master收到PSYNC命令后,会在后台进行数据持久化通过bgsave生成最新的rdb快照文件,持久化期间,master会继续接收客户端的请求,它会把这些可能修改数据集的请求缓存在内存中。当持久化进行完毕以后,master会把这份rdb文件数据集发送给slave,slave会把接收到的数据进行持久化生成rdb,然后再加载到内存中。然后,master再将之前缓存在内存中的命令发送给slave。

当master与slave之间的连接由于某些原因而断开时,slave能够自动重连Master,如果master收到了多个slave并发连接请求,它只会进行一次持久化,而不是一个连接一次,然后再把这一份持久化的数据发送给多个并发连接的slave。
数据部分复制
当master和slave断开重连后,一般都会对整份数据进行复制。但从redis2.8版本开始,redis改用可以支持部分数据复制的命令PSYNC去master同步数据,slave与master能够在网络连接断开重连后只进行部分数据复制(断点续传)。
master会在其内存中创建一个复制数据用的缓存队列,缓存最近一段时间的数据,master和它所有的
slave都维护了复制的数据下标offset和master的进程id,因此,当网络连接断开后,slave会请求master
继续进行未完成的复制,从所记录的数据下标开始。如果master进程id变化了,或者从节点数据下标
offset太旧,已经不在master的缓存队列里了,那么将会进行一次全量数据的复制。

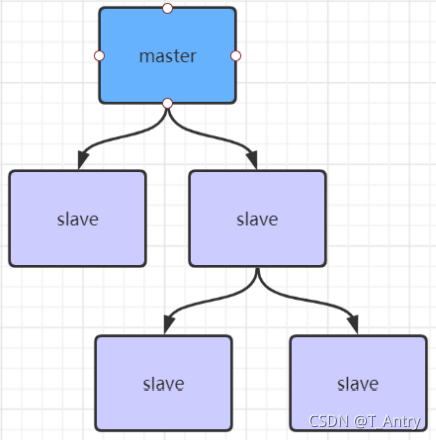
如果有很多从节点,为了缓解主从复制风暴(多个从节点同时复制主节点导致主节点压力过大),可以做如下架构,让部分从节点与从节点(与主节点同步)同步数据

Jedis使用
Jedis集成了redis的一些命令操作,封装了redis的java客户端,提供了连接池管理,类似阿里巴巴的(Druid)德鲁伊。
简单使用,先引入包
<!-- https://mvnrepository.com/artifact/redis.clients/jedis -->
    <dependency>
      <groupId>redis.clients</groupId>
      <artifactId>jedis</artifactId>
      <version>3.7.0</version>
    </dependency>
JedisTest
public class JedisTest {
    private JedisPool jedisPool;

    @Before
    public void before(){
        JedisPoolConfig jedisPoolConfig = new JedisPoolConfig();
        jedisPoolConfig.setMaxTotal(20);
        jedisPoolConfig.setMaxIdle(10);
        jedisPoolConfig.setMinIdle(5);
        // timeout,这里既是连接超时又是读写超时,从Jedis 2.8开始有区分connectionTimeout和soTimeout的构造函数
        jedisPool = new JedisPool(jedisPoolConfig, "192.168.200.135", 6379, 3000, null);
    }
    @Test
    public void test1() {
        Jedis jedis = null;
        //******* jedis普通操作示例 ********
        try {
            //从redis连接池里拿出一个连接执行命令
            jedis = jedisPool.getResource();
            //******* jedis普通操作示例 ********
            System.out.println(jedis.set("antry", "antry"));
            System.out.println(jedis.get("antry"));
        } catch (Exception e) {
            e.printStackTrace();
        } finally {
            if (jedis!=null)
                jedis.close();
        }

    }
}
Redis的管道(Pipeline)
redis命令在从提交到返回处理结果的过程中,消耗的时间我们称之为RTT(往返时间)。
在需要批量执行redis 命令的场景下,如果命令单条逐个执行,那么总共花费的时间是命令条数 N * RTT。
redis 提供了管道技术来提高批量执行效率,即将多个命令打包发送给redis服务端。
需要注意到是用pipeline方式打包命令发送,redis必须在处理完所有命令前先缓存起所有命令的处理结果。打包的命令越多,缓存消耗内存也越多。所以并不是打包的命令越多越好。
所有命令执行完后,再将所有结果打包返回。
在redis-cli命令行中,使用redis管道技术时,我们通常将待执行的命令放到一个文本里,比如commands.txt ,然后使用命令:
cat commands.txt | redis-cli --pipe
去读取文本里的命令,然后打包已pipe管道的方式发送给redis服务端。管道中前面命令失败,后面命令
不会有影响,继续执行。
Jedis使用管道技术:
    @Test
    public void testPipeline(){

        //******* 管道示例 ********
        //管道的命令执行方式:cat redis.txt | redis-cli -h 127.0.0.1 -a password - p 6379 --pipe
        Jedis jedis = null;
        try {
            jedis = jedisPool.getResource();
            Pipeline pl = jedis.pipelined();
            for (int i = 0; i < 10; i++) {
                pl.incr("pipelineKey");
                pl.set("zhuge" + i, "zhuge");
                //模拟管道报错
                //pl.setbit("zhuge", -1, true);
            }
            List<Object> results = pl.syncAndReturnAll();
            System.out.println(results);
        } catch (Exception e) {
            e.printStackTrace();
        } finally {
            jedis.close();
        }
    }
Redis Lua脚本
上面的管道操作,即使有一个执行失败也会继续执行下一个任务,因此不是原子操作,而lua是原子操作,Redis会将整个脚本作为一个整体执行。由于redis自带的事务比较鸡肋,所以使用lua实现事务。
Lua是一个高效的轻量级脚本语言,用标准C语言编写并以源代码形式开放, 其设计目的是为了嵌入应用程序中,从而为应用程序提供灵活的扩展和定制功能。
使用lua脚本的测试
    @Test
    public void  testLua(){
        //******* lua脚本示例 ********
        //模拟一个商品减库存的原子操作
        //lua脚本命令执行方式:redis-cli --eval /tmp/test.lua , 10
        Jedis jedis = null;
        //从redis连接池里拿出一个连接执行命令
        try {
            jedis = jedisPool.getResource();
            jedis.set("product_stock_10016", "15");  //初始化商品10016的库存
            String script = " local count = redis.call('get', KEYS[1]) " +
                    " local a = tonumber(count) " +
                    " local b = tonumber(ARGV[1]) " +
                    " if a >= b then " +
                    "   redis.call('set', KEYS[1], a-b) " +
                    //模拟语法报错回滚操作
                    //"   bb == 0 " +
                    "   return 1 " +
                    " end " +
                    " return 0 ";
            Object obj = jedis.eval(script, Arrays.asList("product_stock_10016"), Arrays.asList("10"));
            System.out.println(obj);
        } catch (Exception e) {
            e.printStackTrace();
        } finally {
            if (jedis!=null)
                jedis.close();
        }
    }
具体的lua使用,可以查看菜鸟教程。稍微看一下能懂的,就是突然一看有点迷糊很正常。
Redis哨兵高可用架构
sentinel哨兵是特殊的redis服务,不提供读写服务,主要用来监控redis实例节点。有点类似rocke的namespace,哨兵架构下client端第一次从哨兵找出redis的主节点,后续就直接访问redis的主节点,当redis的主节点发生变化,哨兵会第一时间感知到,并且将新的redis主节点通知给client端(这里面redis的client端一般都实现了订阅功能,订阅sentinel发布的节点变动消息)

搭建
目录下有个sentinel.conf文件,复制三份,分别命名sentinel‐26379.conf,sentinel‐26380.conf,sentinel‐26381.conf
修改配置
port 26379 # 端口号
daemonize yes
# quorum是一个数字,指明当有多少个sentinel认为一个master失效时(值一般为:sentinel总数/2 +1),master才算真正失效
sentinel monitor mymaster 192.*.*.*(你的redis master ip) 6379 2 # mymaster这个名字随便取,客户端访问时会用到
启动
src/redis-sentinel sentinel-26379.conf
src/redis-sentinel sentinel-26380.conf
src/redis-sentinel sentinel-26381.conf
启动完之后在sentinel的配置文件末尾可以看到新增了几行
protected-mode no
sentinel known-replica mymaster 192.168.200.135 6381
sentinel known-replica mymaster 192.168.200.135 6380
sentinel known-sentinel mymaster 192.168.200.135 26381 bc0e7eb8c645e8f8be0a61e528e6d218cdc30722
sentinel known-sentinel mymaster 192.168.200.135 26380 f631c92ac7311f6ca99c89be80b46f7a0b0f112e
sentinel current-epoch 2
-
sentinel known-replica mymaster 192.168.200.135 6381是slave的信息
-
sentinel known-sentinel mymaster 192.168.200.135 26381
bc0e7eb8c645e8f8be0a61e528e6d218cdc30722是其他哨兵的信息
如果你没有其他哨兵信息,那么可能是你在启动完一个哨兵之后复制的sentinel.conf的配置文件,是因为myid已经生产没删掉造成的。所以要在没启动之前复制配置文件,或者删掉myid就行了
如果是从节点信息没有,那就是你的从节点配置有问题,没有上线,检查下端口之类的
假设master挂了
把master的进程的进程kill之后
[root@localhost redis-5.0.13]# ps -ef | grep redis
root      61438      1  0 21:04 ?        00:00:05 src/redis-sentinel *:26379 [sentinel]
root      61457      1  0 21:04 ?        00:00:05 src/redis-sentinel *:26380 [sentinel]
root      61467      1  0 21:04 ?        00:00:05 src/redis-sentinel *:26381 [sentinel]
root      61565  42435  0 21:09 pts/2    00:00:00 src/redis-cli
root      61566  59731  0 21:09 pts/3    00:00:00 src/redis-cli -p 6380
root      61603  60091  0 21:10 pts/4    00:00:00 src/redis-cli -p 6381
root      61803      1  0 21:19 ?        00:00:02 src/redis-server 0.0.0.0:6379
root      62048      1  0 21:28 ?        00:00:01 src/redis-server 0.0.0.0:6381
root      62191      1  0 21:30 ?        00:00:01 src/redis-server 0.0.0.0:6380
root      62401  42366  0 21:48 pts/0    00:00:00 grep --color=auto redis
[root@localhost redis-5.0.13]# kill -9 61803
一开始查看连个从节点的info角色还是slave
# Replication
role:slave
master_host:192.168.200.135
master_port:6379
master_link_status:down
master_last_io_seconds_ago:-1
master_sync_in_progress:0
slave_repl_offset:265023
master_link_down_since_seconds:5
slave_priority:100
slave_read_only:1
connected_slaves:0
master_replid:97ebdca2e26494047dd88a5b3c8b741c324729b7
master_replid2:0000000000000000000000000000000000000000
master_repl_offset:265023
second_repl_offset:-1
repl_backlog_active:1
repl_backlog_size:1048576
repl_backlog_first_byte_offset:1
repl_backlog_histlen:265023
过了一会儿,其中有一台slave会被选举成新的master
# Replication
role:master
connected_slaves:1
slave0:ip=192.168.200.135,port=6381,state=online,offset=265626,lag=0
master_replid:1dde684c1e2bd3f8f8b264c4d51ea567f4561df4
master_replid2:97ebdca2e26494047dd88a5b3c8b741c324729b7
master_repl_offset:265916
second_repl_offset:265024
repl_backlog_active:1
repl_backlog_size:1048576
repl_backlog_first_byte_offset:1
repl_backlog_histlen:265916
此时把挂掉的master重启,一开始这台机器的状态会显示是master,但随后会很快变成slave
# Replication
role:master
connected_slaves:1
slave0:ip=192.168.200.135,port=6381,state=online,offset=265626,lag=0
master_replid:1dde684c1e2bd3f8f8b264c4d51ea567f4561df4
master_replid2:97ebdca2e26494047dd88a5b3c8b741c324729b7
master_repl_offset:265916
second_repl_offset:265024
repl_backlog_active:1
repl_backlog_size:1048576
repl_backlog_first_byte_offset:1
repl_backlog_histlen:265916
Jedis使用通过哨兵获取信息连接
public class JedisSentinelTest {
    public static void main(String[] args) {
        JedisPoolConfig config = new JedisPoolConfig();
        config.setMaxTotal(20);
        config.setMaxIdle(10);
        config.setMinIdle(5);
        String masterName = "mymaster";
        Set<String> sentinels = new HashSet<String>();
        sentinels.add(new HostAndPort("192.168.200.135",26379).toString());
        sentinels.add(new HostAndPort("192.168.200.135",26380).toString());
        sentinels.add(new HostAndPort("192.168.200.135",26381).toString());
        //JedisSentinelPool其实本质跟JedisPool类似,都是与redis主节点建立的连接池
        //JedisSentinelPool并不是说与sentinel建立的连接池,而是通过sentinel发现redis主节点并与其建立连接
        JedisSentinelPool jedisSentinelPool = new JedisSentinelPool(masterName, sentinels, config, 3000, null);
        Jedis jedis = null;
        try {
            jedis = jedisSentinelPool.getResource();
            System.out.println(jedis.set("sentinel", "antry"));
            System.out.println(jedis.get("sentinel"));
        } catch (Exception e) {
            e.printStackTrace();
        } finally {
            //注意这里不是关闭连接,在JedisPool模式下,Jedis会被归还给资源池。
            if (jedis != null)
                jedis.close();
        }
    }
}
哨兵的Spring Boot整合Redis连接
pom
<parent>
    <groupId>org.springframework.boot</groupId>
    <artifactId>spring-boot-starter-parent</artifactId>
    <version>2.3.12.RELEASE</version>
    <relativePath /> <!-- lookup parent from repository -->
  </parent>
  <dependencies>
    <dependency>
      <groupId>junit</groupId>
      <artifactId>junit</artifactId>
      <version>4.11</version>
      <scope>test</scope>
    </dependency>
    <dependency>
      <groupId>org.springframework.boot</groupId>
      <artifactId>spring-boot-starter-web</artifactId>
    </dependency>

    <dependency>
      <groupId>org.springframework.boot</groupId>
      <artifactId>spring-boot-starter-data-redis</artifactId>
    </dependency>

    <dependency>
      <groupId>org.apache.commons</groupId>
      <artifactId>commons-pool2</artifactId>
    </dependency>

    <dependency>
      <groupId>org.springframework.boot</groupId>
      <artifactId>spring-boot-starter-test</artifactId>
      <scope>test</scope>
    </dependency>

  </dependencies>
yml
server:
  port: 8080
spring:
  redis:
    database: 0
    connect-timeout: 3000
    sentinel:
      master: mymaster
      nodes: 192.168.200.135:26379,192.168.200.135:26380,192.168.200.135:26381
    lettuce:
      pool:
        max-idle: 50
        min-idle: 10
        max-active: 100
        max-wait: 1000
Controller
@RestController
public class IndexController {
    public static final Logger logger = LoggerFactory.getLogger(IndexController.class);
    @Autowired
    private StringRedisTemplate stringRedisTemplate;
    /**
     * 测试节点挂了哨兵重新选举新的master节点,客户端是否能动态感知到
     * 新的master选举出来后,哨兵会把消息发布出去,客户端实际上是实现了一个消息监听机制,
     * 当哨兵把新master的消息发布出去,客户端会立马感知到新master的信息,从而动态切换访问的masterip
     */
    @RequestMapping("/test_sentinel")
    public void testSentinel()throws InterruptedException {
        int i = 1;
         while (true){
             try {
                 stringRedisTemplate.opsForValue().set("antry"+i, i+"");
                 System.out.println("设置key:"+ "antry" + i);
                 i++;
                 Thread.sleep(1000);
                 }catch (Exception e){
                 logger.error("错误:", e);
                 }
             }
    }
}
启动后访问http://127.0.0.1:8080/test_sentinel
设置key:antry1
设置key:antry2
设置key:antry3
设置key:antry4
设置key:antry5
设置key:antry6
设置key:antry7
关闭master
设置key:antry37
设置key:antry38
2021-09-15 13:49:33.712  INFO 136712 --- [xecutorLoop-1-8] i.l.core.protocol.ConnectionWatchdog     : Reconnecting, last destination was /192.168.200.135:6380
2021-09-15 13:49:35.735  WARN 136712 --- [ioEventLoop-4-4] i.l.core.protocol.ConnectionWatchdog     : Cannot reconnect to [192.168.200.135:6380]: Connection refused: no further information: /192.168.200.135:6380
2021-09-15 13:49:40.011  INFO 136712 --- [ecutorLoop-1-15] i.l.core.protocol.ConnectionWatchdog     : Reconnecting, last destination was 192.168.200.135:6380
2021-09-15 13:49:42.029  WARN 136712 --- [oEventLoop-4-10] i.l.core.protocol.ConnectionWatchdog     : Cannot reconnect to [192.168.200.135:6380]: Connection refused: no further information: /192.168.200.135:6380
2021-09-15 13:49:46.313  INFO 136712 --- [xecutorLoop-1-5] i.l.core.protocol.ConnectionWatchdog     : Reconnecting, last destination was 192.168.200.135:6380
2021-09-15 13:49:48.331  WARN 136712 --- [oEventLoop-4-16] i.l.core.protocol.ConnectionWatchdog     : Cannot reconnect to [192.168.200.135:6380]: Connection refused: no further information: /192.168.200.135:6380
2021-09-15 13:49:53.410  INFO 136712 --- [ecutorLoop-1-11] i.l.core.protocol.ConnectionWatchdog     : Reconnecting, last destination was 192.168.200.135:6380
2021-09-15 13:49:55.421  WARN 136712 --- [ioEventLoop-4-6] i.l.core.protocol.ConnectionWatchdog     : Cannot reconnect to [192.168.200.135:6380]: Connection refused: no further information: /192.168.200.135:6380
2021-09-15 13:50:00.611  INFO 136712 --- [ecutorLoop-1-15] i.l.core.protocol.ConnectionWatchdog     : Reconnecting, last destination was 192.168.200.135:6380
2021-09-15 13:50:02.632  WARN 136712 --- [oEventLoop-4-10] i.l.core.protocol.ConnectionWatchdog     : Cannot reconnect to [192.168.200.135:6380]: Connection refused: no further information: /192.168.200.135:6380
2021-09-15 13:50:06.811  INFO 136712 --- [xecutorLoop-1-1] i.l.core.protocol.ConnectionWatchdog     : Reconnecting, last destination was 192.168.200.135:6380
2021-09-15 13:50:06.817  INFO 136712 --- [oEventLoop-4-12] i.l.core.protocol.ReconnectionHandler    : Reconnected to 192.168.200.135:6381
设置key:antry39
设置key:antry40
设置key:antry41
设置key:antry42
设置key:antry43
Redis客户端命令对应的RedisTemplate中的方法列表:
String结构
| redis客户端命令 | redisTemplate方法 |
|---|---|
| Redis | RedisTemplate rt |
| set key value | rt.opsForValue().set(“key”,“value”) |
| get key | rt.opsForValue().get(“key”) |
| del key | rt.delete(“key”) |
| strlen key | rt.opsForValue().size(“key”) |
| getset key value | rt.opsForValue().getAndSet(“key”,“value”) |
| getrange key start | end rt.opsForValue().get(“key”,start,end) |
| append key value | rt.opsForValue().append(“key”,“value”) |
Hash结构
| redis客户端命令 | redisTemplate方法 |
|---|---|
| hmset key field1 value1 field2 value2… | rt.opsForHash().putAll(“key”,map) //map是一个集合对象 |
| hset key field value | rt.opsForHash().put(“key”,“field”,“value”) |
| hexists key field | rt.opsForHash().hasKey(“key”,“field”) |
| hgetall key | rt.opsForHash().entries(“key”) //返回Map对象 |
| hvals key | rt.opsForHash().values(“key”) //返回List对象 |
| hkeys key | rt.opsForHash().keys(“key”) //返回List对象 |
| hmget key field1 field2… | rt.opsForHash().multiGet(“key”,keyList) |
| hsetnx key field value | rt.opsForHash().putIfAbsent(“key”,“field”,“value” |
| hdel key field1 field2 | rt.opsForHash().delete(“key”,“field1”,“field2”) |
| hget key field | rt.opsForHash().get(“key”,“field”) |
List结构
| redis客户端命令 | redisTemplate方法 |
|---|---|
| lpush list node1 node2 node3… | rt.opsForList().leftPush(“list”,“node”) |
| lpush list node1 node2 node3… | rt.opsForList().leftPushAll(“list”,list) //list是集合对象 |
| rpush list node1 node2 node3… | rt.opsForList().rightPush(“list”,“node”) |
| lpush list node1 node2 node3… | rt.opsForList().rightPushAll(“list”,list) //list是集合对象 |
| lindex key index | rt.opsForList().index(“list”, index) |
| llen key | rt.opsForList().size(“key”) |
| lpop key | rt.opsForList().leftPop(“key”) |
| rpop key | rt.opsForList().rightPop(“key”) |
| lpushx list node | rt.opsForList().leftPushIfPresent(“list”,“node”) |
| rpushx list node | rt.opsForList().rightPushIfPresent(“list”,“node”) |
| lrange list start end | rt.opsForList().range(“list”,start,end) |
| lrem list count value | rt.opsForList().remove(“list”,count,“value”) |
| lset key index value | rt.opsForList().set(“list”,index,“value”) |
Set结构
| redis客户端命令 | redisTemplate方法 |
|---|---|
| sadd key member1 member2… | rt.boundSetOps(“key”).add(“member1”,“member2”,…) |
| sadd key member1 member2… | rt.opsForSet().add(“key”, set) //set是一个集合对象 |
| scard key | rt.opsForSet().size(“key”) |
| sidff key1 key2 | rt.opsForSet().difference(“key1”,“key2”) //返回一个集合对象 |
| sinter key1 key2 | rt.opsForSet().intersect(“key1”,“key2”)//同上 |
| sunion key1 key2 | rt.opsForSet().union(“key1”,“key2”)//同上 |
| sdiffstore des key1 key2 | rt.opsForSet().differenceAndStore(“key1”,“key2”,“des”) |
| sinter des key1 key2 | rt.opsForSet().intersectAndStore(“key1”,“key2”,“des”) |
| sunionstore des key1 key2 | rt.opsForSet().unionAndStore(“key1”,“key2”,“des”) |
| sismember key member | rt.opsForSet().isMember(“key”,“member”) |
| smembers key | rt.opsForSet().members(“key”) |
| spop key | rt.opsForSet().pop(“key”) |
| srandmember key count | rt.opsForSet().randomMember(“key”,count) |
| srem key member1 member2… | rt.opsForSet().remove(“key”,“member1”,“member2”,…) |