一、主界面
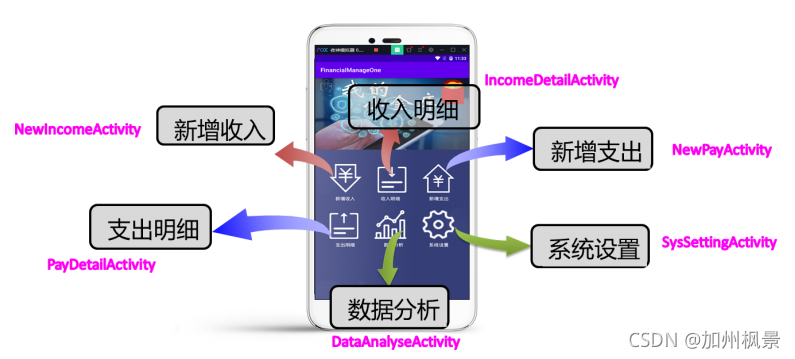
1、界面效果
2、准备工作
(1)在工程包名下面建立一个文件夹 选择工程的包名——右击——new——package——在目前出现的内容后面追加输入 activity——单击 ok 按钮,便可生成 activity 文件夹。
(2) 在 activity 文件夹中建立 6 个子页面 选择 activity 文件夹,右击——new——activity——Empty Activity——输入类 名:InComeActivity——单击 ok 按钮。
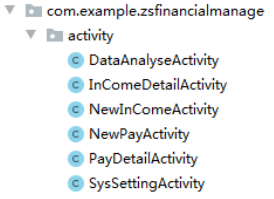
3、主界面布局 activity_main.xml
<?xml version="1.0" encoding="utf-8"?>
<LinearLayout
xmlns:android="http://schemas.android.com/apk/res/android"
     xmlns:app="http://schemas.android.com/apk/res-auto"
     xmlns:tools="http://schemas.android.com/tools"
     android:layout_width="match_parent"
     android:layout_height="match_parent"
     android:orientation="vertical"
     android:background="@drawable/welcomebg"
     tools:context=".view.MainActivity">
     <ImageButton
         android:layout_width="match_parent"
         android:layout_height="250dp"
         android:background="@drawable/main_top"/>
     <LinearLayout
         android:layout_width="match_parent"
         android:layout_height="wrap_content"
         android:orientation="horizontal"
         android:layout_marginTop="40dp"
         android:gravity="center">
         <Button
             android:id="@+id/bt_newincome_main"
             android:layout_width="90dp"
             android:layout_height="90dp"
             android:background="@drawable/new_pay_in"
             android:layout_marginRight="50dp"/>
         <Button
             android:id="@+id/bt_incomedetail_main"
             android:layout_width="90dp"
             android:layout_height="90dp"
             android:background="@drawable/my_pay_in"
             android:layout_marginRight="50dp"/>
         <Button
             android:id="@+id/bt_newpay_main"
             android:layout_width="90dp"
             android:layout_height="90dp"
             android:background="@drawable/new_pay_out" />
     </LinearLayout>
     <LinearLayout
         android:layout_width="match_parent"
         android:layout_height="wrap_content"
         android:orientation="horizontal"
         android:layout_marginTop="20dp"
         android:gravity="center">
         <TextView
             android:layout_width="wrap_content"
             android:layout_height="wrap_content"
             android:text="新增收入"
             android:textSize="15sp"
             android:textColor="#ffffff"
             android:layout_marginRight="80dp"/>
         <TextView
             android:layout_width="wrap_content"
             android:layout_height="wrap_content"
             android:text="收入明细"
             android:textSize="15sp"
             android:textColor="#ffffff"
             android:layout_marginRight="80dp"/>
         <TextView
             android:layout_width="wrap_content"
             android:layout_height="wrap_content"
             android:text="新增支出"
             android:textSize="15sp"
             android:textColor="#ffffff"/>
     </LinearLayout>
     <LinearLayout
         android:layout_width="match_parent"
         android:layout_height="wrap_content"
         android:orientation="horizontal"
         android:layout_marginTop="40dp"
         android:gravity="center">
         <Button
             android:id="@+id/bt_paydetail_main"
             android:layout_width="90dp"
             android:layout_height="90dp"
             android:background="@drawable/my_pay_out"
             android:layout_marginRight="50dp"/>
         <Button
             android:id="@+id/bt_dataanalyse_main"
             android:layout_width="90dp"
             android:layout_height="90dp"
             android:background="@drawable/data_administration"
             android:layout_marginRight="50dp"/>
         <Button
             android:id="@+id/bt_syssetting_main"
             android:layout_width="90dp"
             android:layout_height="90dp"
             android:background="@drawable/sys_setting" />
     </LinearLayout>
     <LinearLayout
         android:layout_width="match_parent"
         android:layout_height="wrap_content"
         android:orientation="horizontal"
         android:layout_marginTop="20dp"
         android:gravity="center">
         <TextView
             android:layout_width="wrap_content"
             android:layout_height="wrap_content"
             android:text="支出明细"
             android:textSize="15sp"
             android:textColor="#ffffff"
             android:layout_marginRight="80dp"/>
         <TextView
             android:layout_width="wrap_content"
             android:layout_height="wrap_content"
             android:text="数据分析"
             android:textSize="15sp"
             android:textColor="#ffffff"
             android:layout_marginRight="80dp"/>
         <TextView
             android:layout_width="wrap_content"
             android:layout_height="wrap_content"
             android:text="系统设置"
             android:textSize="15sp"
             android:textColor="#ffffff"/>
     </LinearLayout>
</LinearLayout>
4、主界面类文件 MainActivity.java
public class MainActivity extends AppCompatActivity {
//定义对象
     Button bt_newincome,bt_incomedetail,btn_newpay,btn_paydetail,bt_dataanalyse,btn_setting;
     @Override
     protected void onCreate(Bundle savedInstanceState) {
         super.onCreate(savedInstanceState);
         setContentView(R.layout.activity_main);
         // 绑定控件
         initView();
         //按钮单击事件
         btnOnClick();
     }
     // 绑定控件--------------------------代码
     private void initView() {
         bt_newincome=findViewById(R.id.bt_newincome_main);
         bt_incomedetail=findViewById(R.id.bt_incomedetail_main);
         btn_newpay=findViewById(R.id.bt_newpay_main);
         btn_paydetail=findViewById(R.id.bt_paydetail_main);
         bt_dataanalyse=findViewById(R.id.bt_dataanalyse_main);
         btn_setting=findViewById(R.id.bt_syssetting_main);
     }
     //按钮单击事件-------------------代码
     private void btnOnClick() {
         bt_newincome.setOnClickListener(new View.OnClickListener() {
             @Override
             public void onClick(View v) {
                 Intent intent=new Intent(MainActivity.this, NewInComeActivity.class);
                 startActivity(intent);
             }
         });
         bt_incomedetail.setOnClickListener(new View.OnClickListener() {
             @Override
             public void onClick(View v) {
                 Intent intent=new Intent(MainActivity.this, InComeDetailActivity.class);
                 startActivity(intent);
             }
         });
         btn_newpay.setOnClickListener(new View.OnClickListener() {
             @Override
             public void onClick(View v) {
                 Intent intent=new Intent(MainActivity.this, NewPayActivity.class);
                 startActivity(intent);
             }
         });
         btn_paydetail.setOnClickListener(new View.OnClickListener() {
             @Override
             public void onClick(View v) {
                 Intent intent=new Intent(MainActivity.this, PayDetailActivity.class);
                 startActivity(intent);
             }
         });
         bt_dataanalyse.setOnClickListener(new View.OnClickListener() {
             @Override
             public void onClick(View v) {
                 Intent intent=new Intent(MainActivity.this, DataAnalyseActivity.class);
                 startActivity(intent);
             }
         });
         btn_setting.setOnClickListener(new View.OnClickListener() {
             @Override
             public void onClick(View v) {
                 Intent intent=new Intent(MainActivity.this, SysSettingActivity.class);
                 startActivity(intent);
             }
         });
     }
}
5、代码讲解
项目中使用到了ImageButton,但是给图片设置具体尺寸后发现还是原来的大小,后来将ImageButton变成ImageView就可以了。首先我们从源码的角度来看一下两者的区别。
ImageView继承的是View ImageButton继承的是ImageView
我们来分析一下几种不同情况下两者之间的差别。
1、两者均不设置具体的宽高。
其显示效果没有什么差别。
2、设置了具体的宽高。
ImageView会按照具体的宽高尺寸发生变化,但是ImageButton只会显示图片的原始像素大小。如果给ImageButton设置了scaleType属性就可以达成ImageView的效果,但是图片会失真。
3、设置背景选择器。
ImageView要想使选择器效果生效,需要让控件获得焦点。需要加上android:clickable=true;
ImageButton就不需要处理,因为在源码中ImageButton的构造函数中已经设置过了setFocusable(true)。
4、设置background无具体宽高。
效果一样。
5、设置background有具体宽高。
效果一样。与src不同的是,两者均随着具体宽高发生改变。
二、新增收入界面
1、界面效果

2、 前期准备
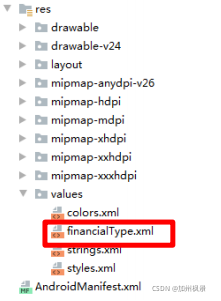
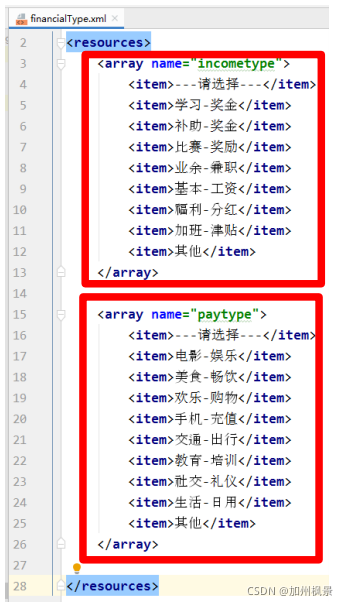
(1)为 spinner 控件准备数据
(1)在 values 下新建一个 xml 文件,如下图:
(2)在文件中添加两个字符串数
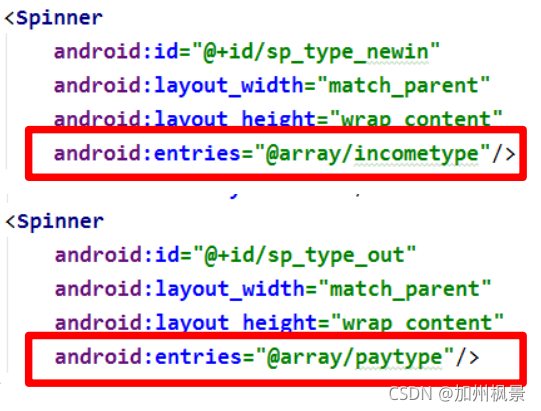
(3)在布局文件用 entries 属性引用字符串数组
(2)在数据库类文件中添加收入表和支出表

//创建一个收入表
 db.execSQL("create table in_come(id integer primary key autoincrement,inmoney double,intime varchar(20),intype varchar(30),inpayer varchar(100),inremark varchar(500))");
//创建一个支出表
db.execSQL("create table out_pay(id integer primary key autoincrement,outmoney double,outtime varchar(20),outtype varchar(30),outpayee varchar(100),outremark varchar(500))");
3、新增收入布局界面 activity_new_income.xml
<?xml version="1.0" encoding="utf-8"?>
<LinearLayout xmlns:android="http://schemas.android.com/apk/res/android"
     xmlns:app="http://schemas.android.com/apk/res-auto"
     xmlns:tools="http://schemas.android.com/tools"
     android:layout_width="match_parent"
     android:layout_height="match_parent"
     android:orientation="vertical"
     android:background="@drawable/new_income_bg"
     tools:context=".activity.NewInComeActivity">
     <LinearLayout
         android:layout_width="match_parent"
         android:layout_height="wrap_content"
         android:orientation="horizontal"
         android:layout_marginTop="220dp"
         android:layout_marginLeft="30dp"
         android:layout_marginRight="30dp">
         <TextView
             android:layout_width="wrap_content"
             android:layout_height="wrap_content"
             android:text="金 额:"
             android:textColor="#000000"
             android:textSize="20sp"
             android:textStyle="bold"/>
         <EditText
             android:id="@+id/et_money_newin"
             android:layout_width="match_parent"
             android:layout_height="wrap_content"
             android:hint="0.00"
             android:textColor="#000000"
             android:textSize="20sp"
             android:textStyle="bold"
             android:gravity="center"/>
     </LinearLayout>
     <LinearLayout
         android:layout_width="match_parent"
         android:layout_height="wrap_content"
         android:orientation="horizontal"
         android:layout_marginTop="10dp"
         android:layout_marginLeft="30dp"
         android:layout_marginRight="30dp">
         <TextView
             android:layout_width="wrap_content"
             android:layout_height="wrap_content"
             android:text="日 期:"
             android:textColor="#000000"
             android:textSize="20sp"
             android:textStyle="bold"/>
         <EditText
             android:id="@+id/et_time_newin"
             android:layout_width="match_parent"
             android:layout_height="wrap_content"
             android:hint="2020-05-12"
             android:textColor="#000000"
             android:textSize="20sp"
             android:textStyle="bold"
             android:gravity="center"/>
     </LinearLayout>
     <LinearLayout
         android:layout_width="match_parent"
         android:layout_height="wrap_content"
         android:orientation="horizontal"
         android:layout_marginTop="10dp"
         android:layout_marginLeft="30dp"
         android:layout_marginRight="30dp">
         <TextView
             android:layout_width="wrap_content"
             android:layout_height="wrap_content"
             android:text="类 型:"
             android:textColor="#000000"
             android:textSize="20sp"
             android:textStyle="bold"/>
         <Spinner
             android:id="@+id/sp_type_newin"
             android:layout_width="match_parent"
             android:layout_height="wrap_content"
             android:entries="@array/incometype"/>
     </LinearLayout>
     <LinearLayout
         android:layout_width="match_parent"
         android:layout_height="wrap_content"
         android:orientation="horizontal"
         android:layout_marginTop="10dp"
         android:layout_marginLeft="30dp"
         android:layout_marginRight="30dp">
         <TextView
             android:layout_width="wrap_content"
             android:layout_height="wrap_content"
             android:text="付款方:"
             android:textColor="#000000"
             android:textSize="20sp"
             android:textStyle="bold"/>
         <EditText
             android:id="@+id/et_payer_newin"
             android:layout_width="match_parent"
             android:layout_height="wrap_content"
             android:hint="海明有限公司"
             android:textColor="#000000"
             android:textSize="20sp"
             android:textStyle="bold"
             android:gravity="center"/>
     </LinearLayout>
     <LinearLayout
         android:layout_width="match_parent"
         android:layout_height="wrap_content"
         android:orientation="horizontal"
         android:layout_marginTop="10dp"
         android:layout_marginLeft="30dp"
         android:layout_marginRight="30dp">
         <TextView
             android:layout_width="wrap_content"
             android:layout_height="wrap_content"
             android:text="备 注:"
             android:textColor="#000000"
             android:textSize="20sp"
             android:textStyle="bold"/>
         <EditText
             android:id="@+id/et_remark_newin"
             android:layout_width="match_parent"
             android:layout_height="wrap_content"
             android:hint="远程技术指导费"
             android:textColor="#000000"
             android:textSize="20sp"
             android:textStyle="bold"
             android:gravity="center"/>
     </LinearLayout>
     <Button
         android:id="@+id/bt_save_newin"
         android:layout_width="match_parent"
         android:layout_height="wrap_content"
         android:text="保存"
         android:textSize="20sp"
         android:textColor="#ffffff"
         android:layout_marginLeft="60dp"
         android:layout_marginRight="60dp"
         android:background="@drawable/btn_style_one"
         android:layout_marginTop="40dp"/>
     <Button
         android:id="@+id/bt_cancel_newin"
         android:layout_width="match_parent"
         android:layout_height="wrap_content"
         android:text="取消"
         android:textSize="20sp"
         android:textColor="#000000"
         android:layout_marginLeft="60dp"
         android:layout_marginRight="60dp"
         android:background="@drawable/btn_style_two"
         android:layout_marginTop="20dp"/>
</LinearLayout>
4、新增收入类文件 NewInComeActivity.java
public class NewInComeActivity extends AppCompatActivity {
//1 定义对象
     EditText et_money,et_time,et_payer,et_remark;
     Spinner sp_type;
     Button bt_sava,bt_cancel;
     MyDBHelper mhelper;
     SQLiteDatabase db;
     @Override
     protected void onCreate(Bundle savedInstanceState) {
         super.onCreate(savedInstanceState);
         setContentView(R.layout.activity_new_in_come);
         //2 绑定控件
         initView();
         //3 保存按钮功能的实现
         btnSave();
         //4 取消按钮功能的实现
         btnCancel();
     }
     //2 绑定控件-------------------代码
     private void initView() {
         et_money=findViewById(R.id.et_money_newin);
         et_time=findViewById(R.id.et_time_newin);
         sp_type=findViewById(R.id.sp_type_newin);
         et_payer=findViewById(R.id.et_payer_newin);
         et_remark=findViewById(R.id.et_remark_newin);
         bt_sava=findViewById(R.id.bt_save_newin);
         bt_cancel=findViewById(R.id.bt_cancel_newin);
         mhelper=new MyDBHelper(NewInComeActivity.this);
         db=mhelper.getWritableDatabase();
     }
     //3 保存按钮功能的实现--------代码
     private void btnSave() {
         bt_sava.setOnClickListener(new View.OnClickListener() {
             @Override
             public void onClick(View v) {
                 //获取输入的内容保存到数据库的收入表中
                 ContentValues values=new ContentValues();
                 values.put("inmoney",et_money.getText().toString());
                 values.put("intime",et_time.getText().toString());
                 values.put("intype",sp_type.getSelectedItem().toString());
                 values.put("inpayer",et_payer.getText().toString());
                 values.put("inremark",et_remark.getText().toString());
                 db.insert("in_come",null,values);
                 Toast.makeText(NewInComeActivity.this,"保存成功",Toast.LENGTH_SHORT).show();
                 //刷新本页面
                 Intent intent=new Intent(NewInComeActivity.this,NewInComeActivity.class);
                 startActivity(intent);
                 finish();
             }
         });
     }
     //4 取消按钮功能的实现--------代码
     private void btnCancel() {
         bt_cancel.setOnClickListener(new View.OnClickListener() {
             @Override
             public void onClick(View v) {
                 Intent intent=new Intent(NewInComeActivity.this, MainActivity.class);
                 startActivity(intent);
                 finish();
             }
         });
     }
}
三、新增支出界面
1、界面效果

3、新增支出布局界面 activity_new_pay.xml
<?xml version="1.0" encoding="utf-8"?>
<LinearLayout
xmlns:android="http://schemas.android.com/apk/res/android"
     xmlns:app="http://schemas.android.com/apk/res-auto"
     xmlns:tools="http://schemas.android.com/tools"
     android:layout_width="match_parent"
     android:layout_height="match_parent"
     android:orientation="vertical"
     android:background="@drawable/new_pay_bg"
     tools:context=".activity.NewPayActivity">
     <LinearLayout
         android:layout_width="match_parent"
         android:layout_height="wrap_content"
         android:orientation="horizontal"
         android:layout_marginTop="220dp"
         android:layout_marginLeft="30dp"
         android:layout_marginRight="30dp">
         <TextView
             android:layout_width="wrap_content"
             android:layout_height="wrap_content"
             android:text="金 额:"
             android:textColor="#000000"
             android:textSize="20sp"
             android:textStyle="bold"/>
         <EditText
             android:id="@+id/et_money_newout"
             android:layout_width="match_parent"
             android:layout_height="wrap_content"
             android:hint="0.00"
             android:textColor="#000000"
             android:textSize="20sp"
             android:textStyle="bold"
             android:gravity="center"/>
     </LinearLayout>
     <LinearLayout
         android:layout_width="match_parent"
         android:layout_height="wrap_content"
         android:orientation="horizontal"
         android:layout_marginTop="10dp"
         android:layout_marginLeft="30dp"
         android:layout_marginRight="30dp">
         <TextView
             android:layout_width="wrap_content"
             android:layout_height="wrap_content"
             android:text="日 期:"
             android:textColor="#000000"
             android:textSize="20sp"
             android:textStyle="bold"/>
         <EditText
             android:id="@+id/et_time_newout"
             android:layout_width="match_parent"
             android:layout_height="wrap_content"
             android:hint="2020-05-12"
             android:textColor="#000000"
             android:textSize="20sp"
             android:textStyle="bold"
             android:gravity="center"/>
     </LinearLayout>
     <LinearLayout
         android:layout_width="match_parent"
         android:layout_height="wrap_content"
         android:orientation="horizontal"
         android:layout_marginTop="10dp"
         android:layout_marginLeft="30dp"
         android:layout_marginRight="30dp">
         <TextView
             android:layout_width="wrap_content"
             android:layout_height="wrap_content"
             android:text="类 型:"
             android:textColor="#000000"
             android:textSize="20sp"
             android:textStyle="bold"/>
         <Spinner
             android:id="@+id/sp_type_newout"
             android:layout_width="match_parent"
             android:layout_height="wrap_content"
             android:entries="@array/paytype"/>
     </LinearLayout>
     <LinearLayout
         android:layout_width="match_parent"
         android:layout_height="wrap_content"
         android:orientation="horizontal"
         android:layout_marginTop="10dp"
         android:layout_marginLeft="30dp"
         android:layout_marginRight="30dp">
         <TextView
             android:layout_width="wrap_content"
             android:layout_height="wrap_content"
             android:text="收款方:"
             android:textColor="#000000"
             android:textSize="20sp"
             android:textStyle="bold"/>
         <EditText
             android:id="@+id/et_payer_newout"
             android:layout_width="match_parent"
             android:layout_height="wrap_content"
             android:hint="海明有限公司"
             android:textColor="#000000"
             android:textSize="20sp"
             android:textStyle="bold"
             android:gravity="center"/>
     </LinearLayout>
     <LinearLayout
         android:layout_width="match_parent"
         android:layout_height="wrap_content"
         android:orientation="horizontal"
         android:layout_marginTop="10dp"
         android:layout_marginLeft="30dp"
         android:layout_marginRight="30dp">
         <TextView
             android:layout_width="wrap_content"
             android:layout_height="wrap_content"
             android:text="备 注:"
             android:textColor="#000000"
             android:textSize="20sp"
             android:textStyle="bold"/>
         <EditText
             android:id="@+id/et_remark_newout"
             android:layout_width="match_parent"
             android:layout_height="wrap_content"
             android:hint="远程技术指导费"
             android:textColor="#000000"
             android:textSize="20sp"
             android:textStyle="bold"
             android:gravity="center"/>
     </LinearLayout>
     <Button
         android:id="@+id/bt_save_newout"
         android:layout_width="match_parent"
         android:layout_height="wrap_content"
         android:text="保存"
         android:textSize="20sp"
         android:textColor="#ffffff"
         android:layout_marginLeft="60dp"
         android:layout_marginRight="60dp"
         android:background="@drawable/btn_style_one"
         android:layout_marginTop="40dp"/>
     <Button
         android:id="@+id/bt_cancel_newout"
         android:layout_width="match_parent"
         android:layout_height="wrap_content"
         android:text="取消"
         android:textSize="20sp"
         android:textColor="#000000"
         android:layout_marginLeft="60dp"
         android:layout_marginRight="60dp"
         android:background="@drawable/btn_style_two"
         android:layout_marginTop="20dp"/>
</LinearLayout>
4、新增支出类文件 NewPayActivity.java
public class NewPayActivity extends AppCompatActivity {
//定义对象
EditText et_money,et_time,et_payer,et_remark;
     Spinner sp_type;
     Button bt_sava,bt_cancel;
     MyDBHelper mhelper;
     SQLiteDatabase db;
     @Override
     protected void onCreate(Bundle savedInstanceState) {
         super.onCreate(savedInstanceState);
         setContentView(R.layout.activity_new_pay);
         //2 绑定控件
         initView();
         //3 保存按钮功能的实现
         btnSave();
         //4 取消按钮功能的实现
         btnCancel();
     }
     //2 绑定控件-------------------代码
     private void initView() {
         et_money=findViewById(R.id.et_money_newout);
         et_time=findViewById(R.id.et_time_newout);
         sp_type=findViewById(R.id.sp_type_newout);
         et_payer=findViewById(R.id.et_payer_newout);
         et_remark=findViewById(R.id.et_remark_newout);
         bt_sava=findViewById(R.id.bt_save_newout);
         bt_cancel=findViewById(R.id.bt_cancel_newout);
         mhelper=new MyDBHelper(NewPayActivity.this);
         db=mhelper.getWritableDatabase();
     }
     //3 保存按钮功能的实现--------代码
     private void btnSave() {
         bt_sava.setOnClickListener(new View.OnClickListener() {
             @Override
             public void onClick(View v) {
                 //获取输入的内容保存到数据库的收入表中
                 ContentValues values=new ContentValues();
                 values.put("outmoney",et_money.getText().toString());
                 values.put("outtime",et_time.getText().toString());
                 values.put("outtype",sp_type.getSelectedItem().toString());
                 values.put("outpayee",et_payer.getText().toString());
                 values.put("outremark",et_remark.getText().toString());
                 db.insert("pay_out",null,values);
                 Toast.makeText(NewPayActivity.this,"保存成功",Toast.LENGTH_SHORT).show();
                 //刷新本页面
                 Intent intent=new Intent(NewPayActivity.this,NewPayActivity.class);
                 startActivity(intent);
                 finish();
             }
         });
     }
     //4 取消按钮功能的实现--------代码
     private void btnCancel() {
         bt_cancel.setOnClickListener(new View.OnClickListener() {
             @Override
             public void onClick(View v) {
                 Intent intent=new Intent(NewPayActivity.this, MainActivity.class);
                 startActivity(intent);
                 finish();
             }
         });
     }
}
