本次主要讲解的是服务器上node环境的搭建,以及vue/react/等的项目的部署,作为一名前端,一定要学会哦。
购买云服务器/主机
云服务器:阿里云、百度云、新浪云、腾讯云
主机:不建议购买,共享的不稳定
我下面的案例用10几块的渣渣云服务器进行演示,因为便宜,但我不推荐你们用
购买域名,进行备案
这个步骤可以不需要先进行,有了服务器有公网ip也可以访问,域名后面讲
远程连接
1. 阿里云等服务器网页自带的 , 输入远程连接密码
2.通过ssh客户端连接(推荐)
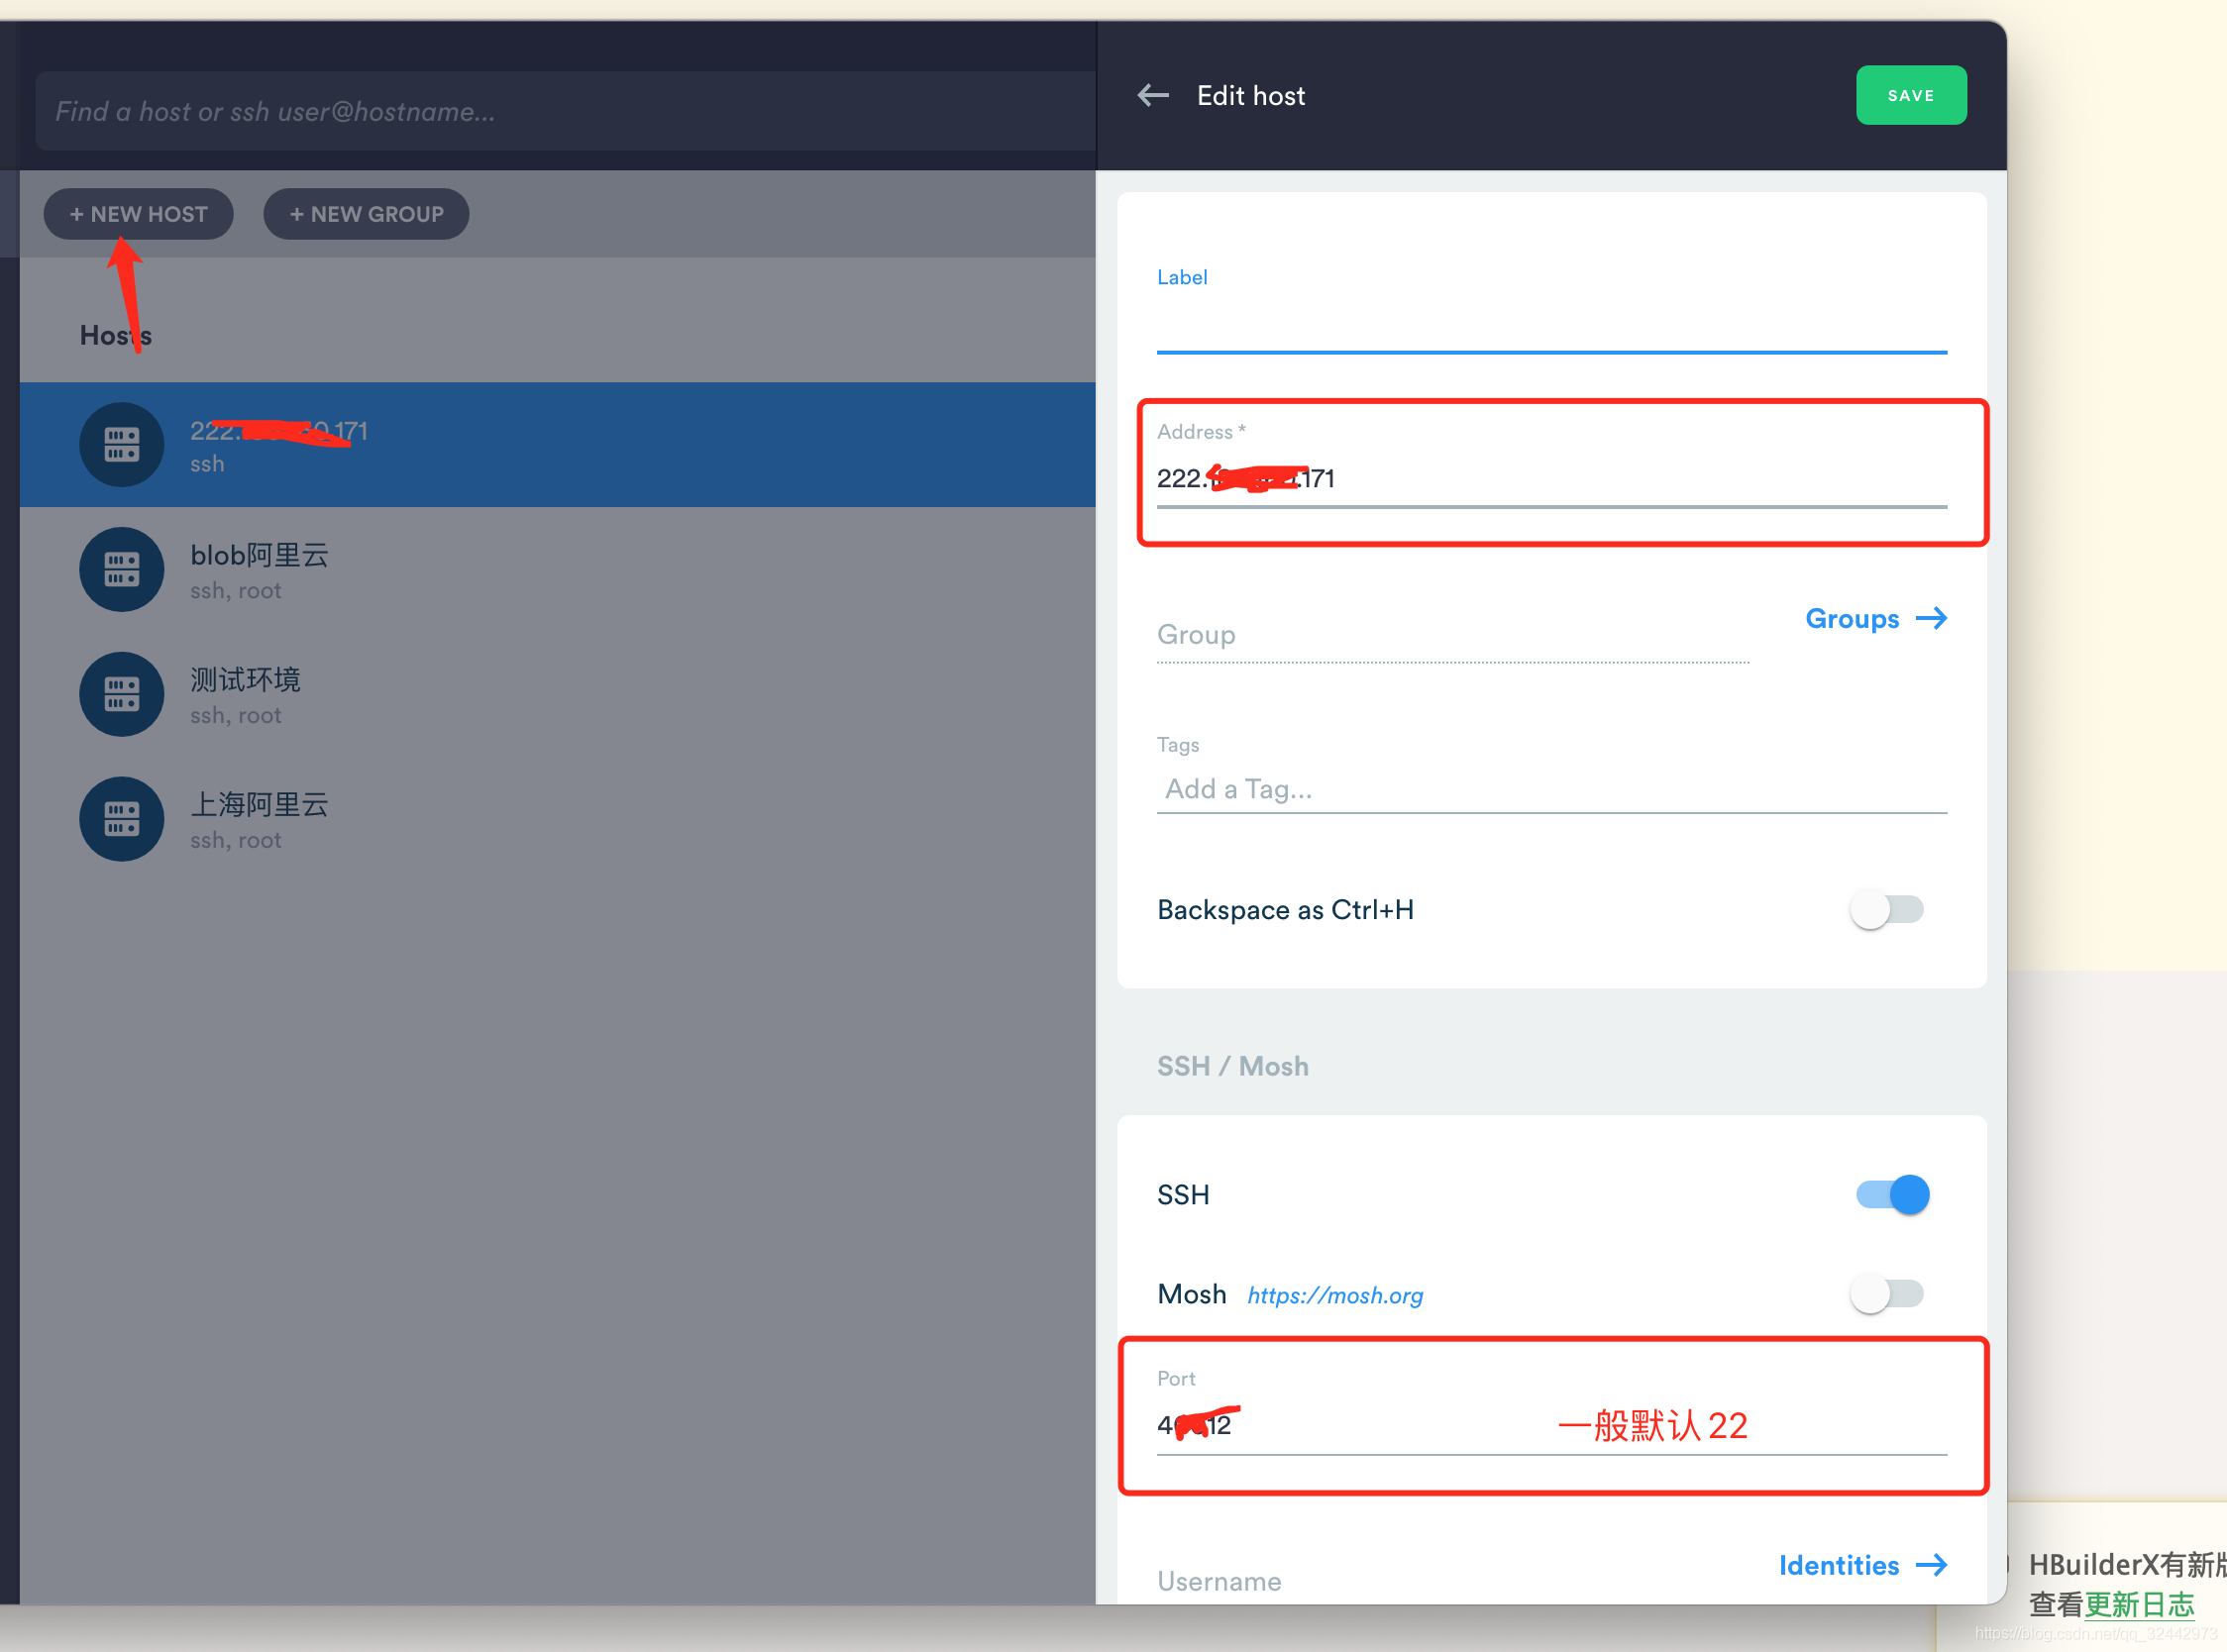
由于我用的Mac,所以我就用Termius演示吧,windows的话推荐putty等ssh工具,搜索关键词windows常用ssh

如图上只需要address(公网ip)和port(ssh端口号),这里有必要声明一下:
- 云服务器回默认22为ssh端口号
- 共享云主机分配给你ip一般就是ssh端口号
连接成功后如下:

安装node
如何从EPEL库安装Node.js

另一个有效且简单的方法来安装Node.js就是从官方库。这同样确保您可以访问到EPEL库,

你可以通过运行以下命令。

sudo yum install epel-release

现在可以使用yum命令安装Node.js了。

sudo yum install nodejs

因为在开发过程中我需要管理节点包,我还要安装新公共管理的软件包管理器,

使用以下命令。

sudo yum install npm

whereis node
三条安装命令, 中间有提示yes/no的一律按y,带宽小的耐心等待安装
安装成功后执行where is node 如下,表明已经安装成功
配置安全组
云服务器的话可以配置,云主机的话一般不给配置,这个根据需求来配置,一般我都是配置
1. 端口范围   1/60000
2. 授权对象: 0.0.0.0/0
我不建议大家这样配置 ,安全组顾名思义为了安全,所以端口应该开放的越少越好,例如你要用8080端口那么给个8080就好了
当然也有的是给你配置防火墙的,如果你的端口不能用,请查看安全组或者防火墙有没有打开你要用的端口

这里的演示暂且跳过,上图大家想必能看懂,就是配置了几个端口。
测试是否可用
我们测试上传一个server.js看看,先做如下准备工作:
文件上传的话我们推荐xftp或者xshell等ftp工具
我用FileZilla演示,界面都差不多的,首先我们连接到服务器:

这个就是协议不对了,我们修改下连接协议

修改成sftp协议后点击连接

如上连接成功!
既然连接成功那我们写个简单的接口:
// 导入http模块:
var http = require('http');
// 创建http server,并传入回调函数:
var server = http.createServer(function (request, response) {
    // 回调函数接收request和response对象,
    // 获得HTTP请求的method和url:
    console.log(request.method + ': ' + request.url);
    // 将HTTP响应200写入response, 同时设置Content-Type: text/html:
    response.writeHead(200, {'Content-Type': 'text/html'});
    // 将HTTP响应的HTML内容写入response:
    response.end('Hello world!');
});

// 让服务器监听8080端口:
server.listen(8089);

console.log('Server is running at http://127.0.0.1:8089/'); 
这条接口本地可以运行,那么我们再用ftp工具上传到服务器

再用ssh工具运行

运行后我们打开站点,ip:端口,发现无法访问
 这时我们去检测下端口号(http://coolaf.com/tool/port)的开放情况,发现如下图,22是开放的,8089是关闭的,这也就是为什么我们ssh和ftp能通过22端口连接,8089不能访问站点的原因了,那么我们就得打开端口了,方式前面提到过,就是安全组和防火墙,开启就行当然也可以通过命令打开,下面我用命令打开端口
命令行控制防火墙
//打开8000-9000端口,成功返回success
firewall-cmd --zone=public --add-port=8000-9000/udp --permanen

//打开8089端口,成功返回success
firewall-cmd --zone=public --add-port=8089/tcp --permanent

//重启防火墙,成功返回success
firewall-cmd --reload

//检测是否打开端口,成功打开返回yes
firewall-cmd --zone=public --query-port=8089/tcp
执行了上述操作后,可以看到已经可以访问了
添加负载均衡(pm2)
你看我们是启动了这个测试案例,可是如果服务器重启,那么案例就直接结束了,这是相当不对的。所以我们需要负载均衡,即用就挂起服务。
npm i pm2 -g 全局安装pm2

pm2 start app.js  后台挂起服务

pm2 list  查看后台挂起所有服务

pm2 stop id  根据服务id 停止当前服务

pm2 delete id 根据服务 id 删除当前服务

pm2 restart id 重启服务
安装后报错,是node和npm的版本问题

执行下面的 命令
sudo npm install -g n

# 最新版本
n lastest
# 稳定版本
n stable
# 安装指定版本
n 10.12.0
执行pm2 list,如下说明成功

pm2安装好了,我们再来通过pm2启动测试案例:

pm2 start后再执行两条命令
使用pm2 start (启动服务) --- 上面我们执行了
执行pm2 save (保存当前已经启动了的服务)
执行pm2 startup (设置开机自启的配置)
设置开机自启成功!重启服务器看下,loading....启动成功!

pm2开机自启到此已经成功了!
安装MongoDB
MongoDB 是一个介于关系数据库和非关系数据库之间的产品,是非关系数据库当中功能最丰富,最像关系数据库的。他支持的数据结构非常松散,是类似json的bson格式,因此可以存储比较复杂的数据类型。Mongo最大的特点是他支持的查询语言非常强大,其语法有点类似于面向对象的查询语言,几乎可以实现类似关系数据库单表查询的绝大部分功能,而且还支持对数据建立索引。
Packages包说明
MongoDB官方源中包含以下几个依赖包:
mongodb-org: MongoDB元数据包,安装时自动安装下面四个组件包:
1.mongodb-org-server: 包含MongoDB守护进程和相关的配置和初始化脚本。
2.mongodb-org-mongos: 包含mongos的守护进程。
3.mongodb-org-shell: 包含mongo shell。
4.mongodb-org-tools: 包含MongoDB的工具: mongoimport, bsondump, mongodump, mongoexport, mongofiles, mongooplog, mongoperf, mongorestore, mongostat, and mongotop。
安装mongodb过程中注意以下几个知识点
1. vim命令基本使用
       1. vim a.txt
       2. 先按键盘的 i
       3. 写入内容 (shift + ins)
       4. 退出 先按 ESC 键
       5. 再打 **: wq** 会出即可保存并退出
 2. 注意点: 防火墙忽略
1.配置MongoDB的yum源
创建yum源文件:
vi /etc/yum.repos.d/mongodb-org-3.4.repo添加以下内容:
[mongodb-org-3.4]
name=MongoDB Repository
baseurl=https://repo.mongodb.org/yum/redhat/$releasever/mongodb-org/3.4/x86_64/
gpgcheck=1
enabled=1
gpgkey=https://www.mongodb.org/static/pgp/server-3.4.asc
这里可以修改 gpgcheck=0, 省去gpg验证

安装之前先更新所有包 :yum update (可选操作)
2.安装mongodb
安装命令
yum -y install mongodb-org
安装完成后
查看mongo安装位置 whereis mongod
查看修改配置文件 : vim /etc/mongod.conf
3.启动MongoDB
启动mongodb :systemctl start mongod.service
停止mongodb :systemctl stop mongod.service
查到mongodb的状态:systemctl status mongod.service
4.设置开机启动
设置开机启动 :systemctl enable mongod.service
5.启动mongodb
启动:mongo shell
6.设置mongodb远程访问
注意先打开27017端口,前面有讲怎么打开

重启mongodb:systemctl restart mongod.service
nginx安装 /配置
Nginx 是 C语言 开发,建议在 Linux 上运行,当然,也可以安装 Windows 版本,本篇则使用 [CentOS](https://www.linuxidc.com/topicnews.aspx?tid=14) 7 作为安装环境。
1.gcc 安装
安装 nginx 需要先将官网下载的源码进行编译,编译依赖 gcc 环境,如果没有 gcc 环境,则需要安装:
yum install gcc-c++2.PCRE pcre-devel 安装
PCRE(Perl Compatible Regular Expressions) 是一个Perl库,包括 perl 兼容的正则表达式库。nginx 的 http 模块使用 pcre 来解析正则表达式,所以需要在 linux 上安装 pcre 库,pcre-devel 是使用 pcre 开发的一个二次开发库。nginx也需要此库。命令:
yum install -y pcre pcre-devel3.zlib 安装
zlib 库提供了很多种压缩和解压缩的方式, nginx 使用 zlib 对 http 包的内容进行 gzip ,所以需要在 Centos 上安装 zlib 库。
yum install -y zlib zlib-devel4.OpenSSL 安装
OpenSSL 是一个强大的安全套接字层密码库,囊括主要的密码算法、常用的密钥和证书封装管理功能及 SSL 协议,并提供丰富的应用程序供测试或其它目的使用。
nginx 不仅支持 http 协议,还支持 https(即在ssl协议上传输http),所以需要在 Centos 安装 OpenSSL 库。
yum install -y openssl openssl-devel5.下载nginx
官网下载https://nginx.org/en/download.html
使用`wget`命令下载:
wget -c https://nginx.org/download/nginx-1.10.1.tar.gz两种方式下哪个版本看自己需求,尽量用稳定版。
6.解压:
tar -zxvf nginx-1.10.1.tar.gz
cd nginx-1.10.1
7.配置:
其实在 nginx-1.10.1 版本中你就不需要去配置相关东西,默认就可以了。当然,如果你要自己配置目录也是可以的。
1.使用默认配置
./configure 2.自定义配置(不推荐)
+
    ./configure \
    --prefix=/usr/local/nginx \
    --conf-path=/usr/local/nginx/conf/nginx.conf \
    --pid-path=/usr/local/nginx/conf/nginx.pid \
    --lock-path=/var/lock/nginx.lock \
    --error-log-path=/var/log/nginx/error.log \
    --http-log-path=/var/log/nginx/access.log \
    --with-http_gzip_static_module \
    --http-client-body-temp-path=/var/temp/nginx/client \
    --http-proxy-temp-path=/var/temp/nginx/proxy \
    --http-fastcgi-temp-path=/var/temp/nginx/fastcgi \
    --http-uwsgi-temp-path=/var/temp/nginx/uwsgi \
    --http-scgi-temp-path=/var/temp/nginx/scgi
注:将临时文件目录指定为/var/temp/nginx,需要在/var下创建temp及nginx目录
3.配置https支持的ssl模块
./configure --prefix=/usr/local/nginx --with-http_ssl_module8.编译安装
make
make install
9.查找安装路径
whereis nginx10.启动、停止nginx
cd /usr/local/nginx/sbin/
./nginx
./nginx -s stop
./nginx -s quit
./nginx -s reload
`./nginx -s quit`:此方式停止步骤是待nginx进程处理任务完毕进行停止。
`./nginx -s stop`:此方式相当于先查出nginx进程id再使用kill命令强制杀掉进程
查询nginx进程:
ps aux|grep nginx11.重启 nginx
1.先停止再启动(推荐):
对 nginx 进行重启相当于先停止再启动,即先执行停止命令再执行启动命令。如下:
./nginx -s quit
./nginx
2.重新加载配置文件:
当 ngin x的配置文件 nginx.conf 修改后,要想让配置生效需要重启 nginx,使用`-s reload`不用先 停止 ngin x再启动 nginx 即可将配置信息在 nginx 中生效,如下:
./nginx -s reload以上的步骤执行完后,浏览器输入公网ip
 看到这个,就代表着nginx配置上去了!
12.开机自启动
vi /etc/rc.local增加一行:/usr/local/nginx/sbin/nginx

设置执行权限:
chmod 755 /etc/rc.local到这里,nginx就安装完毕了,启动、停止、重启操作也都完成了,当然,你也可以添加为系统服务,我这里就不在演示了。
就重启看下!

ok了,如果出不来记得开放80端口!
nginx静态服务器 \ 反向代理
我们先上传一个项目,将项目build后的文件

在 /usr/local/nginx/conf/nginx.conf 中修改如下配置:

server {
          listen 80;
          server_name localhost;
          location / {
            root   html/amap-use;
			try_files $uri /index.html; #解决路由重定向跳转 404 页面配置
            index  index.html index.htm;
          }
        }
指向到我们刚刚上传的文件!
再打开浏览器输入 公网ip

成功了!
再来看反向代理
例如我们的vue项目,在vue.config.js里配置了反向代理,本地可用发布后获取不到数据。这个时候我们要配置nignx反向代理
server {
          listen 80;
          server_name localhost;
          location / {
            root   html/amap-use;
			try_files $uri /index.html; #解决路由重定向跳转 404 页面配置
            index  index.html index.htm;
          }
          location /marketing { # 解决反向代理数据获取不到
                proxy_pass https://resource.smartisan.com/marketing;
          }
          location /product {
                proxy_pass https://www.smartisan.com/product;
          }
        }
多项目配置多个端口
解决: 在nginx配置文件中添加多个 server配置, 但是要注意 项目文件夹要和 nginx /html目录同级
目录应该如下:
nginx

     html

     vue-project

     react-project
在 /usr/local/nginx/conf/nginx.conf 中修改如下配置:
server {  #此2为默认端口设置
               listen       80;
               server_name  localhost;

               #charset koi8-r;

               #access_log  logs/host.access.log  main;

               location / {
                   root   project_list;
                   index  index.html index.htm;
               }

               #error_page  404              /404.html;

               # redirect server error pages to the static page /50x.html
               #
               error_page   500 502 503 504  /50x.html;
               location = /50x.html {
                   root   html;
               }

               # proxy the PHP scripts to Apache listening on 127.0.0.1:80
               #
               #location ~ \.php$ {
               #    proxy_pass   http://127.0.0.1;
               #}

               # pass the PHP scripts to FastCGI server listening on 127.0.0.1:9000
               #
               #location ~ \.php$ {
               #    root           html;
               #    fastcgi_pass   127.0.0.1:9000;
               #    fastcgi_index  index.php;
               #    fastcgi_param  SCRIPT_FILENAME  /scripts$fastcgi_script_name;
               #    include        fastcgi_params;
               #}

               # deny access to .htaccess files, if Apache's document root
               # concurs with nginx's one
               #
               #location ~ /\.ht {
               #    deny  all;
               #}
           }

       server {
             listen 10002;
             server_name localhost;
             location / {
                 root zmh_react_project;
                  try_files $uri /index.html; #解决路由重定向跳转 404 页面配置
                  index index.html;
             }
             location /marketing { # 解决反向代理数据获取不到
                   proxy_pass https://resource.smartisan.com/marketing;
             }
             location /product {
                   proxy_pass https://www.smartisan.com/product;
             }
           }

        server {
             listen 10001;
             server_name localhost;
             location / {
                 root zmh_react_project;
                  try_files $uri /index.html; #解决路由重定向跳转 404 页面配置
                  index index.html;
             }
             location /marketing { # 解决反向代理数据获取不到
                   proxy_pass https://resource.smartisan.com/marketing;
             }
             location /product {
                   proxy_pass https://www.smartisan.com/product;
             }
           }
各位在配置过程中可能会遇到的问题
1.浏览器ip打不开
原因可能如下
端口未开放,静态资源指向错误等
卡住可以私信我,看到帮你处理,谢谢大家。
2.如果你是测试的话建议可以把防火墙关了,或者打开所有端口,因为你会经常忘了自己没开放打开端口
