1. 简介
SystemC 是一种基于 C++ 的硬件描述语言 (HDL),用于建模和模拟数字系统。它由 Open SystemC Initiative (OSCI) 开发和维护。
SystemC 的主要特点如下:
基于 C++ 语言:SystemC 是建立在 C++ 语言之上的,利用 C++ 的面向对象特性和丰富的标准库来描述硬件系统。这使得 SystemC 具有良好的可扩展性和可移植性。多层次建模:SystemC 支持从系统级到寄存器传输级 (RTL) 的多层次硬件建模,可以在不同抽象层次之间进行转换。并发建模:SystemC 提供了一个离散事件仿真内核,支持并发建模和仿真。这使得 SystemC 非常适合于建模和仿真复杂的硬件系统。时间建模:SystemC 提供了丰富的时间建模机制,可以精确地描述硬件系统的时序行为。可扩展性:SystemC 提供了一个可扩展的框架,允许用户定义自己的数据类型、接口和组件,以满足特定的建模需求。仿真和验证:SystemC 提供了一个强大的仿真引擎,可以对硬件系统进行全面的仿真和验证。SystemC 的主要应用场景包括:
系统级建模和仿真:SystemC 可用于建模和仿真复杂的系统级硬件,如 SoC (System-on-Chip)、嵌入式系统等。硬件/软件协同设计:SystemC 支持硬件和软件的联合建模和仿真,有助于提高硬件/软件协同设计的效率。IP 核开发和集成:SystemC 可用于开发和集成可重用的 IP 核,以加快产品开发周期。性能分析和优化:SystemC 的仿真引擎可用于对硬件系统的性能进行分析和优化。2. 安装
# SystemC 2.3.3curl -O https://www.accellera.org/images/downloads/standards/systemc/systemc-2.3.3.tar.gztar -xzf systemc-2.3.3.tar.gz cd systemc-2.3.3mkdir buildcd build../configure --prefix=/usr/local/systemc-2.3.3make -j8sudo make install3. 架构

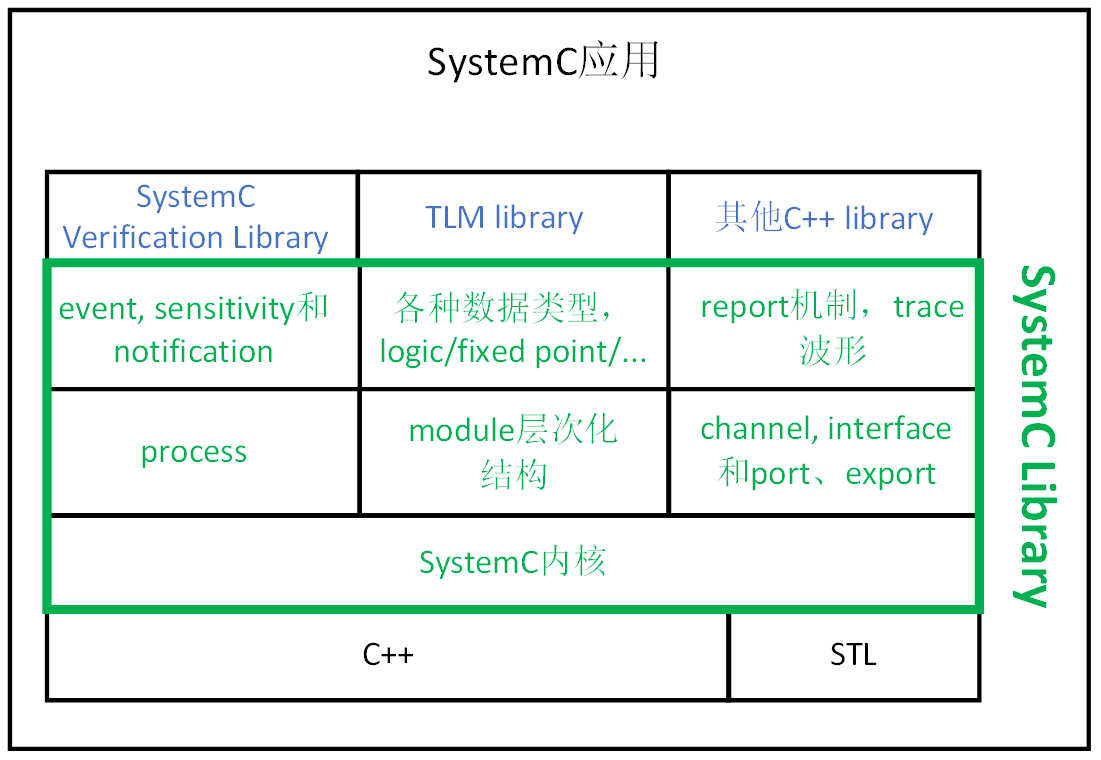
4. 构成
3.1. 头文件
systemc库包含了两个最基本和最重要的命名空间,一个是sc_ocre,一个是sc_dt。
sc_core是systemc基本的内核空间,sc_dt则定义了systemc的最基本数据类型。
systemc.h则包含了除了sc_core和sc_dt外的其他方针中所需要的名字,也包含了一些c++de命名空间,比如namespace std等。
3.2. 模块
模块是Systemc设计中最基本的单元,是完成一个特定功能的基本单元。模块与Verilog中的模块是对应的。
模块的实质是一个类,通过宏来包装简化。
SC_MODULE宏用来定义一个模块,其展开为:
#define SC_MODULE(user_module_name) \ struct user_module_name : ::sc_core::sc_moduleSC_CTOR是用来定义构造函数,其展开为:
#define SC_CTOR(user_module_name) \typedef user_module_name SC_CURRENT_USER_MODULE; \user_module_name( ::sc_core::sc_module_name )// the SC_HAS_PROCESS macro call must be followed by a ;#define SC_HAS_PROCESS(user_module_name) \typedef user_module_name SC_CURRENT_USER_MODULESC_THREAD是通过线程来模块硬件的并发。
SC_MODULE(Hello_SystemC){ SC_CTOR(Hello_SystemC)//create a constructor { SC_THREAD(main_thread);//register the process SC_THREAD(second_thread); SC_THREAD(third_thread); }//end constructor void main_thread(void) { cout<<"Hello SystemC World!"<<endl; sc_lv<4> Lv1;//logic vector 多位的sc_logic Lv1=15; cout<<"Lv1="<<Lv1<<endl; //1111 Lv1="zzzz"; cout<<"Lv1="<<Lv1.to_string()<<endl; sc_lv<8> Lv2("0101xxzz"); cout<<"Lv2="<<Lv2;//0101XXZZ cout<<endl; } void second_thread() { /* 前缀(prefix) 意义 表示 SC_DEC 0d decimal 0d13/-0d13 SC_BIN 0b binary 0b01101/0b10011 SC_BIN_US 0bus binary unsigned 0bus1101/negative SC_BIN_SM 0bsm binary signed magnitude 0bsm01101/-0bsm01101 SC_OCT 0o octal 0o15 SC_HEX 0x hex 0x0d/0xf3*/ sc_int<5> int1; //5-bit signed integer int1="-0d11"; //assign -11 cout<<"Int1="<<int1<<endl; //-11 cout<<"SC_BIN="<<int1.to_string(SC_BIN)<<endl; //-01011->取反10100->加1 0b10101 cout<<"SC_BIN_SM="<<int1.to_string(SC_BIN_SM)<<endl; //-bsm01011 cout<<"SC_HEX="<<int1.to_string(SC_HEX)<<endl; //10101 0xf5 } void third_thread() { /* sc_fixed<WL,IWL [,quant[,ovflw[,nbits]> name;/sc_ufixed/sc_fixed_fast/sc_ufixed_fast sc_fix name(WL,IWL [,quant[,ovflw[,nbits]); /sc_ufix/sc_fix_fast/sc_ufix_fast*/ sc_fixed<5,3> fix1;//5 bit fixed point fix1=-3.3; //-011.011 总长度5bit,3bit整数字 为-011.01 -3.5 cout<<"fix1="<<fix1<<endl; cout<<"SC_BIN="<<fix1.to_string(SC_BIN)<<endl;//011.011 取反后100.100 加1->0b100.101->0b100.10 cout<<"SC_HEX="<<fix1.to_string(SC_HEX)<<endl;//-0011.0110 取反后1100.1001 加1->1100.1010->0x1100.10(0xc.8) }};3.3. 端口
输入端口:sc_in<类型> 名称;
输出端口:sc_out<类型> 名称;
双向端口:sc_inout<类型> 名称;
3.4. 信号
Systemc中信号有两种定义方式:sc_signal<类型> 和 sc_buffer<类型>。
3.5. 类型
systemc rtl支持的systemc数据类型
| 类型名 | 描述 |
| sc_bit | 位宽为 1,值为 0 或 1 之一的二值信号 |
| sc_bv<n> | 任意位宽的位向量 |
| sc_logic | 位宽为 1,值为 0、1、X 或 Z 之一的四值信号 |
| sc_lv<n> | 任意位宽的逻辑向量 |
| sc_int<n> | 最多可达 64 位的有符号整型数 |
| sc_uint<n> | 最多可达 64 位的无符号整型数 |
| sc_bigint<n> | 任意位宽的有符号整型数 |
| sc_biguint<n> | 任意位宽的无符号整型数 |
3.6. delta
Δ 延迟是硬件描述语言中一个非常重要的概念,它是模块的端口与模块内数据的重要区别之一,在硬件描述语言的仿真软件将一个时间点分为一个或者多个 Δ ,在 Δ 延迟之前完成赋值和值的读取,而 Δ 之后才对被赋值的信号和端口的值进行更新,请看下面的一段代码:
SC_MODULE(Writer) { SC_CTOR (Writer) { SC_METHOD(Write); sensitive << clk.pos(); dont_initialize(); } void Write() { val++; out_val.write(val); std::cout << "write " << sc_time_stamp() << " " << val << std::endl; } sc_in_clk clk; sc_out<int> out_val; int val{}; }; SC_MODULE(Reader) { SC_CTOR (Reader) { SC_METHOD(Read); sensitive << clk.pos(); dont_initialize(); } void Read() { std::cout << "read " << sc_time_stamp() << " " << in_val.read() << std::endl; } sc_in_clk clk; sc_in<int> in_val; };Writer 每隔一个时钟向 out_val 写入一个数字,Reader 每隔一个时钟从 in_val 读取数字,那么所谓的 Δ 就是在第 1 个时钟 Writer 写入 1,但是 Reader 要在第 2 个时钟才能读到这个 1,也就是说赋值和拿到值相差了一个时钟
通过 Δ 延迟,仿真软件实现了赋值和更新的分离,保证了仿真结果与硬件一致
在SC_THREAD函数中,wait(1)即为等待一个一个时钟周期,注意此时SC_THREAD后面要添加clk的时钟敏感列表,否则wait(1)会一直阻塞。
5. 进程
在操作系统中,进程是程序在并发环境中的执行过程,它具有动态性、并发性、独立性、异步性和结构性五大特征。在systemc中,进程是一个基本的执行单元,被用来仿真目标系统的行为,systemc基本进程有三种:
SC_METHODSC_THREADSC_CTHREAD4.1. SC_METHOD
SC_METHOD 是一种简单且轻量级的进程类型。它的特点是:
事件驱动:SC_METHOD 进程被事件触发,当敏感列表(sensitive list)上的某个信号发生变化时,它会被立即调用。无阻塞行为:调用后立刻返回,不允许使用wait 语句,因为 SC_METHOD 进程一旦被触发就必须执行到底。无法中途挂起等待其他事件。时间进展依赖:SC_METHOD 的执行会立即完成,只有当它执行完毕后,仿真系统的时间才会继续推进。 举例说明:
假设我们有一个简单的组合逻辑电路,例如一个加法器,当输入 a 或 b 变化时,输出 sum 会立刻更新。此时可以用 SC_METHOD 实现:
SC_MODULE(Adder) { sc_in<int> a, b; sc_out<int> sum; SC_CTOR(Adder) { SC_METHOD(calculate_sum); sensitive << a << b; // 当 a 或 b 发生变化时触发 } void calculate_sum() { sum.write(a.read() + b.read()); // 立即更新 sum }};4.2. SC_THREAD
SC_THREAD 是比 SC_METHOD 更灵活的进程类型,它能够中途暂停并等待信号或者时间。
挂起和重新激活:SC_THREAD 可以使用wait 来中途挂起当前进程,并等待其他信号或定时器到期。与 SC_METHOD 不同,SC_THREAD 可以通过多次调用 wait 来暂停仿真,直到敏感信号发生变化或超时后恢复执行。不能重复进入:在一次仿真中,SC_THREAD 一旦退出,将不能重新进入。 举例说明:
例如,一个控制系统需要周期性地检查某个传感器值,我们可以使用 SC_THREAD 并使用 wait 函数来挂起一段时间:
SC_MODULE(SensorMonitor) { sc_in<bool> sensor; SC_CTOR(SensorMonitor) { SC_THREAD(monitor); sensitive << sensor; // 当传感器信号变化时触发 } void monitor() { while (true) { wait(10, SC_MS); // 每10毫秒检查一次传感器 if (sensor.read()) { std::cout << "Sensor is active" << std::endl; } else { std::cout << "Sensor is inactive" << std::endl; } } }};在该例子中,monitor 进程会每隔10毫秒暂停一次,再次激活时继续执行。
4.3. SC_CTHREAD
SC_CTHREAD 是专门用于时钟同步操作的一种线程进程。它的行为更接近实际硬件中的寄存器传输级(RTL)设计。
时钟触发:SC_CTHREAD 进程只能在时钟的上升沿或者下降沿触发或激活。这意味着它模拟了寄存器在每个时钟周期的行为。适合综合:SC_CTHREAD 设计更符合硬件时序逻辑,因此常用于行为综合。举例说明:
比如一个简单的计数器模块,每当时钟上升沿到来时计数器值增加:
SC_MODULE(Counter) { sc_in<bool> clk; sc_out<int> count; int internal_count; SC_CTOR(Counter) { SC_CTHREAD(counting, clk.pos()); // 在时钟上升沿触发 } void counting() { internal_count = 0; while (true) { wait(); // 等待时钟上升沿 internal_count++; count.write(internal_count); // 更新计数器值 } }};6. 通信
6.1. sc_interface
接口(Interface):派生自sc_interface的抽象类,包括一组虚拟函数集合。sc_interface相比sc_signal,将接口的具体实现封装起来,解耦并提升代码的利用性。sc_interface有抽象接口,基于抽象接口,提升代码的一致性。
示例:
#include <systemc.h>// 定义一个自定义接口类型class MyInterface : public sc_interface{public: virtual void write(int value) = 0; virtual int read() = 0;};// 实现接口类型的一个具体实现class MyInterfaceImpl : public MyInterface{private: int data;public: void write(int value) override { data = value; } int read() override { return data; }};// 定义一个生产者模块SC_MODULE(Producer){ sc_port<MyInterface> port; void produce() { for (int i = 0; i < 10; i++) { wait(10, SC_NS); port->write(i); std::cout << "Producer wrote: " << i << std::endl; } } SC_CTOR(Producer) { SC_THREAD(produce); }};// 定义一个消费者模块SC_MODULE(Consumer){ sc_port<MyInterface> port; void consume() { for (int i = 0; i < 10; i++) { int value = port->read(); std::cout << "Consumer read: " << value << std::endl; wait(10, SC_NS); } } SC_CTOR(Consumer) { SC_THREAD(consume); }};int sc_main(int argc, char *argv[]){ // 创建接口实现 MyInterfaceImpl interface_impl; // 创建生产者和消费者模块,并将它们连接到接口 Producer producer("producer"); producer.port(interface_impl); Consumer consumer("consumer"); consumer.port(interface_impl); // 运行仿真 sc_start(100, SC_NS); return 0;}6.2. sc_port
端口(port):负责提供module写数据的方法,因此一般同具体的实例独立。sc_port和sc_interface配合使用。sc_port 通信,数据立即更新。这与sc_out/sc_signal的数据在一个时钟周期后更新不同。
6.3. sc_export
无论是sc_in/sc_out,还是sc_port,都需要额外申请一个变量来完成两个Module之间的连线。而使用sc_export,则可以让两个Module直接相连,而不需要另外的连线。但是sc_signal移动到Module内部了。
sc_export<sc_signal<int>> p; 声明信号可以在Module外部直接访问,但是内部需要通过sc_signal来访问。sc_port<sc_signal_in_if<int>> p;声明这是一个in的接口,可以接入外部信号。示例:
#include <systemc>using namespace sc_core;SC_MODULE(MODULE1){ // defines one module sc_export<sc_signal<int>> p; // an export for other modules to connect sc_signal<int> s; // a signal (channel) inside the module. If not using export, the channel need to be defined outside module1. SC_CTOR(MODULE1) { p(s); // bind an export to an internal channel SC_THREAD(writer); // a process to write to an internal channel } void writer() { int val = 1; // init value while (true) { s.write(val++); // write to an internal channel wait(1, SC_SEC); } }};SC_MODULE(MODULE2){ // a module that reads from an export sc_port<sc_signal_in_if<int>> p; // a port used to read from an export of another module SC_CTOR(MODULE2) { SC_THREAD(reader); // a process to read from an outside channel sensitive << p; // triggered by value change on the channel dont_initialize(); } void reader() { while (true) { std::cout << sc_time_stamp() << ": reads from outside channel, val=" << p->read() << std::endl; // use port to read from the channel, like a pointer. wait(); // receives from port } }};int sc_main(int, char *[]){ MODULE1 module1("module1"); // instantiate module1 MODULE2 module2("module2"); // instantiate module2 module2.p(module1.p); // connect module2's port to module1's export. No need to declare a channel outside module1 and module2. sc_start(2, SC_SEC); return 0;}6.4. sc_prim_channel
通道(channel):一个primitive channel应该实现一个或多个接口。sc_prim_channel是在sc_interface的基础上,提供多个抽象接口。示例:
#include <systemc>#include <string>using namespace sc_core;class GENERATOR_IF : public sc_interface { // interface for interrupt generatorpublic: virtual void notify() = 0;};class RECEIVER_IF : public sc_interface { // interface for interrupt receiverpublic: virtual const sc_event& default_event() const = 0; // needed for sensitive};class INTERRUPT : public sc_prim_channel, public GENERATOR_IF, public RECEIVER_IF { // interrupt classpublic: INTERRUPT(sc_module_name name) : sc_prim_channel(name) {} // constructor, construct sc_prim_channel void notify() { // implement GENERATOR_IF e.notify(); } const sc_event& default_event() const { // implement RECEIVER_IF return e; }private: sc_event e; // private event for synchronization};SC_MODULE(GENERATOR) { // interrupt generator class sc_port<GENERATOR_IF> p; // port to generate interrupt SC_CTOR(GENERATOR) { // constructor SC_THREAD(gen_interrupt); } void gen_interrupt() { while (true) { p->notify(); // calls notify function of the INTERRUPT channel wait(1, SC_SEC); } }};SC_MODULE(RECEIVER) { // interrupt receiver class sc_port<RECEIVER_IF> p; // port to receive interrupt SC_CTOR(RECEIVER) { // constructor SC_THREAD(rcv_interrupt); sensitive << p; // monitors interrupt on port p dont_initialize(); } void rcv_interrupt() { // triggered upon interrupt while (true) { std::cout << sc_time_stamp() << ": interrupt received" << std::endl; wait(); } }};int sc_main(int, char*[]) { GENERATOR generator("generator"); // instantiate generator RECEIVER receiver("receiver"); // instantiate receiver INTERRUPT interrupt("interrupt"); // instantiate interrupt generator.p(interrupt); // port binding receiver.p(interrupt); // port binding sc_start(2, SC_SEC); return 0;}7. 时钟
时钟是同步数字逻辑中必不可少的基本元素,在 systemc 中,时钟被作为一个特殊的对象处理,它就是 sc_clock 类,构造函数如下:
sc_clock();explicit sc_clock( const char* name_ );sc_clock(const char* name_, const sc_time& period_, double duty_cycle_ = 0.5,const sc_time& start_time_ = SC_ZERO_TIME, bool posedge_first_ = true );sc_clock(const char* name_, double period_v_, sc_time_unit period_tu_,double duty_cycle_ = 0.5 );sc_clock(const char* name_, double period_v_, sc_time_unit period_tu_,double duty_cycle_, double start_time_v_, sc_time_unit start_time_tu_,bool posedge_first_ = true );// for backward compatibility with 1.0sc_clock(const char* name_,double period_, // in default time unitsdouble duty_cycle_ = 0.5,double start_time_ = 0.0, // in default time unitsbool posedge_first_ = true );其中 name_ 是时钟的名字
period 和 period_v 是时钟的周期
period_tu_ 是时钟的时间单位
duty_cycle_ 是占空比
start_time_v_ 和 start_time_ 是时钟初始第一逻辑值的持续时间
posedge_first_ 是第一个逻辑值是高电平还是低电平,如果为true,则时钟初始化为false,并在开始时间更改为true。也就是说如果为 true,那么初始化第一逻辑为 false,然后在初始化第一逻辑值的持续时间之后更改为 true。
示例:
sc_clock clk("clk", 20, SC_NS);
SystemC 缺省的时间分辨率为 1ps,同时提供了 sc_set_time_resolution(double, sc_time_uint) 函数允许修改系统的时间分辨率
SystemC 对时间分辨率的设置有以下要求
时间分辨率必须是 10 的幂时间分辨率只能在仿真开始之前设置时间分辨率只能设置一次时间分辨率必须在任何非零的 sc_time 声明之前设置SystemC 缺省的时间单位是 SC_NS,同时允许通过 sc_set_default_time_unit(double, sc_time_uint) 来设置缺省的时间单位,但是最好的是我们在设置的时候就加上时间单位,这样可以更加清晰
SystemC 对缺省的时间单位的设置有以下的要求
缺省时间单位必须是 10 的幂缺省时间单位必须大于时间分辨率缺省时间单位只能设置一次缺省时间单位只能在仿真开始之前设置比如设置缺省时间单位为 100 ps
sc_set_default_time_uint(100, SC_PS);那么下面的一个 clk 时钟周期就是 10 * 100ps = 1 NS
sc_clock clk("clk", 10);8. 仿真控制
开始仿真:sc_start()
sc_start() 函数控制所有始终的产生并在适当的时刻激活 SystemC 调度器,SystemC 调度器控制整个仿真过程中的调度工作,包括激活进程,产生 delta 延迟,计算和更新变量和信号的值,一般来讲,sc_start() 只在 sc_main() 中调用
sc_start 函数原型为
void sc_start();
void sc_start(const sc_time& duration);
void sc_start(double duration, sc_time_unit unit);
void sc_start(int duration, sc_time_unit unit);
其中 sc_start() 没有参数,表示仿真一直进行直到遇到 sc_stop 函数,其它的 sc_start() 函数如果没有遇到 sc_stop 函数,那么会在时间执行完之后退出
结束仿真:sc_stop()
sc_stop 函数停止仿真并将控制权交给 sc_main。我们可以通过 void sc_set_stop_mode(sc_stop_mode mode) 来控制 sc_stop 的停止模式,sc_stop_mode 有 SC_STOP_IMMEDIATE 个 SC_STOP_FINISH_DELTA 两个值,其中
SC_STOP_IMMEDIATE:立即停止当前进程和其他任何进程,不再执行更新阶段
SC_STOP_FINISH_DELTA:在返回到 sc_main 之前将当前 delta 周期能够执行的进程都执行并且完成当前 delta 周期的更新阶段
9. 示例
9.1. 代码
代码,下面的代码来自SystemC源码中的dpipe工程。
#include "systemc.h"// This program implements a delay pipe which passes values through a fifo// in a specified number of clocks. A value may be inserted at each clock// edge and it will appear as the output of the pipe after the specified// number of clocks. The template arguments to this class are:// T the class specifying the value to be piped.// N is the number of stages in the pipe, and should be >= 2.//// For this example change the typedef below to the class that you want a // delay pipe for.typedef sc_biguint<121> atom; // Value to be pipe delayed.//==============================================================================// dpipe<T,N> - DELAY PIPELINE FOR AN ARBITRARY CLASS://==============================================================================template<class T, int N>SC_MODULE(dpipe) { typedef sc_export<sc_signal_inout_if<T> > in; // To pipe port type. typedef sc_export<sc_signal_in_if<T> > out; // From pipe port type. SC_CTOR(dpipe) { m_in(m_pipe[0]); m_out(m_pipe[N-1]); SC_METHOD(rachet); sensitive << m_clk.pos(); } void rachet() { for ( int i = N-1; i > 0; i-- ) { m_pipe[i].write(m_pipe[i-1].read()); } } sc_in_clk m_clk; // Pipe synchronization. in m_in; // Input to delay pipe. out m_out; // Output from delay pipe. sc_signal<T> m_pipe[N]; // Pipeline stages.};// Testbench reader of values from the pipe:SC_MODULE(Reader){ public: SC_CTOR(Reader) { SC_METHOD(extract) sensitive << m_clk.pos(); dont_initialize(); } protected: void extract() { cout << sc_time_stamp().to_double() << ": " << m_from_pipe.read() << endl; } public: sc_in_clk m_clk; // Module synchronization. sc_in<atom > m_from_pipe; // Output from delay pipe.};// Testbench writer of values to the pipe:SC_MODULE(Writer){ SC_CTOR(Writer) { SC_METHOD(insert) sensitive << m_clk.pos(); m_counter = 0; } void insert() { m_to_pipe.write(m_counter); m_counter++; } sc_in_clk m_clk; // Module synchronization. atom m_counter; // Write value. sc_inout<atom > m_to_pipe; // Input for delay pipe.};// Main programint sc_main( int, char* [] ){ sc_clock clock; dpipe<atom,4> delay("pipe"); Reader reader("reader"); Writer writer("writer"); delay.m_clk(clock); reader.m_clk(clock); reader.m_from_pipe(delay.m_out); writer.m_clk(clock); writer.m_to_pipe(delay.m_in); sc_start(10, SC_NS); return 0;}9.2. 编译
g++ main.cpp -I/usr/local/systemc-2.3.3/include -L/usr/local/systemc-2.3.3/lib-linux64 -o main -lsystemc
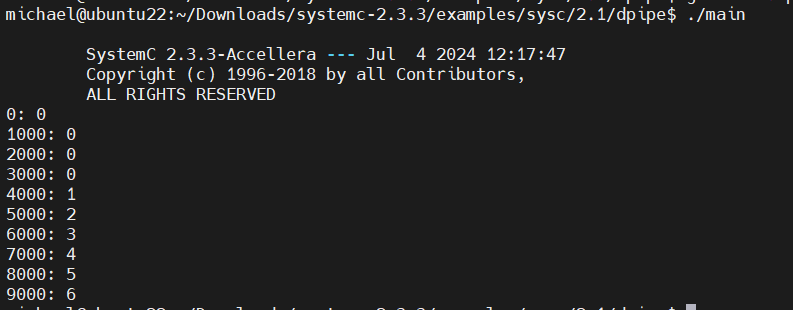
9.3. 仿真
