目录
01.红黑树的迭代器
operator++:
operator*、->
operator==、!=
02.红黑树的改造
begin和end方法
keyOfValue
insert方法
find方法
size方法
clear方法
03.map&set的模拟实现
01.红黑树的迭代器
前面的博客我们介绍了红黑树的底层原理并手撕了一个自己的红黑树,但是这与库里的红黑树还是差了些意思(博客跳转链接?:红黑树万字详解)
要想实现一个完整的红黑树,我们还得实现迭代器的功能,使其可以访问红黑树的每个节点,方便遍历、修改等操作。
实现 iterator 时,begin 和 end 的定义方式决定了如何遍历树中的元素,那么问题来了,begin 和 end 分别该如何定义呢?我们知道,红黑树是一棵二叉搜索树,它中序遍历的结果是一个有序数列,那么我们可以通过 begin 获取红黑树中最小的元素,end 则是迭代的终止位置,而迭代的过程,就是红黑树中序遍历的过程。
下面我们对红黑树进行改造:
迭代器Iterator
迭代器Iterator的底层就是一个类,通过内部成员函数重载++、--、*、->等操作符实现迭代器的各种操作。
在红黑树的迭代器内部,我们需要存放红黑树的节点指针,通过该指针可以访问树中的任意元素:
于是初始框架搭好了:
template <class T>struct RBTreeIterator{typedef RBTreeNode<T> Node;typedef RBTreeIterator<T> Self;Node* _node;RBTreeIterator(Node* node):_node(node){}// 迭代器的++操作Self& operator++();// 让迭代器可以像指针一样操作T& operator*();T* operator->();// 让迭代器能够支持比较bool operator!=(const Self& s)const;bool operator==(const Self& s)const;};operator++:
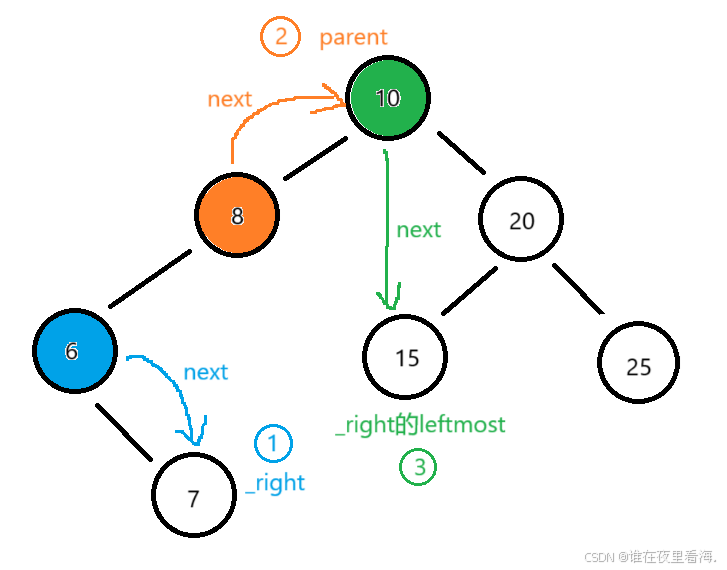
迭代器begin()表示红黑树中最小元素,++操作后迭代器需要指向下一个元素,下个元素在什么位置呢,需要分类讨论,根据二叉搜索树的性质,可分为以下三种情况:

①:当前节点的右孩子存在且右孩子为叶子节点 --> next = 右孩子(_right)
②:当前节点右子树不存在且双亲节点存在 --> next = 双亲(_parent)
③:当前节点右孩子存在且右孩子有其左孩子 --> next = _right的最左节点(leftmost)
依据上述思路,可得代码如下:
Self& operator++(){if (_node->_right){// 右不为空,右子树最左节点就是中序下一个Node* leftMost = _node->_right;while (leftMost->_left){leftMost = leftMost->_left;}_node = leftMost;}else{Node* cur = _node;Node* parent = cur->_parent;while (parent && cur == parent->_right){cur = parent;parent = cur->_parent;}_node = parent;}return *this;}总结:next的位置优先考虑有右孩子的情况,没有右孩子则看有无双亲,如果都没有,说明来到了到末尾。
operator*、->
重载解引用*操作符的目的是模拟迭代器为指针,在外部看来,迭代器就是一个指向有序序列某一元素的指针,而解引用*可以得到当前元素。
而->操作符的重载是针对容器内部节点有自己的成员的情况,重载->就可以做到像访问普通对象一样访问迭代器指向的对象的成员。
比如set内部存放string类型的元素,it->length()可以直接访问其计算长度的成员函数:
int main() { set<string> s; s.insert("Hello"); s.insert("World"); s.insert("!"); // 使用迭代器访问元素 for (auto it = s.begin(); it != s.end(); ++it) { cout << it->length() << " "; // 访问字符串成员函数 } cout << endl; return 0;}实现重载非常简单,直接返回节点的_data成员即可:
T& operator*(){return _node->_data;}T* operator->(){return &operator*();}operator==、!=
判断两个迭代器是否相等实际上就是判断节点是否相等:
bool operator!=(const Self& s)const{return _node != s._node;}bool operator==(const Self& s)const{return _node == s->_node;}如此一来,表示迭代器的类我们就定义好了,下面就是将迭代器添加到红黑树当中。
02.红黑树的改造
begin和end方法
迭代器begin指向红黑树中最小元素的节点,根据二叉搜索树的性质,最小节点就是最左节点。begin()函数中,我们的想法是,找到红黑树最左节点,将其改造成Iterator并返回:
Iterator Begin(){Node* _leftMost = _root;while (_leftMost && _leftMost->_left)_leftMost = _leftMost->_left;return Iterator(_leftMost);}迭代器end按理应该是指向最大节点也就是最右节点,但是事实上我们不能将最右节点直接包装成迭代器,因为这不符合具体的使用场景:
for (auto i = s1.begin() ; i != s1.end() ; ++i){cout << *i << " ";}cout << endl;通过迭代器遍历容器并打印元素是迭代器的基础用法,如果我们将最大节点作为end(),那么遍历时是不会打印end()的,这不符合我们的预期。其实我们只需要将end()赋值为空即可,因为迭代器begin()往后遍历必然会遍历到最后一个元素,不需要专门标记:
Iterator End(){return Iterator(nullptr);}keyOfValue
由于我们的红黑树要同时满足对map和set的接口实现,但是map存储的是键值对,set只存储键,但是我们又要根据键对容器进行一系列的操作(插入、查询等等)
也就是说,对于实现set的模版参数只需要:
template<class K>而对于map需要:
template<class K,class V>模版参数都不一样,这不符合泛式编程的原则,那么我可不可以让他们俩用相同的模版参数呢,这里就要用到KeyOfValue仿函数:
仿函数又称函数对象,这里的主要作用是从给定的值中提取出键
1.定义仿函数:
KeyOfValue 定义了一个结构体,其中重载了operator() ,使其能像函数一样被调用
2.提取键的逻辑:
在 KeyOfValue 中,operator() 接受一个 ValueType 类型的参数并返回其中的键。比如在set中,ValueType 是 K,在map中,ValueType 是 pair<K,V>,因此这个仿函数的作用就是返回输入参数的键。
// set中 struct KeyOfValue{const K& operator()(const ValueType& key){return key;}}; // map中 struct KeyOfValue{const K& operator()(const ValueType& v){return v.first;}};所以我们给红黑树的模版参数为:
template<class K, class T, class KeyOfT>其中 KeyOfT 类型函数的作用是从 T 类型对象中提取 K类型对象。
insert方法
二叉树元素的插入其实并不需要用到迭代器,这里我们对insert进行改造的原因是,我们要考虑对map的接口实现:
相较于set,map还重载了[]运算符,以便通过键(key)直接访问或插入对应的值(value):
Map<string, int> myMap; // 使用 operator[] 添加元素 myMap["apple"] = 10; myMap["banana"] = 20;其底层实现原理就是用到了迭代器:
①:用insert方法插入键为key的元素
②:返回新插入元素的迭代器,通过对迭代器解引用*,就可以访问或修改value
由于插入可能会失败(当前元素已存在于映射中),所以还需要接收一个bool值返回。相当于我们需要返回两个参数(迭代器Iterator和bool值),可以用pair键值对实现:
pair<Iterator, bool> Insert(const T& data)在insert函数内部,我们根据插入情况返回对应的键值对:
// 头结点插入的情况 if (_root == nullptr) {_root = new Node(data);_root->_col = BLACK;return std::make_pair(Iterator(_root), true);} // 键已存在的情况while (cur) {if (kot(cur->_data) < kot(data)) {parent = cur;cur = cur->_right;}else if (kot(cur->_data) > kot(data)) {parent = cur;cur = cur->_left;}else {return std::make_pair(Iterator(cur), false); // 键已存在}}return std::make_pair(Iterator(newnode), true); // 返回新插入节点find方法
在红黑树中查找某一元素是否存在,我们需要从头结点开始,向左右子树递归遍历:
Iterator Find(K key){return Iterator(_find(_root, key));} Node* _find(Node* cur, K key){if (!cur)return nullptr;KeyOfT kov;if (kov(cur->_data) == key)return cur;Node* ret1 = _find(cur->_left, key);Node* ret2 = _find(cur->_right, key);if (ret1)return ret1;else if (ret2)return ret2;return nullptr;}size方法
同样是要递归遍历树,我们要考虑的是如何在递归的过程中记录节点的数量,通过返回值:
当遍历到空节点时,返回0,只要不为空,返回 1 + _size(cur->_left) + _size(cur->_right),只要当前节点存在,就会在最终的返回值上+1:
size_t Size(){return _size(_root);}size_t _size(Node* cur){if (cur == nullptr)return 0;return 1 + _size(cur->_left) + _size(cur->_right);}clear方法
同样是递归遍历红黑树,只不过我们对节点的操作需要放在遍历之后,也就是我们要递归到叶子节点才开始进行空间释放,然后依次往上进行释放,空间释放也要分为两种情况:
①不为根节点:
此时不仅要对当前节点释放空间并置空,还需要找到双亲节点,使其对该节点的索引(左孩子或右孩子)也置空
②为根节点:
对根节点进行空间释放并置空
void Clear(){_clear(_root);} void _clear(Node* cur){if(cur->_left)_clear(cur->_left);if(cur->_right)_clear(cur->_right);cur->_data = T();if (cur->_parent){if (cur == cur->_parent->_left)cur->_parent->_left = nullptr;elsecur->_parent->_right = nullptr;delete cur;cur = nullptr;}else{delete _root;_root = nullptr;}}03.map&set的模拟实现
具体的实现过程在红黑树中已经完成,这里只需要连接各自的接口即可,需要根据各自的结构进行合理的传参与引用,下面直接看代码吧:
// Set.h#pragma once#include"RBTree.h"template<class K>class set{typedef K ValueType;// 作用是:将value中的key提取出来struct KeyOfValue{const K& operator()(const ValueType& key){return key;}};// 红黑树类型重命名typedef RBTree<K, ValueType, KeyOfValue> RBTree;public:typedef typename RBTree::Iterator iterator;public:set() {}// Iteratoriterator begin() { return _t.Begin(); }iterator end() { return _t.End(); }// Capacitysize_t size() { return _t.Size(); }bool empty() { return _t.Empty(); }// modifybool insert(const ValueType& data){return _t.Insert(data).second;}void clear() { _t.Clear(); }iterator find(const K& key){return _t.Find(key);}private:RBTree _t;};// Map.h#pragma once#include"RBTree.h"template<class K, class V>class map{typedef pair<K, V> ValueType;// 作用:将value中的key提取出来struct KeyOfValue{const K& operator()(const ValueType& v){return v.first;}};typedef RBTree<K, ValueType, KeyOfValue> RBTree;public:typedef typename RBTree::Iterator iterator;public:map() {}// Iteratoriterator begin() { return _t.Begin(); }iterator end() { return _t.End(); }// Capacitysize_t size()const { return _t.Size(); }bool empty()const { return _t.Empty(); }// AcessV& operator[](const K& key) {// 插入新元素或获取已有元素的迭代器auto result = _t.Insert(ValueType(key, V()));return result.first->second; // 返回值的引用}const V& operator[](const K& key) const {auto it = _t.Find(key); // 查找键值对if (it != _t.end()) {return it->second; // 返回找到的值的引用}}// modifypair<iterator, bool> insert(const ValueType& data) {return_t.Insert(data);}void clear() { _t.Clear(); }iterator find(const K& key) { return _t.Find(key); }private:RBTree _t;};最后是红黑树部分的完整代码:
// RBTree.h#pragma once#include<iostream>#include<utility>enum Color {RED,BLACK};template<class T>struct RBTreeNode {RBTreeNode(const T& data = T(), Color color = RED):_left(nullptr),_right(nullptr),_parent(nullptr),_data(data),_col(color){}RBTreeNode* _left;RBTreeNode* _right;RBTreeNode* _parent;T _data;Color _col;};template <class T>struct RBTreeIterator{typedef RBTreeNode<T> Node;typedef RBTreeIterator<T> Self;Node* _node;RBTreeIterator(Node* node):_node(node){}// 迭代器的++操作,让迭代器可以移动Self& operator++(){if (_node->_right){// 右不为空,右子树最左节点就是中序下一个Node* leftMost = _node->_right;while (leftMost->_left){leftMost = leftMost->_left;}_node = leftMost;}else{Node* cur = _node;Node* parent = cur->_parent;while (parent && cur == parent->_right){cur = parent;parent = cur->_parent;}_node = parent;}return *this;}// 让迭代器可以像指针一样操作T& operator*(){return _node->_data;}T* operator->(){return &operator*();}// 让迭代器能够支持比较bool operator!=(const Self& s)const{return _node != s._node;}bool operator==(const Self& s)const{return _node == s->_node;}};// 此处给红黑树添加迭代器,其他用不到的操作暂被拿掉,只留下红黑树构建的核心操作template<class K, class T, class KeyOfT>class RBTree{typedef RBTreeNode<T> Node;public:// 给红黑树的迭代器取别名,方便后序使用typedef RBTreeIterator<T> Iterator;// Begin() 和 End()方法Iterator Begin(){Node* _leftMost = _root;while (_leftMost && _leftMost->_left)_leftMost = _leftMost->_left;return Iterator(_leftMost);}Iterator End(){return Iterator(nullptr);}size_t Size(){return _size(_root);}bool Empty(){return _root == nullptr;}void Clear(){_clear(_root);}Iterator Find(K key){return Iterator(_find(_root, key));}~RBTree(){Destroy(_root);_root = nullptr;}std::pair<Iterator, bool> Insert(const T& data) {if (_root == nullptr) {_root = new Node(data);_root->_col = BLACK;return std::make_pair(Iterator(_root), true);}KeyOfT kot;Node* parent = nullptr;Node* cur = _root;// 查找插入位置while (cur) {if (kot(cur->_data) < kot(data)) {parent = cur;cur = cur->_right;}else if (kot(cur->_data) > kot(data)) {parent = cur;cur = cur->_left;}else {return std::make_pair(Iterator(cur), false); // 键已存在}}// 插入新节点,初始化为红色cur = new Node(data);cur->_col = RED;Node* newnode = cur;// 设置父节点的左/右子节点if (kot(parent->_data) < kot(data)) {parent->_right = cur;}else {parent->_left = cur;}cur->_parent = parent;// 红黑树调整过程while (parent && parent->_col == RED) {Node* grandfather = parent->_parent;if (parent == grandfather->_left) {Node* uncle = grandfather->_right;if (uncle && uncle->_col == RED) {// 情况1:叔节点为红色parent->_col = uncle->_col = BLACK;grandfather->_col = RED;cur = grandfather;parent = cur->_parent;}else {// 叔节点为黑或不存在if (cur == parent->_left) {RotateR(grandfather); // 单右旋parent->_col = BLACK;grandfather->_col = RED;}else {RotateL(parent); // 双旋:左旋 + 右旋RotateR(grandfather);cur->_col = BLACK;grandfather->_col = RED;}break;}}else {Node* uncle = grandfather->_left;if (uncle && uncle->_col == RED) {parent->_col = uncle->_col = BLACK;grandfather->_col = RED;cur = grandfather;parent = cur->_parent;}else {if (cur == parent->_right) {RotateL(grandfather); // 单左旋parent->_col = BLACK;grandfather->_col = RED;}else {RotateR(parent); // 双旋:右旋 + 左旋RotateL(grandfather);cur->_col = BLACK;grandfather->_col = RED;}break;}}}_root->_col = BLACK; // 确保根节点为黑色return std::make_pair(Iterator(newnode), true); // 返回新插入节点}private:void RotateL(Node* parent){Node* subR = parent->_right;Node* subRL = subR->_left;parent->_right = subRL;if (subRL)subRL->_parent = parent;Node* parentParent = parent->_parent;subR->_left = parent;parent->_parent = subR;if (parentParent == nullptr){_root = subR;subR->_parent = nullptr;}else{if (parent == parentParent->_left){parentParent->_left = subR;}else{parentParent->_right = subR;}subR->_parent = parentParent;}}void RotateR(Node* parent){Node* subL = parent->_left;Node* subLR = subL->_right;parent->_left = subLR;if (subLR)subLR->_parent = parent;Node* parentParent = parent->_parent;subL->_right = parent;parent->_parent = subL;if (parentParent == nullptr){_root = subL;subL->_parent = nullptr;}else{if (parent == parentParent->_left){parentParent->_left = subL;}else{parentParent->_right = subL;}subL->_parent = parentParent;}}void Destroy(Node* root){if (root == nullptr)return;Destroy(root->_left);Destroy(root->_right);delete root;}size_t _size(Node* cur){if (cur == nullptr)return 0;return 1 + _size(cur->_left) + _size(cur->_right);}void _clear(Node* cur){if(cur->_left)_clear(cur->_left);if(cur->_right)_clear(cur->_right);cur->_data = T();if (cur->_parent){if (cur == cur->_parent->_left)cur->_parent->_left = nullptr;elsecur->_parent->_right = nullptr;delete cur;cur = nullptr;}else{delete _root;_root = nullptr;}}Node* _find(Node* cur, K key){if (!cur)return nullptr;KeyOfT kov;if (kov(cur->_data) == key)return cur;Node* ret1 = _find(cur->_left, key);Node* ret2 = _find(cur->_right, key);if (ret1)return ret1;else if (ret2)return ret2;return nullptr;}private:Node* _root = nullptr;};下面我们对模拟实现的map和set进行验证:
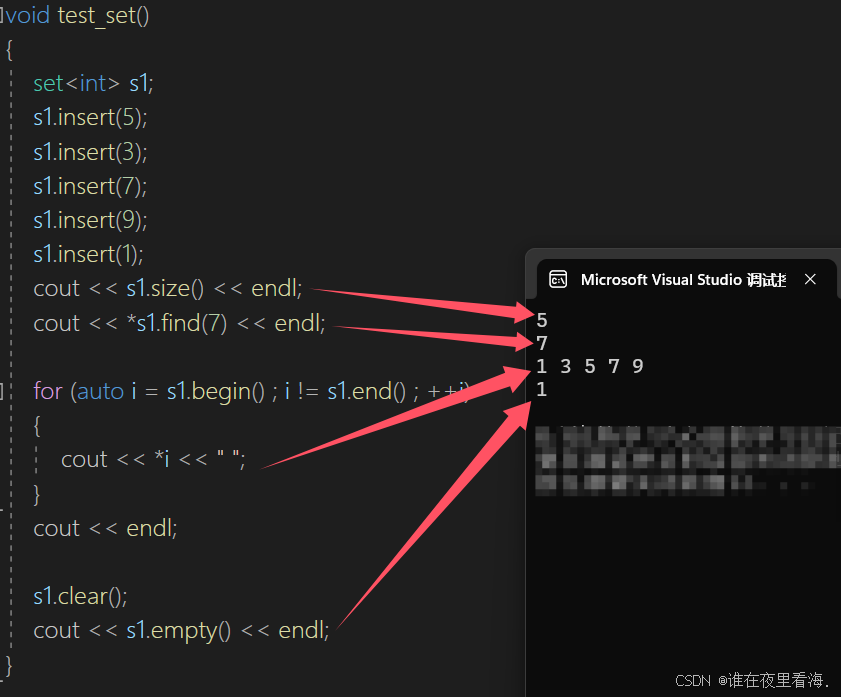
set的验证:

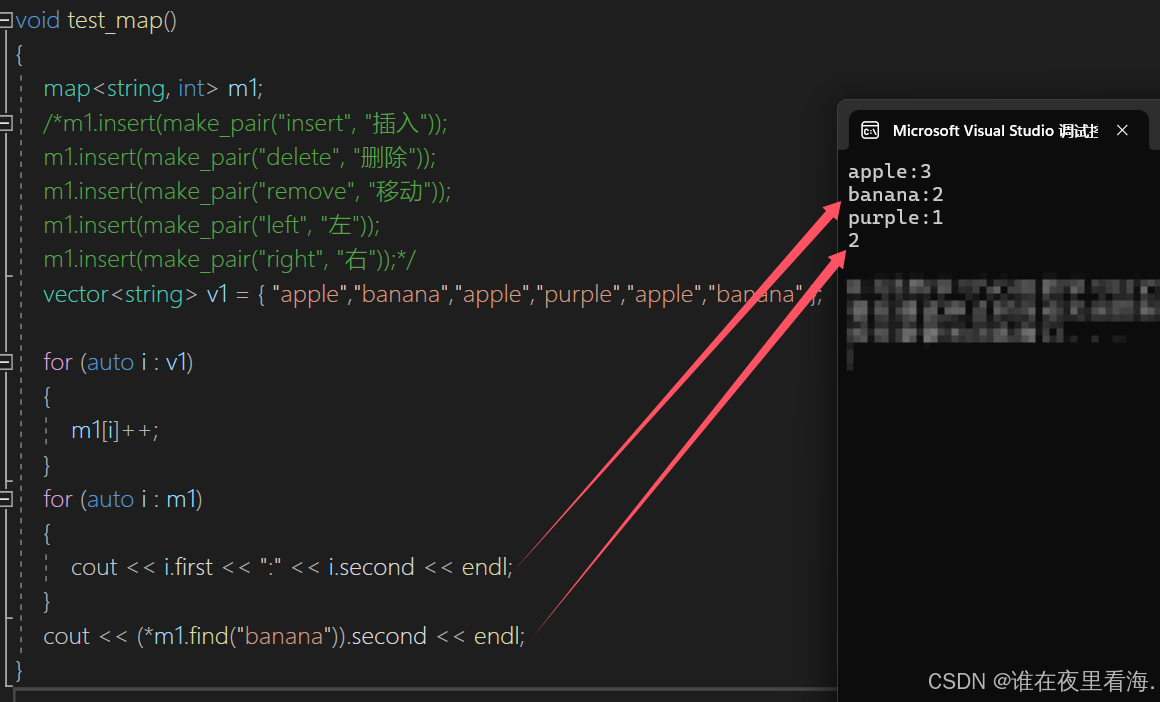
map的验证:
 验证无误~
验证无误~
以上就是红黑树的改造与map&set模拟实现详解,码文不易,觉得这篇内容还不错的,给博主点个关注吧~~?你们的支持就是对我最大的鼓励??