目录
一、下载
三、开始训练
train.py
detect.py
export.py
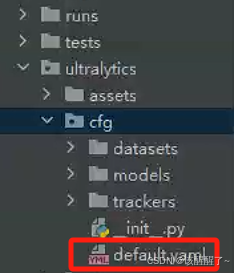
超参数都在这个路径下
四、C#读取yolov10模型进行部署推理
如下程序是用来配置openvino
配置好引用后就可以生成dll了 再创建一个控件,作为显示 net framework 4.8版本的
再nuget工具箱里下载 opencvsharp4 以及openvino
然后主流程代码
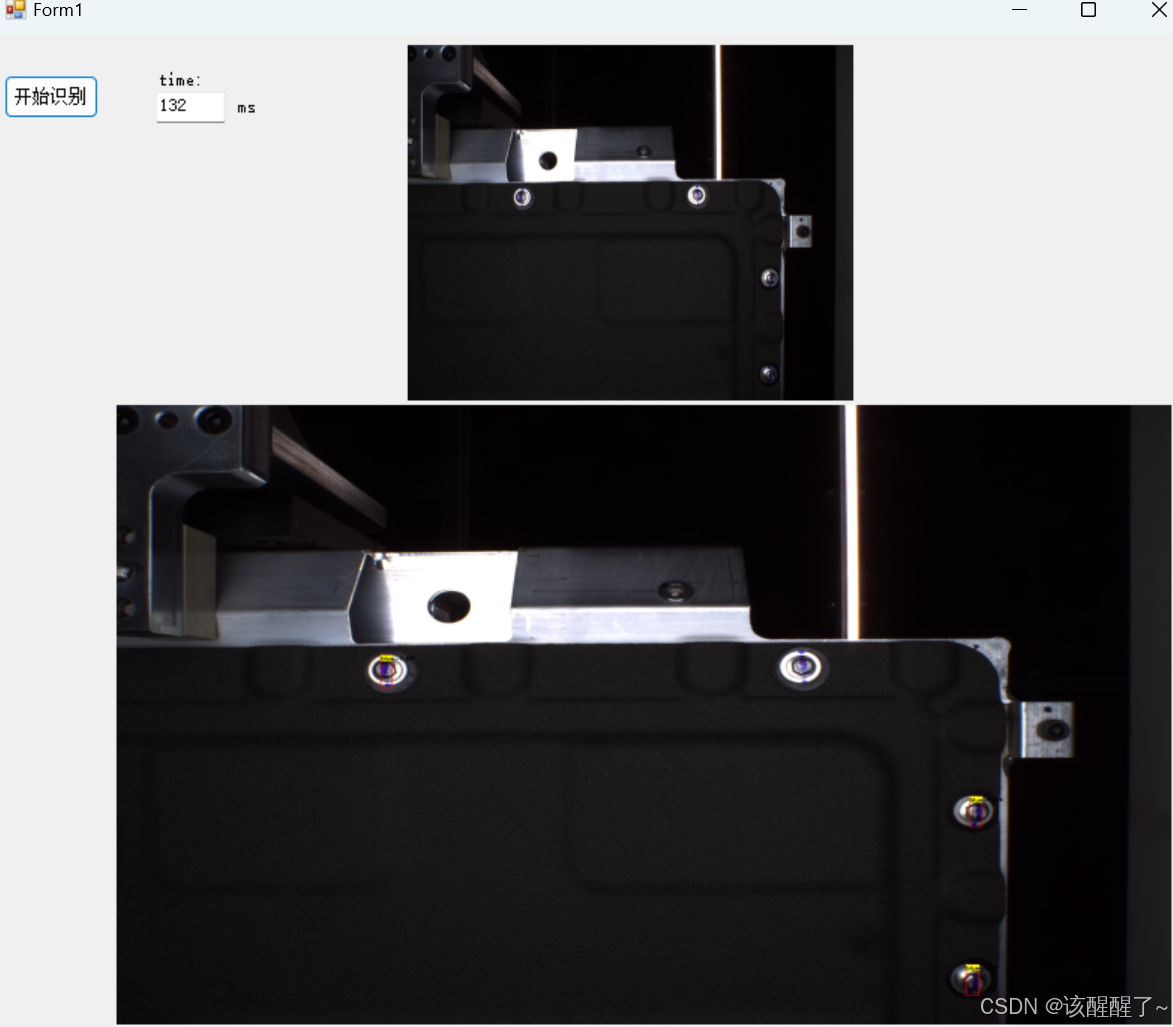
效果
我的yolov10 训练源码
C#部署yolov10源码
一、下载
GitHub - THU-MIG/yolov10: YOLOv10: Real-Time End-to-End Object Detection
或者你可以再浏览器搜索框里直接搜索 yolov10 github
二、环境配置
下载anaconda 并安装 在网上随意下载一个2022版本的就行
yolov10和yolov8的文件结构差不多 所以如果你训练过其他的yolov5以上的yolo,你可以直接拷贝环境进行使用,当然你如果想配置gpu
就需要cuda cudnn 和 gpu版本的torch
其他的直接pip install 即可
pip install requirements.txt -i https://pypi.tuna.tsinghua.edu.cn/simple下方网站中下载你需要的版本下载时要注意对应关系,
cuda和cudnn各个版本的Pytorch下载网页版,onnx,ncnn,pt模型转化工具_cuda国内镜像下载网站-CSDN博客
也可以看我另一篇文章
Yolov10训练,转化onnx,推理_yolov10转onnx-CSDN博客
三、开始训练
有一点要注意v10版本其实是从v8版本上面改的 所以v10的预训练模型你需要自行下载 否则就会下载成v8的
首先标注数据集 在pycharm 中下载labelimg
pip install labelimg -i https://pypi.tuna.tsinghua.edu.cn/simple下载好后直接在终端输入labelimg 开始标注 训练流程基本和yolov5差不多
在yolov10的根目录下创建一个名为data的文件夹 里面再创建一个data.yaml文件 用于数据集的读取

再在根目录创建三个py文件 分别是 train.py detect.py export.py
train.py
from ultralytics import YOLOv10model_yaml_path = "ultralytics/cfg/models/v10/yolov10s.yaml"#数据集配置文件data_yaml_path = 'data/data.yaml'#预训练模型pre_model_name = 'yolov10s.pt'if __name__ == '__main__': #加载预训练模型 model = YOLOv10(model_yaml_path).load(pre_model_name) #训练模型 results = model.train(data=data_yaml_path, epochs=450, batch=8, device=0, name='train/exp')# yolo export model="H:\\DL\\yolov10-main\\runs\\detect\\train\\exp\\weights\\best.pt" format=onnx opset=13 simplifydetect.py
from ultralytics import YOLOv10import torchif torch.cuda.is_available(): device = torch.device("cuda")else: raise Exception("CUDA is not")model_path = r"H:\\DL\\yolov10-main\\runs\\detect\\train\\exp4\\weights\\best.pt"model = YOLOv10(model_path)results = model(source=r'H:\DL\yolov10-main\dataDakeset\two_CD_double\test', name='predict/exp', conf=0.45, save=True, device='0' )export.py
from ultralytics import YOLOv10model=YOLOv10("H:\\DL\\yolov10-main\\runs\\detect\\train\\exp\\weights\\best.pt")model.export(format='onnx')# 'torchscript, onnx, openvino, engine, coreml, saved_model, pb, tflite, edgetpu, tfjs, paddle'超参数都在这个路径下


然后设置好参数就可以直接训练了
推理用detect.py 推理 转化用export.py 转化, 转化为哪种模型 就替换即可

四、C#读取yolov10模型进行部署推理
我们需要设定yolov10的模型结构
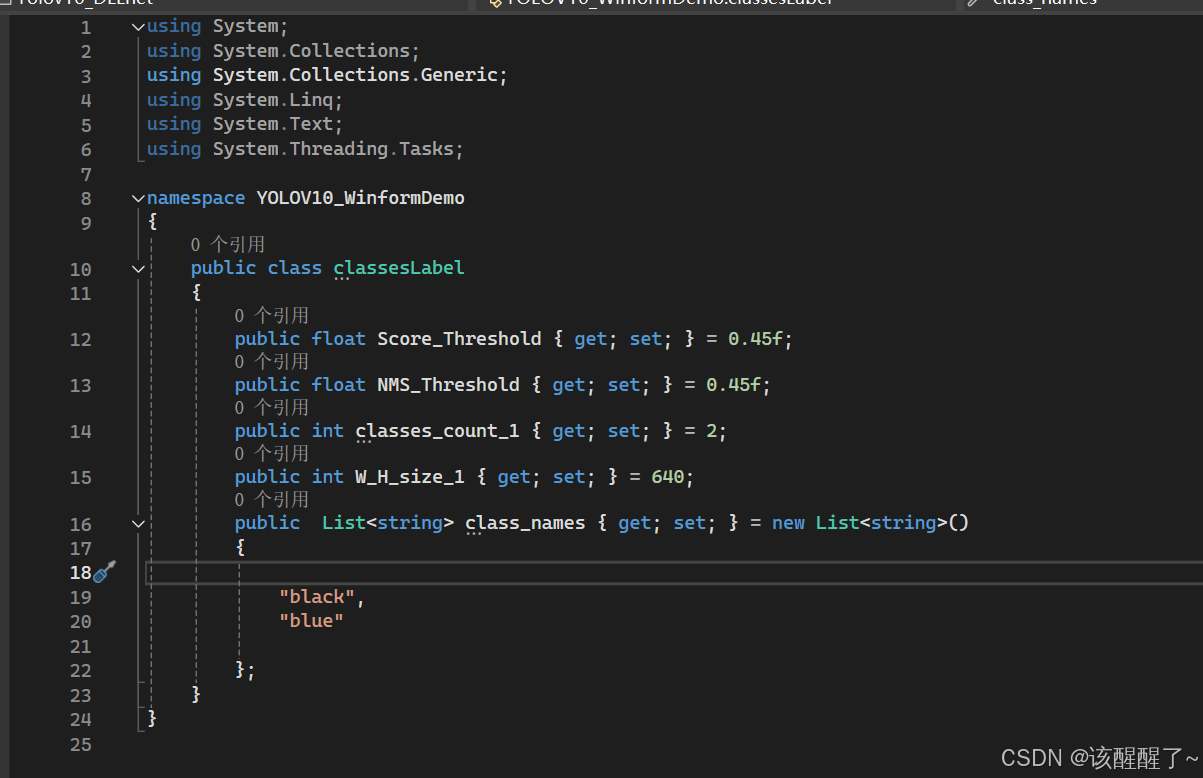
using OpenCvSharp;using OpenVinoSharp.Extensions.result;using System;using System.Collections.Generic;using System.Linq;using System.Text;using System.Threading.Tasks;namespace Yolov10_DLLnet{ public class YOLOv10Det : YOLO { public YOLOv10Det(string model_path, string engine, string device, int categ_nums, float det_thresh, float det_nms_thresh, int input_size) : base(model_path, engine, device, categ_nums, det_thresh, det_nms_thresh, new int[] { 1, 3, input_size, input_size }, new List<string> { "images" }, new List<int[]> { new int[] { 1, 4 + categ_nums, 8400 } }, new List<string> { "output0" }) { } protected override BaseResult postprocess(List<float[]> results) { List<Rect> positionBoxes = new List<Rect>(); List<int> classIds = new List<int>(); List<float> confidences = new List<float>(); // Preprocessing output results for (int i = 0; i < results[0].Length / 6; i++) { int s = 6 * i; if ((float)results[0][s + 4] > 0.5) { float cx = results[0][s + 0]; float cy = results[0][s + 1]; float dx = results[0][s + 2]; float dy = results[0][s + 3]; int x = (int)((cx) * m_factor); int y = (int)((cy) * m_factor); int width = (int)((dx - cx) * m_factor); int height = (int)((dy - cy) * m_factor); Rect box = new Rect(); box.X = x; box.Y = y; box.Width = width; box.Height = height; positionBoxes.Add(box); classIds.Add((int)results[0][s + 5]); confidences.Add((float)results[0][s + 4]); } } DetResult re = new DetResult(); // for (int i = 0; i < positionBoxes.Count; i++) { re.add(classIds[i], confidences[i], positionBoxes[i]); } return re; } }}然后再设置各项参数 你可以再其中自己定义一个文件 里面写上你需要的类 比如置信度,类别 以及类别数量等等。为后续的dll生成做准备。

如下程序是用来配置openvino
using OpenCvSharp.Dnn;using OpenCvSharp;using OpenVinoSharp;using System;using System.Collections.Generic;using System.Linq;using System.Runtime.InteropServices;using System.Text;using System.Threading.Tasks;using System.Reflection;//using static System.Windows.Forms.Design.AxImporter;namespace Yolov10_DLLnet{ public class Predictor : IDisposable { private Core core; private Model model; private CompiledModel compiled; private InferRequest openvino_infer; private Net opencv_infer; private string engine = null; public Predictor() { } public Predictor(string model_path, string engine, string device) { if (model_path == null) { throw new ArgumentNullException(nameof(model_path)); } this.engine = engine; if (engine == "OpenVINO") { core = new Core(); model = core.read_model(model_path); compiled = core.compile_model(model, device); openvino_infer = compiled.create_infer_request(); } } public void Dispose() { openvino_infer.Dispose(); compiled.Dispose(); model.Dispose(); core.Dispose(); GC.Collect(); } public List<float[]> infer(float[] input_data, List<string> input_names, int[] input_size, List<string> output_names, List<int[]> output_sizes) { List<float[]> returns = new List<float[]>(); var input_tensor = openvino_infer.get_input_tensor(); input_tensor.set_data(input_data); openvino_infer.infer(); foreach (var name in output_names) { var output_tensor = openvino_infer.get_tensor(name); returns.Add(output_tensor.get_data<float>((int)output_tensor.get_size())); } return returns; } }}创建一个名为yolo的cs文件用于 将yolov10模型结构做引用
//using Microsoft.VisualBasic.Logging;using OpenCvSharp;using OpenVinoSharp.Extensions.model;using OpenVinoSharp.Extensions.process;using OpenVinoSharp.Extensions.result;using System;using System.Collections.Generic;using System.Diagnostics;using System.Linq;using System.Text;using System.Threading.Tasks;//using Yolov10_DLLnet;using static OpenVinoSharp.Node;namespace Yolov10_DLLnet{ public class YOLO : IDisposable { protected int m_categ_nums; protected float m_det_thresh; protected float m_det_nms_thresh; protected float m_factor; protected int[] m_input_size; protected List<int[]> m_output_sizes; protected List<string> m_input_names; protected List<string> m_output_names; protected List<int> m_image_size = new List<int>(); private Predictor m_predictor; Stopwatch sw = new Stopwatch(); public YOLO() { m_predictor = new Predictor(); } public YOLO(string model_path, string engine, string device, int categ_nums, float det_thresh, float det_nms_thresh, int[] input_size, List<string> input_names, List<int[]> output_sizes, List<string> output_names) { m_predictor = new Predictor(model_path, engine, device); m_categ_nums = categ_nums; m_det_thresh = det_thresh; m_det_nms_thresh = det_nms_thresh; m_input_size = input_size; m_output_sizes = output_sizes; m_input_names = input_names; m_output_names = output_names; } float[] preprocess(Mat img) { m_image_size = new List<int> { (int)img.Size().Width, (int)img.Size().Height }; Mat mat = new Mat(); Cv2.CvtColor(img, mat, ColorConversionCodes.BGR2RGB); mat = Resize.letterbox_img(mat, (int)m_input_size[2], out m_factor); mat = Normalize.run(mat, true); return Permute.run(mat); } List<float[]> infer(Mat img) { List<float[]> re; float[] data = preprocess(img); re = m_predictor.infer(data, m_input_names, m_input_size, m_output_names, m_output_sizes); return re; } public BaseResult predict(Mat img) { List<float[]> result_data = infer(img); BaseResult re = postprocess(result_data); return re; } protected virtual BaseResult postprocess(List<float[]> results) { return new BaseResult(); } public void Dispose() { m_predictor.Dispose(); } public static YOLO GetYolo(string model_type, string model_path, string engine, string device, int categ_nums, float det_thresh, float det_nms_thresh, int input_size) { return new YOLOv10Det(model_path, engine, device, categ_nums, det_thresh, det_nms_thresh, input_size); } protected static float sigmoid(float a) { float b = 1.0f / (1.0f + (float)Math.Exp(-a)); return b; } }}配置好引用后就可以生成dll了 再创建一个控件,作为显示 net framework 4.8版本的
再nuget工具箱里下载 opencvsharp4 以及openvino

然后主流程代码
//using Microsoft.VisualBasic.Logging;using OpenCvSharp;using OpenVinoSharp.Extensions.process;using OpenVinoSharp.Extensions.result;using OpenVinoSharp.Extensions.utility;using SharpCompress.Common;using System.Collections.Generic;using System;using System.Diagnostics;using System.Runtime.CompilerServices;using System.Windows.Forms;using static OpenVinoSharp.Node;using static System.Windows.Forms.VisualStyles.VisualStyleElement;using Point = OpenCvSharp.Point;using Yolov10_DLLnet;using System.Drawing;using ZstdSharp.Unsafe;namespace YOLOV10_WinformDemo{ public partial class Form1 : Form { //string filePath = ""; private YOLO yolo; public Form1() { InitializeComponent(); yolo = new YOLO(); //string model_path = "best_0613.onnx"; } /// <summary> /// yolov10 onnx模型文件路径 /// </summary> private string model_path = "H:\\YCDandPCB_Yolov5_net\\Yolov10_and_Yolov5Seg\\yolov10_Detztest\\YOLOV10_WinformDemo\\bestV10det.onnx"; /// <summary> /// 开始识别 /// </summary> /// <param name="sender"></param> /// <param name="e"></param> private void button2_Click(object sender, EventArgs e) { Stopwatch sw = new Stopwatch(); OpenFileDialog openFile = new OpenFileDialog(); string filePath = ""; if (openFile.ShowDialog() == DialogResult.OK) { filePath = openFile.FileName; } //目标检测 //string model_path = "best_0613.onnx"; classesLabel label = new classesLabel(); string model_type = "YOLOv10Det"; string engine_type = "OpenVINO"; string device = "CPU"; //################# 阈值 ####################################### float score = label.Score_Threshold; float nms = label.NMS_Threshold; int categ_num = label.classes_count_1; int input_size = label.W_H_size_1; yolo = YOLO.GetYolo(model_type, model_path, engine_type, device, categ_num, score, nms, input_size); //##################### 图片推理阶段 ####################### //System.Drawing.Image image = Image.FromFile(openFile.FileName); //string input_path = openFile; Mat img = Cv2.ImRead(filePath); pictureBox1.Image = OpenCvSharp.Extensions.BitmapConverter.ToBitmap(img); sw.Restart(); (Mat, BaseResult) re_img = image_predict(img); sw.Stop(); pictureBox2.Image = OpenCvSharp.Extensions.BitmapConverter.ToBitmap(re_img.Item1); DetResult detResult = re_img.Item2 as DetResult; for (int i = 0; i < detResult.count; i++) { //textBox1.Text = detResult.datas[i].lable; //置信度 //textBox2.Text = detResult.datas[i].score.ToString("0.00"); int X = detResult.datas[i].box.TopLeft.X; int Y = detResult.datas[i].box.TopLeft.Y; int W = detResult.datas[i].box.Width; int H = detResult.datas[i].box.Height; //textBox3.Text = X.ToString(); //textBox4.Text = Y.ToString(); //textBox5.Text = W.ToString(); //textBox6.Text = H.ToString(); Console.WriteLine(X); Console.WriteLine(Y); } // 获取并打印运行时间 //TimeSpan ts = sw.Elapsed; textBox7.Text = sw.ElapsedMilliseconds.ToString(); } (Mat, BaseResult) image_predict(Mat img, bool is_video = false) { Mat re_img = new Mat(); //############################# classes ################################### classesLabel label = new classesLabel(); List<string> class_names = label.class_names; //开始识别,并返回识别结果 BaseResult result = yolo.predict(img); result.update_lable(class_names); re_img = Visualize.draw_det_result(result, img); return (re_img, result); } }}效果

我的yolov10 训练源码
【免费】yolov10优化代码,包含,train.py,detect.py,export.py脚本以及预训练模型资源-CSDN文库
C#部署yolov10源码
C#部署YoloV10目标检测.netframework4.8,打开即用内有(主程序和dll生成程序)资源-CSDN文库