目录
引言
一、基础功能
二、属性设置
2.1 属性介绍
2.2 代码示例
2.3 代码解析
三、常用API
3.1 添加子部件
3.2 插入子部件
3.3 移除子部件
3.4 设置当前页面索引值
3.5 设置当前显示子部件
3.6 返回索引处子部件指针
3.7 返回子部件索引值
四、信号与槽
4.1 currentChanged
4.2 widgetRemoved
五、应用示例
5.1 代码
5.2 实现效果
5.3 代码解析
结语
引言
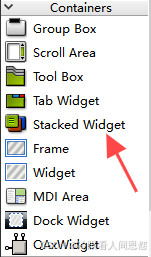
QStackedWidget是 Qt 框架中的一个非常有用的控件,它允许你堆叠多个窗口部件(widgets),但一次只显示一个。这种机制非常适合于实现向导、多视图应用程序、选项卡界面(虽然它没有内置的选项卡头)以及表单向导等场景。通过改变当前索引,可以轻松地切换显示的窗口部件。

一、基础功能
QStackedWidget是Qt框架中的一个容器控件,用于在同一区域内动态地堆叠和显示不同的子部件(如窗口、对话框、页面等)。它一次只显示一个子部件,但允许开发者通过编程方式轻松地在这些子部件之间切换。
页面堆叠:QStackedWidget通过堆叠的方式管理多个页面(子部件),每个页面都有一个唯一的索引值。只有当前索引对应的页面是可见的,其他页面则会被隐藏。动态切换:开发者可以通过设置当前索引或当前子部件来动态地切换显示的页面。这种切换是即时的,且可以响应各种事件或用户操作。灵活布局:QStackedWidget本身并不提供布局管理功能,但它可以与其他布局管理器(如QVBoxLayout、QHBoxLayout等)结合使用,以实现复杂的界面布局。二、属性设置
2.1 属性介绍
虽然QStackedWidget没有像QWidget那样众多的属性需要直接设置,但它通过其API函数提供了丰富的控制手段。以下是一些与属性设置相关的要点:
当前页面索引(currentIndex):这是一个只读属性,用于获取当前显示的页面的索引值。虽然不能直接设置该属性,但可以通过调用setCurrentIndex()函数来改变当前页面。当前页面(currentWidget):这同样是一个只读属性,返回当前显示的页面的指针。同样地,不能直接设置该属性,但可以通过setCurrentWidget()函数来改变当前页面。页面计数(count):这是一个只读属性,返回QStackedWidget中子部件的数量。这有助于在编程时遍历或检查子部件。2.2 代码示例
以下是为QStackedWidget的currentIndex、currentWidget和count属性提供代码示例的方式。需要注意的是,由于currentIndex和currentWidget是只读属性,我们不能直接“设置”它们,但可以通过调用相关函数来改变它们所代表的状态。
#include <QApplication> #include <QStackedWidget> #include <QPushButton> #include <QVBoxLayout> #include <QWidget> #include <QLabel> int main(int argc, char *argv[]) { QApplication app(argc, argv); // 创建主窗口 QWidget window; QVBoxLayout *layout = new QVBoxLayout(&window); // 创建QStackedWidget QStackedWidget *stackedWidget = new QStackedWidget; // 添加几个页面到QStackedWidget QWidget *page1 = new QWidget; QLabel *label1 = new QLabel("Page 1", page1); QVBoxLayout *page1Layout = new QVBoxLayout(page1); page1Layout->addWidget(label1); QWidget *page2 = new QWidget; QLabel *label2 = new QLabel("Page 2", page2); QVBoxLayout *page2Layout = new QVBoxLayout(page2); page2Layout->addWidget(label2); QWidget *page3 = new QWidget; QLabel *label3 = new QLabel("Page 3", page3); QVBoxLayout *page3Layout = new QVBoxLayout(page3); page3Layout->addWidget(label3); stackedWidget->addWidget(page1); stackedWidget->addWidget(page2); stackedWidget->addWidget(page3); // 将QStackedWidget添加到主窗口布局 layout->addWidget(stackedWidget); // 创建按钮来切换页面 QPushButton *prevButton = new QPushButton("Previous"); QPushButton *nextButton = new QPushButton("Next"); QHBoxLayout *buttonLayout = new QHBoxLayout; buttonLayout->addWidget(prevButton); buttonLayout->addWidget(nextButton); layout->addLayout(buttonLayout); // 初始时禁用“Previous”按钮 prevButton->setEnabled(false); // 连接信号与槽以切换页面 QObject::connect(nextButton, &QPushButton::clicked, [stackedWidget, prevButton]() { int currentIndex = stackedWidget->currentIndex(); if (currentIndex < stackedWidget->count() - 1) { stackedWidget->setCurrentIndex(currentIndex + 1); prevButton->setEnabled(true); } }); QObject::connect(prevButton, &QPushButton::clicked, [stackedWidget]() { int currentIndex = stackedWidget->currentIndex(); if (currentIndex > 0) { stackedWidget->setCurrentIndex(currentIndex - 1); if (currentIndex == 1) { // 在这个简单的例子中,我们总是启用“Previous”按钮 // 但在更复杂的应用中,你可能需要根据实际情况来决定是否禁用它 } } }); // 示例:打印当前页面索引和页面计数 qDebug() << "Initial current index:" << stackedWidget->currentIndex(); qDebug() << "Total page count:" << stackedWidget->count(); // 示例:通过currentWidget获取当前页面并打印其标签文本(假设标签是页面的直接子部件) if (QLabel *currentLabel = stackedWidget->currentWidget()->findChild<QLabel*>()) { qDebug() << "Current page label text:" << currentLabel->text(); } window.setWindowTitle("QStackedWidget Example"); window.resize(400, 300); window.show(); return app.exec(); }2.3 代码解析
在这个示例中:
我们创建了一个QStackedWidget并向其中添加了三个页面。每个页面都是一个包含QLabel的QWidget。我们添加了两个按钮来在页面之间切换,并根据当前页面索引启用或禁用“Previous”按钮。使用qDebug()打印了初始的当前页面索引和页面总数,展示了如何访问这些只读属性。我们还展示了如何通过currentWidget()获取当前页面,并使用findChild<QLabel*>()查找并打印当前页面上QLabel的文本(注意:这种方法假设QLabel是页面的直接子部件,且页面上只有一个QLabel)。在实际应用中,你可能需要更复杂的逻辑来定位特定的子部件。 三、常用API
QStackedWidget提供了丰富的API函数,以便开发者能够灵活地管理和控制其包含的页面。以下是一些常用的API函数及其说明:
3.1 添加子部件
addWidget(QWidget *widget, int index = -1):向QStackedWidget中添加一个子部件。如果指定了索引(index),则子部件将被插入到该索引位置;如果未指定索引(或指定为-1),则子部件将被添加到末尾。
// 创建一个主窗口 QWidget window; QVBoxLayout *layout = new QVBoxLayout(&window); // 创建一个QStackedWidget QStackedWidget *stackedWidget = new QStackedWidget; // 创建几个页面 QWidget *page1 = new QWidget; QLabel *label1 = new QLabel("Page 1", page1); QVBoxLayout *page1Layout = new QVBoxLayout(page1); page1Layout->addWidget(label1); QWidget *page2 = new QWidget; QLabel *label2 = new QLabel("Page 2", page2); QVBoxLayout *page2Layout = new QVBoxLayout(page2); page2Layout->addWidget(label2); QWidget *page3 = new QWidget; QLabel *label3 = new QLabel("Page 3", page3); QVBoxLayout *page3Layout = new QVBoxLayout(page3); page3Layout->addWidget(label3); // 使用addWidget添加页面到末尾 stackedWidget->addWidget(page1); stackedWidget->addWidget(page2);3.2 插入子部件
insertWidget(int index, QWidget *widget):在指定索引处插入一个子部件。如果索引超出当前范围,则子部件将被添加到末尾。
// 使用insertWidget在指定索引处插入页面 stackedWidget->insertWidget(1, page3); // 这将page3插入到page1和page2之间 3.3 移除子部件
removeWidget(QWidget *widget):从QStackedWidget中移除一个子部件。子部件本身不会被删除,只是从布局中移除,从而被隐藏。
// 假设现在想要移除page2 stackedWidget->removeWidget(page2); 3.4 设置当前页面索引值
setCurrentIndex(int index):设置当前显示的页面的索引值。如果索引值超出范围,则不会改变当前页面。
// 设置当前页面索引 stackedWidget->setCurrentIndex(0); // 显示page13.5 设置当前显示子部件
setCurrentWidget(QWidget *widget):设置当前显示的子部件。如果指定的子部件已经存在于QStackedWidget中,则它将成为当前页面;如果不存在,则什么也不会发生。
3.6 返回索引处子部件指针
widget(int index):返回指定索引处的子部件的指针。如果索引超出范围,则返回nullptr。
// 获取并显示指定索引处的子部件 QWidget *currentPage = stackedWidget->widget(0); if (currentPage) { QLabel *currentLabel = currentPage->findChild<QLabel*>(); if (currentLabel) { qDebug() << "Current page label text:" << currentLabel->text(); } } 3.7 返回子部件索引值
indexOf(QWidget *widget):返回子部件在QStackedWidget中的索引值。如果子部件不存在于QStackedWidget中,则返回-1。
// 获取子部件在QStackedWidget中的索引 int index = stackedWidget->indexOf(page3); qDebug() << "Index of page3:" << index; // 应该输出1,除非在添加/移除后修改了索引四、信号与槽
QStackedWidget还提供了几个信号,以便在页面切换或页面被移除时通知开发者。这些信号可以与槽函数(即回调函数)连接,以执行特定的操作。
4.1 currentChanged
currentChanged(int index):当当前显示的页面改变时发射。参数index是新显示的页面的索引值。
// 连接currentChanged信号 connect(stackedWidget, &QStackedWidget::currentChanged, this, [=](int index) { qDebug() << "Current page changed to index:" << index; }); 4.2 widgetRemoved
widgetRemoved(int index):当一个小部件(页面)从QStackedWidget中移除时发射。参数是被移除的小部件的索引值。
// 连接widgetRemoved信号 connect(stackedWidget, &QStackedWidget::widgetRemoved, this, [=](int index) { qDebug() << "Widget removed from index:" << index; }); 五、应用示例
5.1 代码
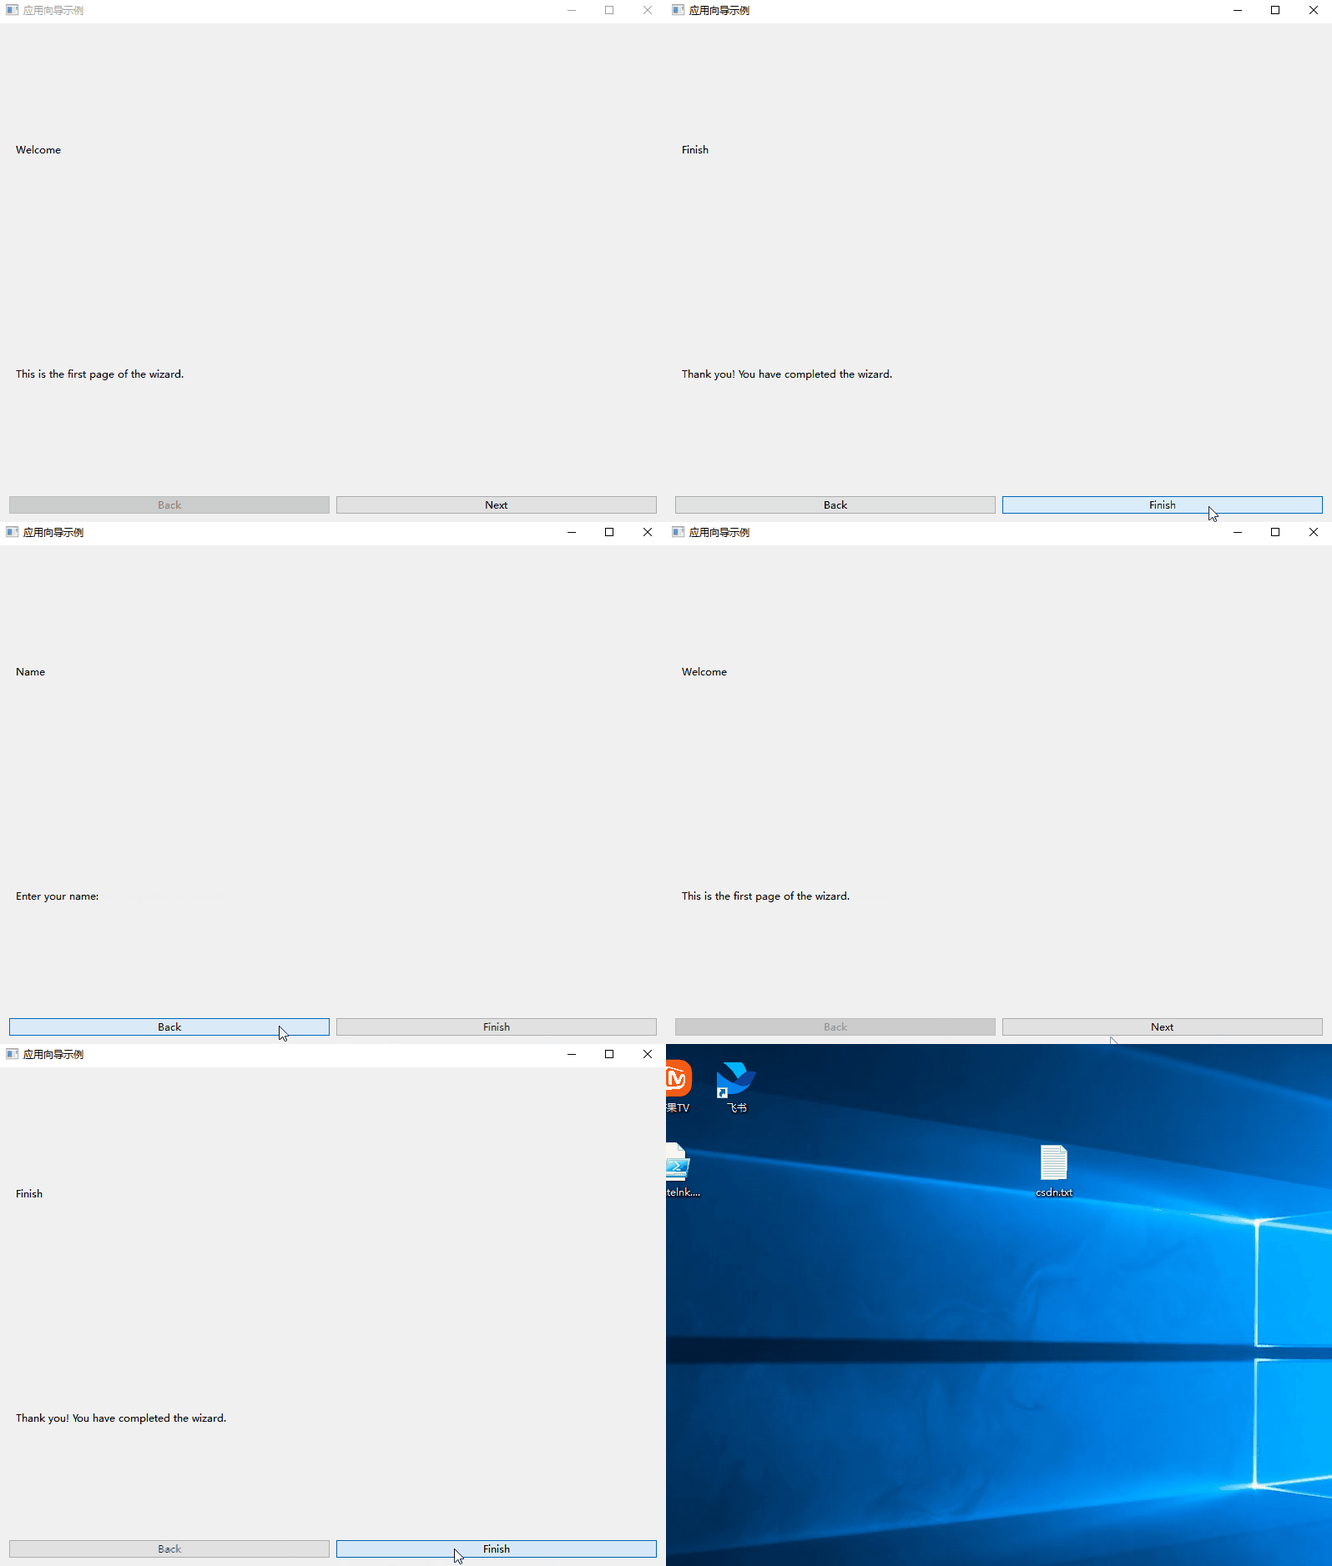
以下是一个简化的向导示例,展示了如何使用QStackedWidget来实现一个多步骤的向导界面。
#include <QApplication> #include <QStackedWidget> #include <QLabel> #include <QPushButton> #include <QVBoxLayout> #include <QHBoxLayout> class Wizard : public QWidget { Q_OBJECT public: Wizard(QWidget *parent = nullptr) : QWidget(parent) { auto *stackedWidget = new QStackedWidget(this); // 创建向导页面 QWidget *page1 = createPage("Welcome", "This is the first page of the wizard."); QWidget *page2 = createPage("Name", "Enter your name:"); QWidget *page3 = createPage("Finish", "Thank you! You have completed the wizard."); stackedWidget->addWidget(page1); stackedWidget->addWidget(page2); stackedWidget->addWidget(page3); // 导航按钮 auto *backButton = new QPushButton("Back", this); auto *nextButton = new QPushButton("Next", this); // 禁用“后退”按钮在第一页 backButton->setEnabled(false); // 布局 auto *mainLayout = new QVBoxLayout(this); mainLayout->addWidget(stackedWidget); auto *buttonLayout = new QHBoxLayout(); buttonLayout->addWidget(backButton); buttonLayout->addWidget(nextButton); mainLayout->addLayout(buttonLayout); // 连接信号和槽 connect(nextButton, &QPushButton::clicked, [=]() { if(nextButton->text() == "Finish") { this->close(); } int currentIndex = stackedWidget->currentIndex(); if (currentIndex < stackedWidget->count() - 1) { stackedWidget->setCurrentIndex(currentIndex + 1); if (currentIndex == 1) { // 假设第二页是最后一页需要处理的 // 在这里处理用户输入,如验证名称等 // ... } backButton->setEnabled(true); if (currentIndex == stackedWidget->count() - 2) { // 在最后一页设置“下一步”按钮文本 nextButton->setText("Finish"); } } }); connect(backButton, &QPushButton::clicked, [=]() { int currentIndex = stackedWidget->currentIndex(); if (currentIndex > 0) { stackedWidget->setCurrentIndex(currentIndex - 1); backButton->setEnabled(currentIndex > 0); if (currentIndex == 1) { nextButton->setText("Next"); nextButton->setEnabled(true); } } }); // 初始显示第一步 stackedWidget->setCurrentIndex(0); } private: QWidget *createPage(const QString &title, const QString &text) { QWidget *page = new QWidget(); QLabel *label = new QLabel(text, page); QVBoxLayout *layout = new QVBoxLayout(page); layout->addWidget(new QLabel(title, page)); layout->addWidget(label); return page; } }; // ... (main函数和QApplication的实例化)5.2 实现效果

5.3 代码解析
在这个示例中,我们创建了一个简单的向导,它有三个页面:欢迎页、名称输入页和完成页。通过createPage辅助函数,我们简化了页面创建的过程。导航按钮根据当前页面的索引启用或禁用,并在最后一页时将“下一步”按钮的文本更改为“完成”并且在判断识别到文本更改为”Finsh“,并点击时,关闭窗口。这个示例展示了如何在页面切换时执行简单的逻辑,并管理按钮的启用/禁用状态。
结语
QStackedWidget是Qt框架中一个非常实用的控件,它允许开发者在一个固定区域内堆叠多个子窗口或页面,并通过切换来显示不同的内容。通过使用QStackedWidget,我们可以轻松地创建多页的用户界面,如向导、选项卡等。希望本文的详细解析和示例代码能够帮助你更好地理解和使用QStackedWidget。
